When you click on links to various merchants on this site and make a purchase, this can result in this site earning a commission. Affiliate programs and affiliations include, but are not limited to, the eBay Partner Network.
So I've been slacking on updates because frankly I find the new site atrocious. I can no longer link images from albums online because of a buggy interface. I liked the build thread to keep all my thoughts here like a journal but it's become a pita with the new updated s2ki. Anyway..
I finally installed the Sparco EVO 2, and ultimately it's coming back out and it's for sale. If you're in the DC metro area and want to meet up, I'll give you a very good deal on it. Long story short my big girl hips are too snug. It's not my waist, but my hips which makes the seat a little too snug for me. I will likely be running a pole position because it fits my hips a little better and I know the seat will bolt right in.
Onto fitment.. The seat is a very snug fit in the car. I'm using BC (buddy club) rails and am the 2nd from the bottom on the mounting holes for the front and the back. I'd say the seat sits you ~1" lower than my '06 oem seat (this is just a guesstimate). The seat has a wide base as people have noted so you can't use the very lowest mounting hole on the bc rails (as the base of the seat won't clear the rails at this point), but for me at 5'9", that extra 3/4" or so won't make a big difference. I used some large washers and flipped the brackets around 90 degrees on either the front or the rear (can't remember which) since the base of the seat is V shaped and gets wider as it comes forward.
Regarding fitment in the car, if you want it to slide w/ the sliders, you will need to trim the seat at the lower part by the tranny tunnel. It touches. You might need to trim on the driver's side lower as well by the frame rail/door where it barely touches, and the wing on the door panel just lightly touches as well. I haven't cut the seat yet, but it'd be quite easy to do the trimming with a dremel and put the cover back on. If the seat fit me better I'd do the trimming and not think twice about it, as you wouldn't have to remove a lot of material. One other note, the bottom cushion is very flat in the butt region and very high under your leg which puts you at slight recline relative to the seat. For this reason I found using a higher mounting point on the front made me sit at too much of a recline. Just an FYI. Removing the seat pad you will sit leaning forward and it's quite uncomfortable. I'd definitely recommend against running without the seat pad. Here are the pictures.
I see I'm not the only one slacking on updating build threads since the site change. Is it possible to use google photos/microsoft onedrive anymore?
So February these came in the mail. I got them from across the pond. A Schroth HNRS and a Schroth profi 2-6h.
I also finally got my diff mounts installed that have been sitting around for a while. These are the ES inserts. I think they have a durometer of 75A? Total waste of time getting new ones installed in some old diff mounts, I'd def recommend just getting the aftermarket ones for <$200 ready to toss in. Noise/vibrations are noticeably worse but the drivetrain feels much more solid with less slop. My OEM diff mounts weren't leaking yet with 49k miles on the car.
Early April I swapped in some new engine mounts. I opted for the Megan Racing that comes w/ new tranny mounts as well. I was going to get the spoon but ultimately cheaped out and just got the Megan Racing. I'd say it's a solid upgrade for a track car over oem mounts. Upon first firing up the car I thought WTF (I feel like an old man these days), the vibrations felt pretty bad, but driving the car to work more, it's really not that bad. It's definitely between OEM and urethane mounts.On the plus side with the diff mounts, the drivetrain doesn't move much now which means instant throttle response and the tranny stays put so easier shifting. On bumpy tracks I've missed gears with me and the tranny simultenously bouncing around (I know, an excuse.. lol).
On another note, my car has ~49k miles on it, and this picture is the passenger side mount. It was torn. I have roughly 18 track days on the car, but the last half at least have been with an Ingalls torque dampener (I highly recommend it if you're on OEM mounts). So, just a reminder to check and probably change your mounts if you track a fair bit on oem mounts. They won't last that long. If you want to stick with OEM mounts to avoid the added NVH, I'd definitely consider a torque dampener (it's a quasi 3rd mount really). My ETD is now removed and for sale if anyone wants one.
After driving the car for a month I'd say I really like the engine and diff mounts. The OEM mounts were so soft you really couldn't tell what was going on. Cold starts have a bit of a bad vibration and a few rpm spots there's some annoying vibrations from the mounts but it's definitely not that bad. The drivetrain now feels incredibly solid with no/little slop.
So I've been debating which seat to run for a while now and ultimately decided to sell the EVO 2. I had some BC rails from the EVO 2 and I just kept them for the new seat. I decided on a pole position because I sat in one last year and it fit me the best. The harness holes are a little low on the pole position, but they are a little low on the EVO 2 for me as well, so it's a wash. The one thing I didn't like about the PP I usually see is the material. I'm not a huge fan of the velour as it doesn't seem very durable, so I ultimately settled on an ABE version of the seat in black vinyl/fake suede. I debated getting a full leather one, but am very happy with the quality of the vinyl seat. The ABE also has larger side holes which should make it easier to run 3 pt belts on the street and 6 pts on the track.
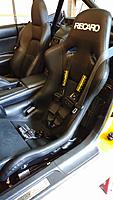
I had to move my amp located under the driver's seat to behind the seat. I also installed a bulkhead replacement bar. To remove the OEM bulkhead, you need to cut it in half w/ the rollbar installed. Installation of the seat was pretty straightforward. I had to install and remove the seat a few times to get it aligned straight, but it wasn't terrible. It lightly contacts the transmission tunnel but the seat still will slide just fine. I used a seat belt extender and it seems to be secure. I sit at least an inch or two lower, and the seat is almost brushing the carpet. Here's a shot of the finished product.
I still need to cut the center console/secret compartment so I can fit it over the new bulkhead replacement bar, but I've been driving it on the street w/o it in for now. I ended up going one higher on the front mount of the seat so there's a little more rake and it's perfect. A few things I wasnt expecting.. The PP is actually more comfy than the stock seat. It has more cushioning and lower lumbar support which is good because my lower back isnt in great shape. A big difference I wasnt expecting was that the lowered seat position means my ears are sitting lower and the sound stage is improved dramatically. Ya most track folks proly dont care.. lol The lowered seating position means I can see stop lights easier and the like, and coming from an '06 that has the newer seats that sit higher, I think this is the perfect seating position now for me in the car. Ingress/egress is a pita now, but doable. If this was my sole daily driver I think the seat would get annoying climbing in/out of everyday, but as a 2nd car it doesn't bother me. When you're in the seat it's much more comfortable than stock, so I understand how people can go on road trips with this seat. At some point I also need to get some heating elements and place them in the new seat, but that's not high on the list with summer coming around.
A few more to do things before I get back on track: Install harness, center console, drill a hole in the oil sandwich plate to bring up pressures a tad, and change the brake fluid.
Nice updates, I really considered the Reacaro ABE, but couldn't really justify the cost over the seat I ended up with (Corbeau Forza Sport). I'm still running all my OEM mounts, did have to replace one of the diff mounts last year, but stayed with OEM... I'll likely go with something similar as you when my current ones give up the ghost.
Nice updates, I really considered the Reacaro ABE, but couldn't really justify the cost over the seat I ended up with (Corbeau Forza Sport). I'm still running all my OEM mounts, did have to replace one of the diff mounts last year, but stayed with OEM... I'll likely go with something similar as you when my current ones give up the ghost.
After living with the replacement mounts for a little while now, I gotta say the oem mounts are super soft, too soft really. My concern would be (especially since you're SC'd) that the OEM motor mounts won't last that long and cause too much engine movement. The vibrations are definitely noticeable but not too bad imo. I'd recommend the innovative diff mounts since they're cheap and look like they'll do the job just fine.
Hey, your thread contained a lot of good information and I enjoyed reading it. Just wondering if you had to modify your fenders at all to fit your wheels with how low you went? Sorry if I missed it.
Hey, your thread contained a lot of good information and I enjoyed reading it. Just wondering if you had to modify your fenders at all to fit your wheels with how low you went? Sorry if I missed it.
Glad it was worth reading. I may have not spelled it out or only put it in a small blurb, but I did roll the front fenders, but didn't touch the rears. I used a heat gun to heat up the paint and rolled the lip and tabs almost flat I believe (it's been a while). I didn't have to cut anything on the front.
So I finally did a track day this past weekend with the new harness and hans, but I'll add some notes about the harness install first.
I purchased a Schroth Profi-2 6h. The harness comes with eyelet bolts and 2 backing plates. I needed to order an extra backing plate and Schroth sr 01324 which is the bendable brackets for the driver's side outter lap belt.
For the harness install, I tried to gather all the hardware ahead of time so I could get the install done before the track day this past weekend. I read rob robinette's website and tutorial about the harness install and I found it very helpful. The only correction I'd add for anyone looking to install harnesses is that the driver's side OEM 3 point mount point has the "standard" threaded hole here in the US, which I believe is 7/16." I reused the oem bolt so I didn't actually need another bolt, but I ordered an extra one to be safe. If you reuse the oem washers and hardware w/ the oem bolt you can retain the swivel nature of the oem belt. This is important as when running the outter lap belt you need to swivel the oem belt out of the way. For the driver's side 3 point mounting location it's VERY tight with the BC rails, so I couldn't use an eyelet bolt on the outside driver's lap belt. I used a bendable schroth bracket and reused the OEM bolt. Keep in mind it's very tight and it needs to be bent and positioned correctly so that the harness can fit and won't be pinched, but I got it to work for me. The other 3 mounting points I used eyelet bolts and backing plates in similar locations noted to rob rob's website. The shoulder harnesses wrap around the harness bar of the rollbar. Just follow the directions. The install is pretty easy, just takes a bit of time.
I also reinstalled the secret compartment which fits alright. You have to hack up the bottom of the secret compartment so it'll fit and rests on the OEM seatbelt reels. It wasn't difficult, just takes a little time.
Here's a picture of the finished product:
I will upload some pictures later of the mounting points (sorry I didn't take any during the install).
The thing I like about the harness install is I can easily unclip the lap belts and sub harnesses from the mounting points and remove them for the street in a couple minutes. The shoulder harnesses can be pulled through the harness holes in the seat and be stowed under the rollbar as well.
So first event since last year running the car and I signed up for Saturday only. I had to do the "usual" prep for my track day, which I'll be honest, is getting a little annoying. I swapped the pfc pads, switched over to a 2mm vs 3mm spacer, and changed the brake fluid. Someone had an extra set made that I purchased last fall, and I finally put them on. Not a big deal, but w/ oem studs figure a shorter spacer doesn't hurt. It clears the BBK just fine. I didn't have time to drill a hole in my oil sandwich plate for my oil cooler but more on that later.
I'm definitely a little rusty and didn't put in a new best for the day at Shenandoah. It was cool (high 60's with an overcast) so it was an ideal track day. My best time I think was a 1:44.7 (I should be running consistent 1:42s) which sucks. The new seat and harness is awesome that I don't move at all. In fact, I think I feel everything more now which is perhaps why I wasn't sliding around as much as I should have to be faster. I'm used to sliding around in the OEM seat and w/ the new harness snugged down I barely move and feel everything. I also tended to overbrake at the end of the longer straights.. yep, I suck. I definitely need more seat time. I will say, strapping myself into harness takes another minute, and the hans limits your side to side head movement in the pits, but on track I didn't notice it. The added "safety" is nice in the back of my head over the oem 3 point.
I didn't change my setup on the car at all this time, and I'm not planning on changing it for a while. It feels good and I just need more seat time to turn faster times. My oil temps were in the 230's (couldn't tell exactly where) which is good. Oil pressure is at 65psi in vtec which isn't bad, but not great. I will drill a hole in my sandwich plate to see if that'll bring it up over 70psi in vtec, which would be ideal. Not too much else to say really. There were a few s2000's at the track this time around. I hung out w/ Jeff (who has a pristine blue CR) for the day, and his car is gorgeous. It's "too stock" for me, but to each their own. The nice thing about the harness install was at the end of the track day being able to simply unclip the lap belts and sub harnesses and tuck the shoulder harnesses underneath the rollbar, and drive home on the oem 3 point. It took a couple minutes to unclip all the harnesses which is nice. I wasn't sure how realistic that goal was (to easily swap back and forth between the 6 pt and 3 pt), but I can say it's pretty painless. I have no intention of swapping my oem seat back in for the street, so I wanted a painless way to swap back and forth to the oem 3 pt and 6 pt harness.
Well, I'm pretty late getting these pictures up but here they are from last year's event.. I've kind of been taking a hiatus from the track since there just isn't the time lately but I'm hoping to get back into it one of these days. Here's a shot of the harness installed w/o the side belts.
Here's the center console and secret compartment reinstalled. I opted for the black duct tape attachment in a couple spots because it got hacked up so much.
Here's Jeff's pretty blue CR. It's definitely more show car than track car.
All packed up and heading home. The lap belts and sub harnesses unclip easily so I use the oem 3 point on the street.
 02-02-2017, 10:25 AM


 I may have not spelled it out or only put it in a small blurb, but I did roll the front fenders, but didn't touch the rears. I used a heat gun to heat up the paint and rolled the lip and tabs almost flat I believe (it's been a while). I didn't have to cut anything on the front.

 The nice thing about the harness install was at the end of the track day being able to simply unclip the lap belts and sub harnesses and tuck the shoulder harnesses underneath the rollbar, and drive home on the oem 3 point. It took a couple minutes to unclip all the harnesses which is nice. I wasn't sure how realistic that goal was (to easily swap back and forth between the 6 pt and 3 pt), but I can say it's pretty painless. I have no intention of swapping my oem seat back in for the street, so I wanted a painless way to swap back and forth to the oem 3 pt and 6 pt harness.