Slowteg- Build thread
 01-20-2016, 07:29 AM
#21


 I didn't buy the modified bracket from Urge so I gotta take an angle grinder to mine still. The nice thing about the rear rotors is you can just throw an OEM solid disc on there if need be.
 I contemplated different brake options for the rear quite a bit, and ended up with the Urge setup because it's cheap, retains the ebrake, and simple. I gave strong consideration to the RB +1 rear kit, but they seem to have some serious QC issues and I don't want to have any doubt of the brakes. There's a very interesting rear "kit" that's sold in Japan that uses the RX7 rear caliper that largely keeps the OEM brake bias, but it seems to be not known very well, cost ~$1k, and the rotors would have to be sourced from Japan from the RX-7 RZ rear brakes.
 It's just not worth the hassle for me at this time.
The RX8 also came with rear vented discs, but the piston size is considerably larger and shifts bias to the rear (on the S) quite a bit. Solid rear discs on this car blows, but Honda has always been notoriously cheap when it comes to brakes.
 01-20-2016, 07:53 AM
#22

 01-20-2016, 08:00 AM
#23
Registered User

Join Date: Jul 2014
Location: Fort Walton Beach, FL
Posts: 2,629
Likes: 0
Received 53 Likes
on
42 Posts
Originally Posted by King Tut' timestamp='1453305555' post='23857769
The tight interior of the S2000 is probably the number one issue I have with the car. I am planning to install an OMP HTE-R XL, so I know I am already up for a very difficult install
03-03-2016, 05:55 AM
#24
Been a while so figured I'd post an update..
Weather was nice this past weekend and after spending some time cleaning up the garage, I (finally) had some time to do some work on/for my S. First off, I'll say it's nice finally having my own garage. I'm still debating whether I can fit a lift in it, but I just need to break out the tape measure and go from there (it's a 3 car garage 20' deep and 3 cars wide). I'm afraid it'll be too tight with other cars in it since builders always scrimp on the dimensions.
Anyway, onto the #build.
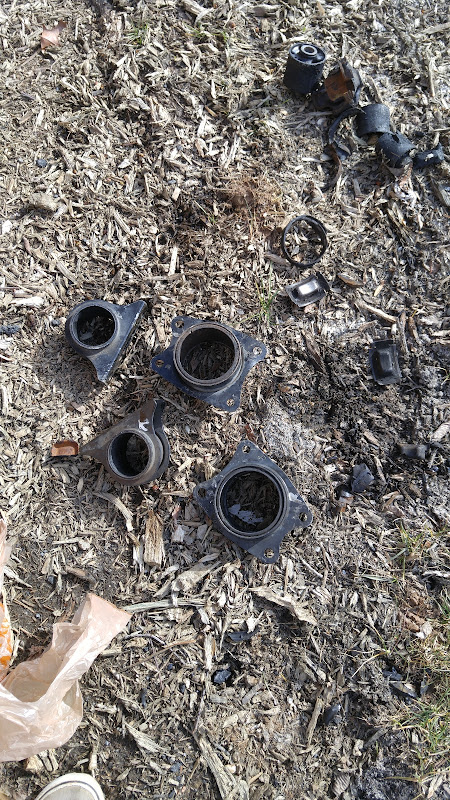
So in an effort to save a couple bucks (and saving some old mounts from the landfill (ok, this is really a tertiary concern lol)), I opted to go the ES inserts route for the rear diff. The ES inserts and junkyard mounts were a little over $100 for everything. The mounts came out of a '00 with ~190k miles the junkyard said. 2 were bad, 1 was questionable, and 1 was still good (you can see the liquid oozing out of 1).

So on I marched with the torch I have (just a standard propane one for sweating copper pipes). I installed the whole ES bushing kit on my old integra, so I'm familiar w/ the PITA nature of these things. For these, you just heat up the metal shell (not the rubber) until you hear sizzling. The rubber releases from the metal and you can free the rubber insert. The two big ones are a pita and took most of the time. ES also didn't mention that there's a metal lip on each side of the larger mounts that I'll grind down with a bench grinder. Not a huge deal, just annoying and one more step. Here are the shells. I need to grind down the lips and then bring em over to Dave (yeaitsahonda) to press them in next time he does my alignment. All in all, given the time I spent, I'm not sure it's worth going this route over just buying ones, but you will save yourself a few bucks. My car only has ~46k miles, but I figure for the low cost these should help a little remove drivetrain slop. If I hate them I can always remove them.
Over the next month I gotta get to it to try and make some event(s) in April. Last year I only did one weekend, this year I want to try and do at least 4 or more. I'm debating removing the OEM oil cooler when I install my oil cooler but since it's a street car I might just leave it. Does the OEM oil cooler really help the oil warm up considerably faster? Anyone monitored it?
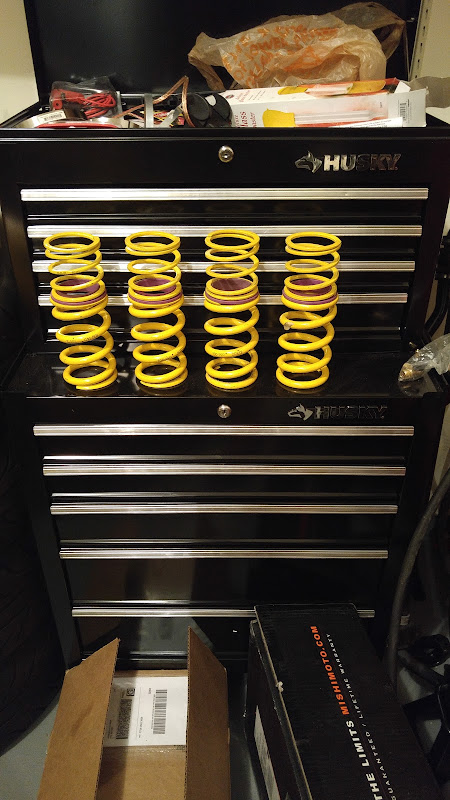
I also found a set of KW clubsport 10kg springs. I'll probably put a pair on the rear as the 8k's are a little soft imo.
Weather was nice this past weekend and after spending some time cleaning up the garage, I (finally) had some time to do some work on/for my S. First off, I'll say it's nice finally having my own garage. I'm still debating whether I can fit a lift in it, but I just need to break out the tape measure and go from there (it's a 3 car garage 20' deep and 3 cars wide). I'm afraid it'll be too tight with other cars in it since builders always scrimp on the dimensions.
Anyway, onto the #build.
So in an effort to save a couple bucks (and saving some old mounts from the landfill (ok, this is really a tertiary concern lol)), I opted to go the ES inserts route for the rear diff. The ES inserts and junkyard mounts were a little over $100 for everything. The mounts came out of a '00 with ~190k miles the junkyard said. 2 were bad, 1 was questionable, and 1 was still good (you can see the liquid oozing out of 1).
So on I marched with the torch I have (just a standard propane one for sweating copper pipes). I installed the whole ES bushing kit on my old integra, so I'm familiar w/ the PITA nature of these things. For these, you just heat up the metal shell (not the rubber) until you hear sizzling. The rubber releases from the metal and you can free the rubber insert. The two big ones are a pita and took most of the time. ES also didn't mention that there's a metal lip on each side of the larger mounts that I'll grind down with a bench grinder. Not a huge deal, just annoying and one more step.
Here are the shells. I need to grind down the lips and then bring em over to Dave (yeaitsahonda) to press them in next time he does my alignment. All in all, given the time I spent, I'm not sure it's worth going this route over just buying ones, but you will save yourself a few bucks. My car only has ~46k miles, but I figure for the low cost these should help a little remove drivetrain slop. If I hate them I can always remove them.Over the next month I gotta get to it to try and make some event(s) in April. Last year I only did one weekend, this year I want to try and do at least 4 or more. I'm debating removing the OEM oil cooler when I install my oil cooler but since it's a street car I might just leave it. Does the OEM oil cooler really help the oil warm up considerably faster? Anyone monitored it?
I also found a set of KW clubsport 10kg springs. I'll probably put a pair on the rear as the 8k's are a little soft imo.
03-03-2016, 07:02 AM
#25
Registered User
Join Date: Jul 2014
Location: Fort Walton Beach, FL
Posts: 2,629
Likes: 0
Received 53 Likes
on
42 Posts
With readily available diff mounts from Innovate and Hasport there is no way I would go this route. I would think the OEM oil warmer does a real good job of getting the car up to temps in normal driving situations.
03-03-2016, 07:26 AM
#26
Regarding the oem oil warmer.. ya I wonder to what extent. I watch oil temps putzing on the street and it can take 10mins or so to get temps 160F+, so it's not exactly very fast either. Maybe I'll actually time it a few times and write the actual times down for a log.

 03-11-2016, 05:18 PM
#28
03-11-2016, 05:33 PM
#29
So finally got around to working on the car, and of course I hit a few snags..
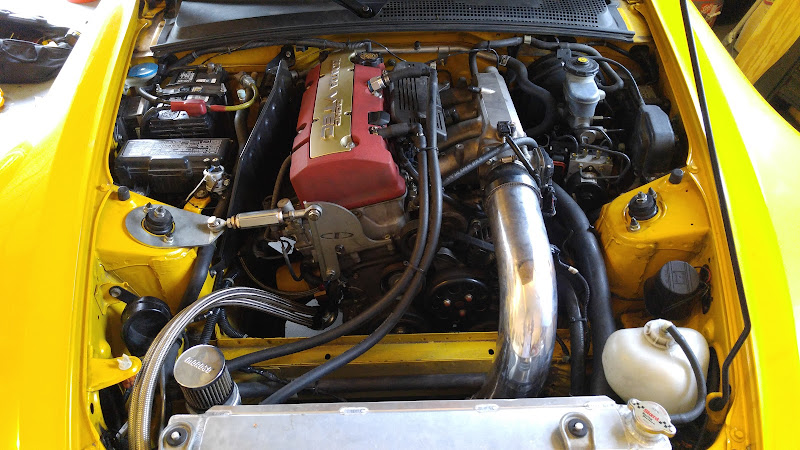
Here's how the engine bay looked prior to today:
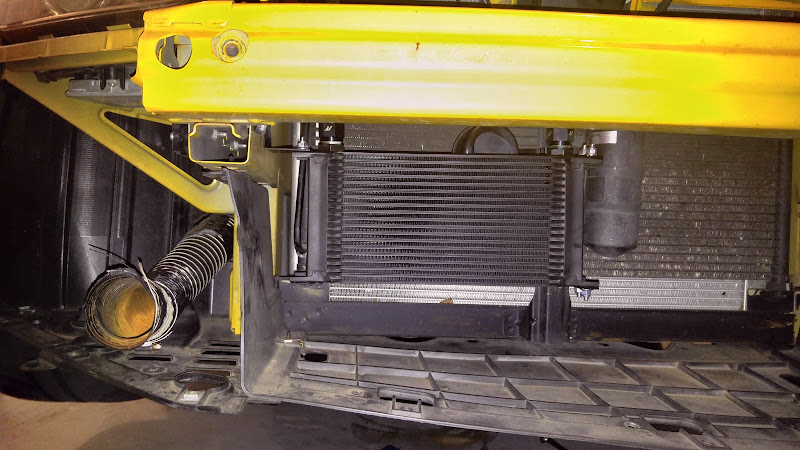
I decided to finally install my Mishimoto oil cooler, and of course it doesn't look like it'll fit with the OEM airbox and my catch can setup. I have too much crap around the area (the Ingalls ETD is also in the way), and I need to clean things up somehow. Here's a shot of the oil cooler mounted. I got a 200F thermostat for it, and the cooler mounts nicely with their brackets:
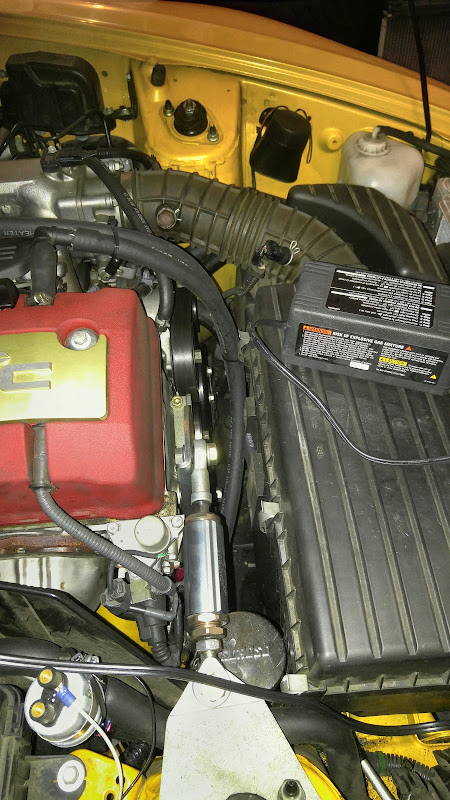
Anyway, so here's some shots of the engine bay w/ the catch can removed and the tight space on the passenger side. The plan at this point is to run a 3.5" intake with the filter down in the passenger fender. Several people have made this intake and posted it on s2ki. We'll see how that works. I put the OEM intake on just for my own spacing.
My only "complaint" with the Mishimoto kit is it uses 160 degree fittings to connect to the sandwich plate. Unfortunately w/ the Mishimoto sandwich plate and oem oil warmer, I can't rotate the adapter to face forward and use 45 degree -10an fitting I'll just rock the 160 degree fittings, maybe they'll be fine and I'm overthinking it. I need to make an intake asap so I can find a new home for my catch can, and I should probably look into Spoon engine mounts sooner than later as the Ingalls ETD is just annoyingly in the way at this point. I think it's a great bang for your buck mod, but better mounts are the true fix rather than using an ETD as a band aid..
Ugh.. kind of annoying as I didn't get nearly as much done today as I wanted (and found more work I need to do), but that's part of the "fun." I'm trying to get back on track in exactly a month so got a bunch of things I need to get done. On the bright side my Canton pan doesn't look to be leaking anywhere *knock on wood*. If I saw a leak I decided I was going to yank it and just install an OEM pan with Moroso baffle.
Here's how the engine bay looked prior to today:
I decided to finally install my Mishimoto oil cooler, and of course it doesn't look like it'll fit with the OEM airbox and my catch can setup. I have too much crap around the area (the Ingalls ETD is also in the way), and I need to clean things up somehow. Here's a shot of the oil cooler mounted. I got a 200F thermostat for it, and the cooler mounts nicely with their brackets:
Anyway, so here's some shots of the engine bay w/ the catch can removed and the tight space on the passenger side. The plan at this point is to run a 3.5" intake with the filter down in the passenger fender. Several people have made this intake and posted it on s2ki. We'll see how that works. I put the OEM intake on just for my own spacing.
My only "complaint" with the Mishimoto kit is it uses 160 degree fittings to connect to the sandwich plate. Unfortunately w/ the Mishimoto sandwich plate and oem oil warmer, I can't rotate the adapter to face forward and use 45 degree -10an fitting
I'll just rock the 160 degree fittings, maybe they'll be fine and I'm overthinking it. I need to make an intake asap so I can find a new home for my catch can, and I should probably look into Spoon engine mounts sooner than later as the Ingalls ETD is just annoyingly in the way at this point. I think it's a great bang for your buck mod, but better mounts are the true fix rather than using an ETD as a band aid..Ugh.. kind of annoying as I didn't get nearly as much done today as I wanted (and found more work I need to do), but that's part of the "fun."
I'm trying to get back on track in exactly a month so got a bunch of things I need to get done. On the bright side my Canton pan doesn't look to be leaking anywhere *knock on wood*. If I saw a leak I decided I was going to yank it and just install an OEM pan with Moroso baffle.
04-11-2016, 07:06 PM
#30
So first things first, I've putzed around with the Mishimoto oil cooler and kept an eye on oil pressure and it's virtually identical to prior pressure readings so that's a good thing. If there's a pressure drop it's on the order of 1-3 psi at most. Also, if you have an '06+ with the ambient air temp readout on your cluster, the sensor needs to be relocated elsewhere or else it'll read warm. The instructions don't mention this. I mounted it on the a/c filter/dryer.
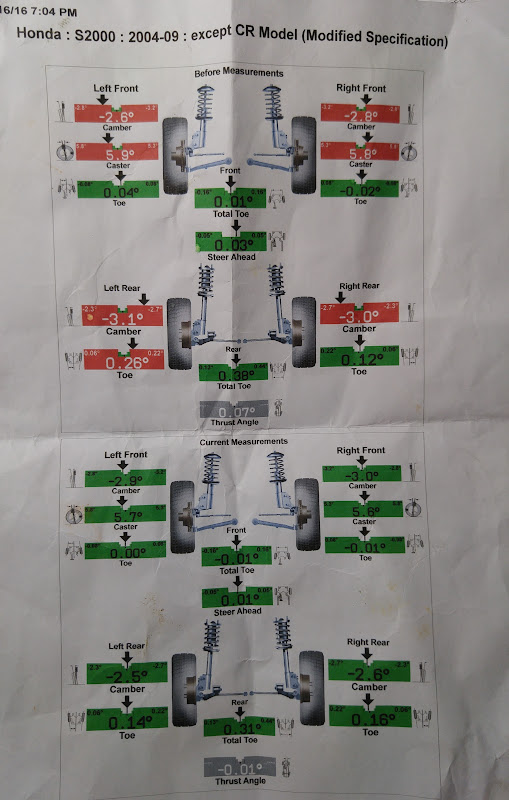
I also got an alignment (do it once a year at least) done by my homeboy Dave (yesitsahonda). If you're in the Northern VA area I highly recommend him if you want some work done on your S or even just an alignment. Anyway, I need to try and keep track of things better so I can compare setups a little more scientifically so it's here as a log.
So after making the decision to remove the OEM intake (it takes up too much damn space), I made the decision to try out a 3.5" intake. Several people have posted about it so I figured I'd give it a shot. I ordered all the parts for it from siliconintakes.com and a filter and blox velocity stack from amazon. Big props to slowd16 for sharing all the details of the intake! Here is a link to the details of it: https://www.s2ki.com/s2000/topic/110...t__p__23441137
I'm not sure it's worth all the headaches and squeezing over say a 3" off the shelf intake, but I like a challenge! First off I'll say fitting it is a giant PITA. It requires hacking up the fender liner pretty good, and since I opted to keep my 2.5" brake ducts, it's a SUPER tight fit. The air filter presses up against the WASP bumper duct. I also slash cut the 3.5" 90 degree tube on both ends that goes to the throttle body so that I could get the pipe to angle downwards a little and clear the hood, otherwise it hit the hood for me.
So I got the car back together tonight and took it for a test drive. WOW! It's been a while since I've driven a honda with an aftermarket intake, but g-damn this thing is SUPER loud at WOT! Personally I like quiet/stealth (yes I'm an old man) so I'm not quite sold on it, but I can just lift my foot a little if it bothers me on the street. Ultimately I needed an intake to fit things in my engine bay so whether I like it or not is a moot point. The butt dyno says the top end feels a little better, but I'll have to datalog w/ the hondata on the street and see if it's leaning out anywhere. I added +2% fuel at the higher load points to play it safe.
I found a nice new home for the catch can right next to the radiator, and still have plenty of room. I was planning on doing a track day today, but the weather was calling for rain, I got sick this past Friday so didn't get a chance to work on the car, and I'm sure I have some other excuses. I signed up for a Track Night in America at the new Dominion track next month May 10th, but I'm hoping to be doing a lot more track days over the summer and fall. I have a few more little things I need to do before I get on track next month, but shouldn't be a problem getting it done in time.
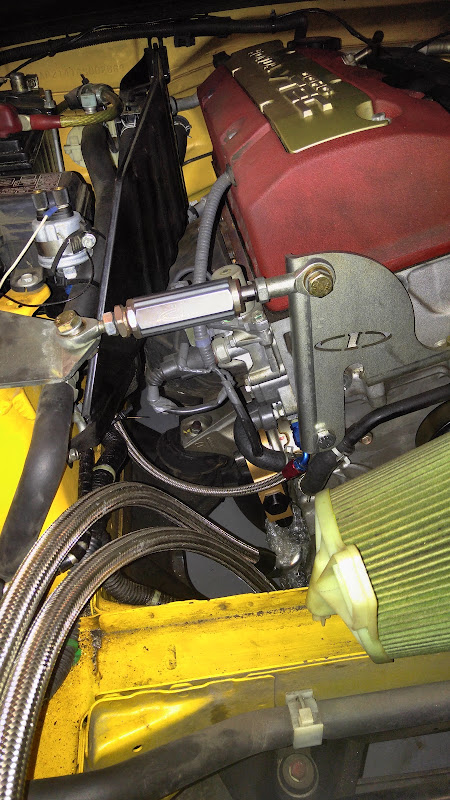
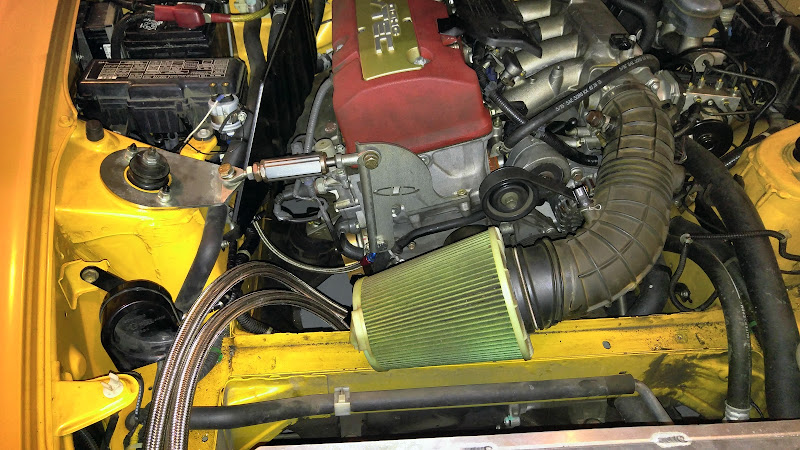
Here are some pictures of the intake/engine bay:
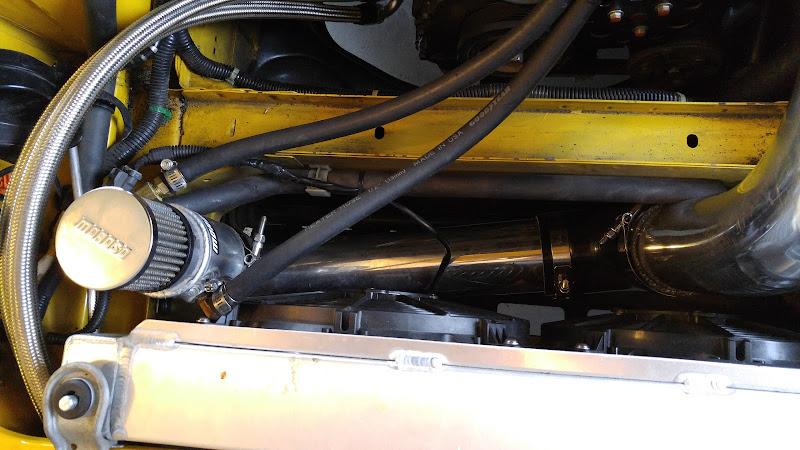

Here's a zip tie that goes around the 3.5" pipe that pulls it forward. Otherwise the 90 degree elbow will touch the tire at full lock:

I also got an alignment (do it once a year at least) done by my homeboy Dave (yesitsahonda). If you're in the Northern VA area I highly recommend him if you want some work done on your S or even just an alignment. Anyway, I need to try and keep track of things better so I can compare setups a little more scientifically so it's here as a log.
So after making the decision to remove the OEM intake (it takes up too much damn space), I made the decision to try out a 3.5" intake. Several people have posted about it so I figured I'd give it a shot. I ordered all the parts for it from siliconintakes.com and a filter and blox velocity stack from amazon. Big props to slowd16 for sharing all the details of the intake! Here is a link to the details of it: https://www.s2ki.com/s2000/topic/110...t__p__23441137
I'm not sure it's worth all the headaches and squeezing over say a 3" off the shelf intake, but I like a challenge!
First off I'll say fitting it is a giant PITA. It requires hacking up the fender liner pretty good, and since I opted to keep my 2.5" brake ducts, it's a SUPER tight fit. The air filter presses up against the WASP bumper duct. I also slash cut the 3.5" 90 degree tube on both ends that goes to the throttle body so that I could get the pipe to angle downwards a little and clear the hood, otherwise it hit the hood for me.So I got the car back together tonight and took it for a test drive. WOW! It's been a while since I've driven a honda with an aftermarket intake, but g-damn this thing is SUPER loud at WOT! Personally I like quiet/stealth (yes I'm an old man) so I'm not quite sold on it, but I can just lift my foot a little if it bothers me on the street. Ultimately I needed an intake to fit things in my engine bay so whether I like it or not is a moot point. The butt dyno says the top end feels a little better, but I'll have to datalog w/ the hondata on the street and see if it's leaning out anywhere. I added +2% fuel at the higher load points to play it safe.
I found a nice new home for the catch can right next to the radiator, and still have plenty of room. I was planning on doing a track day today, but the weather was calling for rain, I got sick this past Friday so didn't get a chance to work on the car, and I'm sure I have some other excuses.
I signed up for a Track Night in America at the new Dominion track next month May 10th, but I'm hoping to be doing a lot more track days over the summer and fall. I have a few more little things I need to do before I get on track next month, but shouldn't be a problem getting it done in time.Here are some pictures of the intake/engine bay:
Here's a zip tie that goes around the 3.5" pipe that pulls it forward. Otherwise the 90 degree elbow will touch the tire at full lock:

