Cusco/Safety21 5 point roll bar installation!
 04-13-2007, 10:36 PM
#1

Thread Starter
Cusco/Safety21 roll bar comes with everything needed:
Bars
Backing Plates
Nuts, bolts, washers, and lock washers (to mount the bars to the chassis)
Allen bolts/lock nuts (to connect the bars together)
Here’s the tools you’ll be needing:
Jack & Jack Stands
Power Drill & Bits (90 degree angle drill attachment will make it a lot easier, but i used a straight angle)
Dremmel & sanding drums/cutting discs
12mm wrench and socket
14mm socket
17mm wrench and socket
Allen Wrench
Phillips screwdriver
Small Flathead screwdriver (for the plastic clips)
Flashlight (optional for those dark corners)
A friend! (Optional, I did this by myself, but in some areas, an extra hand may help)
99% of this Install is done TOP UP. The only time I had the top down was when I was finishing up and tightening the nuts and bolts that hold the bars together. I did the bare minimum in terms of panel removal. If you remove all the rear interior panels and stock roll hoops it would make this install A LOT easier. Use your discretion in terms of how many interior panels you want to remove.
1. Remove the Seats (For Driver and Passenger)
Slide the seats all the way back to get easy access to the front bolts. Remove the two 12mm bolts. A wobble extension would help with the fronts, as it is hard to get at them straight, if you don’t have a wobble, you might have to use a wrench.
Slide the seats forward and remove the two 14mm bolts in the rear.
The driver seat has a seatbelt sensor plug that you need to unplug in order to remove the seat completely. Tilt the seat and unplug it. Remove both seats.
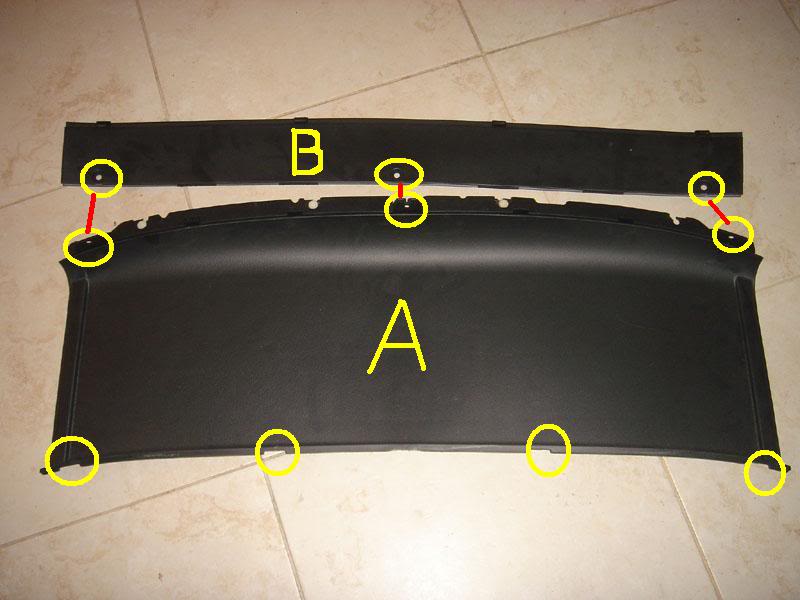
2. Removal of the plastic trunk cover (2 pieces)
There are 2 pieces to this, pry out panel B.
To do this, remove the 3 clips that are visible, then pry the panel out bottom first. You can now remove this piece.
On to the larger panel A. There are 4 clips holding it down, press the center in with your small flathead then pry them up and out.You’ll have to remove this part through the trunk, so start by removing the trunk lining.The spare tire needs to be relocated or removed anyway. Once the trunk lining is out of the way, push up on panel A because there are white clips holding it down, then remove the plastic trunk cover through the trunk
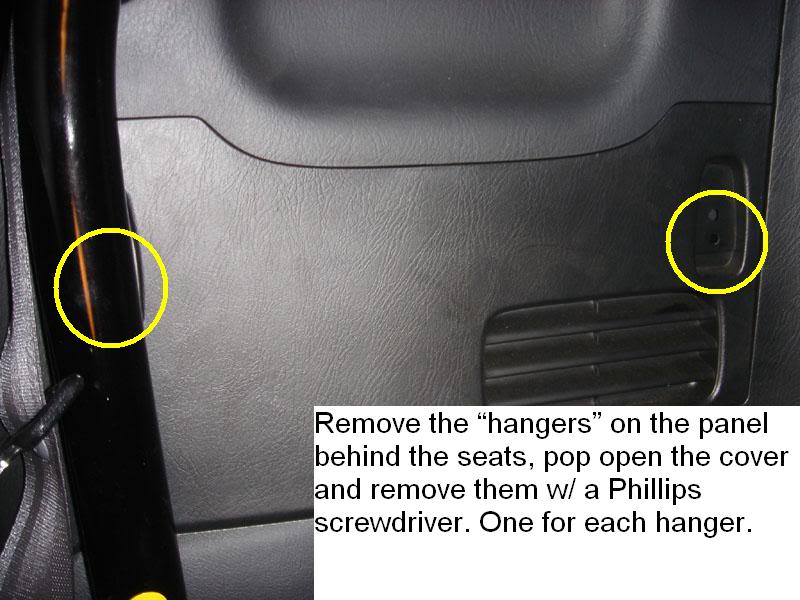
3. Removal of plastic cover behind the seats
There will be two hooks on each side of the car (4 total).
Pry the hinged cover off of those and remove them with a socket or Phillips screwdriver.
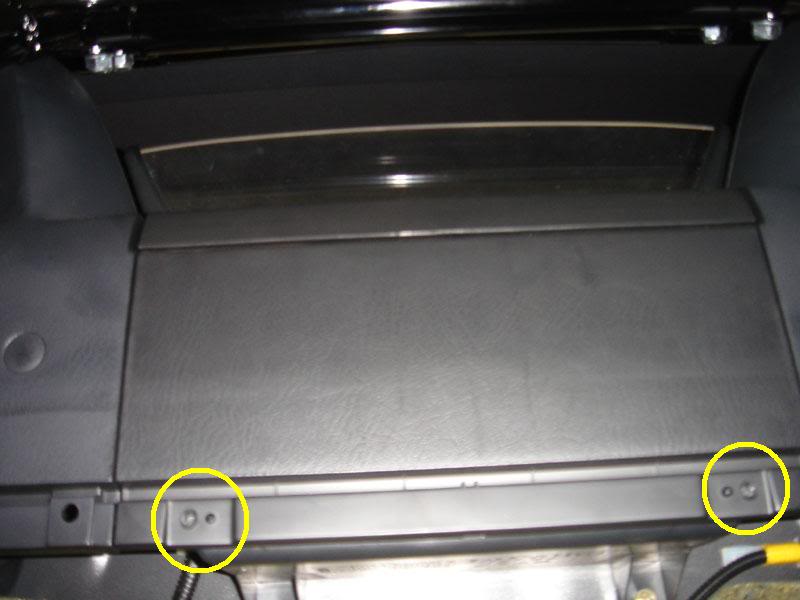
The panel is held in by clips so just pry the cover off, removing the cover on both sides allows you access to the screws that hold the center console in place. Remove these 2 screws in preparation to remove the center console.
4. Removal of the Center Console (Storage areas)
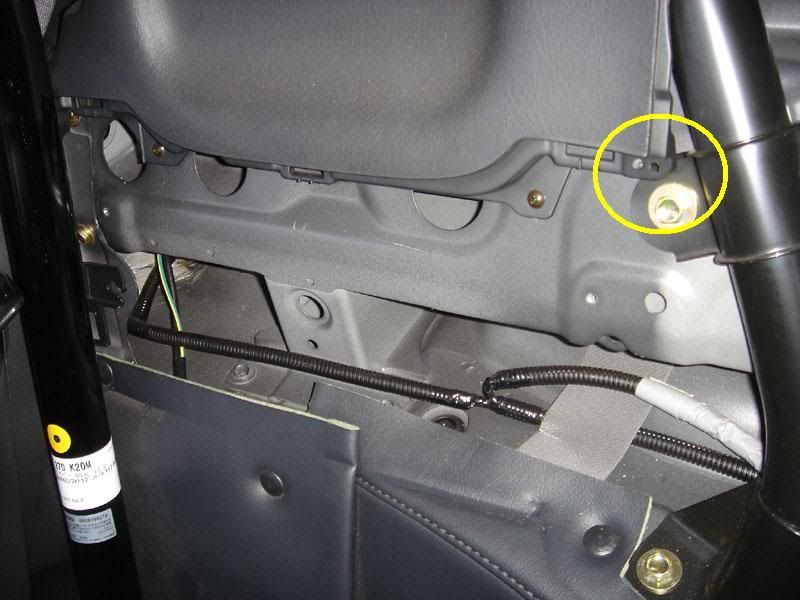
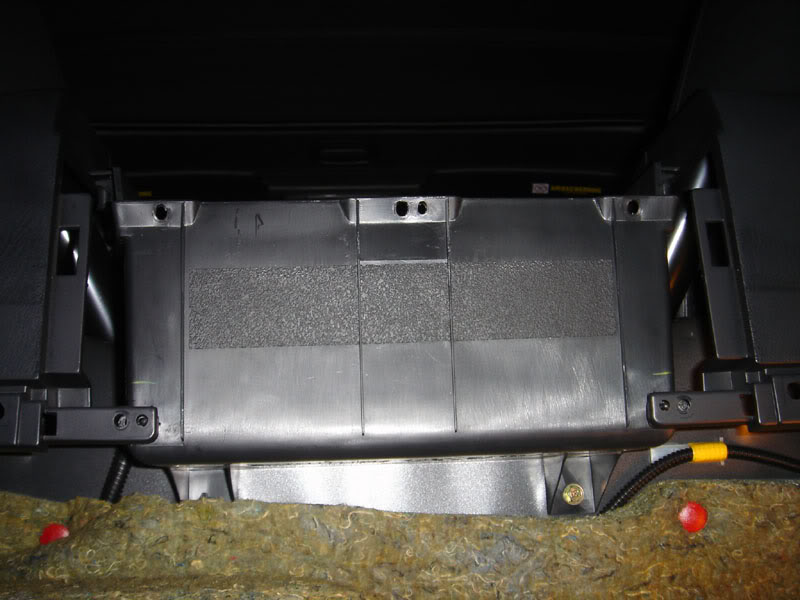
You’ll need to go through the trunk and remove the rectangular plastic cover on the backside of the center console. It’s held in by 2 screws on each side, which become visible after you removed the panels up in step 2 (picture 2 &3 below). Once the screws are removed, pry it off, it’s just held in by clips on the top side.
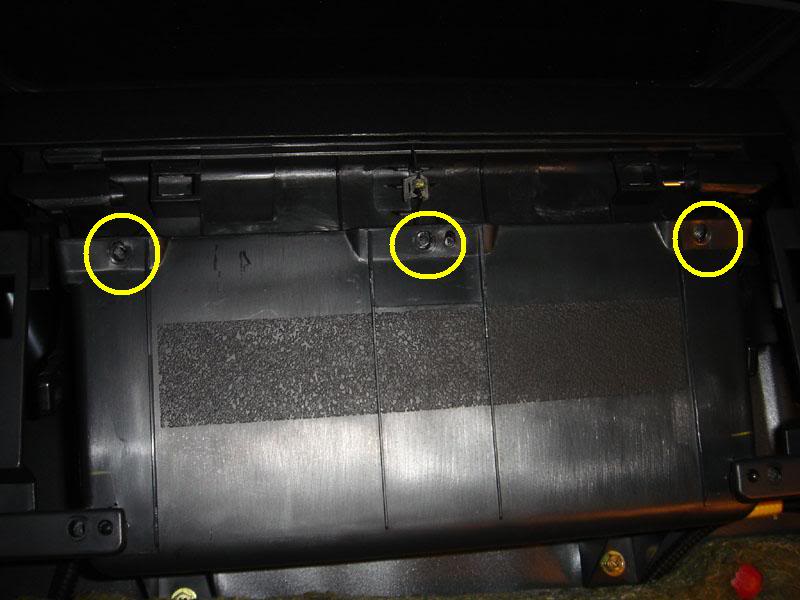
Remove the 3 phillips screws shown:
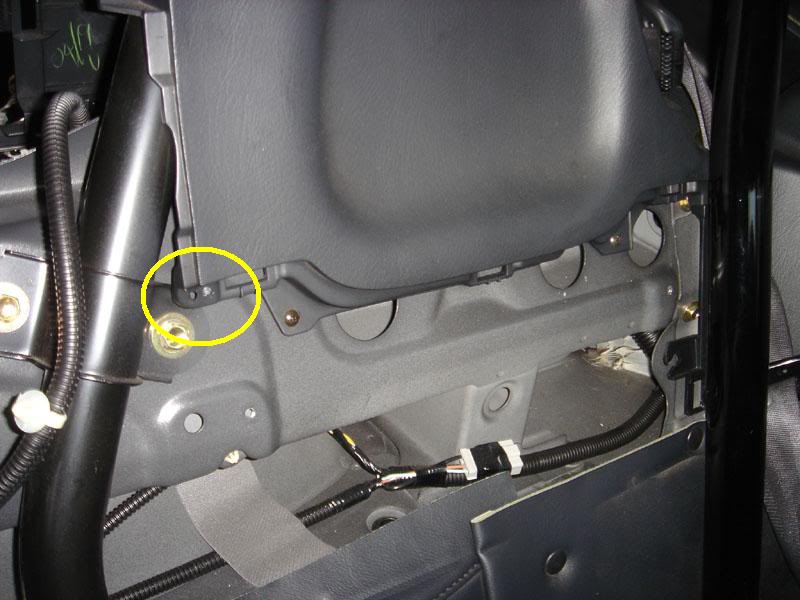
Move back to the inside of the car and open the secret compartment, there will be 4 screws that you can see (2 on each side). Remove these.
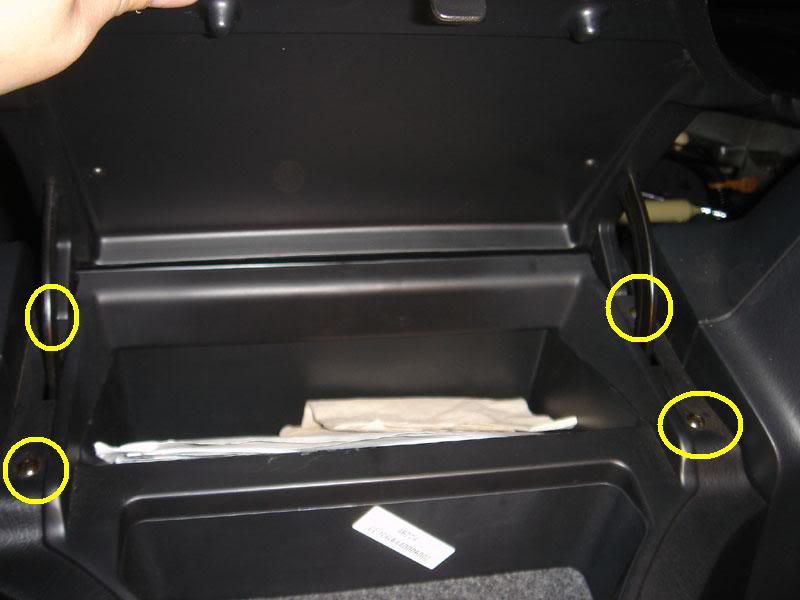
Now at the base of the center console, pull up on the perforated leather armrest (its held down by clips, or you can remove the entire center console, just pull up), so you can have access to the 2 screws that hold down the base of the center console. Remove the 2 screws.
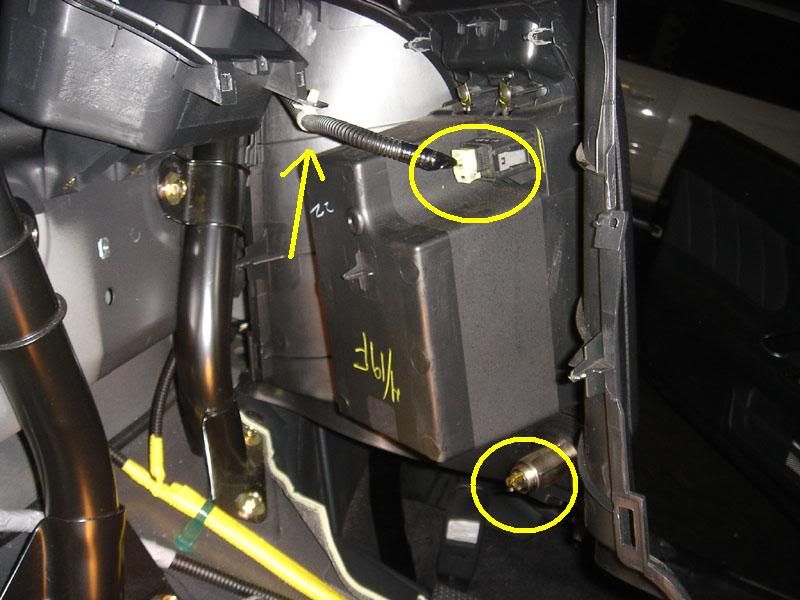
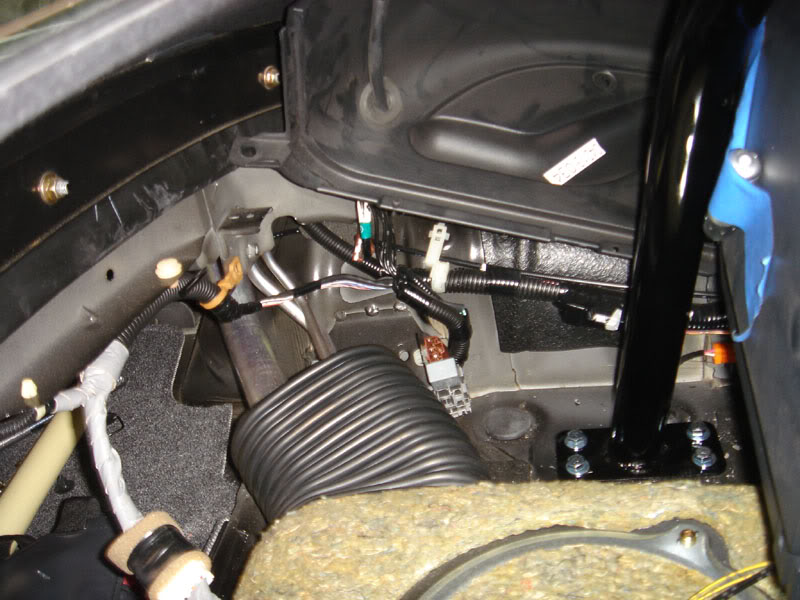
The center console should be free now, just slightly held in by the stock roll bar covers and 2 plugs: the trunk release plug and the power outlet plug. Unplug both of these so you can fully remove the center console from the car. The picture is of the backside of the center console, showing the plugs that need to be unplugged.
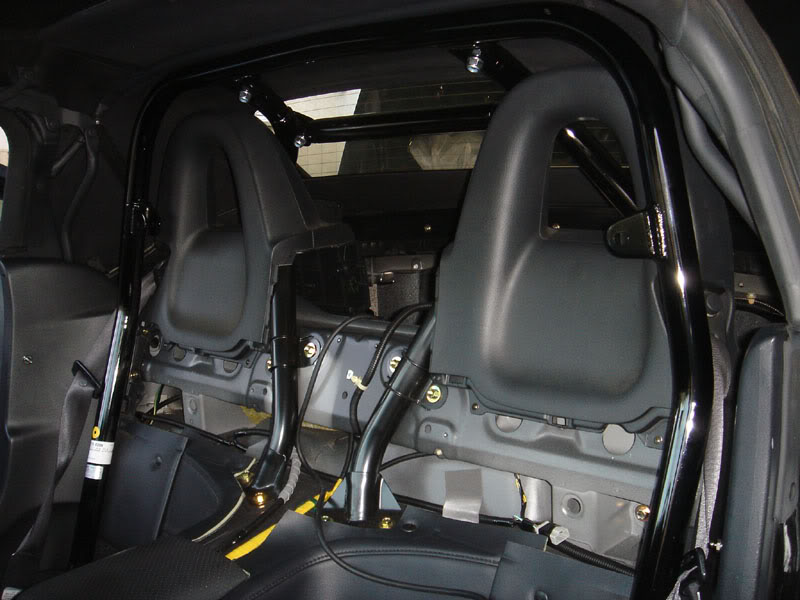
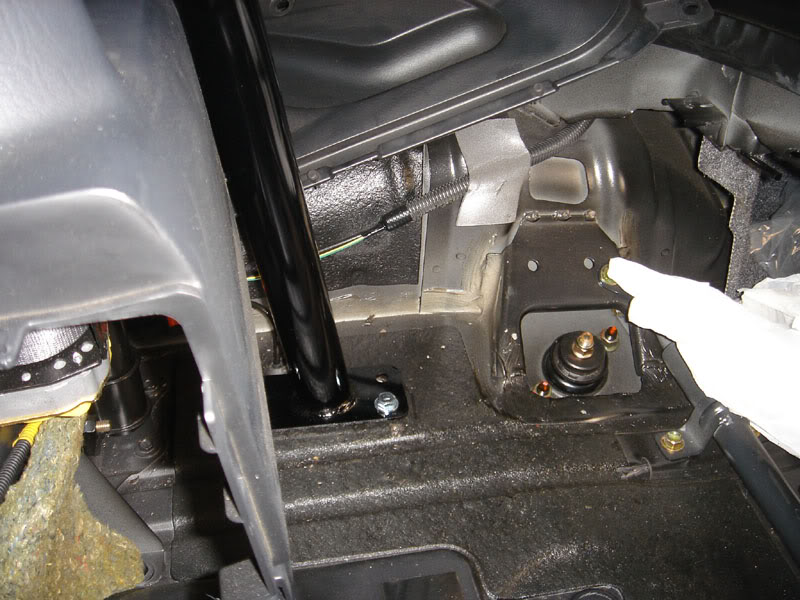
With this out of the way, you now have a gaping hole in the center of your car that will help with installing the rear legs of the bar. Your car should look like the picture below now, minus the bar already installed of course!
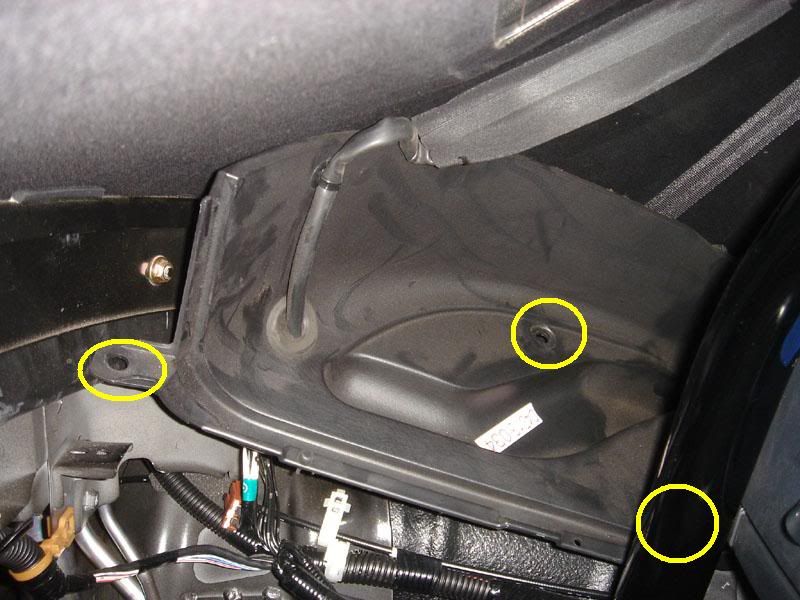
5. Adjusting the rear plastic corner panels out of the way
To allow room for the drill to drill straight down, I had to adjust the plastic panels out of the way. Just remove the 3 fasteners (each is a different type) and push it out of the way as shown. It takes a little finesse, but depending on how big your drill is, if you adjust it out of the way as much as I did, your drill will not be able to drill straight down and the panels won’t get in the way.
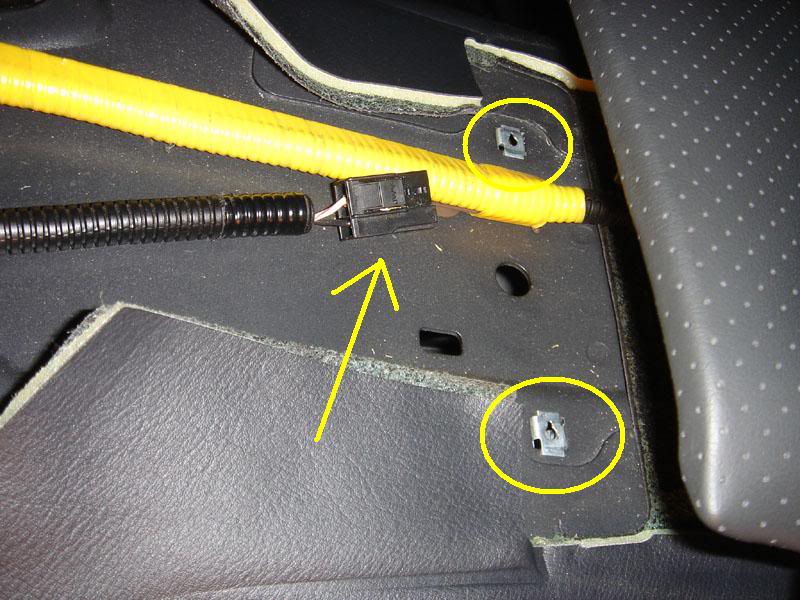
The driver side has a plug connected to it, so unplug the connector showed in the picture and then move the panel. 3 Fastener locations are circled, the passenger side has the same fasteners.
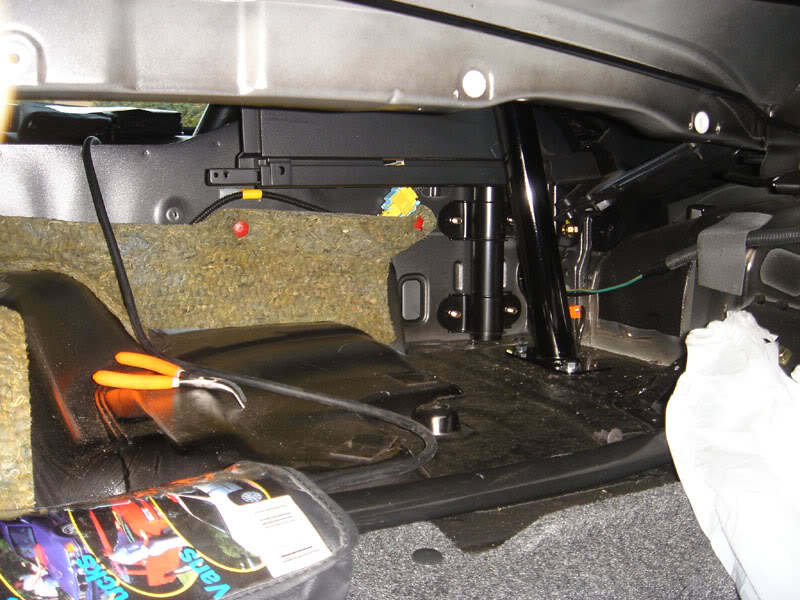
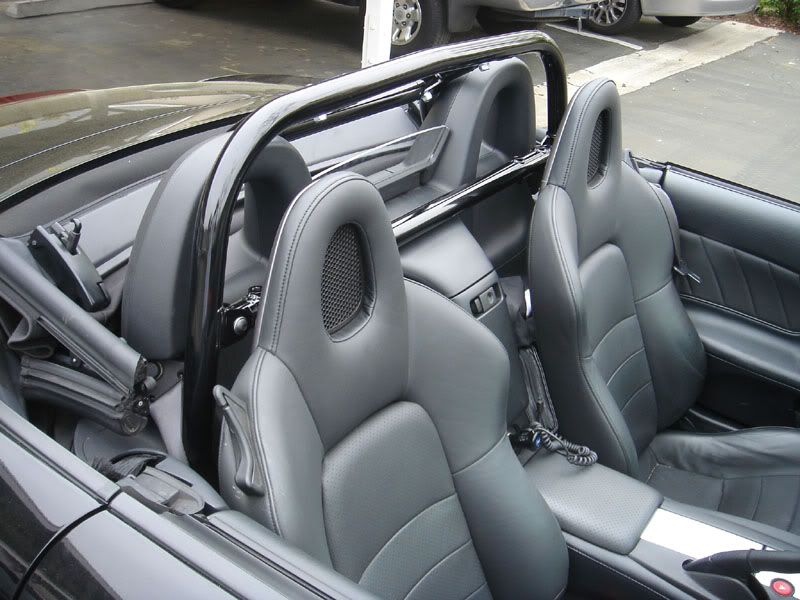
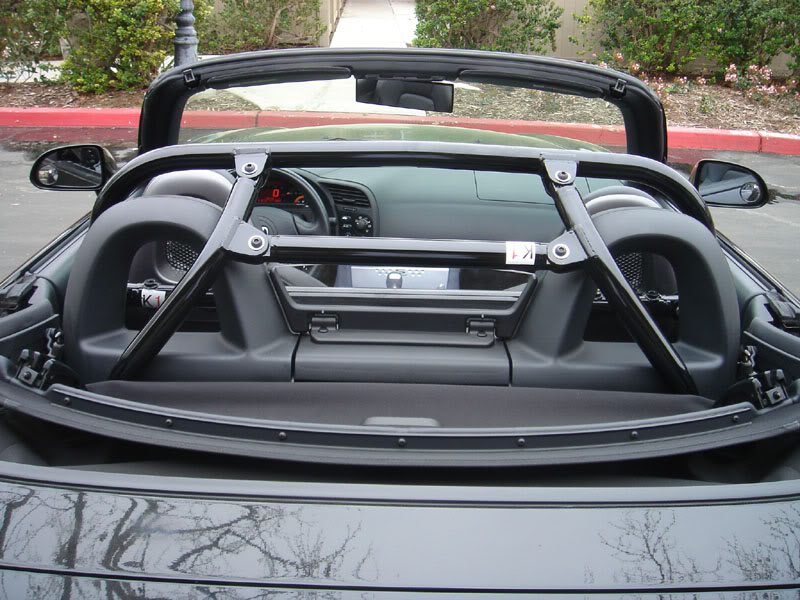
6. Mounting the Roll Bar main hoop
Put the main hoop in the car, and connect the rear legs using the hex bolt and nut. If you have the bare 4 point bar, meaning just the main hoop and legs, move on to the next step below. If you have the harness bar, I would recommend loosely mounting it to the main hoop right now before you are about to drill the main hoop legs because the legs on the main hoop have a little play. It would be bad to accidentally mount the legs too close to each other not allowing enough room for the harness bar to be attached. This goes the same for the rear legs and the 5point conversion bar if you have it. Loosely mount this bar connecting the two rear legs so that they are spaced correctly from each other.
The Japanese instructions tell you to scrape off all of the sound deadening material on the chassis (the gummy stuff) so the roll bar has a nice flat surface to mount to. Of all the pictures I’ve seen, most people don’t do it, probably because it’s a pain in the ass to do. But if you wanted to remove this material, most people bust out the dry ice and a scraper. I didn’t do it because I was lazy.
Heck, a lot of people don’t even cut the carpet up like I did, they just drill through the carpet and mount the bar on top of the carpet! You can do as you like, but at the bare minimum I suggest cutting the carpet because the bar follows the contours of the floor pan and mounting it over the carpet, I think, would make the bar sit funny. Not removing the sound deadening material isn’t so bad because when you tighten the backing plates and the bar, sandwiching the chassis, the material tends to get squished flat anyway.
Push the Main hoop back as far as you can, the mounting plate will hit the hump where the stock seat bolts to. Mounting the bar back as much as possible is VERY important because this will allow the rear legs to sit flat.
Make sure the main hoop is mounted as central as possible, there is enough room for the bar to be accidentally biased to one side of the car or the other so be careful and make sure that there is equal distance from the bar to the door sills on both sides.
Once you have the main hoop where you want it, cut the carpet, then position the carpet out of the way and set the bar on the chassis. You are ready to drill, reference the pictures to see which hole I drilled first. I drilled this single hole on each side just to keep the bar in position while I go to mount the rear bars. It might be easier to have a friend hold the bar in place while you drill, but is not necessary. Use your tap to put a pilot mark so your drill doesn’t slide all over the place, then begin drilling.
Mount the bolt in there, but don’t put the nut on the bottom yet. Just leave the bolt in the hole so the bar doesn’t slide forward. When I mounted the fronts down first, for some reason the rear legs were floating, so I just loosened up the front (leaving the bolt in) and allowed the rears to touch the chassis then I drilled the rears and everything was good…
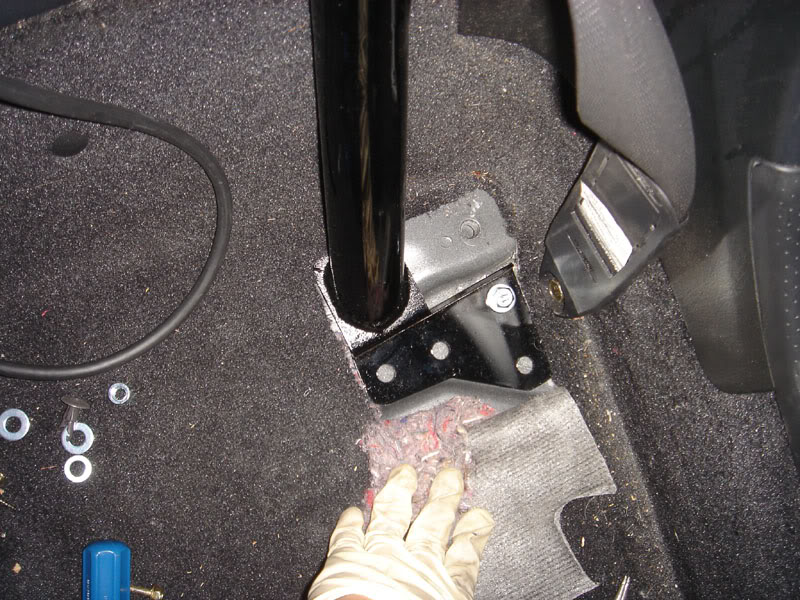
7. Mounting roll bar rear legs
Jack up the rear of the car (use the bottom of the differential as the jack up point)
Mount your jack stands on the reinforced parts of the chassis (check your owners manual if you do not know where these are).
Remove the rear wheels.
I accessed the rear as shown below, this is where it pays to be on the smaller size:
First make sure the legs sit flat on the chassis.
Next is to find the perfect spot, this takes a little luck/guessing. Basically you need to set the base of the legs as close to the rubber grommet as possible (ie. towards the sides of the car).
If you set it too far from the rubber grommet (ie. towards the center of the car), you will end up drilling into a different part of the chassis where the backing plate cannot go.
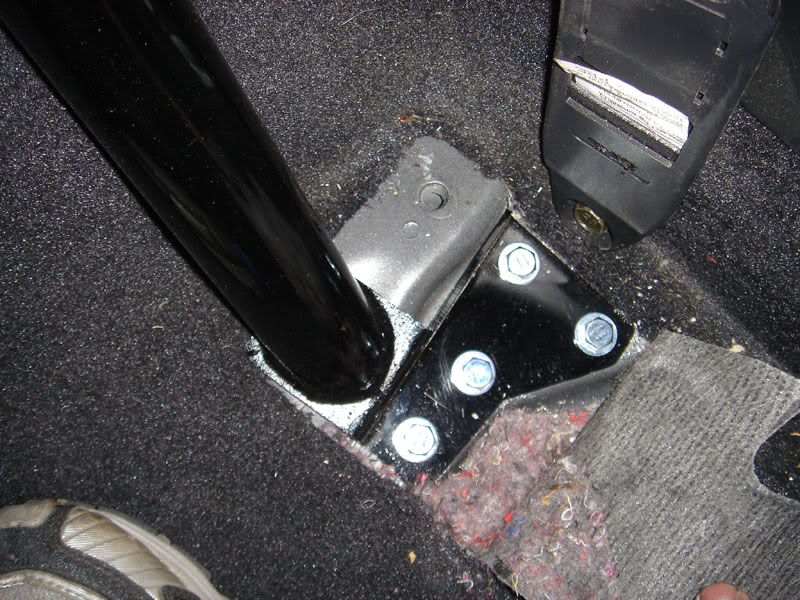
I ended up marking the two rear most holes in the legs and drilling them out.
Then mounted the backing plate to the bottom of the chassis to make sure the plate is in the correct place (ie. not overlapping the rubber grommet) and to make sure the plate will fit fine.
Check to make sure the rear legs do not hit the stock roll bar covers. I have about 1-2mm clearance on mine.
Once confirmed these holes are fine, mark the other holes and drill them out. I was lazy and didn’t want to remove the legs completely, so I just pushed them out of the way to the side—If they are loosely mounted you will have enough play to do this as well, and drilled the holes.
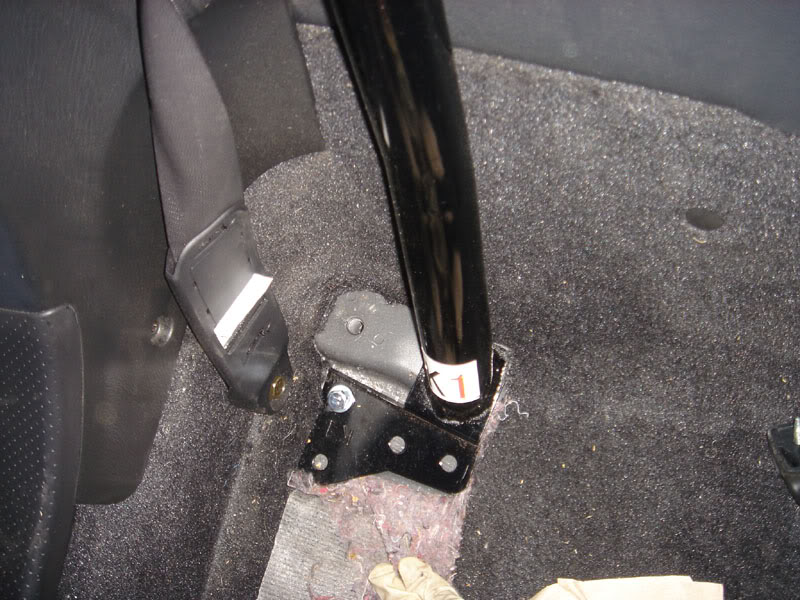
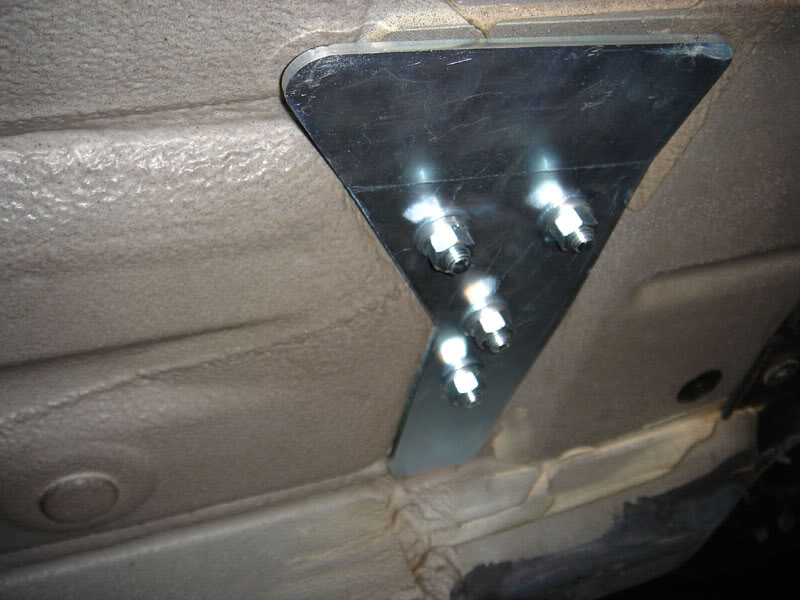
Once all holes are drilled in the rear, mount the backing plates and install all bolts and nuts. Usually the lock washers go on the nut side. You can tighten these right now.
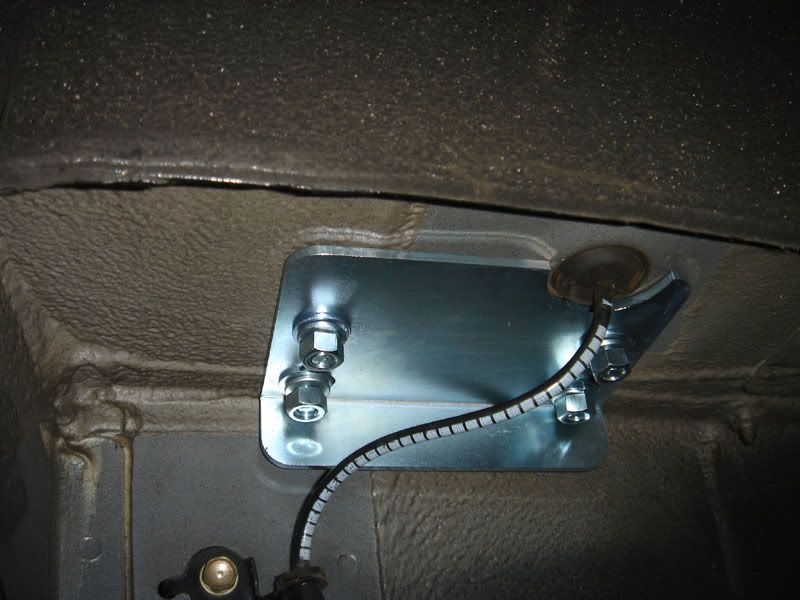
Picture below is the passenger side backing plate, notice if you have the rear legs in the correct position, the rubber grommet will fit directly where it should in the backing plate. You can also use this picture as a reference of how close the holes should be from the rubber grommet when you try to position it from above:
8. Back to the main hoop
You have 1 of 4 holes drilled already, drill the rest of them out, mount the backing plate, nuts and bolts.
9. Put the car back together!
*If you have the harness bar mounted, remove it so you can put the center console back. *Reverse the instructions on removing it to install it, don’t forget to plug the trunk release and power outlet plugs back in! Put the bottom of it in first (under the leather armrest near the shifter), then move the rest of it into place, lifting up the secret compartment will help because the hinges for it need to fit into a small slot. Mount it down under the leather armrest, then the two screws under the vented panels behind the seats, then the 3 screws on the back side of the secret compartment, then the 4 screws near the hinges of the secret compartment.
*Put the vented panel behind the seats back in, it just snaps back into place. I opted to leave all 4 hangers out, but you can put 2 back in for the cleaner look. I don’t think the 2 behind the main hoop bars fit in, so just leave those out (and its too late to put those in anyway, the bar is in the way!).
*Install the panel behind the center console, the top snaps in, the bottom screws in w/ 2 phillips screws.
*Reposition the plastic corner pieces back down, clip the plug back in on the driver side, install the 3 fasteners on both sides.
*Next you need to cut the plastic panel A cover to accommodate for the rear legs. Just cut two half circle shapes with your dremmel. Once this is done, install this panel and panel B back into place. I don’t have pictures of this, because I didn’t do it yet, but this should be easy to figure out how to do.
*Tighten all the nuts and bolts down on the mounting plates of the roll bar (if you haven’t done so already). Use a 12mm wrench to hold one side and a 12mm socket or wrench for the other.
*Mount the harness bar back onto the main hoop and proceed to tighten all bars (hex screw and nuts). Reinstall the rear wheels, lower the car back onto the ground.
*Make sure your seats are still in the forward most position on the sliders and put the seats in. Mount the rears of the seats first, slide the seat back, then mount the fronts.
*If you want to keep your spare tire, a relocator is included, but I just left mine out, the relocator would move the tire more into the middle of the already limited trunk space.
*Reinstall trunk interior pieces.
10. Checkup
Slowly put the top down. The only part that I noticed is that in the top down position, the cloth gets creased where the rear legs are, but there’s nothing to help this. Just make sure the legs don’t hit the glass (if you have a glass rear window).
Finished!
Bars
Backing Plates
Nuts, bolts, washers, and lock washers (to mount the bars to the chassis)
Allen bolts/lock nuts (to connect the bars together)
Here’s the tools you’ll be needing:
Jack & Jack Stands
Power Drill & Bits (90 degree angle drill attachment will make it a lot easier, but i used a straight angle)
Dremmel & sanding drums/cutting discs
12mm wrench and socket
14mm socket
17mm wrench and socket
Allen Wrench
Phillips screwdriver
Small Flathead screwdriver (for the plastic clips)
Flashlight (optional for those dark corners)
A friend! (Optional, I did this by myself, but in some areas, an extra hand may help)
99% of this Install is done TOP UP. The only time I had the top down was when I was finishing up and tightening the nuts and bolts that hold the bars together. I did the bare minimum in terms of panel removal. If you remove all the rear interior panels and stock roll hoops it would make this install A LOT easier. Use your discretion in terms of how many interior panels you want to remove.
1. Remove the Seats (For Driver and Passenger)
Slide the seats all the way back to get easy access to the front bolts. Remove the two 12mm bolts. A wobble extension would help with the fronts, as it is hard to get at them straight, if you don’t have a wobble, you might have to use a wrench.
Slide the seats forward and remove the two 14mm bolts in the rear.
The driver seat has a seatbelt sensor plug that you need to unplug in order to remove the seat completely. Tilt the seat and unplug it. Remove both seats.
2. Removal of the plastic trunk cover (2 pieces)
There are 2 pieces to this, pry out panel B.
To do this, remove the 3 clips that are visible, then pry the panel out bottom first. You can now remove this piece.
On to the larger panel A. There are 4 clips holding it down, press the center in with your small flathead then pry them up and out.You’ll have to remove this part through the trunk, so start by removing the trunk lining.The spare tire needs to be relocated or removed anyway. Once the trunk lining is out of the way, push up on panel A because there are white clips holding it down, then remove the plastic trunk cover through the trunk
3. Removal of plastic cover behind the seats
There will be two hooks on each side of the car (4 total).
Pry the hinged cover off of those and remove them with a socket or Phillips screwdriver.
The panel is held in by clips so just pry the cover off, removing the cover on both sides allows you access to the screws that hold the center console in place. Remove these 2 screws in preparation to remove the center console.
4. Removal of the Center Console (Storage areas)
You’ll need to go through the trunk and remove the rectangular plastic cover on the backside of the center console. It’s held in by 2 screws on each side, which become visible after you removed the panels up in step 2 (picture 2 &3 below). Once the screws are removed, pry it off, it’s just held in by clips on the top side.
Remove the 3 phillips screws shown:
Move back to the inside of the car and open the secret compartment, there will be 4 screws that you can see (2 on each side). Remove these.
Now at the base of the center console, pull up on the perforated leather armrest (its held down by clips, or you can remove the entire center console, just pull up), so you can have access to the 2 screws that hold down the base of the center console. Remove the 2 screws.
The center console should be free now, just slightly held in by the stock roll bar covers and 2 plugs: the trunk release plug and the power outlet plug. Unplug both of these so you can fully remove the center console from the car. The picture is of the backside of the center console, showing the plugs that need to be unplugged.
With this out of the way, you now have a gaping hole in the center of your car that will help with installing the rear legs of the bar. Your car should look like the picture below now, minus the bar already installed of course!
5. Adjusting the rear plastic corner panels out of the way
To allow room for the drill to drill straight down, I had to adjust the plastic panels out of the way. Just remove the 3 fasteners (each is a different type) and push it out of the way as shown. It takes a little finesse, but depending on how big your drill is, if you adjust it out of the way as much as I did, your drill will not be able to drill straight down and the panels won’t get in the way.
The driver side has a plug connected to it, so unplug the connector showed in the picture and then move the panel. 3 Fastener locations are circled, the passenger side has the same fasteners.
6. Mounting the Roll Bar main hoop
Put the main hoop in the car, and connect the rear legs using the hex bolt and nut. If you have the bare 4 point bar, meaning just the main hoop and legs, move on to the next step below. If you have the harness bar, I would recommend loosely mounting it to the main hoop right now before you are about to drill the main hoop legs because the legs on the main hoop have a little play. It would be bad to accidentally mount the legs too close to each other not allowing enough room for the harness bar to be attached. This goes the same for the rear legs and the 5point conversion bar if you have it. Loosely mount this bar connecting the two rear legs so that they are spaced correctly from each other.
The Japanese instructions tell you to scrape off all of the sound deadening material on the chassis (the gummy stuff) so the roll bar has a nice flat surface to mount to. Of all the pictures I’ve seen, most people don’t do it, probably because it’s a pain in the ass to do. But if you wanted to remove this material, most people bust out the dry ice and a scraper. I didn’t do it because I was lazy.
Heck, a lot of people don’t even cut the carpet up like I did, they just drill through the carpet and mount the bar on top of the carpet! You can do as you like, but at the bare minimum I suggest cutting the carpet because the bar follows the contours of the floor pan and mounting it over the carpet, I think, would make the bar sit funny. Not removing the sound deadening material isn’t so bad because when you tighten the backing plates and the bar, sandwiching the chassis, the material tends to get squished flat anyway.
Push the Main hoop back as far as you can, the mounting plate will hit the hump where the stock seat bolts to. Mounting the bar back as much as possible is VERY important because this will allow the rear legs to sit flat.
Make sure the main hoop is mounted as central as possible, there is enough room for the bar to be accidentally biased to one side of the car or the other so be careful and make sure that there is equal distance from the bar to the door sills on both sides.
Once you have the main hoop where you want it, cut the carpet, then position the carpet out of the way and set the bar on the chassis. You are ready to drill, reference the pictures to see which hole I drilled first. I drilled this single hole on each side just to keep the bar in position while I go to mount the rear bars. It might be easier to have a friend hold the bar in place while you drill, but is not necessary. Use your tap to put a pilot mark so your drill doesn’t slide all over the place, then begin drilling.
Mount the bolt in there, but don’t put the nut on the bottom yet. Just leave the bolt in the hole so the bar doesn’t slide forward. When I mounted the fronts down first, for some reason the rear legs were floating, so I just loosened up the front (leaving the bolt in) and allowed the rears to touch the chassis then I drilled the rears and everything was good…
7. Mounting roll bar rear legs
Jack up the rear of the car (use the bottom of the differential as the jack up point)
Mount your jack stands on the reinforced parts of the chassis (check your owners manual if you do not know where these are).
Remove the rear wheels.
I accessed the rear as shown below, this is where it pays to be on the smaller size:
First make sure the legs sit flat on the chassis.
Next is to find the perfect spot, this takes a little luck/guessing. Basically you need to set the base of the legs as close to the rubber grommet as possible (ie. towards the sides of the car).
If you set it too far from the rubber grommet (ie. towards the center of the car), you will end up drilling into a different part of the chassis where the backing plate cannot go.
I ended up marking the two rear most holes in the legs and drilling them out.
Then mounted the backing plate to the bottom of the chassis to make sure the plate is in the correct place (ie. not overlapping the rubber grommet) and to make sure the plate will fit fine.
Check to make sure the rear legs do not hit the stock roll bar covers. I have about 1-2mm clearance on mine.
Once confirmed these holes are fine, mark the other holes and drill them out. I was lazy and didn’t want to remove the legs completely, so I just pushed them out of the way to the side—If they are loosely mounted you will have enough play to do this as well, and drilled the holes.
Once all holes are drilled in the rear, mount the backing plates and install all bolts and nuts. Usually the lock washers go on the nut side. You can tighten these right now.
Picture below is the passenger side backing plate, notice if you have the rear legs in the correct position, the rubber grommet will fit directly where it should in the backing plate. You can also use this picture as a reference of how close the holes should be from the rubber grommet when you try to position it from above:
8. Back to the main hoop
You have 1 of 4 holes drilled already, drill the rest of them out, mount the backing plate, nuts and bolts.
9. Put the car back together!
*If you have the harness bar mounted, remove it so you can put the center console back. *Reverse the instructions on removing it to install it, don’t forget to plug the trunk release and power outlet plugs back in! Put the bottom of it in first (under the leather armrest near the shifter), then move the rest of it into place, lifting up the secret compartment will help because the hinges for it need to fit into a small slot. Mount it down under the leather armrest, then the two screws under the vented panels behind the seats, then the 3 screws on the back side of the secret compartment, then the 4 screws near the hinges of the secret compartment.
*Put the vented panel behind the seats back in, it just snaps back into place. I opted to leave all 4 hangers out, but you can put 2 back in for the cleaner look. I don’t think the 2 behind the main hoop bars fit in, so just leave those out (and its too late to put those in anyway, the bar is in the way!).
*Install the panel behind the center console, the top snaps in, the bottom screws in w/ 2 phillips screws.
*Reposition the plastic corner pieces back down, clip the plug back in on the driver side, install the 3 fasteners on both sides.
*Next you need to cut the plastic panel A cover to accommodate for the rear legs. Just cut two half circle shapes with your dremmel. Once this is done, install this panel and panel B back into place. I don’t have pictures of this, because I didn’t do it yet, but this should be easy to figure out how to do.
*Tighten all the nuts and bolts down on the mounting plates of the roll bar (if you haven’t done so already). Use a 12mm wrench to hold one side and a 12mm socket or wrench for the other.
*Mount the harness bar back onto the main hoop and proceed to tighten all bars (hex screw and nuts). Reinstall the rear wheels, lower the car back onto the ground.
*Make sure your seats are still in the forward most position on the sliders and put the seats in. Mount the rears of the seats first, slide the seat back, then mount the fronts.
*If you want to keep your spare tire, a relocator is included, but I just left mine out, the relocator would move the tire more into the middle of the already limited trunk space.
*Reinstall trunk interior pieces.
10. Checkup
Slowly put the top down. The only part that I noticed is that in the top down position, the cloth gets creased where the rear legs are, but there’s nothing to help this. Just make sure the legs don’t hit the glass (if you have a glass rear window).
Finished!


 04-14-2007, 08:23 AM
#6
Thread Starter
Originally Posted by cornercompacts,Apr 14 2007, 06:22 AM
i dont get why u had to remove the center console
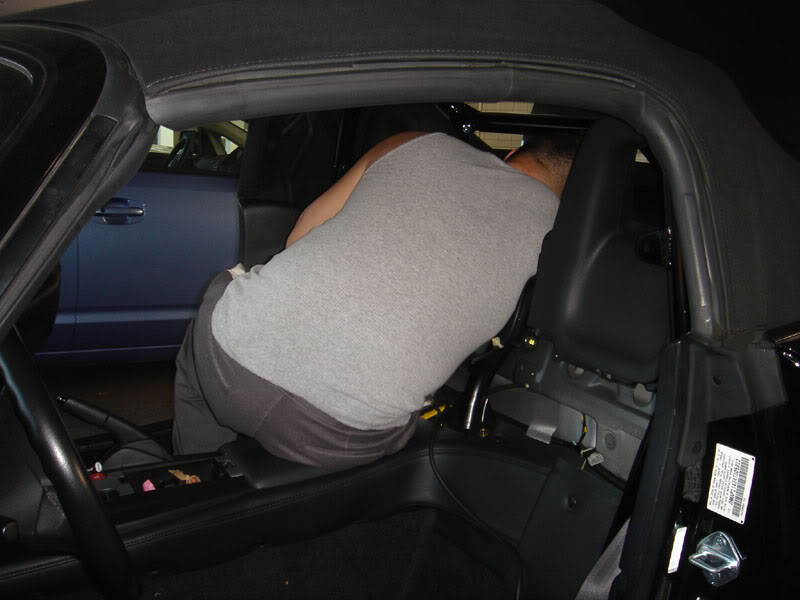
But to better answer your question, i removed the center console so i could get my entire torso through. It's impossible to drill the rears out going through the trunk. The angle just isn't there.
You could try drilling from below, like the guy who did the other writeup, but i tried this and found that i couldn't get a straight shot at the holes either...suspension parts would get in the way.
So in order to drill from above, i had to get my entire torso through the hole that i made by removing the center console. I was able to fit both arms and my chest through, so i could hold the drill with two hands (one on the trigger, one pushing down).

Trending Topics

 04-14-2007, 04:51 PM
#10
Registered User

Skimmed through the tutorial... 
When I installed my 4pt, I elected to not cut the carpet- just drilled through it. It looks cleaner that way. add silicon to the underside and you're golden.
To the guy asking about removing the center compartments, you definitely want all the room you can get.
When I installed my 4pt, I elected to not cut the carpet- just drilled through it. It looks cleaner that way. add silicon to the underside and you're golden.
To the guy asking about removing the center compartments, you definitely want all the room you can get.