J's Differential DIY
 01-05-2008, 10:59 PM
#1
Registered User

Thread Starter

Join Date: Jun 2006
Location: Lexington, Ky
Posts: 2,540
Likes: 0
Received 0 Likes
on
0 Posts
Well I finally got my differential together and I took plenty of pictures because I wanted to make a DIY for you guys and here it is!
First things first, this is the part I do not have pictures for, but its the teardown so if you cant do this please take it somewhere haha.
The first step is obvious, drain the differential.
I'm going to just start by how I remove the differential from the car. With the car on a lift or fairly tall jack stands I remove the twelve half shaft bolts, six per side, use the e brake if you have to to get them loose because they are designed to "lock", you will have to release the e-brake one or more times to get them all. While your using the e-brake you can also start breaking loose the allen head bolts on the driveshaft coupler, I use a matco allen socket for my 3/8" drive ratchet, its slightly shorter than most and has good bite, these are very easy to strip so be careful, if you do strip one there is a special pair of pliers you can buy just for removing these, they are available at Sears, Snap-On and other various tool distributors. I don't recommend cutting since a few people have cut into their sealed unit and that means the whole driveshaft has to come out and be welded back up etc etc so take your time with these make sure the allen head is as flush as possible and 99% of the time they will come out without a problem, maybe even soak them overnight before you try to break them loose for the first time, who knows that may help.
Next remove the cotter pins and loosen the castle nuts from the lower control arms, screw them until the bottom of the nut is about flush with the bottom of the control arm ball joint bolt. Place a hammer up against the control arm where the bolt goes through the lower control arm and use another hammer to strike it until the bolt becomes loose, do this on both sides (safety glasses). You can also use a spreading tool but this works for me and I don't have to buy tools this way Now you should be able to pull the spindle from the lower control arm and move it away a couple inches, this allows you to remove the differential without removing the axles.
Next remove the small rectangular peice from under the car that is perpendicular to both tubes of the rear subframe, Honda calls this a rear suspension stiffener its like paper thin. It should be four main bolts then two 10mm bolts connected to a shield that protects the charcoal canister.
Next remover 8 14mm bolts (4 on each rubber support) in the back of the sub frame that attach the differential bushings to the sub frame, they face the rear of the car. While you are back there, you should be able to see four 17mm bolts that are holding the aluminum bracket to the bushings you just loosened. Take these out, then there are four more 17mm bolts that I take out that go through the differential housing into two aluminum arms, they face the ground. I prefer to remove these and let the other support bushings hang, one reason is because if you're working alone like me and your on your back trying to hoist this thing up and put a bolt in it the added weight isn't much help lol. This thing is 68.5lbs!!
Now the front (driveshaft end) of the differential should be trying to sag to the ground, first push it back toward the rear bumper, you should feel the back of the differential drop about an inch, thats a good thing, the supports you loosened will catch on the subframe and allow you to pull the differential out at about a 30-45 degree angle. At this point the differential should be on your chest!! ouch, or on a transmission jack if your lucky enough to be using a lift.
Tear down begins, remove the half shafts, you can use two 2' pry bars and they should pop right out very similar to how an axle does. remove all the 12mm bolts from the rear casing. Use a hammer, preferably a dead blow (rubber with sand inside) or a plastic hammer to loosen the casing, it shouldn't be too difficult so don't get carried away, this part is aluminum and will break if you get HEMAN on it. There are two longer bolts, one about 50mm long and one about 75mm long, just a guess. You can not get them confused, everything only goes back one way so no worries.
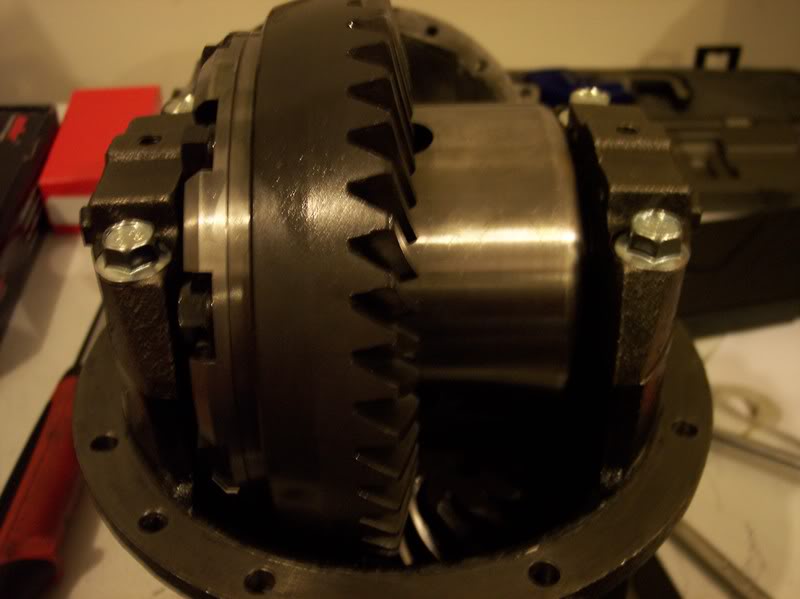
Now that the housing is apart you can stand the differrential on its end like this
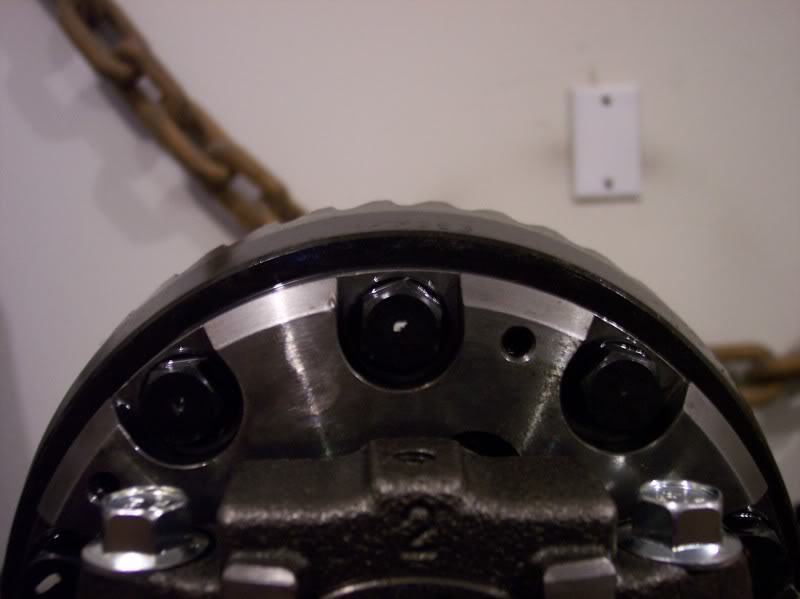
Remove the small 12mm bolts holding the spanner nuts in place. Be sure to mark where the nuts are relative to the caps. I first cleaned the caps then used white touch up paint, this will help you with backlash later on. Next mark the caps, very similar to how you would in an engine, so you can use number stamps or I used a punch to make a mark on one so they would not get confused. Also be sure to keep the retainer nuts and the bearing races with the same cap, all this stuff is very important, you don't want a simple mistake to cost you a differential.
Now that everything is marked take the 4 14mm bolts from both caps and keep them separate along with their respective nuts and bearing races, like I mentioned. Since the caps are off you should be able to remove your LSD. once you've done that you can remove the nylon lock nut on the driveshaft coupler. If you've got an impact you can hold the coupler with one hand and zip it off. If not use a pipe wrench to prevent it from turning, this will remove your paint, but its not on there very good anyways lol. The coupler should slide right off, you can use a deadblow again to pop the pinion gear out of the housing. You can also grab the differential by the cap area and hit the pinion gear on a piece of wood, just don't damage the threading and it will be fine. Mine popped right out with a smack to the ole 2X4 hehe.
Time to put some goodies into this thing, I'm starting off with an AP2 differential because Honda changed the casting process to FD and supposedly its 40% stronger. Ben Leung @ AJ-Racing.com has been using AP2 diffs with gears in his race car without a problem.
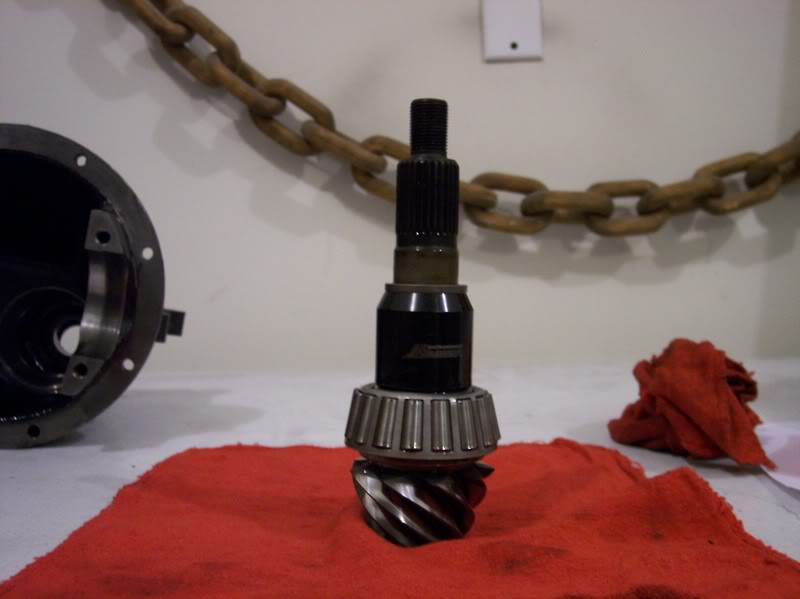
Add One J's Racing pinion gear with your selection of final drive 4.777 in this case and one J's Racing Distance collar with shim, I started with a "standard" 3.91mm shim, we'll get to this later.
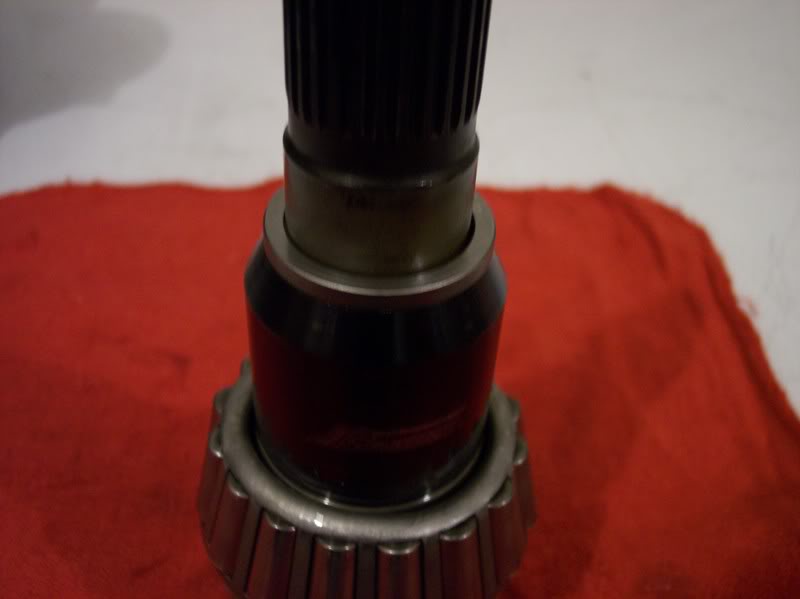
Here you can see the shim
You have to press the old bearings from the original pinion gear, be extremely careful, if the race is damaged you'll have to remove the outer race inside the housing and that may prove difficult, you need a special tool to do that. Install the pinion depth shim and bearing onto your new gear. The other bearing usually stays inside the case unless you want to replace it, then you must remove the rear seal, I would reinstall the old seal until you get the proper turning force on the gear, I'll mention this in the next couple of steps.
When using a solid sleeve like this you may as well go to Honda and purchase yourself a new coupler seal because if you have to take it out more than a time or two it will likely tear or get damaged somehow, its not expensive so do it! Also purchase a new nylon lock nut for the reason previously mentioned, you may be taking all this back out a couple of times.
Insert the assembly into the housing, place the coupler onto the pinion shaft, take your old nylon lock nut and thread it on. Torque it to 75ft lbs, then rotate the assembly, once it feels free torque the lock nut to 94ft lbs. rotate it again. Now zip the nut back loose and re-torque it in the same method two more times, this allows for any compression that may take place. Now you need a dial indicating tool that reads in lbs of turning force. Once you have the nut torqued to 94ft lbs. get your tool that looks like this one.
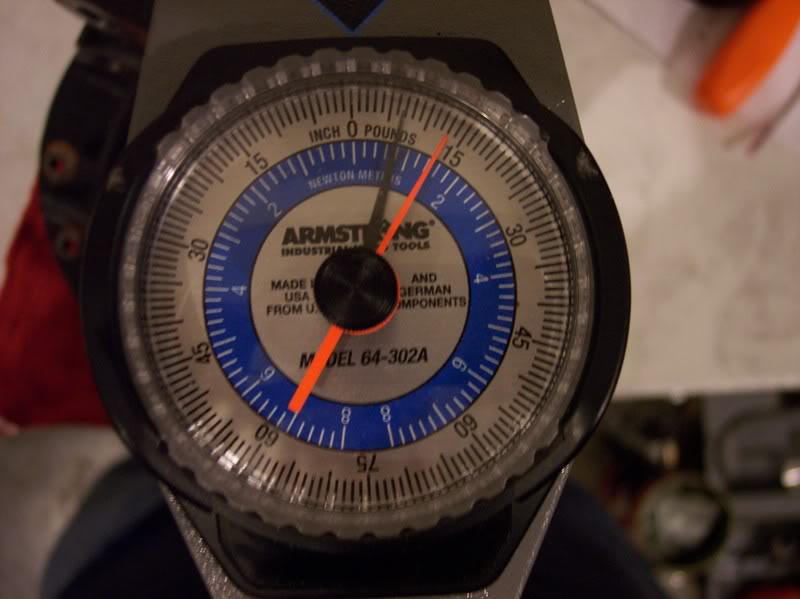
I got it from MSC Industries, its a 1/4" drive but I bought the proper extensions to convert it to 1/2" drive. Not the most ideal but usually inch lb indicator that read low enough (in this case 7-12 inch lbs) are 1/4" drive so we have to make due I guess. Use it to turn the the pinion gear and check the turning force. This is your bearing preload. If the reading is above 12 inch lbs your shim is too thick and you should adjust in .001" thickness, in this example take off .001" And yes this means you have to tear it all back out remove the shim and reinstall everything again. It sucks but you gotta do what you gotta do. I had a local machine shop mill the shim down to a 3.81mm thickness I ended up with 22 inch lbs of turning force, after I got it together I could tell there was way too much load on the bearings. I had them cut me one .001" or .02mm thicker (.15104 IIRC) and I now have 13 inch lbs of turning force which should be fine, it will drop once it has had a load applied on it and has been broken in.
Now with one headache out of the way its on to another YAY . The bearings on the LSD are somewhat hard to remove so I ended up installing new ones because I could tell they were going to get damaged since we didn't have anything that could get in there that tight. make sure you get bearings with races if you purchase new ones, you cannot mix and match with your originals, thats just bad craftsmanship
Install your ring gear onto the LSD, torque is 55 ft lbs. If you're having trouble you could wait until you put the assembly in the differential and then hold the coupler while you torque the ring gear bolts, just make sure they are somewhat tight so you don't damage anything. Place your LSD in its new home with the races installed on the bearings, put the caps on then HAND thread the spanner nuts into the caps. HAND THREAD!! They are an extreme pain to line up sometimes so make sure they are not cross threaded, you should be able to screw them in all the way by hand up against the bearing race. Install your bolts into the caps, run them all the way down but do not torque them yet. This is the way the manual does it, if you wish to tighten I don't think it will matter. It could actually prevent the nuts from moving so this will be up to you. I followed the manual.
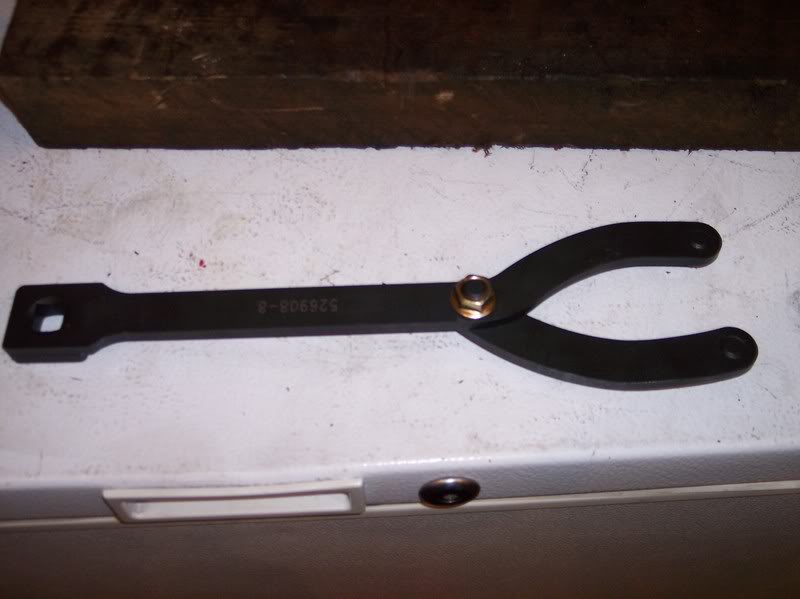
Use a spanner wrench like this to snug the nuts, you don't want much tension.
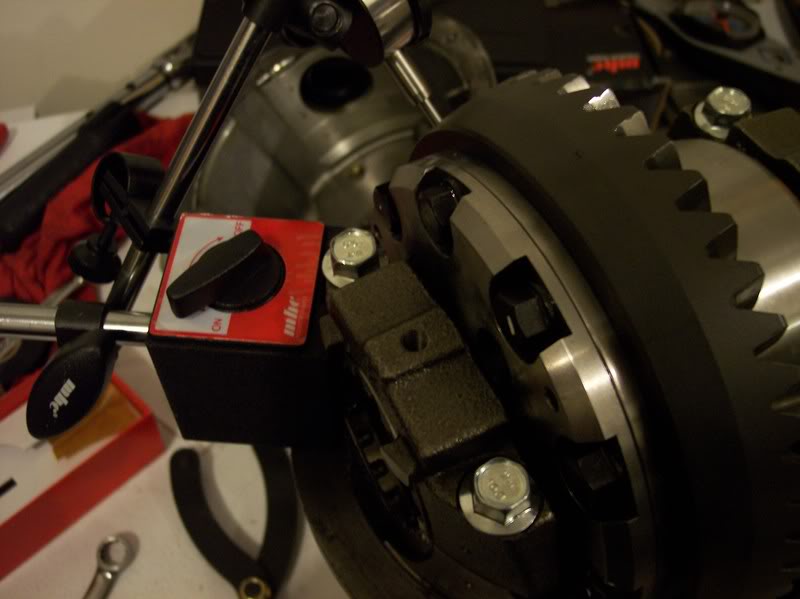
Now set up your dial indicator to check the backlash. I set mine up just as they had it in the manual. But I have a magnetic type and it was difficult to get into place, I ended up mounting it on the side of the cap closest to the ring gear, like this:
Now get the tip of the indicator to contact the tooth, set the indicator to zero. Now this can be difficult with a one man clan but I stood the differential on a piece of wood, this helped to prevent the pinion gear from turning. A vice would be nice here but I'm working on top of my moms deep freeze lol. So I made due with the differential on some wood. If you didn't torque the ring gear bolts now is the time, I used touch up paint to mark one of the bolts so I knew I touched every one of them.
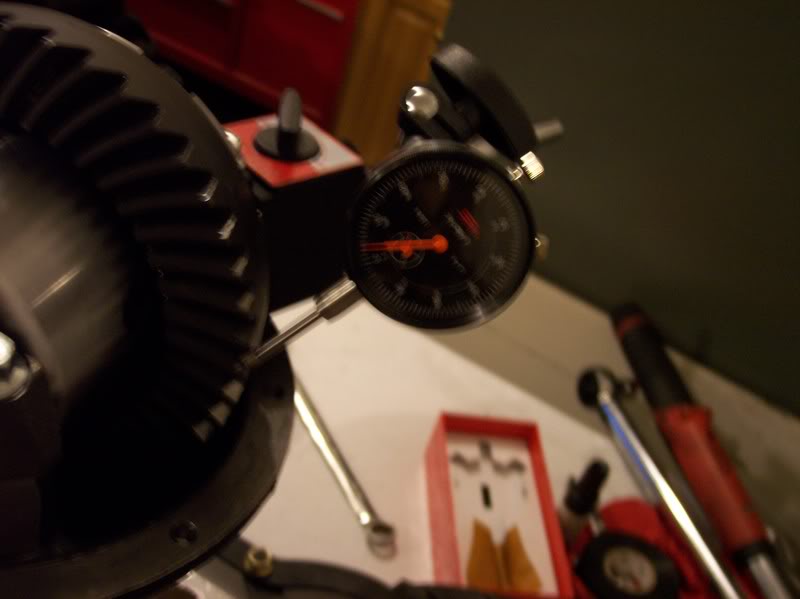
Backlash: You should be able to move the LSD and ring gear assembly, with a somewhat quick motion try to rock the LSD assembly without allowing the pinion gear to move. Watch your dial indicator, you want .0035" backlash, this is the minimum suggested by Honda and it will be very quiet as well!! Now check the backlash in four different spots in a square pattern, you can use whiteout or paint to get it perfect. This allows you to check "runout" basically, Honda calls it difference range . All the readings should be within .0028" and the absolute minimum allowed backlash is .002" If your difference range exceeds .0028" you got a junk set of gears, to be blunt  That would suck!
Time to torque those bolts on the caps torque is 33 ft lbs. I bought 10.9 grade replacement bolts from Amazon to prevent any bolt stretch, now its up to the caps to hold up. Leave your indicator on the differential, just to be sure once you've torqued the bolts down you should re-check all the backlash. Mine did not move.
Time to check the tooth contact, when using quality parts such as J's you might get lucky like me and your tooth contact be perfect. If not, remember that shim between the large diameter bearing and the pinion gear, thats the pinion depth adjustment, you will need a Honda shim kit. And once again you will have to tear the whole thing down and adjust accordingly. A thicker shim will push the tooth contact inward toward the flank. Thinner, outward toward the face(away from where the LSD and ring gear bolt together). Perfect is centered in all directions. Like I said my contact was fine so I don't have much detail here.
Now you're almost there!! Re-install the 12mm bolts with clips that hold the spanner nuts in place. Torque the bolts on the clips to 16ft lbs. You are ready to put the lid on the housing. Clean both ends thoroughly and make sure no debris falls into the case. The lid is easy since you can flush it out if necessary, but the case you could get something in the bearings and well we don't want to talk about it after you spent this kinda cash.
Now is a good time to put that rear seal on and new nylon locknut since you are pretty certain you are done.
A thin bead of silicone and torque all the bolts on the housing to 17ft lbs. There is a patter that Honda suggests, its in the manual. The silicone usually takes 20 minutes to start hardening, I left mine overnight. You can put the half shafts back in. When re-installing the differential remember that your two rear mounts are still sagging and caught on the subframe. Slide the differential back into the bolt holes on the rear mounting bracket. Get at least two of the nuts started and be sure plenty of threads are grabbing. Then you can let it sag get another stab at it and lift up the front of the differential close enough to the front brackets and get a bolt started. From there its just the reverse of how I stated previously. Hope this will help someone someday. Enjoy!! ShocK
Very special thanks to PuddyDaddy and Ben Leung @ aj-racing.
First things first, this is the part I do not have pictures for, but its the teardown so if you cant do this please take it somewhere haha.
The first step is obvious, drain the differential.
I'm going to just start by how I remove the differential from the car. With the car on a lift or fairly tall jack stands I remove the twelve half shaft bolts, six per side, use the e brake if you have to to get them loose because they are designed to "lock", you will have to release the e-brake one or more times to get them all. While your using the e-brake you can also start breaking loose the allen head bolts on the driveshaft coupler, I use a matco allen socket for my 3/8" drive ratchet, its slightly shorter than most and has good bite, these are very easy to strip so be careful, if you do strip one there is a special pair of pliers you can buy just for removing these, they are available at Sears, Snap-On and other various tool distributors. I don't recommend cutting since a few people have cut into their sealed unit and that means the whole driveshaft has to come out and be welded back up etc etc so take your time with these make sure the allen head is as flush as possible and 99% of the time they will come out without a problem, maybe even soak them overnight before you try to break them loose for the first time, who knows that may help.
Next remove the cotter pins and loosen the castle nuts from the lower control arms, screw them until the bottom of the nut is about flush with the bottom of the control arm ball joint bolt. Place a hammer up against the control arm where the bolt goes through the lower control arm and use another hammer to strike it until the bolt becomes loose, do this on both sides (safety glasses). You can also use a spreading tool but this works for me and I don't have to buy tools this way
Now you should be able to pull the spindle from the lower control arm and move it away a couple inches, this allows you to remove the differential without removing the axles. Next remove the small rectangular peice from under the car that is perpendicular to both tubes of the rear subframe, Honda calls this a rear suspension stiffener
its like paper thin. It should be four main bolts then two 10mm bolts connected to a shield that protects the charcoal canister. Next remover 8 14mm bolts (4 on each rubber support) in the back of the sub frame that attach the differential bushings to the sub frame, they face the rear of the car. While you are back there, you should be able to see four 17mm bolts that are holding the aluminum bracket to the bushings you just loosened. Take these out, then there are four more 17mm bolts that I take out that go through the differential housing into two aluminum arms, they face the ground. I prefer to remove these and let the other support bushings hang, one reason is because if you're working alone like me and your on your back trying to hoist this thing up and put a bolt in it the added weight isn't much help lol. This thing is 68.5lbs!!
Now the front (driveshaft end) of the differential should be trying to sag to the ground, first push it back toward the rear bumper, you should feel the back of the differential drop about an inch, thats a good thing, the supports you loosened will catch on the subframe and allow you to pull the differential out at about a 30-45 degree angle. At this point the differential should be on your chest!! ouch, or on a transmission jack if your lucky enough to be using a lift.
Tear down begins, remove the half shafts, you can use two 2' pry bars and they should pop right out very similar to how an axle does. remove all the 12mm bolts from the rear casing. Use a hammer, preferably a dead blow (rubber with sand inside) or a plastic hammer to loosen the casing, it shouldn't be too difficult so don't get carried away, this part is aluminum and will break if you get HEMAN on it. There are two longer bolts, one about 50mm long and one about 75mm long, just a guess. You can not get them confused, everything only goes back one way so no worries.
Now that the housing is apart you can stand the differrential on its end like this
Remove the small 12mm bolts holding the spanner nuts in place. Be sure to mark where the nuts are relative to the caps. I first cleaned the caps then used white touch up paint, this will help you with backlash later on. Next mark the caps, very similar to how you would in an engine, so you can use number stamps or I used a punch to make a mark on one so they would not get confused. Also be sure to keep the retainer nuts and the bearing races with the same cap, all this stuff is very important, you don't want a simple mistake to cost you a differential.
Now that everything is marked take the 4 14mm bolts from both caps and keep them separate along with their respective nuts and bearing races, like I mentioned. Since the caps are off you should be able to remove your LSD. once you've done that you can remove the nylon lock nut on the driveshaft coupler. If you've got an impact you can hold the coupler with one hand and zip it off. If not use a pipe wrench to prevent it from turning, this will remove your paint, but its not on there very good anyways lol. The coupler should slide right off, you can use a deadblow again to pop the pinion gear out of the housing. You can also grab the differential by the cap area and hit the pinion gear on a piece of wood, just don't damage the threading and it will be fine. Mine popped right out with a smack to the ole 2X4 hehe.
Time to put some goodies into this thing, I'm starting off with an AP2 differential because Honda changed the casting process to FD and supposedly its 40% stronger. Ben Leung @ AJ-Racing.com has been using AP2 diffs with gears in his race car without a problem.
Add One J's Racing pinion gear with your selection of final drive 4.777 in this case and one J's Racing Distance collar with shim, I started with a "standard" 3.91mm shim, we'll get to this later.
Here you can see the shim
You have to press the old bearings from the original pinion gear, be extremely careful, if the race is damaged you'll have to remove the outer race inside the housing and that may prove difficult, you need a special tool to do that. Install the pinion depth shim and bearing onto your new gear. The other bearing usually stays inside the case unless you want to replace it, then you must remove the rear seal, I would reinstall the old seal until you get the proper turning force on the gear, I'll mention this in the next couple of steps.
When using a solid sleeve like this you may as well go to Honda and purchase yourself a new coupler seal because if you have to take it out more than a time or two it will likely tear or get damaged somehow, its not expensive so do it! Also purchase a new nylon lock nut for the reason previously mentioned, you may be taking all this back out a couple of times.
Insert the assembly into the housing, place the coupler onto the pinion shaft, take your old nylon lock nut and thread it on. Torque it to 75ft lbs, then rotate the assembly, once it feels free torque the lock nut to 94ft lbs. rotate it again. Now zip the nut back loose and re-torque it in the same method two more times, this allows for any compression that may take place. Now you need a dial indicating tool that reads in lbs of turning force. Once you have the nut torqued to 94ft lbs. get your tool that looks like this one.
I got it from MSC Industries, its a 1/4" drive but I bought the proper extensions to convert it to 1/2" drive. Not the most ideal but usually inch lb indicator that read low enough (in this case 7-12 inch lbs) are 1/4" drive so we have to make due I guess. Use it to turn the the pinion gear and check the turning force. This is your bearing preload. If the reading is above 12 inch lbs your shim is too thick and you should adjust in .001" thickness, in this example take off .001" And yes this means you have to tear it all back out remove the shim and reinstall everything again. It sucks but you gotta do what you gotta do. I had a local machine shop mill the shim down to a 3.81mm thickness I ended up with 22 inch lbs of turning force, after I got it together I could tell there was way too much load on the bearings. I had them cut me one .001" or .02mm thicker (.15104 IIRC) and I now have 13 inch lbs of turning force which should be fine, it will drop once it has had a load applied on it and has been broken in.
Now with one headache out of the way its on to another YAY .
The bearings on the LSD are somewhat hard to remove so I ended up installing new ones because I could tell they were going to get damaged since we didn't have anything that could get in there that tight. make sure you get bearings with races if you purchase new ones, you cannot mix and match with your originals, thats just bad craftsmanship Install your ring gear onto the LSD, torque is 55 ft lbs. If you're having trouble you could wait until you put the assembly in the differential and then hold the coupler while you torque the ring gear bolts, just make sure they are somewhat tight so you don't damage anything. Place your LSD in its new home with the races installed on the bearings, put the caps on then HAND thread the spanner nuts into the caps. HAND THREAD!! They are an extreme pain to line up sometimes so make sure they are not cross threaded, you should be able to screw them in all the way by hand up against the bearing race. Install your bolts into the caps, run them all the way down but do not torque them yet. This is the way the manual does it, if you wish to tighten I don't think it will matter. It could actually prevent the nuts from moving so this will be up to you. I followed the manual.
Use a spanner wrench like this to snug the nuts, you don't want much tension.
Now set up your dial indicator to check the backlash. I set mine up just as they had it in the manual. But I have a magnetic type and it was difficult to get into place, I ended up mounting it on the side of the cap closest to the ring gear, like this:
Now get the tip of the indicator to contact the tooth, set the indicator to zero. Now this can be difficult with a one man clan but I stood the differential on a piece of wood, this helped to prevent the pinion gear from turning. A vice would be nice here but I'm working on top of my moms deep freeze lol. So I made due with the differential on some wood. If you didn't torque the ring gear bolts now is the time, I used touch up paint to mark one of the bolts so I knew I touched every one of them.
Backlash: You should be able to move the LSD and ring gear assembly, with a somewhat quick motion try to rock the LSD assembly without allowing the pinion gear to move. Watch your dial indicator, you want .0035" backlash, this is the minimum suggested by Honda and it will be very quiet as well!! Now check the backlash in four different spots in a square pattern, you can use whiteout or paint to get it perfect. This allows you to check "runout" basically, Honda calls it difference range
. All the readings should be within .0028" and the absolute minimum allowed backlash is .002" If your difference range exceeds .0028" you got a junk set of gears, to be blunt That would suck!Time to torque those bolts on the caps torque is 33 ft lbs. I bought 10.9 grade replacement bolts from Amazon to prevent any bolt stretch, now its up to the caps to hold up. Leave your indicator on the differential, just to be sure once you've torqued the bolts down you should re-check all the backlash. Mine did not move.
Time to check the tooth contact, when using quality parts such as J's you might get lucky like me and your tooth contact be perfect. If not, remember that shim between the large diameter bearing and the pinion gear, thats the pinion depth adjustment, you will need a Honda shim kit. And once again you will have to tear the whole thing down and adjust accordingly. A thicker shim will push the tooth contact inward toward the flank. Thinner, outward toward the face(away from where the LSD and ring gear bolt together). Perfect is centered in all directions. Like I said my contact was fine so I don't have much detail here.
Now you're almost there!! Re-install the 12mm bolts with clips that hold the spanner nuts in place. Torque the bolts on the clips to 16ft lbs. You are ready to put the lid on the housing. Clean both ends thoroughly and make sure no debris falls into the case. The lid is easy since you can flush it out if necessary, but the case you could get something in the bearings and well we don't want to talk about it after you spent this kinda cash.
Now is a good time to put that rear seal on and new nylon locknut since you are pretty certain you are done.
A thin bead of silicone and torque all the bolts on the housing to 17ft lbs. There is a patter that Honda suggests, its in the manual. The silicone usually takes 20 minutes to start hardening, I left mine overnight. You can put the half shafts back in. When re-installing the differential remember that your two rear mounts are still sagging and caught on the subframe. Slide the differential back into the bolt holes on the rear mounting bracket. Get at least two of the nuts started and be sure plenty of threads are grabbing. Then you can let it sag get another stab at it and lift up the front of the differential close enough to the front brackets and get a bolt started. From there its just the reverse of how I stated previously. Hope this will help someone someday. Enjoy!! ShocK
Very special thanks to PuddyDaddy and Ben Leung @ aj-racing.
 01-05-2008, 11:04 PM
#2
Registered User


once a while some guru will throw in an impossible diy(for the poor bastard like me at least)
 looks like you know your stuff
anyone is down for some paint your whole car in your garage diy?
looks like you know your stuffanyone is down for some paint your whole car in your garage diy?


Trending Topics
01-06-2008, 09:46 PM
#8

Join Date: Jul 2006
Posts: 2,096
Likes: 0
Received 0 Likes
on
0 Posts
awesome write up. i just pulled my differential tonight (came out smooth asside from stripping 1 stud). but will be bringing to my mechanic for installation of gears. DIY for diff pull = inspiring. DIY for gear install = thank you mechanic for doing it for me


