MGA Off Season Folly & Misadventure


 11-23-2016, 10:16 PM
#12

Thread Starter
Levi, I haven't skied in quite a few years. You should see my antique gear! Anyway, I had some notion that it was cheaper to hike to the top of the mountain than to buy new equipment and lift tickets. With the end of the oil crisis, I'm hoping to keep the camp heated this winter, so may be able to knock off some winter peaks.
12-04-2016, 06:07 PM
#13
Thread Starter
Episode 2: Engine Stand Side Mount
Excess engine stock:
I have the Hap Waldrop 1600 race engine in the car built up to a 1645 cc spec. Then I have the detuned “1600” engine with a “15” head as my spare race engine.
Then I have a good “18” head that I rebuilt two winters ago.
So much for the useable, good stuff.
Then I have a 1500 block that has been bored out to a 1655 cc spec. What were they thinking? This engine had severely scored rod bearings so something failed, but I've identified nothing specific. The problem that I see, however, is that the deck has been so severely cut that the pistons extend above the deck by about .030”. I need to shorten the pistons! And haven’t figured out just how to do it.
Then I have a short block that I bought a few years ago in order to get a head for the engine that Hap built. This engine had had a head gasket failure, with water leaking into the #3 cylinder bore and rusting up so that the engine was seized. With some flap sander work in the #3 bore I was able to clear the rust and turn over the engine, but it awaits my attention. For sure, this engine block needs an overbore.
Then I have a 1600 short block that John Terchak sent me from one of his parts cars. This turns over and looks good and might have been my winter project.
The plan was to find a “15” head for John’s short block and then go at it. But I guess that I’m too cheap, and I wasn’t willing to pay up for an untested head. I almost bought one on ebay for $250, but then …
A fellow in my own town had a craigslist ad for MGA parts. They were a bit of a mess, but he had two “15” heads that I coveted. He also had an “18” head, a transmission, an MGA (slightly damaged) and MGB differential, a rear axle housing and a 1600 short block in pieces and a bunch of other items I’ll never need. We couldn’t cut a deal on the heads - but after about 5 weeks, I emailed him an offer on the package that he accepted.
So now I have yet another engine block. Since it’s in pieces, I need to put it together to see what I actually have. The plan is to get one short block and head taken apart, hot tanked and tested, along with a crankshaft. Then go from there. I would prefer to do the one in the worst shape - i.e., the one with the leaked head gasket, but time will tell.
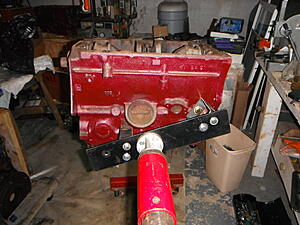
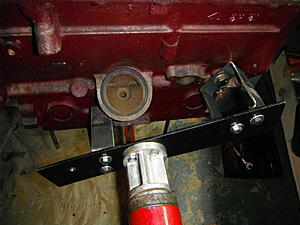
So with engine work in my future, yesterday’s project was to build a side mount bracket for the engine stand. Hap recommends the use of something like this because most standard engine stands attachments prevent installation of the crankshaft. Since I don’t weld, some slight ingenuity and a few bolts were required.
I took some 4” x3” by 1/8” rectangular steel tubing and cut two pieces about 1.5” wide. Then I attached these to the passenger side of the engine at the petcock and at the generator bracket attachment. Once those two pieces were in place, I bolted up a 3” x 16” x 3/16” metal plate between these “brackets”, then attached this piece to the engine stand mount.
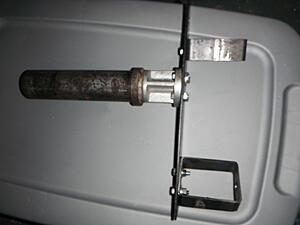
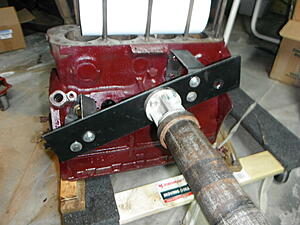
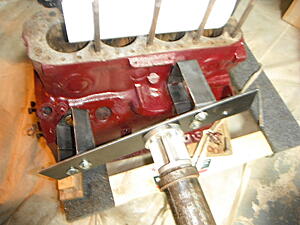
It seems to work OK, but may have a center of gravity issue, as the engine is top heavy when it is turned upside down. But subject to that caveat, success as far as I’m concerned.
Excess engine stock:
I have the Hap Waldrop 1600 race engine in the car built up to a 1645 cc spec. Then I have the detuned “1600” engine with a “15” head as my spare race engine.
Then I have a good “18” head that I rebuilt two winters ago.
So much for the useable, good stuff.
Then I have a 1500 block that has been bored out to a 1655 cc spec. What were they thinking? This engine had severely scored rod bearings so something failed, but I've identified nothing specific. The problem that I see, however, is that the deck has been so severely cut that the pistons extend above the deck by about .030”. I need to shorten the pistons! And haven’t figured out just how to do it.
Then I have a short block that I bought a few years ago in order to get a head for the engine that Hap built. This engine had had a head gasket failure, with water leaking into the #3 cylinder bore and rusting up so that the engine was seized. With some flap sander work in the #3 bore I was able to clear the rust and turn over the engine, but it awaits my attention. For sure, this engine block needs an overbore.
Then I have a 1600 short block that John Terchak sent me from one of his parts cars. This turns over and looks good and might have been my winter project.
The plan was to find a “15” head for John’s short block and then go at it. But I guess that I’m too cheap, and I wasn’t willing to pay up for an untested head. I almost bought one on ebay for $250, but then …
A fellow in my own town had a craigslist ad for MGA parts. They were a bit of a mess, but he had two “15” heads that I coveted. He also had an “18” head, a transmission, an MGA (slightly damaged) and MGB differential, a rear axle housing and a 1600 short block in pieces and a bunch of other items I’ll never need. We couldn’t cut a deal on the heads - but after about 5 weeks, I emailed him an offer on the package that he accepted.
So now I have yet another engine block. Since it’s in pieces, I need to put it together to see what I actually have. The plan is to get one short block and head taken apart, hot tanked and tested, along with a crankshaft. Then go from there. I would prefer to do the one in the worst shape - i.e., the one with the leaked head gasket, but time will tell.
So with engine work in my future, yesterday’s project was to build a side mount bracket for the engine stand. Hap recommends the use of something like this because most standard engine stands attachments prevent installation of the crankshaft. Since I don’t weld, some slight ingenuity and a few bolts were required.
I took some 4” x3” by 1/8” rectangular steel tubing and cut two pieces about 1.5” wide. Then I attached these to the passenger side of the engine at the petcock and at the generator bracket attachment. Once those two pieces were in place, I bolted up a 3” x 16” x 3/16” metal plate between these “brackets”, then attached this piece to the engine stand mount.


It seems to work OK, but may have a center of gravity issue, as the engine is top heavy when it is turned upside down. But subject to that caveat, success as far as I’m concerned.

 01-09-2017, 07:03 PM
#15
Thread Starter
Episode 3 - My Delusions?
See post #299 here: https://www.s2ki.com/forums/new-york...165187/page12/
Episode 4: Hagan Fattie Hot Rod Mirrors
When I first acquired and ran the car back in 2010, the car had two small mirrors, one used as a center mount rear view, and one on the driver’s side fender. These were especially useless, and I soon fashioned a mount for a wide Wink Mirror.

The Wink mirror worked fairly well, but I still had a significant blind spot on the passenger side, and more than once I haven’t seen an overtaking car on the right when entering a right turn at speed. The mirror on the driver’s fender was also inadequate – too small and too low to find in an instant while careening trough traffic into a corner. Given my banged up fender at last fall’s Lime Rock Historics, it was time to address the problem.
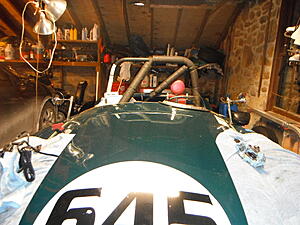
Attachment 161713
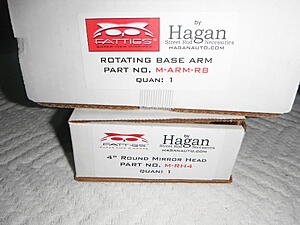
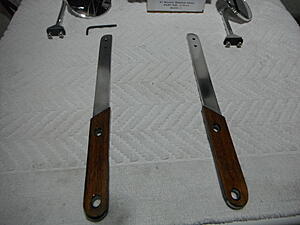
I didn’t want to add any more holes to the body in mounting the mirrors and I wanted convex mirrors with a wide field of view. After hours of evaluation, I opted to buy some expensive Hagen Fattie hot rod mirrors with 5” straight posts. The mounting studs were only one inch apart, so even if I needed to mount to the body, I could probably use at least one existing hole.
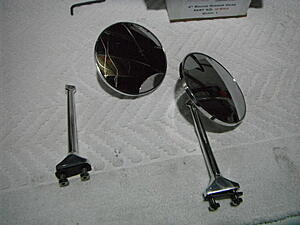
But I also wanted the mirrors to sit high up on the same level as my eyes so I could find them in a flash. I was thinking of mounting the mirrors on cut down windshield posts and these mirrors with the straight posts could sit out at a right angle.
When the mirrors came, I opted to fashion my own mounting posts that I would slide into the mounting hole for the windshield. I found some 1” x 1/4” aluminium stock which served fairly well for the upper portion of the post. The lower portion, however needed to be beefed up. For that I cut some wood strips and epoxied them to the end of the aluminum stock. They serve as a spacer.
Then it took quirt a bit of experimentation to find the location for the through holes. Each side was a bit different. Fortunately, I had a two part test piece in wood and metal that had previously served as part of the Wink mirror mount.
I test fit both sides on the car with the mirrors mounted and was satisfied with the apparent improvement. I then eased the corners of the exposed upper portion of the posts. I used an angle grinder on the top ends, but being afraid of its aggressive nature, used a flap sander in my drill for the edges of the post. Then I polished up the posts as best as I could.
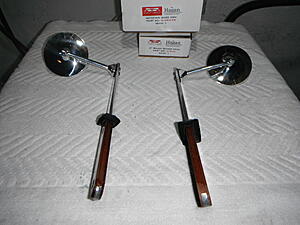
They sit nice and high, seem to provide good vision to the rear and I think I can order another more rectangular mirror to mount on the same type of post where the center mirror typically sits.
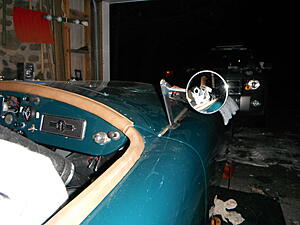
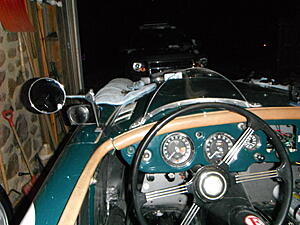
The only possible downside is that they are a bit dainty and perhaps may not hold up to the rigors of racing.
See post #299 here: https://www.s2ki.com/forums/new-york...165187/page12/
Episode 4: Hagan Fattie Hot Rod Mirrors
When I first acquired and ran the car back in 2010, the car had two small mirrors, one used as a center mount rear view, and one on the driver’s side fender. These were especially useless, and I soon fashioned a mount for a wide Wink Mirror.

The Wink mirror worked fairly well, but I still had a significant blind spot on the passenger side, and more than once I haven’t seen an overtaking car on the right when entering a right turn at speed. The mirror on the driver’s fender was also inadequate – too small and too low to find in an instant while careening trough traffic into a corner. Given my banged up fender at last fall’s Lime Rock Historics, it was time to address the problem.
Attachment 161713
I didn’t want to add any more holes to the body in mounting the mirrors and I wanted convex mirrors with a wide field of view. After hours of evaluation, I opted to buy some expensive Hagen Fattie hot rod mirrors with 5” straight posts. The mounting studs were only one inch apart, so even if I needed to mount to the body, I could probably use at least one existing hole.


But I also wanted the mirrors to sit high up on the same level as my eyes so I could find them in a flash. I was thinking of mounting the mirrors on cut down windshield posts and these mirrors with the straight posts could sit out at a right angle.
When the mirrors came, I opted to fashion my own mounting posts that I would slide into the mounting hole for the windshield. I found some 1” x 1/4” aluminium stock which served fairly well for the upper portion of the post. The lower portion, however needed to be beefed up. For that I cut some wood strips and epoxied them to the end of the aluminum stock. They serve as a spacer.
Then it took quirt a bit of experimentation to find the location for the through holes. Each side was a bit different. Fortunately, I had a two part test piece in wood and metal that had previously served as part of the Wink mirror mount.
I test fit both sides on the car with the mirrors mounted and was satisfied with the apparent improvement. I then eased the corners of the exposed upper portion of the posts. I used an angle grinder on the top ends, but being afraid of its aggressive nature, used a flap sander in my drill for the edges of the post. Then I polished up the posts as best as I could.


They sit nice and high, seem to provide good vision to the rear and I think I can order another more rectangular mirror to mount on the same type of post where the center mirror typically sits.


The only possible downside is that they are a bit dainty and perhaps may not hold up to the rigors of racing.

Last edited by blueosprey90; 01-09-2017 at 07:07 PM.
01-09-2017, 07:20 PM
#16
Former Moderator


Not a moments respite for you eh!
I'm not a fan of how they look, but that could just be the angle from the pictures. Besides they serve a function, and I'd rather you be safe.
I'm not a fan of how they look, but that could just be the angle from the pictures. Besides they serve a function, and I'd rather you be safe.
01-10-2017, 06:36 PM
#17
Thread Starter
Episode 5: A Sinking Feeling 
Up until 2015, I had been running standard size brass floats in my SU carburetors. But I had a leak and switched to Nylatron floats at the 2015 Historic Festival courtesy of Joe, the Oxfordmotorcars mechanic. But although I managed to get back on track, fuel starvation problems remained grossly apparent with the 4:55 Detroit Locker differential. I switched to smaller T1 floats for the 2016 season at the recommendation of Joe Curto. But alas, back to brass.
I rationalize that T1 stands for “Type 1”. These floats were apparently run in the small H1 and H2 SU carbs. I also suspect (but just a guess) that the standard larger floats that I run in the H 6 SUs are called T2 floats.
The smaller T1 floats helped with the fuel starvation, but didn’t hold up to well to race conditions. At my third event, I suffered a two float failure, and was fortunate to scrounge some temporary replacements from a MG TD racer. Eric Russell, my friend from the VRG - MGA #61, was on hand and beside feeding me lunch, supervised me in attempting to boil off the fuel - but we met with little success.
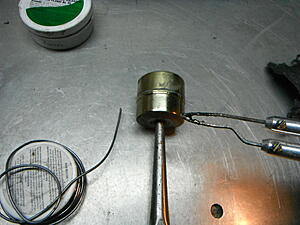
A leaky brass float may not sound like it has fuel inside. Unless there is a lot of fuel, it sounds more like a few grains of small sand or solder spatter when you shake the float. The "extra" weight seems next to nothing.
So the idea is to bring a pan of water up to a boil and then turn down the heat. You do not want a rolling boil where the water has a lot of bubbles. Then submerge the float in the water, and the heat will vaporize the fuel, which will then escape as gas bubbles. This identifies the source of the leak.
You might be able to boil off the fuel from the float by this method, but not necessarily. I had to prick two of my floats with the tip of a box cutter and then wick out the fuel with a paper towel. When the fuel is fully removed from inside the float, some light soldering is all that is needed to make the repair.
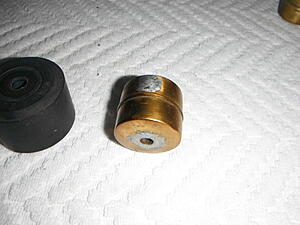
This featured float was an easy one. The side of the float had cracked. I marked it off after confirming the source of the leak with the hot water system.
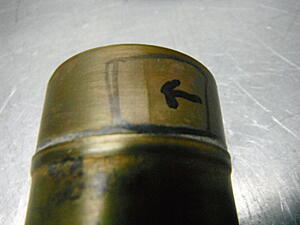
I sanded down the repair area with fine sandpaper and wiped down with acetone to clean.
Then I smeared some soldering flux over the area and laid some solder over the crack with my soldering iron.
Followed by some light sanding of the repair area.
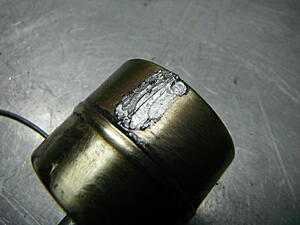
Finally, another dip back in the hot water to test the repair. If you see air bubbles at this stage, your repair was inadequate and it’s time to start again.
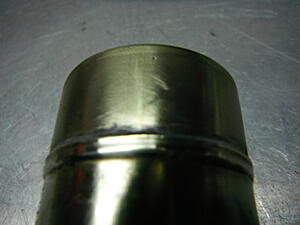
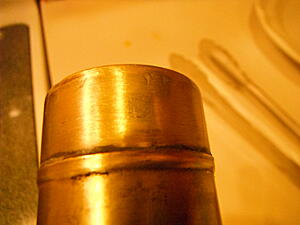
Here are some photos of the other floats. These were tougher birds to crack (and they look it) as they had leaks on both ends where the brass connects to the center sleeve. On these I had to make several attempts before I could seal the leaks, and I almost gave up before I finally was successful.
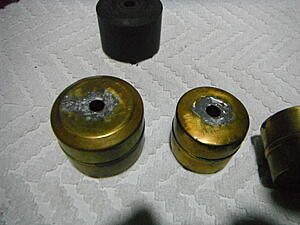
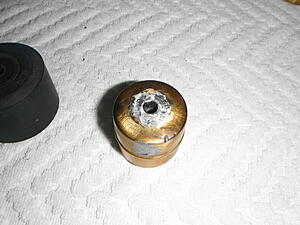
This one had leaks on both ends and on the side!
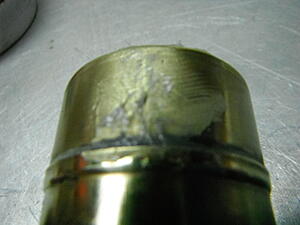
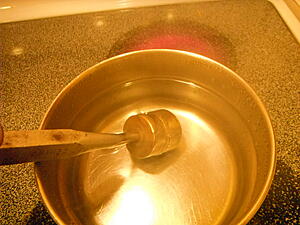
And here you can see where I put a little nick on the "corner" to drain off the fuel.
Up until 2015, I had been running standard size brass floats in my SU carburetors. But I had a leak and switched to Nylatron floats at the 2015 Historic Festival courtesy of Joe, the Oxfordmotorcars mechanic. But although I managed to get back on track, fuel starvation problems remained grossly apparent with the 4:55 Detroit Locker differential. I switched to smaller T1 floats for the 2016 season at the recommendation of Joe Curto. But alas, back to brass.
I rationalize that T1 stands for “Type 1”. These floats were apparently run in the small H1 and H2 SU carbs. I also suspect (but just a guess) that the standard larger floats that I run in the H 6 SUs are called T2 floats.
The smaller T1 floats helped with the fuel starvation, but didn’t hold up to well to race conditions. At my third event, I suffered a two float failure, and was fortunate to scrounge some temporary replacements from a MG TD racer. Eric Russell, my friend from the VRG - MGA #61, was on hand and beside feeding me lunch, supervised me in attempting to boil off the fuel - but we met with little success.
A leaky brass float may not sound like it has fuel inside. Unless there is a lot of fuel, it sounds more like a few grains of small sand or solder spatter when you shake the float. The "extra" weight seems next to nothing.
So the idea is to bring a pan of water up to a boil and then turn down the heat. You do not want a rolling boil where the water has a lot of bubbles. Then submerge the float in the water, and the heat will vaporize the fuel, which will then escape as gas bubbles. This identifies the source of the leak.
You might be able to boil off the fuel from the float by this method, but not necessarily. I had to prick two of my floats with the tip of a box cutter and then wick out the fuel with a paper towel. When the fuel is fully removed from inside the float, some light soldering is all that is needed to make the repair.
This featured float was an easy one. The side of the float had cracked. I marked it off after confirming the source of the leak with the hot water system.

I sanded down the repair area with fine sandpaper and wiped down with acetone to clean.

Then I smeared some soldering flux over the area and laid some solder over the crack with my soldering iron.


Followed by some light sanding of the repair area.


Finally, another dip back in the hot water to test the repair. If you see air bubbles at this stage, your repair was inadequate and it’s time to start again.

Here are some photos of the other floats. These were tougher birds to crack (and they look it) as they had leaks on both ends where the brass connects to the center sleeve. On these I had to make several attempts before I could seal the leaks, and I almost gave up before I finally was successful.

This one had leaks on both ends and on the side!

And here you can see where I put a little nick on the "corner" to drain off the fuel.
 01-11-2017, 02:43 AM
#18
Former Moderator
Great post Jeff. Quite simply you've conveyed the essence of what it involves to own or race an older car. Good luck with the float repairs if you plan to repair the other floats too. Out of curiosity how much do a set of the floats cost? And how often do they develop a leak?
01-11-2017, 03:29 AM
#19
Thread Starter
The lowest price that I've seen is about $30 each. Lately, I've been getting two events ot of them, so say 225 race miles. But they are supposed to last indefinitely. The new style Nylatron ones are more sturdy, but not yet available in the smaller size.
01-11-2017, 05:14 PM
#20
Jeff, have you considered changing to HS6 carbs? Floats are plastic. Seems like a lot of the Triumph racers ditched their H6 carbs for the HS6 carbs. Still need to find the correct orientation float bowls, so that the floats do not hang up when cornering. I found the H6 carbs more prone to leaks, than the HS6 carbs. The seals where the H6 floats attach to the carb body can sometimes be a problem.
SU float bowls can be subject to fuel frothing, resulting in fuel starvation. Do you have the carbs solidly mounted to the intake manifold? If so, you may want to try longer mounting studs and then use compression springs under the mounting nuts. This helps to reduce carb vibration.
SU float bowls can be subject to fuel frothing, resulting in fuel starvation. Do you have the carbs solidly mounted to the intake manifold? If so, you may want to try longer mounting studs and then use compression springs under the mounting nuts. This helps to reduce carb vibration.