DIY: AP1 Arm Rest Replacement / Reupholstering
 09-09-2015, 07:03 PM
#1
Registered User
Thread Starter

Join Date: Sep 2015
Posts: 3
Likes: 0
Received 0 Likes
on
0 Posts
This is a DIY for AP1 arm rests. I wanted to make one specifically for AP1 since the main difference between AP1 and AP2 is simply how AP2 uses screws, whereas AP1 is plastic welded.
I recently did my own using a DIY from an AP2 how-to, but I wanted to add more description and some better guidance for fellow AP1 owners who have dead arm rests.
People mostly suggest replacing the whole center console for an updated console from an AP2, but that can cost ~$150+ for a used one. This way is cheaper and easy enough!
I ain't responsible if you screw this up by the way...
Tools:
New fabric of choice
Foam of choice
Spray Adhesive
Staple Gun (Optional)
Philips Screwdriver or Knife
Wrench for Shift Knob nut
Patience.
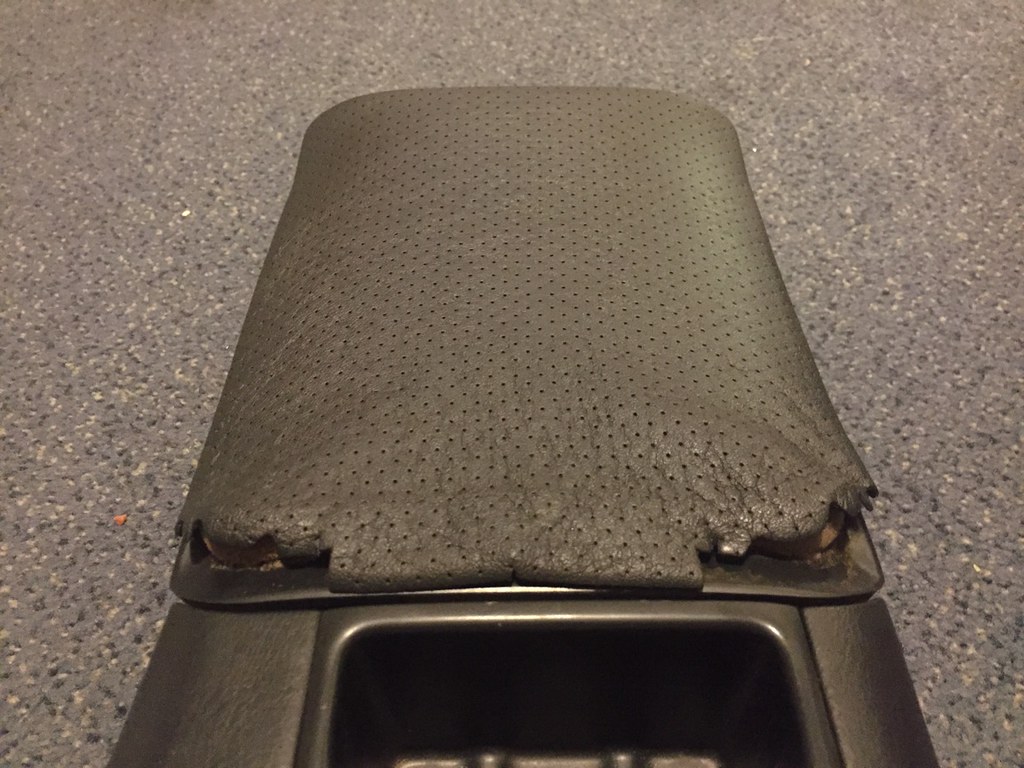
My dated fabric:
Lets get started:
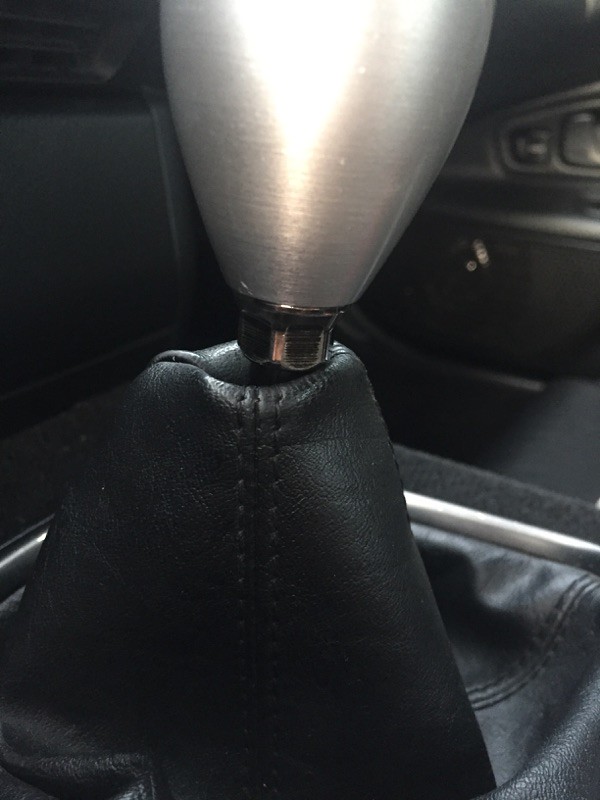
Step 1:
Removing your shift knob. It's important to do this the right way or you could damage your tranny.. Simply use a wrench on the backing nut at the base of the knob as shown below, then turn the knob to loosen the knob. Pay attention to the shaft as you don't want the shaft itself to rotate. This is where the wrench comes in hand. Just apply opposite force on the nut when you turn the knob.
Step 2:
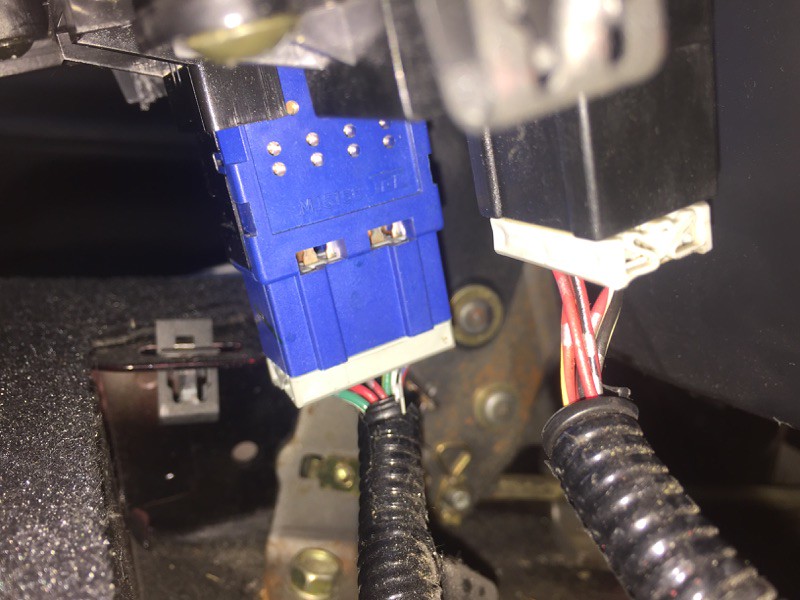
Popping off the center console. The entire center console is held in place by clips and tabs, as well as the wires connected to your hazard and roof switches. Begin near the rear of the center console way back by the arm rest. Get your fingers underneath the sides and wiggle them towards the back until the clips pop off. Then slide your fingers forward and pop all the remaining tabs loose.
[url=https://flic.kr/p/yrEx16]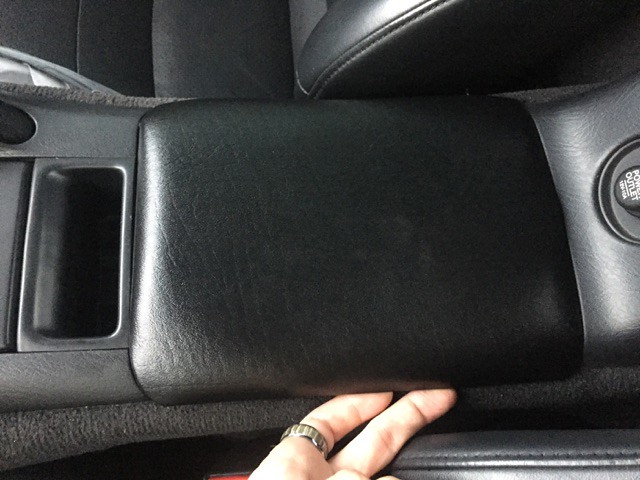
Then lift the back of the console upward first until you can pop off the two connectors on the switches. Push the tabs on the connectors and wiggle them free. Once these are disconnected, lift the back of the console more and feed the e-brake and shift lever through the openings. If you try to lift from the front you'll rub against your dash and risk scratching the finish..
Third step:
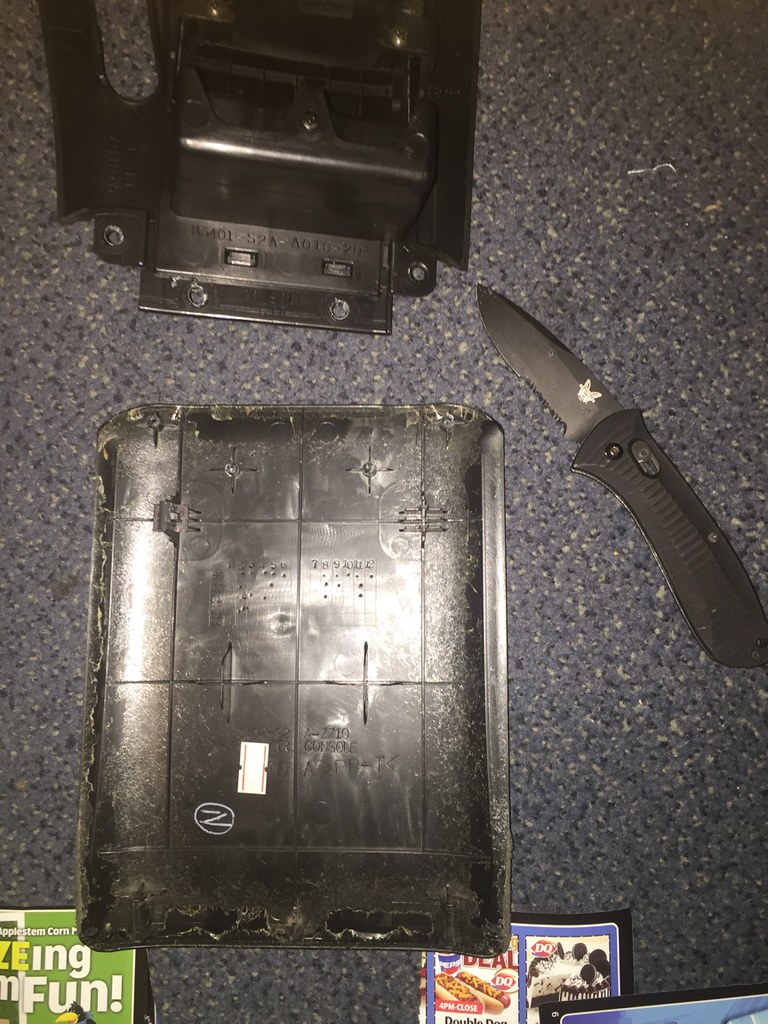
Disassembly of the center console. Some people might stop here, but the plastic welds only hold the assembly together as a whole, but aren't required to hold the arm rest in place. If you look at the back of your arm rest, you'll see that there are 4 clips that hold the arm rest down. This is sufficient enough as you only apply downward pressure to the arm rest and it's not going to fly away in the wind if it's not welded to the rest of the center console... SO, start by digging these welds out. You can use a knife or even a Philips screwdriver head, and just stab the center and rotate your weapon of choice to eat away at the plastic enough until you can pop the two pieces separate.
Fourth step:
Cleaning your new mating surface. Go ahead and rip off all that dated material and get ready to apply your new stuff. Don't worry about saving the material because they're just trash once they're off and they're not required as stencils. Don't stress a completely clean surface, the new foam will stick well enough and it'll be held down by your choice of fabric that overlaps the foam anyway.
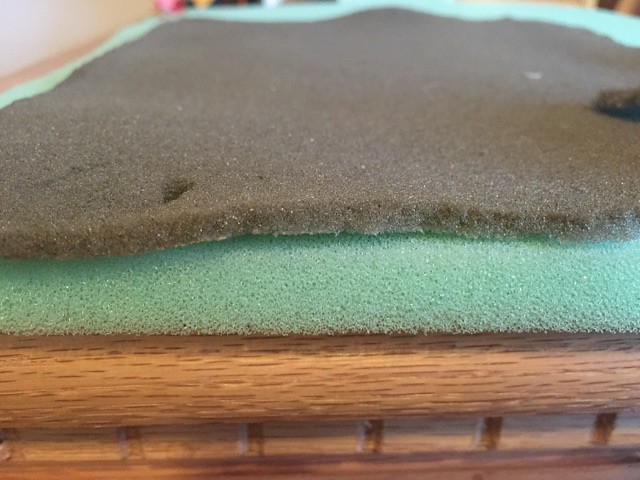
New vs Old foam:
Fifth step:
Now that we have a naked arm rest, cut a big enough piece of foam to cover the arm rest, just barely shorter than the edges of the arm rest itself. Once the piece is cut, go ahead and wack off the pointy corners so we don't have pointy edges under our fabric. Then once the foam is cut to size and shape, go ahead and apply some adhesive to your arm rest and stick your foam on.
Sixth step:
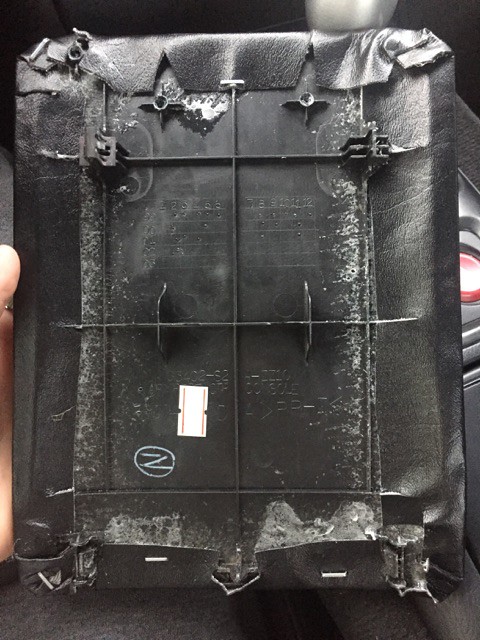
Once your foam is set in place, it's time to cover it with new fabric! This part is a little more challenging because of the tight corners, but it's possible with enough patience.. Go ahead and cut a piece of fabric with a generous amount of excess fabric on the edges. You can always cut shorter as you work, but you can't add more fabric... When you have your fabric cut, start by adhering the fabric to the two longer sides of the arm rest. Get these as straight as you can and pull the fabric tight to avoid loose fabric and unwanted wrinkles. It's optional to add staples as you go. If your staples are too long, you'll poke through too much of the foam and you'll feel the staples in your elbow.. Once you have the longer sides taken care of, pull the fabric around the corners bit by bit and work out the kinks and wrinkles that the fabric forms as you go. I was working with leather-like fabric, so it was a bit harder to work with. If you decide to go with a cloth or suede, this part would be much easier for you.
Picture of how I seated my fabric:
Seventh step:
Let the adhesive cure! I left mine over night with chip clips holding the corners and parts I though might shift on me while I wasn't tending to it. My glue recommended letting it sit for 24 hours to fully cure, but I was a little impatient to see the final results lol. If you need your car while the glue cures, you can go ahead and install the rest of the center console while you leave the arm rest out. It'll be a little uncomfortable to drive but you can easily pop the arm rest in later once it's ready.
Eighth step:
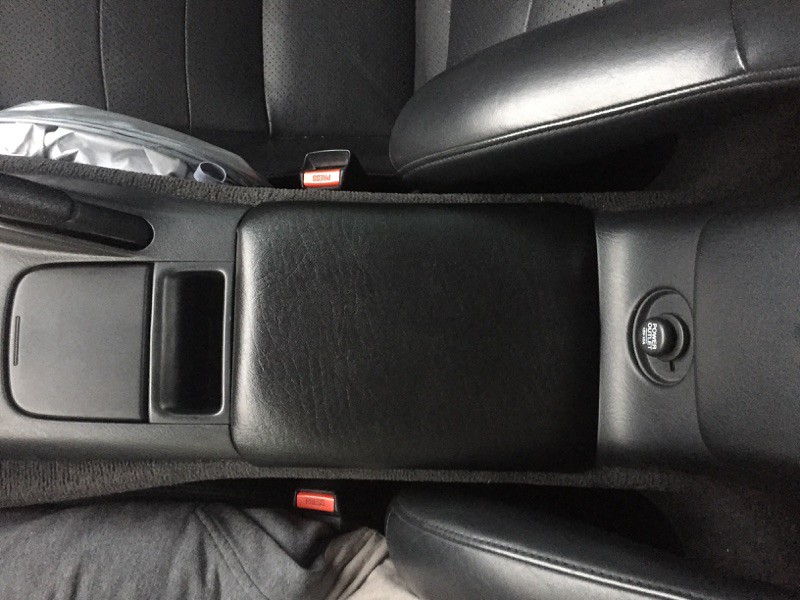
Reinstalling. Begin by installing the front bit by the shift knob first. Feed your e-brake handle through the opening and then your gear lever through the shift boot. Once these two are through, reattach your roof and hazard switches by popping the connectors back in place. You'll hear those "locking" tabs click in place once they're fully inserted. Then proceed to clip the console back in place by lining up the console and pressing along the edges to seat all the clips. Then finally, snap your new arm rest in place once it's ready. 4 clips at each corner will seat the arm rest and keep it in place.
Fin.
I recently did my own using a DIY from an AP2 how-to, but I wanted to add more description and some better guidance for fellow AP1 owners who have dead arm rests.
People mostly suggest replacing the whole center console for an updated console from an AP2, but that can cost ~$150+ for a used one. This way is cheaper and easy enough!
I ain't responsible if you screw this up by the way...
Tools:
New fabric of choice
Foam of choice
Spray Adhesive
Staple Gun (Optional)
Philips Screwdriver or Knife
Wrench for Shift Knob nut
Patience.
My dated fabric:
Lets get started:
Step 1:
Removing your shift knob. It's important to do this the right way or you could damage your tranny.. Simply use a wrench on the backing nut at the base of the knob as shown below, then turn the knob to loosen the knob. Pay attention to the shaft as you don't want the shaft itself to rotate. This is where the wrench comes in hand. Just apply opposite force on the nut when you turn the knob.
Step 2:
Popping off the center console. The entire center console is held in place by clips and tabs, as well as the wires connected to your hazard and roof switches. Begin near the rear of the center console way back by the arm rest. Get your fingers underneath the sides and wiggle them towards the back until the clips pop off. Then slide your fingers forward and pop all the remaining tabs loose.
[url=https://flic.kr/p/yrEx16]
Then lift the back of the console upward first until you can pop off the two connectors on the switches. Push the tabs on the connectors and wiggle them free. Once these are disconnected, lift the back of the console more and feed the e-brake and shift lever through the openings. If you try to lift from the front you'll rub against your dash and risk scratching the finish..
Third step:
Disassembly of the center console. Some people might stop here, but the plastic welds only hold the assembly together as a whole, but aren't required to hold the arm rest in place. If you look at the back of your arm rest, you'll see that there are 4 clips that hold the arm rest down. This is sufficient enough as you only apply downward pressure to the arm rest and it's not going to fly away in the wind if it's not welded to the rest of the center console... SO, start by digging these welds out. You can use a knife or even a Philips screwdriver head, and just stab the center and rotate your weapon of choice to eat away at the plastic enough until you can pop the two pieces separate.
Fourth step:
Cleaning your new mating surface. Go ahead and rip off all that dated material and get ready to apply your new stuff. Don't worry about saving the material because they're just trash once they're off and they're not required as stencils. Don't stress a completely clean surface, the new foam will stick well enough and it'll be held down by your choice of fabric that overlaps the foam anyway.
New vs Old foam:
Fifth step:
Now that we have a naked arm rest, cut a big enough piece of foam to cover the arm rest, just barely shorter than the edges of the arm rest itself. Once the piece is cut, go ahead and wack off the pointy corners so we don't have pointy edges under our fabric. Then once the foam is cut to size and shape, go ahead and apply some adhesive to your arm rest and stick your foam on.
Sixth step:
Once your foam is set in place, it's time to cover it with new fabric! This part is a little more challenging because of the tight corners, but it's possible with enough patience.. Go ahead and cut a piece of fabric with a generous amount of excess fabric on the edges. You can always cut shorter as you work, but you can't add more fabric... When you have your fabric cut, start by adhering the fabric to the two longer sides of the arm rest. Get these as straight as you can and pull the fabric tight to avoid loose fabric and unwanted wrinkles. It's optional to add staples as you go. If your staples are too long, you'll poke through too much of the foam and you'll feel the staples in your elbow.. Once you have the longer sides taken care of, pull the fabric around the corners bit by bit and work out the kinks and wrinkles that the fabric forms as you go. I was working with leather-like fabric, so it was a bit harder to work with. If you decide to go with a cloth or suede, this part would be much easier for you.
Picture of how I seated my fabric:
Seventh step:
Let the adhesive cure! I left mine over night with chip clips holding the corners and parts I though might shift on me while I wasn't tending to it. My glue recommended letting it sit for 24 hours to fully cure, but I was a little impatient to see the final results lol. If you need your car while the glue cures, you can go ahead and install the rest of the center console while you leave the arm rest out. It'll be a little uncomfortable to drive but you can easily pop the arm rest in later once it's ready.
Eighth step:
Reinstalling. Begin by installing the front bit by the shift knob first. Feed your e-brake handle through the opening and then your gear lever through the shift boot. Once these two are through, reattach your roof and hazard switches by popping the connectors back in place. You'll hear those "locking" tabs click in place once they're fully inserted. Then proceed to clip the console back in place by lining up the console and pressing along the edges to seat all the clips. Then finally, snap your new arm rest in place once it's ready. 4 clips at each corner will seat the arm rest and keep it in place.
Fin.

 09-17-2015, 07:24 AM
#3
Registered User

Join Date: Aug 2015
Posts: 66
Likes: 0
Received 0 Likes
on
0 Posts


Trending Topics
 12-07-2016, 07:35 AM
#9
Registered User
Thread Starter
Join Date: Sep 2015
Posts: 3
Likes: 0
Received 0 Likes
on
0 Posts
Joann's fabric store! They have weekly sales and sometimes offer like 20% off the item you purchase. I just bought a single yard of fabric which was more than enough and really affordable.
AFAIK, they're the same size. Don't quote me on that though.. I would suppose the only difference would be that the AP2 has inserts to accept screws, where AP1 would just be plastic welded.
AFAIK, they're the same size. Don't quote me on that though.. I would suppose the only difference would be that the AP2 has inserts to accept screws, where AP1 would just be plastic welded.

Thread
Thread Starter
Forum
Replies
Last Post