DIY: Intermittent or Constant Daytime Running Light on dash FIX
 11-16-2016, 01:15 PM
#1
Hi all,
I have done some research on an issue MY06 S2000 was experiencing and found some help on other sites and wanted to post everything here for the S2000 community. With the 06+ cars getting older I feel like more quirks like this will occur and rather than going to the dealer this is a simple fix you can do yourself.
The 06+ (as well as some of the older NON USA cars) have daytime running lights that usually turn on when you release the parking brake.
Recently when releasing the parking brake I was receiving a "DRL" light on the dash and the running lights were not turning on.
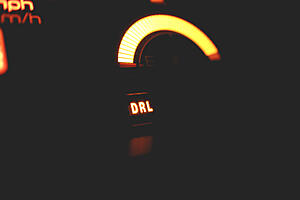
The DRL light would turn off when the headlights were turned on but I noticed that only my passenger side headlight high beam was working. I swapped in new bulbs and bulbs side to side and confirmed that it was not bulb related. I also checked all fuses related to headlights and all worked fine.
STEPS PRIOR TO PERFORMING:
- Confirm all fuses are fine for the headlights
- Confirm both high beam bulbs are fine (DRL = High beam on half power)
TOOLS NEEDED:
-Ratchet
-Extensions
-8mm Socket
-10mm Socket
-Flat head screwdriver
-Soldering iron ($3.99 from Harbor Freight)
-Solder ($3.50 from Harbor Freight)
I ended up coming across a daytime running light problem that numerous other hondas/acuras had. The running light module up under the dash would develop cracks in the soldering which would cause sporadic issues with the high beams/day time running lights/ day time running light indicator on dash.
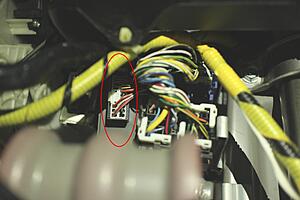
The S2000 running light module is up under the driver side dashboard to the right of the steering wheel (Toward the passenger side). It is most easily noticed by its blue female 14 pin connection.
You can see it in the picture below. To the right is the steering column for reference. The module is held up under the dash by one 8mm bolt. It also has another module that attaches to its mount that has a 10MM bolt. I removed both. To access these use a socket/ratchet/extensions as well as being contorted under the dash while you remove it.
While underneath I also removed the mount for the feet heater ducting. this is just your typical black "Christmas tree" snap. Being able to move that around will help you pull the module out of the dash because it is tight.
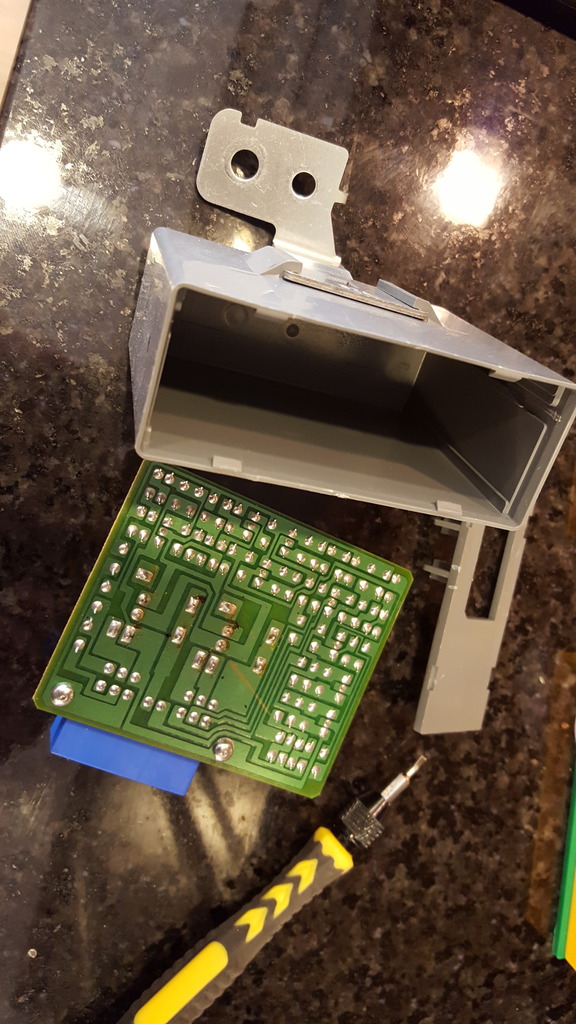
Once out this is what the box looks like.
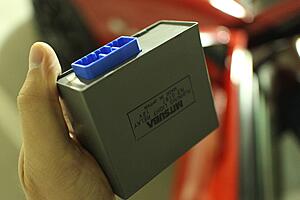
The panel by the blue plug can be pryed out with a flathead screwdriver and you'll be able to slide the board out.
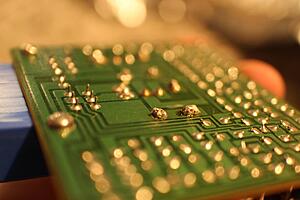
once out, inspect all of the soldering connections and look for cracks or breaks in the material. below is an example of what you should be looking for.
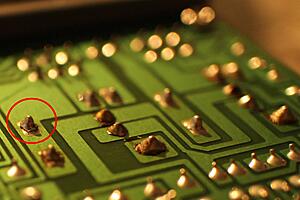
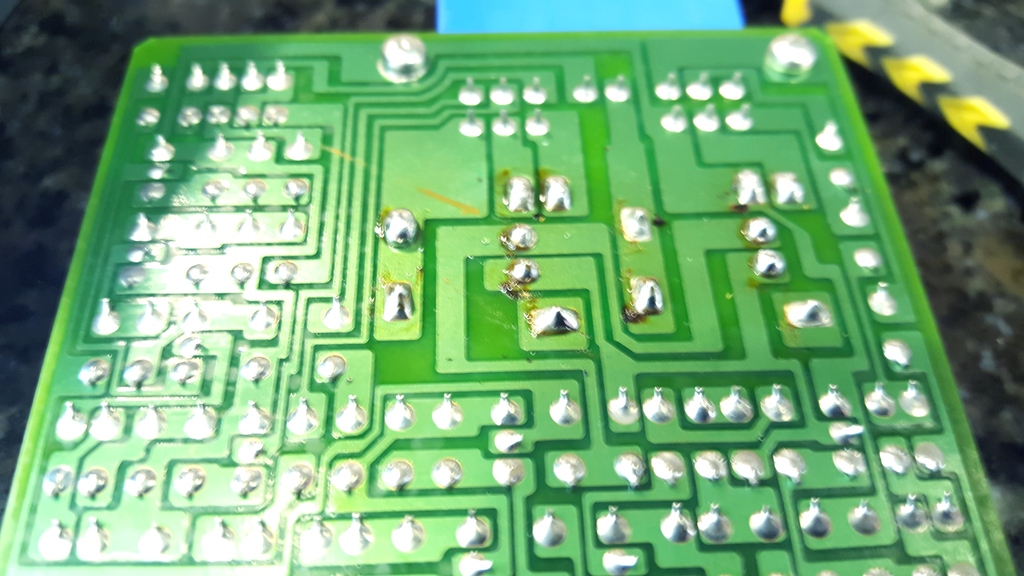
Once you identify all the problem connections get a soldering iron with some solder and go to town. Not the prettiest looking here but like anything with the S2000, Function > Form. You can see the two points I repaired and added a good amount of solder to to prevent this from happening in the future.
Once complete, slide the board back into the box. Before doing all the work of bolting it back in just connect it to the cable and put your car in run position and drop the handbrake lever. Success. the High beam light has a light glow, this is normal when the DRLs are functioning as they are half power of the high beams.


Now contort yourself back into a pretzel and re mount the DRL box back under the dash.
Anyways, I hope this helps future 06+ Day Time Running light people. $7 fix and saves a trip to a mechanic or worse, the dealer.
I have done some research on an issue MY06 S2000 was experiencing and found some help on other sites and wanted to post everything here for the S2000 community. With the 06+ cars getting older I feel like more quirks like this will occur and rather than going to the dealer this is a simple fix you can do yourself.
The 06+ (as well as some of the older NON USA cars) have daytime running lights that usually turn on when you release the parking brake.
Recently when releasing the parking brake I was receiving a "DRL" light on the dash and the running lights were not turning on.

The DRL light would turn off when the headlights were turned on but I noticed that only my passenger side headlight high beam was working. I swapped in new bulbs and bulbs side to side and confirmed that it was not bulb related. I also checked all fuses related to headlights and all worked fine.
STEPS PRIOR TO PERFORMING:
- Confirm all fuses are fine for the headlights
- Confirm both high beam bulbs are fine (DRL = High beam on half power)
TOOLS NEEDED:
-Ratchet
-Extensions
-8mm Socket
-10mm Socket
-Flat head screwdriver
-Soldering iron ($3.99 from Harbor Freight)
-Solder ($3.50 from Harbor Freight)
I ended up coming across a daytime running light problem that numerous other hondas/acuras had. The running light module up under the dash would develop cracks in the soldering which would cause sporadic issues with the high beams/day time running lights/ day time running light indicator on dash.
The S2000 running light module is up under the driver side dashboard to the right of the steering wheel (Toward the passenger side). It is most easily noticed by its blue female 14 pin connection.
You can see it in the picture below. To the right is the steering column for reference. The module is held up under the dash by one 8mm bolt. It also has another module that attaches to its mount that has a 10MM bolt. I removed both. To access these use a socket/ratchet/extensions as well as being contorted under the dash while you remove it.
While underneath I also removed the mount for the feet heater ducting. this is just your typical black "Christmas tree" snap. Being able to move that around will help you pull the module out of the dash because it is tight.

Once out this is what the box looks like.

The panel by the blue plug can be pryed out with a flathead screwdriver and you'll be able to slide the board out.
once out, inspect all of the soldering connections and look for cracks or breaks in the material. below is an example of what you should be looking for.

Once you identify all the problem connections get a soldering iron with some solder and go to town. Not the prettiest looking here but like anything with the S2000, Function > Form. You can see the two points I repaired and added a good amount of solder to to prevent this from happening in the future.

Once complete, slide the board back into the box. Before doing all the work of bolting it back in just connect it to the cable and put your car in run position and drop the handbrake lever. Success. the High beam light has a light glow, this is normal when the DRLs are functioning as they are half power of the high beams.


Now contort yourself back into a pretzel and re mount the DRL box back under the dash.
Anyways, I hope this helps future 06+ Day Time Running light people. $7 fix and saves a trip to a mechanic or worse, the dealer.

The following 4 users liked this post by El S2000:

 11-16-2016, 09:55 PM
#3
Yes the "drl" light should not be on unless a bulb is out or you have an electrical problems such as the op.
mine is on because i pulled the plugs from the bulbs since i luke to be stealth at night when i want to be ☻
mine is on because i pulled the plugs from the bulbs since i luke to be stealth at night when i want to be ☻
11-18-2016, 06:44 AM
#4
Registered User

Thank you, sir! I thought this was wiring-behind-the-light related and was going to troubleshoot this weekend. You saved me a lot of time and effort. I appreciate this write up. 
11-18-2016, 09:31 AM
#5
Registered User
Since Ill be driving down some rural roads tonight taking my daughter to her grandmothers I thought it would be a good time to make use of my highs and decided to go home during lunch to do this. Its quicker than I thought it would be with the hardest part not killing your back getting under that steering wheel and the second would have to be pulling that air duct out of the way. I ended up just giving it a good yank and nothing broke while keeping the plastic push button in tact. I attached some photos to give an idea of what it looks like inside the box. I was afraid of prying on the box to get the top off and damaging the board but you only have to go deep enough to bend the walls of the box to release the top. Thanks again to EI S2000.
Taken out of the box
I resoldered everything under the relays on the other side of the board
Double checked to make sure it works.
Taken out of the box

I resoldered everything under the relays on the other side of the board

Double checked to make sure it works.
 11-18-2016, 01:13 PM
#6
Oh wow I didn't think this DIY would help people so quick to be honest and thought it would get buried until someone ran into this in like a year down the road. Glad its already helping people out  . Good additional pics, I should have taken better ones of what the box looks like opened up but you got it covered
  .
.
. Good additional pics, I should have taken better ones of what the box looks like opened up but you got it covered .
06-02-2017, 01:48 PM
#7
Had the same issue, thanks for the thread.
OK, fixed. PITA to get the module out. Take the seat out, makes life much easier. See the attached pics. It was hard to see the bad joints at first, but if you press on the circuit board, you can clearly see where the joints are broken.
You need a needle nose soldering iron, otherwise it will get too hot. Also, small diameter rosin solder for electronics, not plumbing solder.
If anyone else has this irritating DRL issue, let me know and I'll try to help.
Last edited by hawkman199; 04-08-2019 at 10:54 AM.
Trending Topics
06-03-2017, 11:50 AM
#8
Great DYI El S2000. I also have an '06, but I haven't seen this issue yet. Just a minor comment. Your repaired solder joints look to be "cold". Dull solder is an indicator. It should be shiny when the solder flows correctly. Cold solder joints are brittle and will not adhere to the conductor very well. Hawkman199 has good advice, use the proper soldering iron & solder. Over-heating could cause the PCB to separate. Acid core solder will attack the wiring.
11-13-2018, 04:25 PM
#9

i has a different set of symptoms on my 2006 S2k. My DRL setup seemed to be working fine, but the high beams would take anywhere from maybe 2-30 seconds to turn on when I use the high beam switch. Also, the pull to flash brights generally didn’t work.
Anyway, great advice in this thread on how to fix it. I took the driver seat out, removed the foot heater vent support, and then had to temporarily remove my inline stereo amp and some other non factory wires that were in the way.
I only removed the small 8mm bolt and took both modules out at the same time with a little effort. I should have unplugged the modules before unbolting them I think. It was a little difficult to pull the plugs out when the modules were not bolted to the car.
Got the soldering iron and the small diameter rosin solder at harbor freight. Took about 5 minutes to heat up and resolder the bad contacts. Put it all back together and everything is working perfectly.
Thanks again Matt!
07-28-2019, 04:00 PM
#10
Registered User


Join Date: Nov 2005
Posts: 145
Likes: 0
Received 0 Likes
on
0 Posts
i has a different set of symptoms on my 2006 S2k. My DRL setup seemed to be working fine, but the high beams would take anywhere from maybe 2-30 seconds to turn on when I use the high beam switch. Also, the pull to flash brights generally didn’t work.
Anyway, great advice in this thread on how to fix it. I took the driver seat out, removed the foot heater vent support, and then had to temporarily remove my inline stereo amp and some other non factory wires that were in the way.
I only removed the small 8mm bolt and took both modules out at the same time with a little effort. I should have unplugged the modules before unbolting them I think. It was a little difficult to pull the plugs out when the modules were not bolted to the car.
Got the soldering iron and the small diameter rosin solder at harbor freight. Took about 5 minutes to heat up and resolder the bad contacts. Put it all back together and everything is working perfectly.
Thanks again Matt!
Anyway, great advice in this thread on how to fix it. I took the driver seat out, removed the foot heater vent support, and then had to temporarily remove my inline stereo amp and some other non factory wires that were in the way.
I only removed the small 8mm bolt and took both modules out at the same time with a little effort. I should have unplugged the modules before unbolting them I think. It was a little difficult to pull the plugs out when the modules were not bolted to the car.
Got the soldering iron and the small diameter rosin solder at harbor freight. Took about 5 minutes to heat up and resolder the bad contacts. Put it all back together and everything is working perfectly.
Thanks again Matt!
My soder had problems sticking on but it still worked. Thanks for the post. Now my high beam and running lights works. Before I had no running lights and only 1 high beam.
Last edited by jon604; 07-29-2019 at 05:11 PM. Reason: Update

Thread
Thread Starter
Forum
Replies
Last Post
Orange2k
S2000 Under The Hood
7
02-13-2011 07:35 PM
danny4289
S2000 Under The Hood
6
05-31-2010 10:34 PM

