Subframe Bolts – Have You Checked Yours?
Our member c32b was solving some of his alignment gremlins when he stumbled across some hardly ever broached matters regarding the S2000’s subframe bolt maintenance.
The strangely disappearing range of caster was the first sign, worsening to me only being to manage to eke out 5.25 deg of caster on my race prep alignment. Eyeballing the joints and bushings didn’t give me any hint that they might be worn either. Having a camber setting that was maxed out on one corner while being the minimum on the other only served to continue to leave me stumped.
To heck with it, I thought since I only had less caster than before but still had the camber numbers I wanted. A good driver should be able to drive around that in my mind so I soldiered on for my time attack event. In the end, that I missed first by mere tenths of a second which left me wondering if had I sorted out the issue, might I have taken top honors?
Caster doesn’t seem a big deal to a daily driven ride since a lower caster reading might make the steering lighter and easier to turn. To be perfectly honest, I felt some difference with the lower caster but nothing I thought would be all that significant on the circuit. As I found out rather rudely, things feel different when cornering at 90-100mph. There was no real noticeable response change on braking and on the straights but when I got to the longer higher speed sweepers, that’s when I began to notice a discernible change in the attitude of car. I would turn in with the rear end loaded with throttle to keep it nice and stable. Most of the times for one of the fastest sweepers, I would approach wide and tuck the car in at the end with a slight breath off the throttle to get a wider arc for the following sweeper.
A gentle breathe off the throttle would get the tail to progressively tighten the line and set up my entry. With the reduced caster, suddenly things felt like I was steering “from above the wheels” like a shopping cart would and made the feedback rather vague. Towards the end of the first sweeper, I was just about to tuck the tail in when the tail suddenly inched round, forcing me to get off throttle earlier than I wanted. This limited my time on the throttle thus costing me precious time that might been decisive.
This continued every corner and frustrated me to no end as I felt it lost me grip and time. After the event, I did check out the chassis with two workshops but no one noticed anything bent or worn out. Mike Kang of CounterSpace Garage, who’s been advising me with his excellent knowledge of the S chassis, threw up a couple of ideas in the air and I decided to take a bet on fitting Spoon SubFrame Rigid Collars to attempt to cut the free play in the subframe bolt area.
Here’s a youtube video by Spoon with an overview of the Rigid Collars:
The parts weren’t expensive (about $200 USD which includes collars for front and rear) and labour provided by the Spoon dealer locally, DWA Lubricants, was reasonable. Stephanie of DWA helped me order the parts and within a week had the parts ready for the installation. Jayson, the in-house mechanic of DWA, had done a stint with Spoon in Japan and handled the install for me. He was surprised to see how well my five and a half year old car had weathered the years and pointed out the usual weak points of the S that he’d observed over the years. He told me that the subframe bolts, especially the front ones, tended to need replacement depending on the mileage of the car. This was borne out by service manuals suggesting some form of replacement. Checking the front bolts revealed some of the bolts had become very tough to remove which Jayson did say it was common to have a stuck bolt which could break off. I decided to get new bolts, which were quite inexpensive, so my install of the Spoon Collars would proceed smoothly without interruption should the bolts snap.

Pulling out the bolts carefully, Jayson took pains to try not to break them which would complicate labour significantly. You can see below the flattening of the thread on the upper half of the bolt thread approaching the unthreaded section which caused the tightness of the bolts.

Commenting on how rust-free the bolts were upon extraction, Jayson said generally the undercarriage seemed to be in reasonable shape. Even the commonly known prone to damage suspension arms seemed to be faring fine and Jayson fitted the collars without much further fuss. I took the opportunity to get Jayson to tighten all the subframe bolts since it was known that the bolts might loosen over time up to even a third of their original spec.
Here’s a thread to remind why and how to check the bolts including specs that should be applied to adequately tighten them up. Some of the thread participants also found that their subframe bolts had somehow come loose.
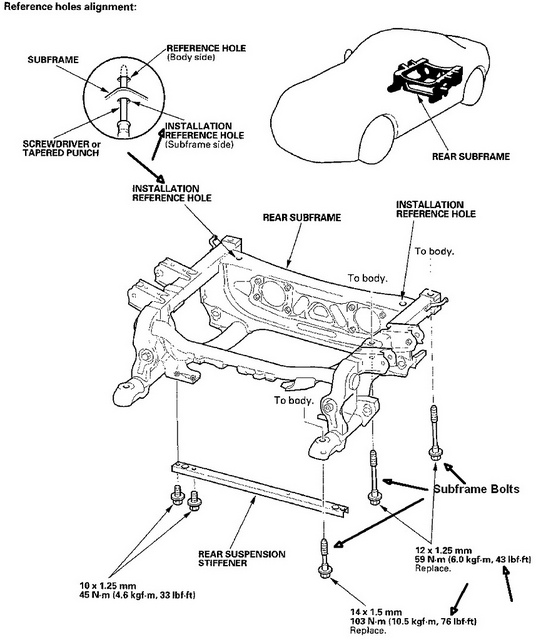
Here are torque specs for the subframe bolts on the front:

Here are torque specs for the subframe bolts on the rear:
I did find some tightening required for the bolts all around and asked Jayson if it was necessary to change out the rear subframe bolts but he said that usually the rear bolts didn’t pose much of an issue. Getting a new alignment was necessary after the installation of the collars and I immediately gained back more than half the caster that I had lost which was proof enough to me that the slack in the subframe bolt gaps was the culprit. Cutting the slack out with the collars did the trick and I had avoided a potentially costly exercise. I had thought the issue was old bushings which would cost me a four-digit figure to replace, chasing a non-existent problem.
Billman250, a member who regularly shares technical and maintenance advice on the forums, commented that he likes the idea of the collars, in that your alignment will be consistent when doing subframe services like a clutch job. The issue with subframe bolts is outside weather makes its way to the front bolts via the open frame rails. He also mentioned that rain and such gets onto the bolt threads above the welded nut-sert which, once it rusts, makes it unable to be properly torqued. The right front tends to have this problem happen most commonly. To properly tighten the bolts, we need to remove them all one at a time, wire wheel the threads, apply anti-seize, and reinstall. By doing this tightening procedure one bolt at a time, you will preserve your current alignment. However, as marcucci adds, it may be ideal if your budget allows to replace the bolt entirely.
Here’s hoping this helps remind all you long term owners of the S to check on this commonly overlooked but critical part of the undercarriage. I can’t say definitely that I felt any difference in the chassis after the collars but it was good to know I had the alignment settings I needed back on the car to keep it driving the way I wanted it to.