Rear Axle Nut TSB - DIY
#1
Registered User

Thread Starter
Even though this topic has been beaten to death and s2000ellier has an excellent DIY Axle Nut TSB, I decided to collaborate with Billman to make another. Here's a summary of the steps and a detailed DIY.
Telescoping 3/4" ratchet
Staking tools, unstaking horizontal, skating vertical
1. Remove Wheel Center Caps
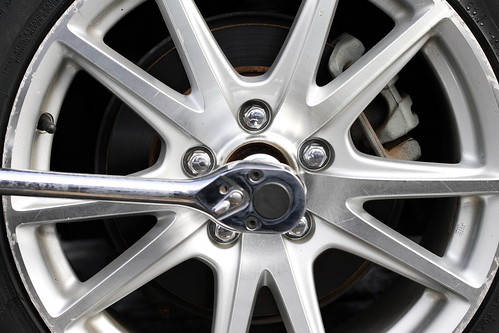
Park the car, apply the emergency brake and leave it in gear. This is easier to do with the car on the ground, than jacked up. Taking care to not scratch them, remove the center caps with trim removal tools or whatever you have availble.
http://www.flickr.com/photos/dwightsghost/6883219855/lightbox/Center cap being removed.
2. Unstake Nut (optional)
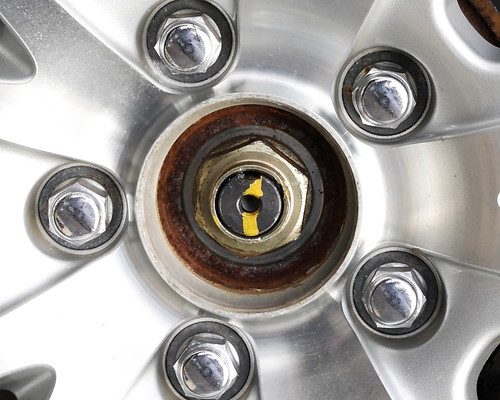
Use the staking tool to unstake the nut. It seems that you can remove the nut without unstaking, but it doesn't take very long to do.
http://www.flickr.com/photos/dwightsghost/6883213103/lightbox/An untouched staked wheel nut from the factory. Notice that the paint line follows from axle to the nut.
3. Remove Nut & Grease Nut face
Remove the nut. You can use an impact wrench for this. Using multipurpose grease, grease the face of the face of the nut only (not the threads).
4. Tighten Nut to Factory Original Position (150-180 ft-lbs)
You can use an impact wrench to do this. This is to help verify that the final tightening is done from the proper starting point. If your axle nuts were still at the torque setting from the factory, this will be the position that you found them in. If the nuts had already been tighened they won't be, and you should have left them alone.
An axle nut re-installed at 180 ft-lbs. Notice that it's slightly past the original position.
5. Tighten Nut approximately 60 degrees
Using the ratchet/breaker bar, you'll be tightening the nut another 60 degrees. One easy way to do this is to set the ratchet slightly above horizontal and then push up until it's almost vertical. Even though Billman makes it look easy, you should make sure you have a lot of leverage and you will have to put some muscle into it.
Starting position for final tightening.
Ending position for final tightening.
Axle nut in its final position.
The corners of the nut should point in the same directions as they when the nut was torqued to 180 ft-lbs
6. Stake Nut
Use the staking tools to stake the nut. The tool should have a rounded edge so you don't cut the nut.
7. Replace Center Cap
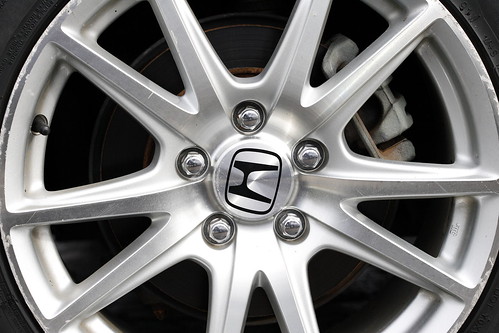
Replace the center cap with the H pointing away from the valve stem.
Installed center cap.
- Remove Wheel Center Caps
- Unstake Nut (optional)
- Remove Nut & Grease Nut face
- Tighten Nut to Original Position (~180 ft-lbs)
- Tighten Nut approximately 60 degrees
- Stake Nut
- Replace Center Cap
- trim removal tool
- multi-purpose grease
- staking tools
- and extension
- or breaker bar (3/4" drive highly recommended)
- depending the length of the ratcher/breaker bar, you may also need a cheater pipe
1. Remove Wheel Center Caps
Park the car, apply the emergency brake and leave it in gear. This is easier to do with the car on the ground, than jacked up. Taking care to not scratch them, remove the center caps with trim removal tools or whatever you have availble.
http://www.flickr.com/photos/dwightsghost/6883219855/lightbox/Center cap being removed.
2. Unstake Nut (optional)
Use the staking tool to unstake the nut. It seems that you can remove the nut without unstaking, but it doesn't take very long to do.
http://www.flickr.com/photos/dwightsghost/6883213103/lightbox/An untouched staked wheel nut from the factory. Notice that the paint line follows from axle to the nut.
3. Remove Nut & Grease Nut face
Remove the nut. You can use an impact wrench for this. Using multipurpose grease, grease the face of the face of the nut only (not the threads).
4. Tighten Nut to Factory Original Position (150-180 ft-lbs)
You can use an impact wrench to do this. This is to help verify that the final tightening is done from the proper starting point. If your axle nuts were still at the torque setting from the factory, this will be the position that you found them in. If the nuts had already been tighened they won't be, and you should have left them alone.
5. Tighten Nut approximately 60 degrees
Using the ratchet/breaker bar, you'll be tightening the nut another 60 degrees. One easy way to do this is to set the ratchet slightly above horizontal and then push up until it's almost vertical. Even though Billman makes it look easy, you should make sure you have a lot of leverage and you will have to put some muscle into it.
The corners of the nut should point in the same directions as they when the nut was torqued to 180 ft-lbs
6. Stake Nut
Use the staking tools to stake the nut. The tool should have a rounded edge so you don't cut the nut.
7. Replace Center Cap
Replace the center cap with the H pointing away from the valve stem.
The following 2 users liked this post by dwight:
keeptrying56 (11-19-2021),
s2k4me2day (07-10-2018)
#2
Registered User

Thread Starter
[SIZE="4"]Purpose[/SIZE]
The axle nut TSB is needed to properly seat the wheel bearing inner races on the rear hub. It also maintains the clamping force of the axle-race-race-hub stack. The factory torque setting is insufficient and allows for the wheel bearing to move on the hub. Tightening the axle nut prevent this motion and prevents wear on the parts.
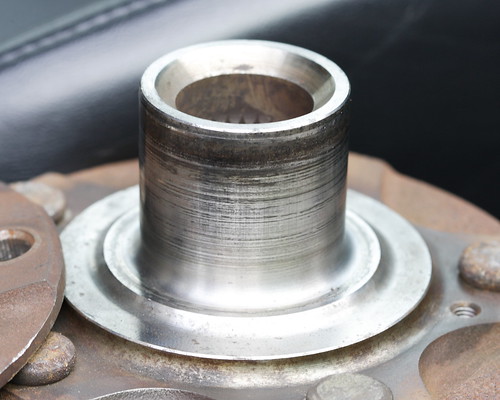
Good used rear hub (1.770" diameter)

Damage used rear hub (1.763" diameter)
[SIZE="4"]Torque Spec[/SIZE]
One of the reasons for this DIY was to establish a torque spec for the axle nut. Unfortunately, it seems that the axle nut needs to be tightened far beyond what we were able to measure as a result we're continuing to recommend the 12 o'clock to 02 o'clock (60-70 degrees) past factory torque. On my car, we ended up moving the nut 68.1 degrees.
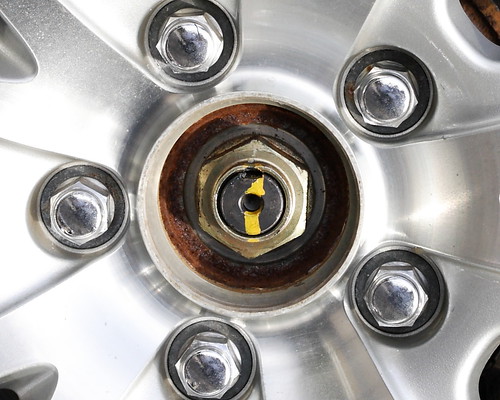
150 ft-lbs, maximum setting on my 1/2" drive torque wrench
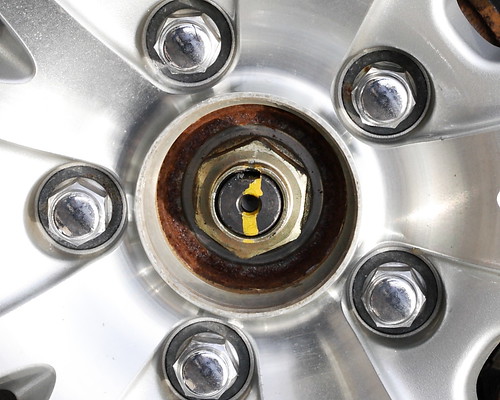
180 ft-lbs, estimated factory torque

250 ft-lbs, maximum setting on Billman's 1/2" drive torque wrench

Graph showing angle from factory position at various torque values
For reference, one website lists the fully lubricated (both threads and face) torque spec for 24mm Class 8.8 (weak graded metric bolt) fastener as 407 ft-lbs.
The axle nut TSB is needed to properly seat the wheel bearing inner races on the rear hub. It also maintains the clamping force of the axle-race-race-hub stack. The factory torque setting is insufficient and allows for the wheel bearing to move on the hub. Tightening the axle nut prevent this motion and prevents wear on the parts.

Good used rear hub (1.770" diameter)

Damage used rear hub (1.763" diameter)
[SIZE="4"]Torque Spec[/SIZE]
One of the reasons for this DIY was to establish a torque spec for the axle nut. Unfortunately, it seems that the axle nut needs to be tightened far beyond what we were able to measure as a result we're continuing to recommend the 12 o'clock to 02 o'clock (60-70 degrees) past factory torque. On my car, we ended up moving the nut 68.1 degrees.

150 ft-lbs, maximum setting on my 1/2" drive torque wrench

180 ft-lbs, estimated factory torque

250 ft-lbs, maximum setting on Billman's 1/2" drive torque wrench

Graph showing angle from factory position at various torque values
For reference, one website lists the fully lubricated (both threads and face) torque spec for 24mm Class 8.8 (weak graded metric bolt) fastener as 407 ft-lbs.
Last edited by Billman250; 11-29-2017 at 01:58 PM.
The following users liked this post:
ynottc (11-22-2019)
#5
Registered User

Thread Starter
It seems like a lot of torque, but Billman has done this to countless cars and continues. So by his experience alone, I trust it.
Back to trying to estimate the torque applied, the ratchet he uses is 40 inches (3.33') long. Even he's pushing 120 lbs on there at the very tip he's only getting 400 ft-lbs, which is still under the 407 ft-lbs for Class 8.8 fasteners.
The axles are likely have a higher yield strength than Class 8.8. The 407 ft-lb number is for fully lubed, thread and face. I'm very comfortable with 60 degree.
Back to your question, how much torque does it take to break axle/hub? I don't know, but if I had to bet whether 500 ft-lbs would break it, I would say 'no'.
#6
wanted to chime in and say i did this, but when i did it i was fortunate enough to have a neighbor that lent me a 600ft lb snap-on diesel mechanics torque wrench. after greasing when my axle nuts got to "2-oclock" i was at about 380-400 ft lbs. since then i have put on about 10k miles with no clicks, and no adverse side effects.
cheers!
cheers!

#7
Moderator


To start off, this is for the REAR of the car only. I know someone will ask  no need to concern yourself with the front hubs.
To answer if 250 is too much....250 is not even remotely close to "too much" when working with a nut this size, or an axle shaft meant to do the job intended...act as a bearing-race clamp.
When turning the 3/4" drive breaker bar after tightening the nut to 180-200 or so, it takes almost no effort at all. You can "feel" that the nut is quite loose at 200 ft-lbs. How is this so? Because 1/2 drive tools, impacts, ANY 1/2" tool just does not have the capacity to pull this nut down properly. Just as you cannot use 1/4" drive to tighten your lug nuts Sounds funny, but it is all facts.
For reference, the little crank pulley bolt gets OILED and torqued to 192 ft-lbs.
It will be very easy to start the big wrench moving. once you get near 60 degrees, you will "feel" that nut get TIGHT. this is where it needs to be.
So my advice to anyone who had torqued there rear axle nuts under 300 ft-lbs is to start over.
I can assure you all at 240 ft-lbs, your wheel bearings and hubs will fail if you do any type of spirited driving.
I'm at 140k on original hubs and wheel bearings. This also includes a car that has done 9 Dragon weekends (500 miles per year of hard twisties, consuming a set of tires in one weekend) drifting, auto X, and track.
Follow DIY with confidence.
 no need to concern yourself with the front hubs.
To answer if 250 is too much....250 is not even remotely close to "too much" when working with a nut this size, or an axle shaft meant to do the job intended...act as a bearing-race clamp.
When turning the 3/4" drive breaker bar after tightening the nut to 180-200 or so, it takes almost no effort at all. You can "feel" that the nut is quite loose at 200 ft-lbs. How is this so? Because 1/2 drive tools, impacts, ANY 1/2" tool just does not have the capacity to pull this nut down properly. Just as you cannot use 1/4" drive to tighten your lug nuts
 Sounds funny, but it is all facts.
For reference, the little crank pulley bolt gets OILED and torqued to 192 ft-lbs.
It will be very easy to start the big wrench moving. once you get near 60 degrees, you will "feel" that nut get TIGHT. this is where it needs to be.
So my advice to anyone who had torqued there rear axle nuts under 300 ft-lbs is to start over.
I can assure you all at 240 ft-lbs, your wheel bearings and hubs will fail if you do any type of spirited driving.
I'm at 140k on original hubs and wheel bearings. This also includes a car that has done 9 Dragon weekends (500 miles per year of hard twisties, consuming a set of tires in one weekend) drifting, auto X, and track.
Follow DIY with confidence.
The following users liked this post:
jonnyrotten (07-04-2021)


