bMa's ssm.ap1 build
 12-15-2015, 08:47 AM
#1
Registered User

Thread Starter
Join Date: Oct 2015
Posts: 118
Likes: 0
Received 0 Likes
on
0 Posts
Hey Guys,
Just wanted to write a post on what I have done and will do to my car to keep you guys (but mostly myself) updated on the build.
Hope you guys like it and I appreciate any feedback that you guys might have.
Instagram @ssm.ap1
Parts included when I purchased the S
---------------------------------------------------------------------
OEM Sidestrake
OEM Trunk Spoiler
Parts, Services, and Modifications after I purchased the S
---------------------------------------------------------------------
Dome Light, Trunk Light, and License Plate Light changed to LED (local LED shop)--10/04/2015
Pioneer Bluetooh Headunit purchased and installed--10/07/2015
3M wrapped center console headunit housing in brushed titanium--10/10/2015
OEM Clutch, Master and Slave Cylinder replaced--10/15/2015
OEM AP1 wheels painted gloss black--12/01/2015
Polyurethane lip purchased off ebay, mounted and painted--01/29/2016
Head re-machined, Motul engine oil, Redline transmission fluid, OEM differential fluid, new battery, repainted valve cover, CR side markers--03/01/2016
Parts, Services, and Modifications in the future
---------------------------------------------------------------------
Engine rebuild... see below for why...
K&N FIPK Short Ram intake (Because it rains way too much in Vancouver)
Invidia Q300 or Tanabe Medalion Touring (Still debating)
Test Pipe.......?
Moddiction Sway Bar
Advan RSII
S2000 Blue tinted Side Convex Mirrors
Zoom Engineering Monaco Rear View Mirror-Silver Carbon
New Robbins Top and/or Mugen Style Hardtop with Carbon Sides
Rick's Leather Console Cover with Perforated Black Leather and Silver Stitching
Leather Visor Covers in Silver
LED Dashboard in White and also Climate Switches in White LED Backlit
White Side Markers with White LED
04 Center Console
Maybe Front and Rear bumper AP2 conversion with
Clear Headlight Diffusers (Still haven't received a PM)
HKS Hipermax IV
Mods currently still debating on
---------------------------------------------------------------------
FI or keep NA?
Brakes?
Over Fenders for Wider Tires?
3M Wrap Matte White/Plasti Dip?
AP2 Rear Tailights Conversation?
 12-15-2015, 08:49 AM
#2
Registered User
Thread Starter
Join Date: Oct 2015
Posts: 118
Likes: 0
Received 0 Likes
on
0 Posts
This is a repost of my intial topic on the Introduction page.
Hey guys,
I recently purchased an s2000 and would like to share my experience with all of you!
Back in September, I was in the market for a new car as I have recently returned to Canada from being in Hong Kong for over years. Unfortunately, I love so many different model cars that I had no idea which one to purchase. What i did know, is that I did not want another black car (already owned a Black MY04 Accord Coupe I4) and that it would be used. During that time, I was hanging out with one of my friends who owned a MY09 Mercedes Benz C350 fully loaded and I loved it. Off I went looking through dealers and Craigslist for a decent priced Benz with low mileage. Low and behold, I didn't have much luck but there was still a few that was just alittle over my budget.
One night, a few days before I was gonna bite the bullet and go to a dealership to purchase a Iridium Silver Metallic C350, I was having bubble tea (you know, that asian drink with the tapioca pearls in it) with my old high school friend (MaceWindu on s2ki forums)and he was talking about how he did something crazy that day. He put a deposit on a MY06 Sebring Silver AP2 with 40k miles. This was a big deal because as far as I could remember, we have both dream about owning this car from when we were still 14 years old going to band class. (Yes, we were those guys. XD) And just like that, monkey see monkey do, I was no longer in the market for a C350 and in the market for my own s2k.
At the beginning of October, I came across a stock MY00 Silverstone Metallic AP1 on Craigslist with 63k miles for a great price. The posting did list that there was some body work required and there was a tear on the soft top. Me and MaceWindu went to go look at the car and all VIN stickers was intact except for the rear bumper. Carfax did say that there was a minor rear collision that resulted in the replacement of the rear bumper. This wasn't a big issue for me as I don't really plan on selling the car in the foreseeable future anyways. The body damage was relatively minor (one dent on left rear quarter panel and some hairline scratches on the body) and the cracked in the soft top was due to opening it on a cold day (plastic rear window cracked).
I slept on the offer and finally came to the conclusion that I do not mind having a low initial cost and investing alittle more into the s2k over time to get it to mint condition. A few days later, I closed with the private buyer and became the proud owner of a MY00 Silverstone Metallic AP1.
Attachment 175390
Parked in my driveway after first drive home.
Parked in front of my girlfriends house waiting for her to be ready.... as always
Attachment 175392
Met up with MaceWindu at his parking lot. (my MY00 Silverstone Metallic AP1 beside his MY06 Sebring Silver AP2)
Attachment 175393
Went to go take some amateur photos at our local mall
Attachment 175394
#TopDownLife
Attachment 175395
MaceWindu's AP2 came with CR radio door and he had a spare AP2 door that he gave to me. Installed
Attachment 175396
Bought some 3m vehicle wrap and matched the color of the housing to the door
The clutch, master and slave cylinder has since been replaced after I got the car. Also, a bluetooth Pioneer deck was installed in it as well (can't recall what model right now). Lots more planned on the car but they are mostly going to be clean mods. I am looking to drop the car on lowering springs, rpf1's and get a Q300 installed once spring rolls around.
Thanks for everyone who took the time to actually read this and I look forward to contributing lots to this forum (also milking information dry from it as well).
tl;dr: wanted benz, didn't buy benz, got s2k, less vroom, more BYAHHHHH, no ragret
12-15-2015, 10:17 AM
#3
Registered User
Thread Starter
Join Date: Oct 2015
Posts: 118
Likes: 0
Received 0 Likes
on
0 Posts
Hey Guys,
I was recently researching on what DIY's I can do to my car and came across this post. This gave me an idea. I was constantly trying to decide what mod I want to do first because I am on a limited budget. I wanted to put some Swift Spec-R on (because I've gotten so used to low cars that even the s2000 seems high at stock height), but I was never a fan of a lowered car on stock rims. I thought by painting my rims, I could allocate some of the money I would've used to get RPF1's towards the springs and exhaust. Another reason why I did it was because the stock ap1 rims that came with the S was a little scratched up from the previous owner and it was getting on my OCD nerves.
Attachment 175374
All those ugly scratches
For the most part, I followed the guide on the original forum post at clubwrx.net.
This is the materials that I used for my 16 inch rims:
1 Can of Dupli-color Primer Sealer
3 Cans of VHT Engine Metallic Black Pearl Paint
1 of Dupli-color Wheel Gloss Clear Coat
4 Sheets of 3M Wet or Dry 600 Grit Sandpaper
4 Sheets of 3M Wet or Dry 1000 Grit Sandpaper
250 Count of 3' X 6' Index Cards
Tape (Painter's tape would be best)
Mask
Spray Bottle
Paper Towels (Bounty or whatever is available)
Clean Cloths
Newspaper or Canvas
1 Buddy to Help You Out (Cause Sanding Sucks)
-----------------------------------------------------
Let's get started!
Attachment 175375
***You can definitely do all 4 rims at the same time but because I only had two jack stands... I spent almost twice as long doing mine because I had to do a pair at a time.***
--------------------------------------------------------------------------------------------------------------------------------------------------------------------------------
#1
I sprayed my stock rims with some heavy duty rim cleaner because the weather has been terrible as of late and I have not washed my car in weeks. Then, I took a spray bottle mixed with 1/5 dish soap to water ratio and wiped it down with the paper towels to cut out any grease or dirt I may have missed. Rinsed throughly with a spray bottle with only water. Punch out the center caps and time to get started!
Rims all clean and degreased
--------------------------------------------------------------------------------------------------------------------------------------------------------------------------------
#2
Let the sanding begin! Start with the 600 grit and make sure you hit every outer facing surface of the rim. This is a wet sand so please make sure that you are liberal with the water spray bottle and keep both the surface of the rim and the sandpaper wet at all times. The water will turn milky but thats just the clear coat being taken off. Once the water isn't milky anymore when you are sanding, you can move onto the 1000 grit to prime the surface for.... well the primer.. haha.
Attachment 175377
A trusty friend to help you sand while you are taking pictures instead
--------------------------------------------------------------------------------------------------------------------------------------------------------------------------------
#3
Once the surface of the rims are evenly sanded, rinse the rim clean with water and wipe dry with cloths. Lay down the newspaper or canvas and place the rims on top to protect the floor. Leave the rims for a while so that the water dries from the creases as well (in between the edge of the rim and tire). ***If you don't have time to wait, you can use the edges of the Index Card and drag it along the crevice to soak up the moisture.*** Once its dry, place index cards in the crease and surround the rim. This will keep the primer, paint, and clear coat from hitting your tires. Remove the cap from the valve stem and tape up the stem to protect it from the paints.
Attachment 175378
Make sure there are no gaps in between the index cards or else it will get your tires dirty
--------------------------------------------------------------------------------------------------------------------------------------------------------------------------------
#4
Let the painting being. Make sure that before starting, shake the can vigorously for about a minute to make sure the primer comes out evenly. Spray evenly in short controlled bursts and don't worry if you miss a spot. You'll get it on the next coat.
1st light coat of primer
*wait 15 minutes*
2nd light coat of primer
*wait 15 minutes*
3rd medium coat of primer
*wait 20-25 minutes*
Attachment 175379
After final coat of primer
--------------------------------------------------------------------------------------------------------------------------------------------------------------------------------
#5
Once the primer has dried, exactly the same procedure with the paint. Shake well and spray in short controlled bursts never staying in the same spot for more than a moment. When I was spray, I realized that you have to hold the paint a little further away compared to the primer. Start with very very light coats and slowly work your way up to medium coat. If you start too heavily, the paint will run and pool.
1st very light coat of paint
*wait 10 minutes*
2nd light coat of paint
*wait 15 minutes*
3rd light coat of paint
*wait 15 minutes*
4rd medium coat of paint
*wait 25-30 minutes*
Attachment 175380
Gloss black comes out a little brown when it's only the first light coat.
Attachment 175381
3 coats completed.
Attachment 175382
4th coat completed and dried
--------------------------------------------------------------------------------------------------------------------------------------------------------------------------------
#6
Rinse and repeat for the clear coat. You can be more liberal with the clear coat and just make sure that it doesn't pool. The clear coat goes on hazy and will end up clear after it dries.
1st light/medium coat of clear
*wait 15 minutes*
2nd light/medium coat of clear
*wait 15 minutes*
3rd medium/heavy coat of clear
*wait 2 hours before mounting to allow most of the drying to be complete*
Attachment 175383
1st coat of clear applied.
Attachment 175384
Index cards can be removed after the final coat of clear.
--------------------------------------------------------------------------------------------------------------------------------------------------------------------------------
#7
That's it! DONE! I recommend waiting atleast 12 hours before driving to ensure the paint has fully cured but you can go ahead and mount the rims back on ***lift the tire, not the rim when you are mounting. Paint will still be alittle wet after 2 hours and you might leave a mark***
Attachment 175374
Before, scratched and OEM color.
Attachment 175385
After, Gloss Black with the center caps kept silver.
Attachment 175386
After, mounted after 2 hours of clear coat drying.
Attachment 175387
Rears completed before starting on the fronts.
Attachment 175388
Front two rims completed as well and mounted on.
Attachment 175389
That wheel gap will hopefully be gone soon
12-15-2015, 12:03 PM
#5
Registered User
Thread Starter
Join Date: Oct 2015
Posts: 118
Likes: 0
Received 0 Likes
on
0 Posts
On December the 8th, my CEL suddenly came on so I took it to my friend that works at a garage to figure out what code caused it to go off.
The code that showed was that Cylinder 1 has misfired and that is never a good sign. Upon asking some fellow member of s2ki group here in Vancouver, I took it to David at Evo Garage and he ran a diagnostic for me to figure out what the issue is.
Long story short, it appears that Cylinder 1 compression is a lot lower than the other 3 and it's causing a loss in power and damaging the engine. The engine needs to be removed from the chassis to see exactly what needs to be changed/upgraded to ap2/machined and also how extent the damage is.
Because I've always had the worst of luck, this happened right during Christmas time and no shop is able to take on the job until January. With this car being my DD, I'm pretty upset about the whole situation. Butttttt, what can you do.
Still driving the car at the moment but I always let the car idle for 5 minutes before driving and not going over 3k because don't want to stress the engine.
Instead of just fixing what is wrong, I am thinking of just paying for a shop to do a full engine rebuild and upgrade the interchangeable parts to AP2 so that I most likely won't have to worry about mechanical issues again for the foreseeable future. Still struggling because this will set me back a few thousand dollars but I will also have a peace of mind.
I guess I'll have some time to think about it because no one can take the job until the new years anyways.
12-15-2015, 12:28 PM
#6
Registered User

Join Date: Jul 2014
Location: Fort Walton Beach, FL
Posts: 2,629
Likes: 0
Received 53 Likes
on
42 Posts
On December the 8th, my CEL suddenly came on so I took it to my friend that works at a garage to figure out what code caused it to go off.
The code that showed was that Cylinder 1 has misfired and that is never a good sign. Upon asking some fellow member of s2ki group here in Vancouver, I took it to David at Evo Garage and he ran a diagnostic for me to figure out what the issue is.
Long story short, it appears that Cylinder 1 compression is a lot lower than the other 3 and it's causing a loss in power and damaging the engine. The engine needs to be removed from the chassis to see exactly what needs to be changed/upgraded to ap2/machined and also how extent the damage is.
12-15-2015, 12:48 PM
#7
Registered User
Thread Starter
Join Date: Oct 2015
Posts: 118
Likes: 0
Received 0 Likes
on
0 Posts
Originally Posted by bMa912' timestamp='1450213383' post='23828838
On December the 8th, my CEL suddenly came on so I took it to my friend that works at a garage to figure out what code caused it to go off.
The code that showed was that Cylinder 1 has misfired and that is never a good sign. Upon asking some fellow member of s2ki group here in Vancouver, I took it to David at Evo Garage and he ran a diagnostic for me to figure out what the issue is.
Long story short, it appears that Cylinder 1 compression is a lot lower than the other 3 and it's causing a loss in power and damaging the engine. The engine needs to be removed from the chassis to see exactly what needs to be changed/upgraded to ap2/machined and also how extent the damage is.
The code that showed was that Cylinder 1 has misfired and that is never a good sign. Upon asking some fellow member of s2ki group here in Vancouver, I took it to David at Evo Garage and he ran a diagnostic for me to figure out what the issue is.
Long story short, it appears that Cylinder 1 compression is a lot lower than the other 3 and it's causing a loss in power and damaging the engine. The engine needs to be removed from the chassis to see exactly what needs to be changed/upgraded to ap2/machined and also how extent the damage is.
Trending Topics
12-15-2015, 02:28 PM
#8
Registered User
Thread Starter
Join Date: Oct 2015
Posts: 118
Likes: 0
Received 0 Likes
on
0 Posts
Last Saturday, me and my friend Chris (Mace Windu) met up to go and pick up some detailing products from our local automotive store. Ended up heading back to my house and testing the products even though it was pouring rain and my neighbors were looking at us like we were crazy.
Purchased some:
Meguiar's Ultimate Compound
Meguair's Ultimate Polish
Meguair's Ultimate Quik Wax
Simoniz Polishing Pads
Lots of Microfiber Clothes
I never fully detailed my car since I got it so wanted to test the product out. As it was pouring rain, I washed the car and the hid in my garage to test on a small scratch that I found. Buffed out quite nicely but takes time and patience. Did it all by hand but will most likely us a DA buffer for the compound part when I do my whole car. Compound takes forever to buff out.
Chris installed his BlackVue dashcam. He thought it was the Wifi model and spent over 30 minutes trying to connect it to his phone through the app. Then a quick google search indicated that it is not the wifi model.
After all was said and done, we took some amateur pictures with my Samsung Note 5. I will be looking to purchase a DSLR in the future but in the meantime, ENJOY TERRIBLE PHOTOS WITH NO EDIT AND NO FILTERS!
At local automotive store in the pouring rain
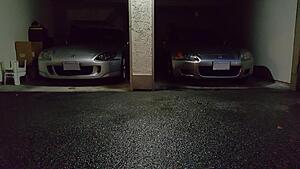
The Dream Garage. Ap1 + Ap2
Goodnight
Funtime is over

Nicest photo I have ever taken with just my phone
Purchased some:
Meguiar's Ultimate Compound
Meguair's Ultimate Polish
Meguair's Ultimate Quik Wax
Simoniz Polishing Pads
Lots of Microfiber Clothes
I never fully detailed my car since I got it so wanted to test the product out. As it was pouring rain, I washed the car and the hid in my garage to test on a small scratch that I found. Buffed out quite nicely but takes time and patience. Did it all by hand but will most likely us a DA buffer for the compound part when I do my whole car. Compound takes forever to buff out.
Chris installed his BlackVue dashcam. He thought it was the Wifi model and spent over 30 minutes trying to connect it to his phone through the app. Then a quick google search indicated that it is not the wifi model.
After all was said and done, we took some amateur pictures with my Samsung Note 5. I will be looking to purchase a DSLR in the future but in the meantime, ENJOY TERRIBLE PHOTOS WITH NO EDIT AND NO FILTERS!

At local automotive store in the pouring rain

The Dream Garage. Ap1 + Ap2

Goodnight

Funtime is over
Nicest photo I have ever taken with just my phone
12-23-2015, 08:32 PM
#9
Registered User
Thread Starter
Join Date: Oct 2015
Posts: 118
Likes: 0
Received 0 Likes
on
0 Posts
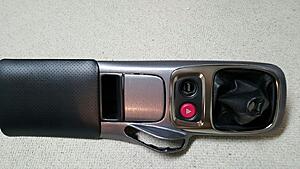
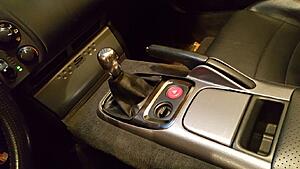
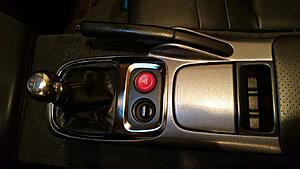
So I had a day off today and decided to make the interior of my car look alittle more modern.
I am going to be purchasing Rick's leather console cover and probably an AP2 conversion sometime in the future but since the price of it is so high right now and I cant found someone parting our their s2k, I modified my AP1 console alittle bit.
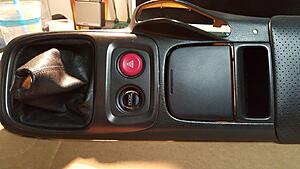
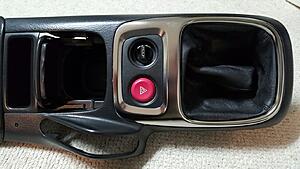
Found on the forums that you can use nail polish remover with acetone to take off the cheap looking black paint around the shift boot. Took off the paint and a sparkly metal appears. Then I proceeded to wrap the rest of the console in 3m Brushed Titanium wrap. I quite like the results and makes the center console look alot more updated.
How it was stock/OEM
Nail polish used to remove dated black paint
Wrapped with 3M Brushed Titanium
Installed back into the car
Top view after installation
May decide to re-wrap later on with 3M Carbon Fibre Anthracite cause I really like that silver carbon fibre look.
I am going to be purchasing Rick's leather console cover and probably an AP2 conversion sometime in the future but since the price of it is so high right now and I cant found someone parting our their s2k, I modified my AP1 console alittle bit.
Found on the forums that you can use nail polish remover with acetone to take off the cheap looking black paint around the shift boot. Took off the paint and a sparkly metal appears. Then I proceeded to wrap the rest of the console in 3m Brushed Titanium wrap. I quite like the results and makes the center console look alot more updated.

How it was stock/OEM

Nail polish used to remove dated black paint

Wrapped with 3M Brushed Titanium

Installed back into the car

Top view after installation
May decide to re-wrap later on with 3M Carbon Fibre Anthracite cause I really like that silver carbon fibre look.
01-29-2016, 09:53 AM
#10
Registered User
Thread Starter
Join Date: Oct 2015
Posts: 118
Likes: 0
Received 0 Likes
on
0 Posts
Decided to post a little update of what is happening.
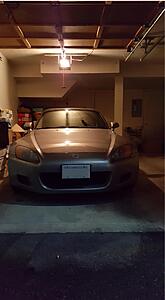
My car went into the shop on January 21st to get my cylinder 1 compression issue resolved. The parts will be picked up from a Honda dealership in Washington today as the wait time for the parts locally in Canada is back ordered till April..... Should expect the car back sometime next week after the parts are dropped off at the shop tomorrow but currently, my car looks like this.
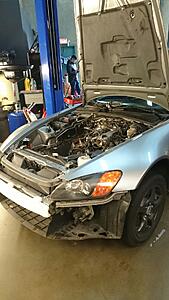
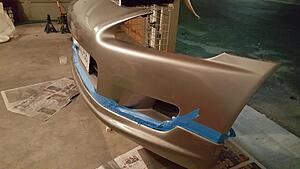
In the meantime, my mechanic assisted me in pulling off my bumper so that I can get some work done on it. I recently ordered a polyurethane lip from ebay and although it was already painted and mounted once, the fitment and paint wasn't as good as I wanted it to be so I decided to redo it. I was originally going to just put the bumper plugs (which I have actually purchased) when I relocated my license plate. But after I took off the license bracket, I found this....
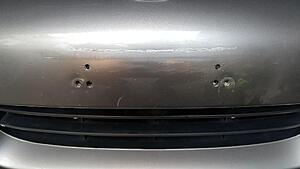
No idea what the heck happened when the previous owner had this car but I have never seen 6 license plate holes before. Bumper looks like its been to hell and back. This needed a bigger fix, and not just with a license plug.
Puddy went on after the bumper was cleaned and badge removed
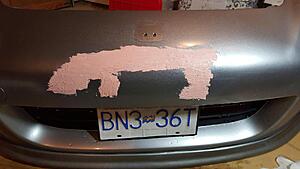
Sanded it smooth the best I could
The bigger picture from far away
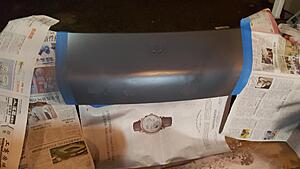
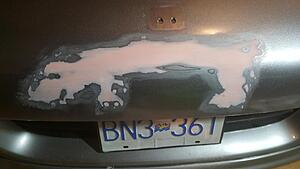
3 coats of primer, wet sanded with 600 grit, 2-3 coats primer again
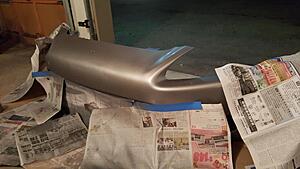
Rattle canned with OEM Silverstone Metallic I got from a local paint shop
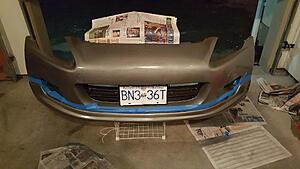
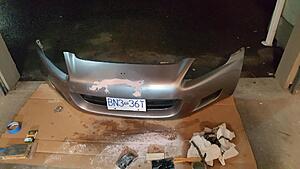
The lip went through the exact same process off the bumper and this is the fitment during the clear coat stage
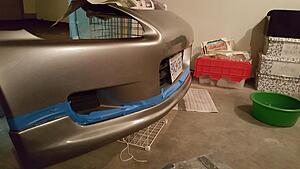
I think for the most part, it turned out quite well. It's definitely not autobody shop quality. I did this in my garage bit by bit every day with just some puddy, sandpaper, and primer, paint, clear coat rattle cans. If I ever wanted this car in showroom condition, I would have to sent it to get repainted again but for the meantime, I'm happy. This little project kept me from going crazy while my car was in the shop.
Only thing left to do now is to wet sand the clear coat with 2000+ grit then compound, polish, wax.
My car went into the shop on January 21st to get my cylinder 1 compression issue resolved. The parts will be picked up from a Honda dealership in Washington today as the wait time for the parts locally in Canada is back ordered till April..... Should expect the car back sometime next week after the parts are dropped off at the shop tomorrow but currently, my car looks like this.

In the meantime, my mechanic assisted me in pulling off my bumper so that I can get some work done on it. I recently ordered a polyurethane lip from ebay and although it was already painted and mounted once, the fitment and paint wasn't as good as I wanted it to be so I decided to redo it. I was originally going to just put the bumper plugs (which I have actually purchased) when I relocated my license plate. But after I took off the license bracket, I found this....

No idea what the heck happened when the previous owner had this car but I have never seen 6 license plate holes before. Bumper looks like its been to hell and back. This needed a bigger fix, and not just with a license plug.

Puddy went on after the bumper was cleaned and badge removed

Sanded it smooth the best I could

The bigger picture from far away

3 coats of primer, wet sanded with 600 grit, 2-3 coats primer again

Rattle canned with OEM Silverstone Metallic I got from a local paint shop

The lip went through the exact same process off the bumper and this is the fitment during the clear coat stage


I think for the most part, it turned out quite well. It's definitely not autobody shop quality. I did this in my garage bit by bit every day with just some puddy, sandpaper, and primer, paint, clear coat rattle cans. If I ever wanted this car in showroom condition, I would have to sent it to get repainted again but for the meantime, I'm happy. This little project kept me from going crazy while my car was in the shop.
Only thing left to do now is to wet sand the clear coat with 2000+ grit then compound, polish, wax.