Feezy's Build Thread - 2002 New Formula Red
 04-25-2018, 12:34 PM
#461
Site Moderator


 04-25-2018, 12:36 PM
#462
Moderator


Do it, but not until its ready and I fly out for photos!! 
11-09-2018, 08:28 AM
#463
Moderator

Thread Starter
It's been a while since I've made an update so we've got a lot to go through. I have made next to no progress on the ITBs. The goal was to get the cars suspension dialed in before I pulled the car apart again for the ITB install. Unfortunately that has taken longer than anticipated.
12.15.2016 - Tanabe Precedeo Refinishing
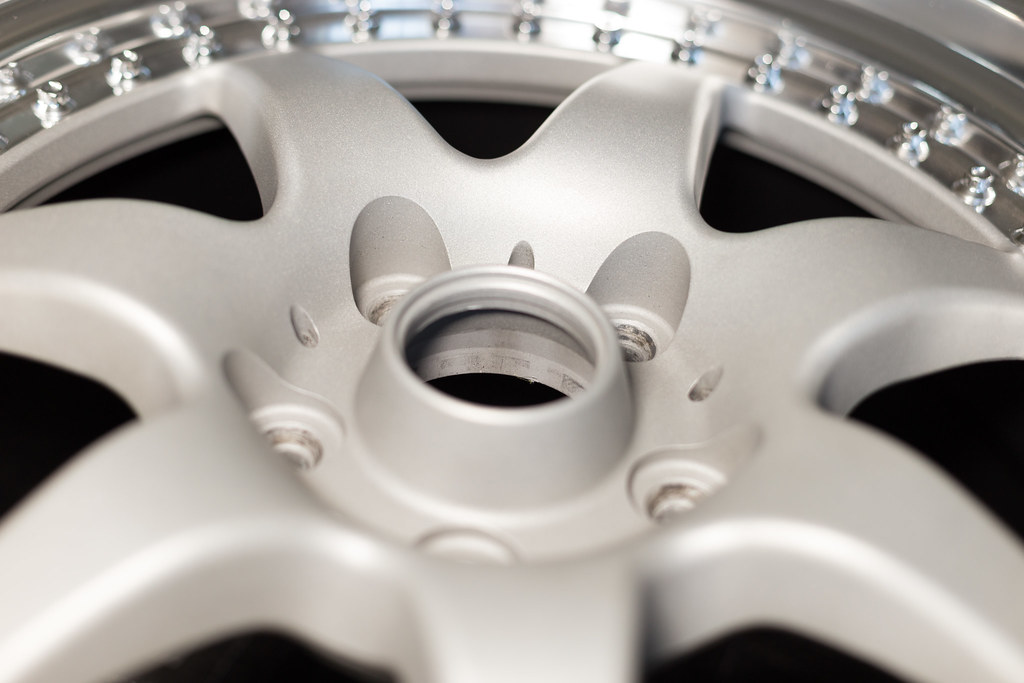
At the end of 2016 I started refinishing my Precedeos. I wanted them as fresh and as new as possible. I ended up getting my hands on an old set of RS3's off of my Regamasters and was able to see what the 225/255 RS3 looked like on the wheel, and then on the car itself. I was reasonably happy with the the look so I had everything dismounted and then went out and found someone to refinish the wheels.
I ended up finding a place locally that seemed competent enough, and got them started on the refinishing. I wanted to keep the matte silver faces, polish the lips, and do the inner barrels gloss black so they would be easy to maintain. Hardware was to be replaced if needed, or restored if it still looked good. The goal was to get them in as new as possible condition. This ended up being a bit more troublesome than I had initially anticipated.
We disassembled the wheels, split the faces and barrels and sent everything off. The powder coater was able to find a silver that was very close to what I wanted. I would have preferred something a shade or two brighter but it's very very close to what I was after. The initial plan was for them to find a couple of silver colors and give me some test shots, but that didn't end up happening. I followed up one day asking what the status of the faces was and got a few pictures back of them completely finished. Thankfully the color was very close to what I had asked for. It's just a little bit frustrating to be told one thing and have a completely different thing happen. The barrels were also coated at the same time in a nice satin black color. I am however very happy with the quality of the work. The powder coater did an excellent job.
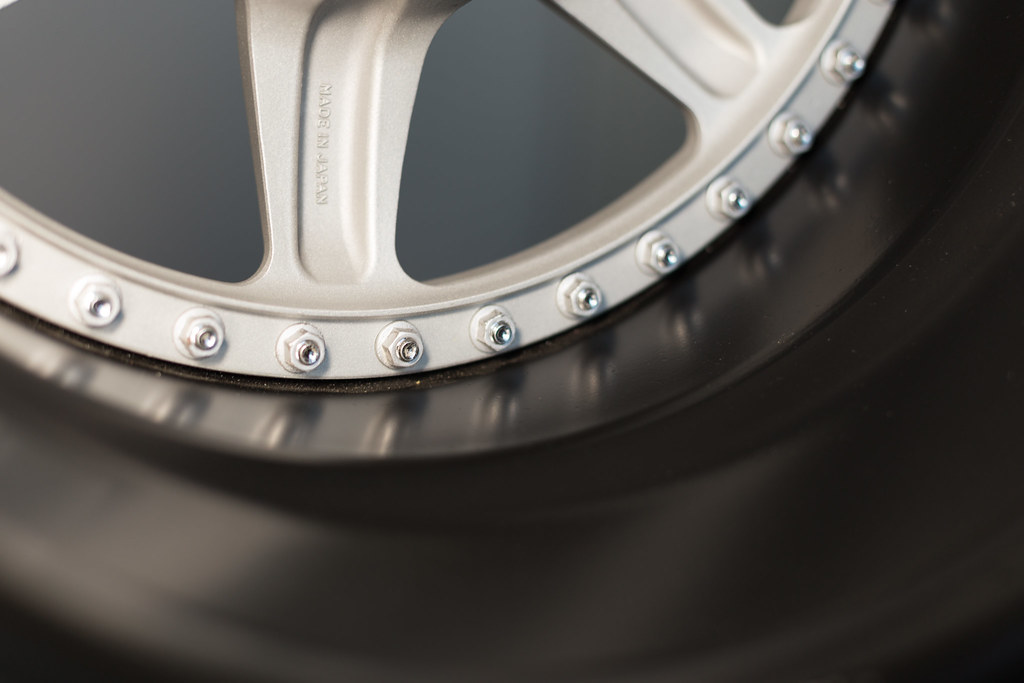
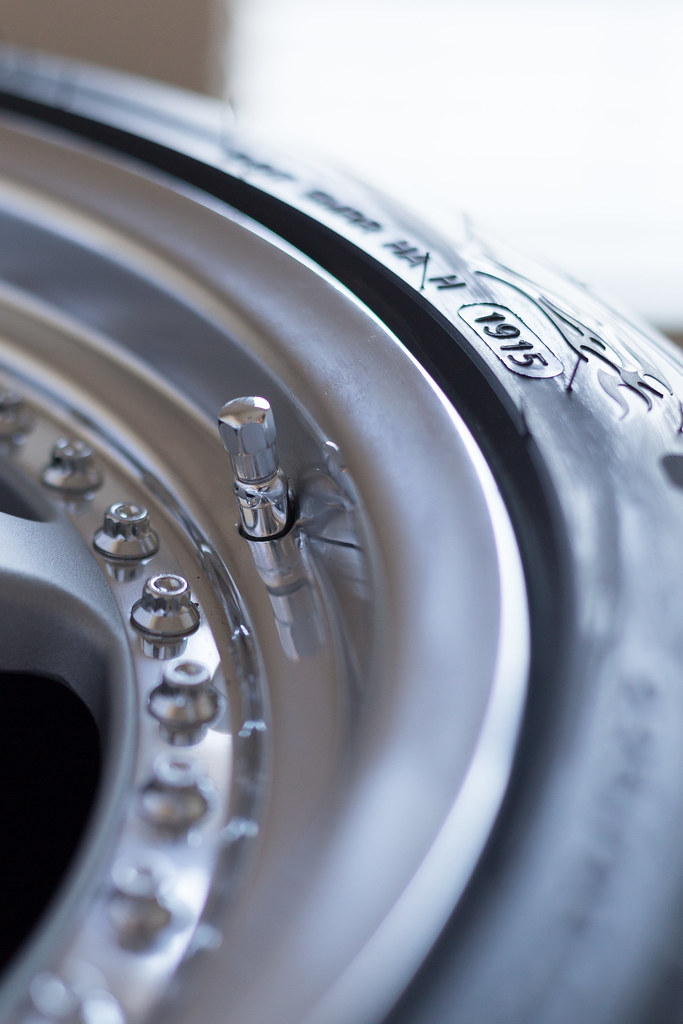
Next we had the lips, they were sent off for polishing. Polishing itself took a bit longer than quoted but everything came out great. We ran into a problem when it came time to source new valve stems. The valve stems that were on the wheels were modified and secured on in such a way that if I had known how they were set up I wouldn't have been driving on the wheels. It was very obviously not supposed to be like that so I started looking for an alternative. The valve stem hole had been enlarged to fit the current stem, and the top most portion of them were ground down to be able to fit in the area that they needed to sit. The seals didn't sit right, and honestly it was such a poorly done job. I needed to find a new valve stem that would fit securely through the hole and that had seals that could fit into the recesses. The shop had some generic valve stem that seemed to do the job, but they only came in an anodized black finish. We went back and forth for a bit and the shop wanted to just install the black ones that he had and be done with it. The owner kept saying that it would look fine and wouldn't be that noticeable. It was at that point that I decided to come and collect the wheels and finish them myself. I had the shop assemble the lips, faces, and barrels and once that was done I was going to pick them up and work on finding a solution to for the value stems.
I ordered several different styles of valve stems from a few different companies to test fitments with. What I ended up finding was a set of 949 racing value stems that seemed to do the trick. They fit, they were the correct height, and I was happy with their general shape. They have a seal under the bottom of the stem and then a big seal that gets sandwiched in from the back. This worked perfectly. The only issues that I had was the shape of the hex sleeve and the fact that they don't offer them in a polished finish. I ordered a set in an anodized silver to see if I could modify them in a way that would make me happy. I wasn't happy with the hex pattern on the outer collar and I wanted to polish the stems themselves so they matched the lips. I ended up creating a tool out of one of the old valve stems, a drill bit attachment, some 5 minute epoxy, a few zip ties, and some tape. I was able to thread the 949 sleeve onto the tool and then insert the other end into an electric drill. From there I spent the next five to six hours over a sink with various grits of sandpaper. I have to say these collars came out way better than I expected. I was able to round the hex collar, and they polished out nicely. Next I started on polishing the caps. They took a bit more work as I didn't want to round them off as much. These were done by hand against a flat surface so that I could retain the majority of their shape.
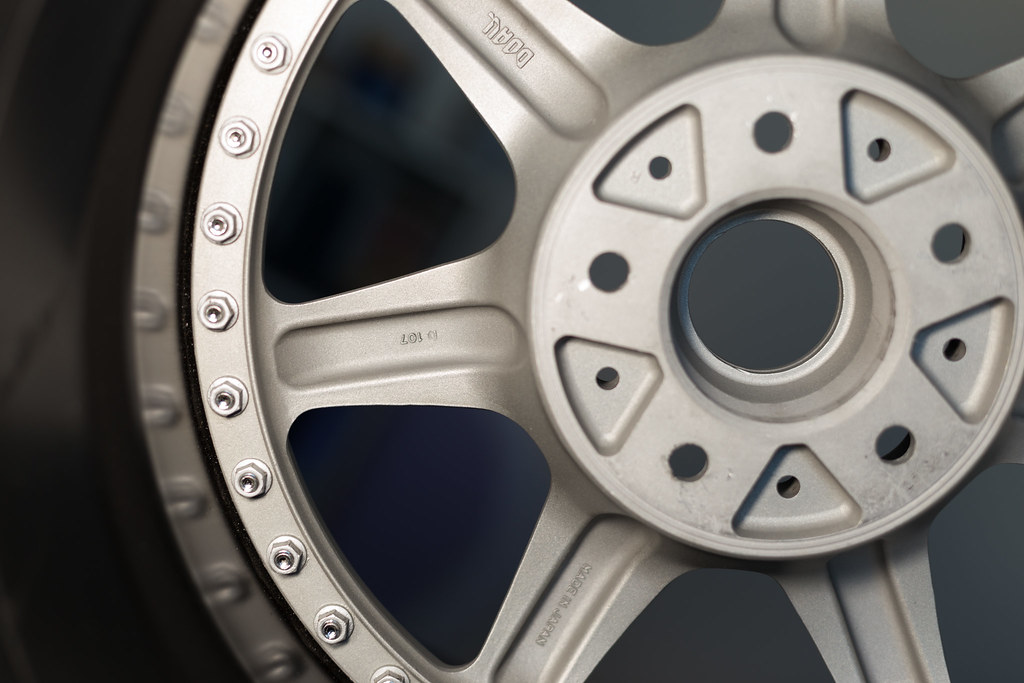
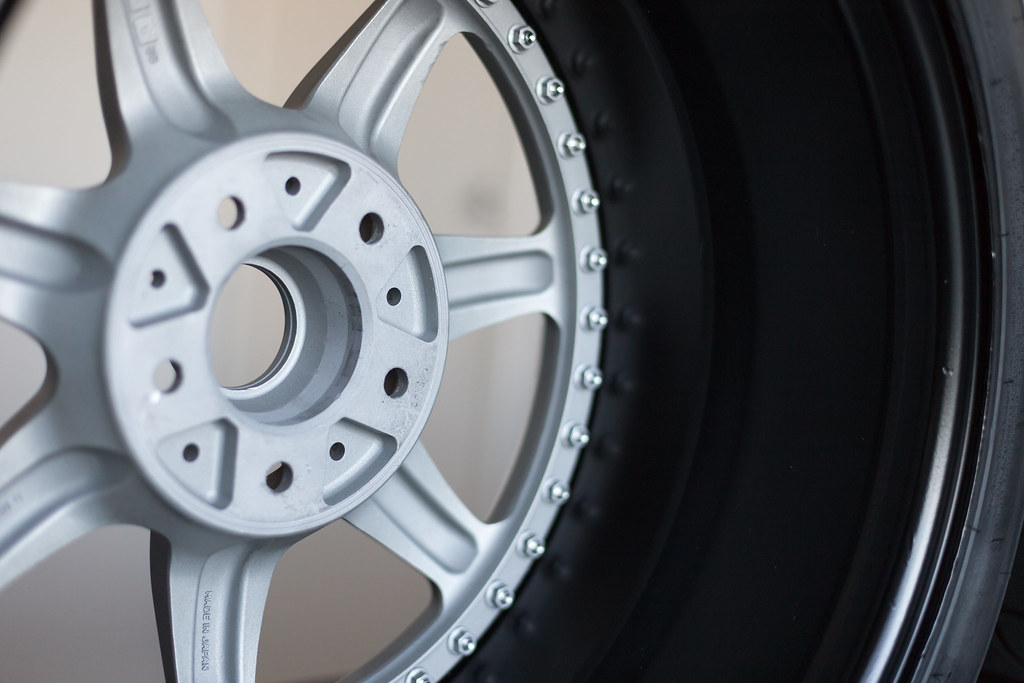
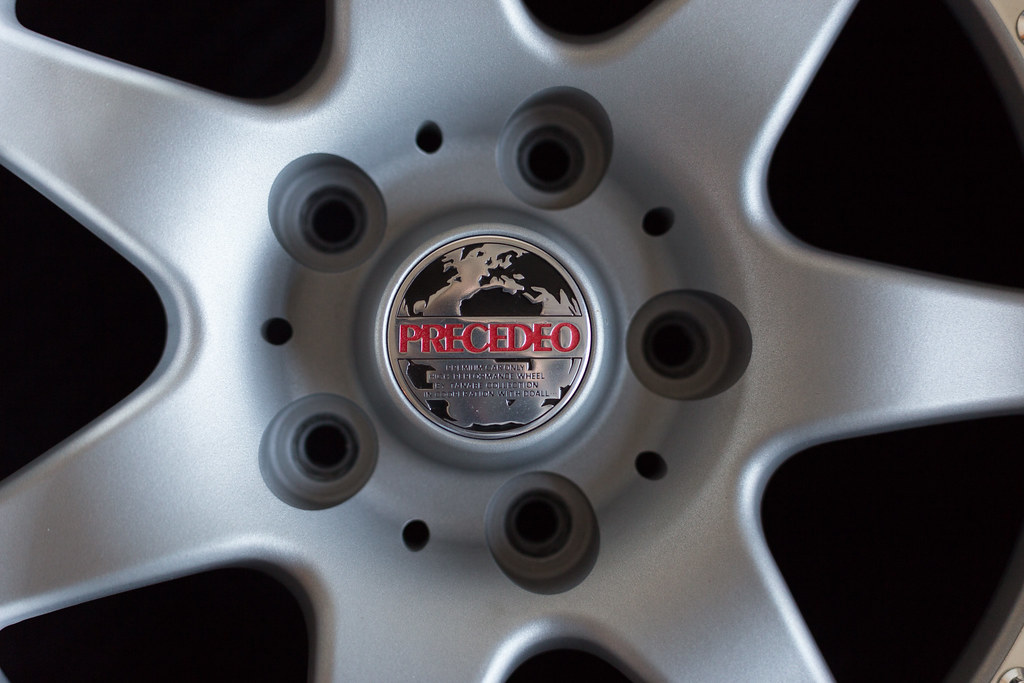
Finally we get to the center caps. When I originally talked to the shop the plan was to have the caps polished by them, and then I would repaint them. After a few conversations it was suggested that we try to powder coat the detail in the caps to make it more durable. I gave them the go ahead to do it, but for some reason they sent the caps off to be powder coated before polishing. From that point they didn't make much progress. Weeks went by with no update, and I had already taken the wheels home and started working on finishing up the valve stems myself. I finally gave them a deadline and showed up to collect the caps on a Friday. When I showed up nobody could find my caps and I wasn't going to leave without them. One of the staff was sent over to the polishers to see if they were there and about an hour later he shows back up with all the caps in the exact same state they were in when I saw them a month prior. He said the polisher was having trouble polishing the caps without damaging the powder coat that touched a few of the edges, and I just looked at him in disbelief. I asked why it took so long to get nothing done and he of course didn't have an answer. I picked up all the caps and walked out. I have no idea how some of these companies are in business, especially when you're entire business model is being a glorified general contractor. You would think if you just sub-contracted everything out all day every day you'd be better about communicating and keeping projects moving along. I put the caps into storage and I haven't messed with them since. At some point I might have them done but I've lost interest at this point. I ended up re-polishing and and re-painting the caps that I originally had on the wheels.Excited to finally have my wheels done I picked up a set of 225/45/17 255/40/17 RS3s from Tirerack. I went and had them mounted up and then set them aside as I did some other part installations to the car. From the side the wheels looked great, I was very happy with how everything turned out, until I started playing with the alignment settings and driving the car around. With the larger tires and lower amount of camber these were a bit to aggressive for what I wanted. Disappointed, I ended up putting them up for sale after deciding to go a different direction.
12.15.2016 - Tanabe Precedeo Refinishing
At the end of 2016 I started refinishing my Precedeos. I wanted them as fresh and as new as possible. I ended up getting my hands on an old set of RS3's off of my Regamasters and was able to see what the 225/255 RS3 looked like on the wheel, and then on the car itself. I was reasonably happy with the the look so I had everything dismounted and then went out and found someone to refinish the wheels.
I ended up finding a place locally that seemed competent enough, and got them started on the refinishing. I wanted to keep the matte silver faces, polish the lips, and do the inner barrels gloss black so they would be easy to maintain. Hardware was to be replaced if needed, or restored if it still looked good. The goal was to get them in as new as possible condition. This ended up being a bit more troublesome than I had initially anticipated.
We disassembled the wheels, split the faces and barrels and sent everything off. The powder coater was able to find a silver that was very close to what I wanted. I would have preferred something a shade or two brighter but it's very very close to what I was after. The initial plan was for them to find a couple of silver colors and give me some test shots, but that didn't end up happening. I followed up one day asking what the status of the faces was and got a few pictures back of them completely finished. Thankfully the color was very close to what I had asked for. It's just a little bit frustrating to be told one thing and have a completely different thing happen. The barrels were also coated at the same time in a nice satin black color. I am however very happy with the quality of the work. The powder coater did an excellent job.
Next we had the lips, they were sent off for polishing. Polishing itself took a bit longer than quoted but everything came out great. We ran into a problem when it came time to source new valve stems. The valve stems that were on the wheels were modified and secured on in such a way that if I had known how they were set up I wouldn't have been driving on the wheels. It was very obviously not supposed to be like that so I started looking for an alternative. The valve stem hole had been enlarged to fit the current stem, and the top most portion of them were ground down to be able to fit in the area that they needed to sit. The seals didn't sit right, and honestly it was such a poorly done job. I needed to find a new valve stem that would fit securely through the hole and that had seals that could fit into the recesses. The shop had some generic valve stem that seemed to do the job, but they only came in an anodized black finish. We went back and forth for a bit and the shop wanted to just install the black ones that he had and be done with it. The owner kept saying that it would look fine and wouldn't be that noticeable. It was at that point that I decided to come and collect the wheels and finish them myself. I had the shop assemble the lips, faces, and barrels and once that was done I was going to pick them up and work on finding a solution to for the value stems.
I ordered several different styles of valve stems from a few different companies to test fitments with. What I ended up finding was a set of 949 racing value stems that seemed to do the trick. They fit, they were the correct height, and I was happy with their general shape. They have a seal under the bottom of the stem and then a big seal that gets sandwiched in from the back. This worked perfectly. The only issues that I had was the shape of the hex sleeve and the fact that they don't offer them in a polished finish. I ordered a set in an anodized silver to see if I could modify them in a way that would make me happy. I wasn't happy with the hex pattern on the outer collar and I wanted to polish the stems themselves so they matched the lips. I ended up creating a tool out of one of the old valve stems, a drill bit attachment, some 5 minute epoxy, a few zip ties, and some tape. I was able to thread the 949 sleeve onto the tool and then insert the other end into an electric drill. From there I spent the next five to six hours over a sink with various grits of sandpaper. I have to say these collars came out way better than I expected. I was able to round the hex collar, and they polished out nicely. Next I started on polishing the caps. They took a bit more work as I didn't want to round them off as much. These were done by hand against a flat surface so that I could retain the majority of their shape.
Finally we get to the center caps. When I originally talked to the shop the plan was to have the caps polished by them, and then I would repaint them. After a few conversations it was suggested that we try to powder coat the detail in the caps to make it more durable. I gave them the go ahead to do it, but for some reason they sent the caps off to be powder coated before polishing. From that point they didn't make much progress. Weeks went by with no update, and I had already taken the wheels home and started working on finishing up the valve stems myself. I finally gave them a deadline and showed up to collect the caps on a Friday. When I showed up nobody could find my caps and I wasn't going to leave without them. One of the staff was sent over to the polishers to see if they were there and about an hour later he shows back up with all the caps in the exact same state they were in when I saw them a month prior. He said the polisher was having trouble polishing the caps without damaging the powder coat that touched a few of the edges, and I just looked at him in disbelief. I asked why it took so long to get nothing done and he of course didn't have an answer. I picked up all the caps and walked out. I have no idea how some of these companies are in business, especially when you're entire business model is being a glorified general contractor. You would think if you just sub-contracted everything out all day every day you'd be better about communicating and keeping projects moving along. I put the caps into storage and I haven't messed with them since. At some point I might have them done but I've lost interest at this point. I ended up re-polishing and and re-painting the caps that I originally had on the wheels.Excited to finally have my wheels done I picked up a set of 225/45/17 255/40/17 RS3s from Tirerack. I went and had them mounted up and then set them aside as I did some other part installations to the car. From the side the wheels looked great, I was very happy with how everything turned out, until I started playing with the alignment settings and driving the car around. With the larger tires and lower amount of camber these were a bit to aggressive for what I wanted. Disappointed, I ended up putting them up for sale after deciding to go a different direction.
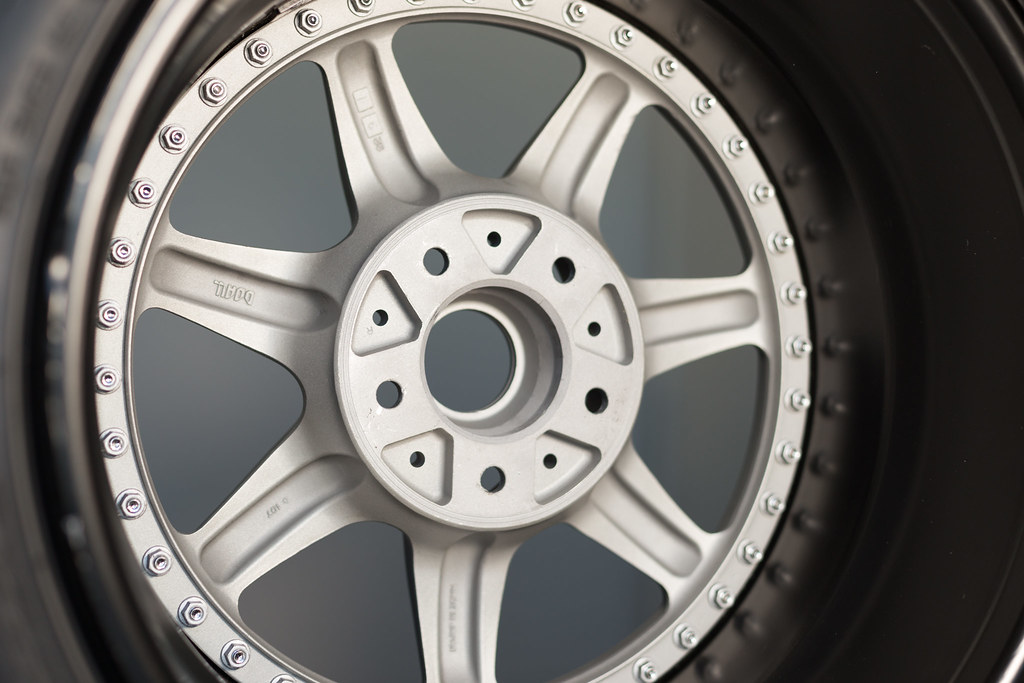
I ended up selling the wheels three months ago I think it was. I was sad to see them go but after going back and forth on them for years I was just never satisfied with how they fit. Rest assured they will make a come back one day as a have a full set of faces and two sets of center caps. If I ever want I can have lips and barrels made and fit these to the car perfectly.
11-09-2018, 09:40 AM
#464

Holy moly.
 11-09-2018, 12:25 PM
#466
Moderator
Thread Starter
11-10-2018, 02:33 PM
#467
Moderator
Thread Starter
01.19.2018 - KW Clubsports
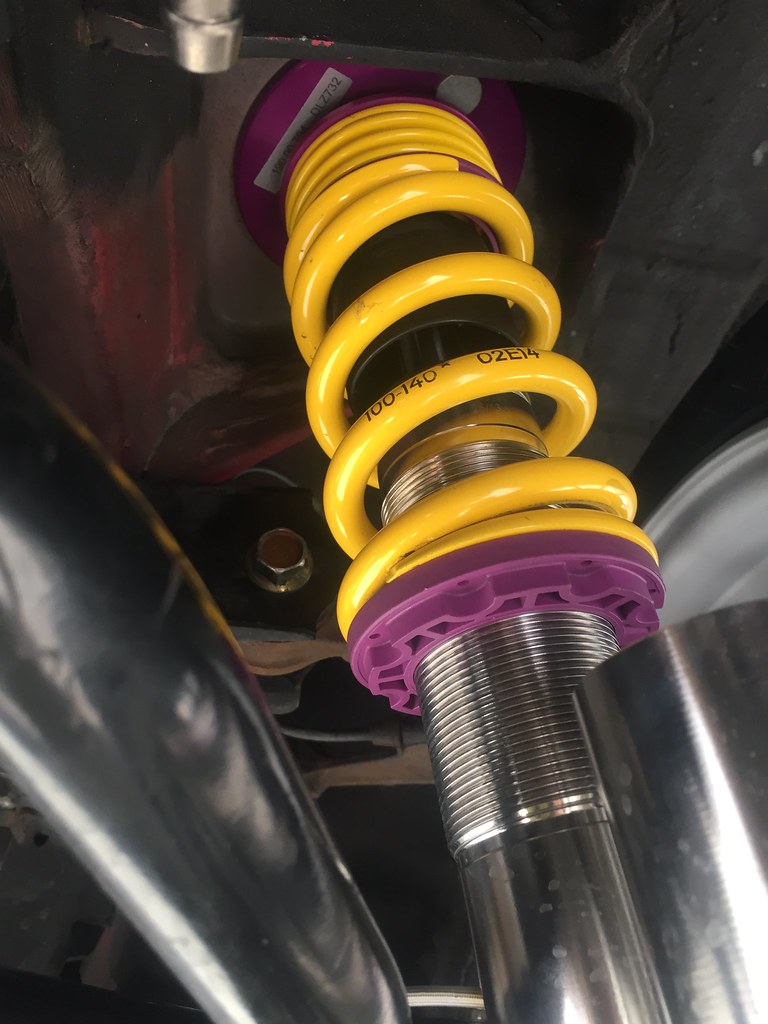
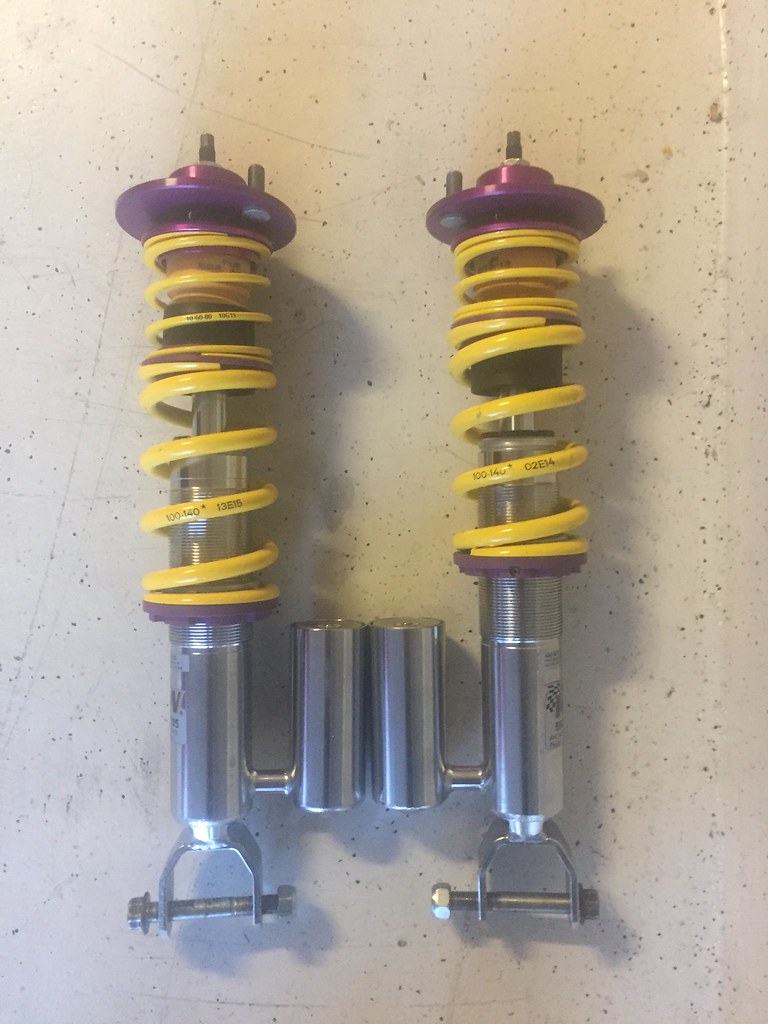
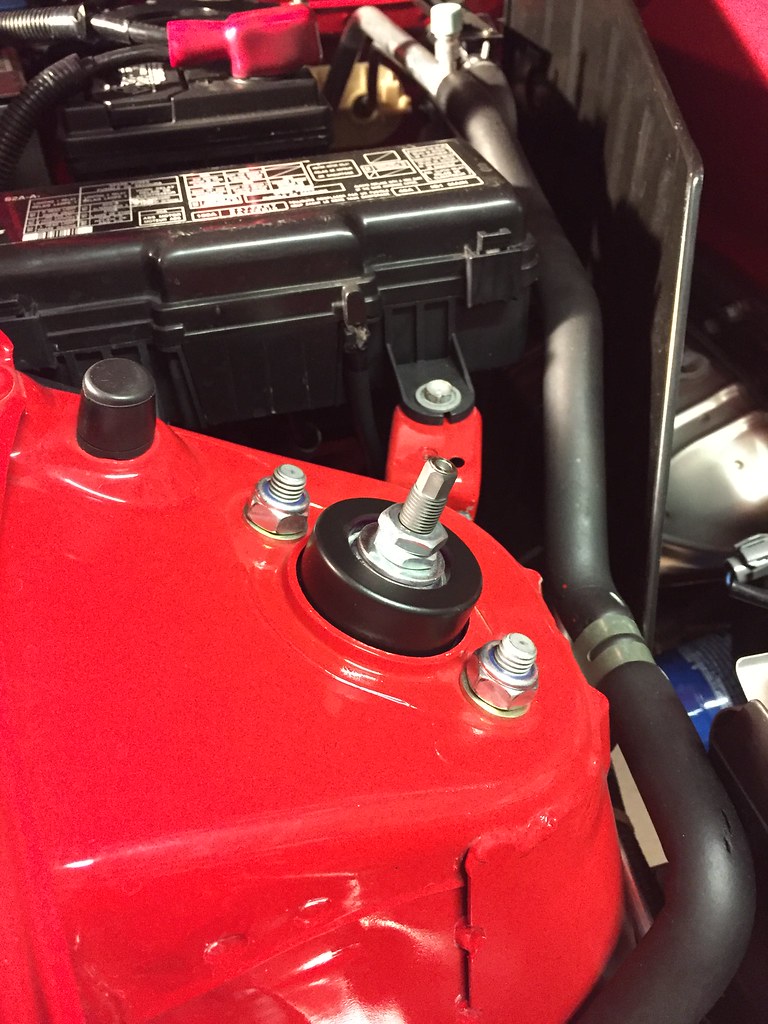
I picked up a spare set of KW Clubsports that ADRS2K had three or four years ago, and they had been sitting in my closet ever since. I decide to get them installed in anticipation of putting the newly refinished Precedeos on the car. Install was simple as with any other coilover on these cars, however afterwards I had a couple of things I needed to sort out though. One of the coilovers was sitting uneven compared to the others. On a side to side comparison of the rear perches I had to have one of the perches almost 2 inches higher to have the car sit level. I couldn't figure out why so I let it be for the time being. The other issue I had was the purple top hats on the Clubsports. I know I'm entirely too picky but the purple top hats look terrible in the New Formula Red engine bay. I was trying to come up with a way to refinish them and figured anodizing them black would be the way to go, but I would have to wait until I removed them to do that.
Here is an example of how differently the rears were sitting:

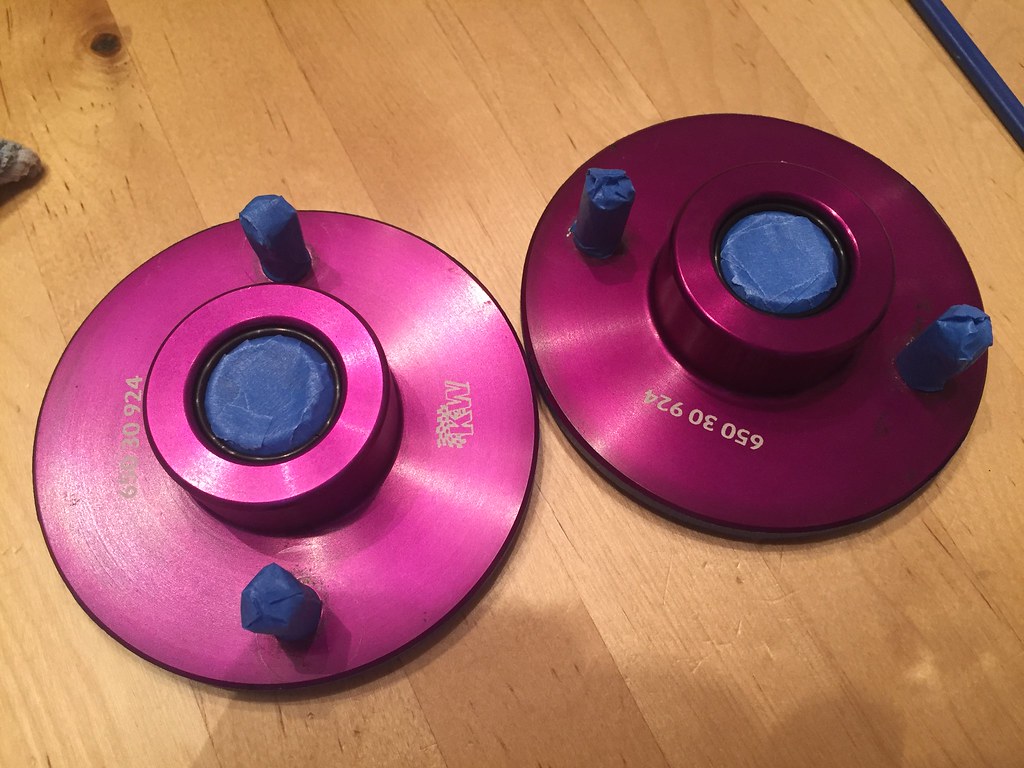
We're going to jump ahead a bit for the sake of keeping the KW information together. To address the spring perch height disparity I reached out to KW's customer support. I explained the issue and sent a few pictures.They were incredibly helpful and provided me multiple documents of the parts and all of their assorted part numbers as well as some suggestions on what to check. We couldn't determine anything substantial with the shocks on the car so I decided to remove them. After pulling the shocks completely apart and comparing part numbers I determined that all the part numbers were correct and that the wrong part wasn't the culprit. I reached back out to KW and asked for the recommended assembling instructions. I had assembled coilovers several times before but I wanted to make sure I was doing everything by the book to eliminate that from the equation. KW send back their recommended instructions and I set them aside until it was time to reassemble.
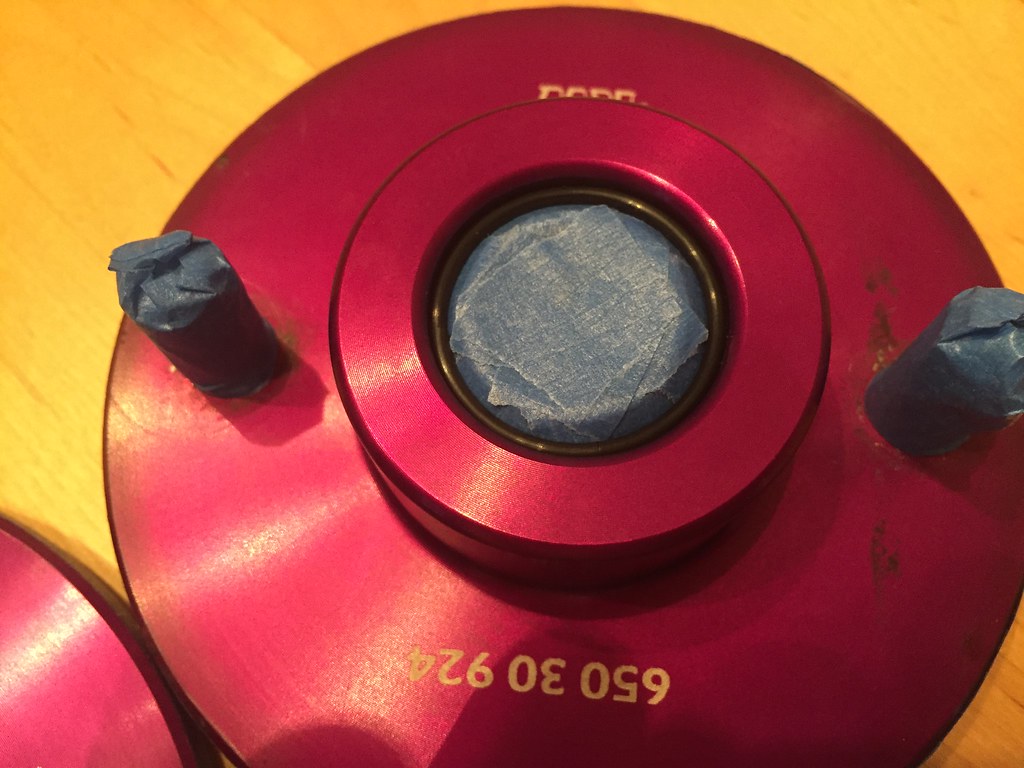
With the coilovers apart I started looking into how I was going to change the color on the top hats. At first I was dead set on anodizing them, however once I got them apart and realized that I would have to press the bearings, and studs out, as well as find the tool to remove the clip holding the bearing in I wanted to make sure that making them black was really what I wanted. I decided to plastidip them in the mean time. This would let me visualize how it looked once it was installed, as well as be removable and completely reversible. The only issue was keeping the dip out of the bearing. I tried a few different iterations of painting them and I wasn't really happy with the results. I couldn't get a perfect tape line down around everything and I kept pulling the dip off to redo it. I finally tried getting some small rubber O rings and cutting them so that I could make them into the size I needed. I was able to use about one and a half O rings to completely seal off the bearing as well as leave an even paint line. I went and taped everything else off again and sprayed them one last time.
Masking and Prep
Finished
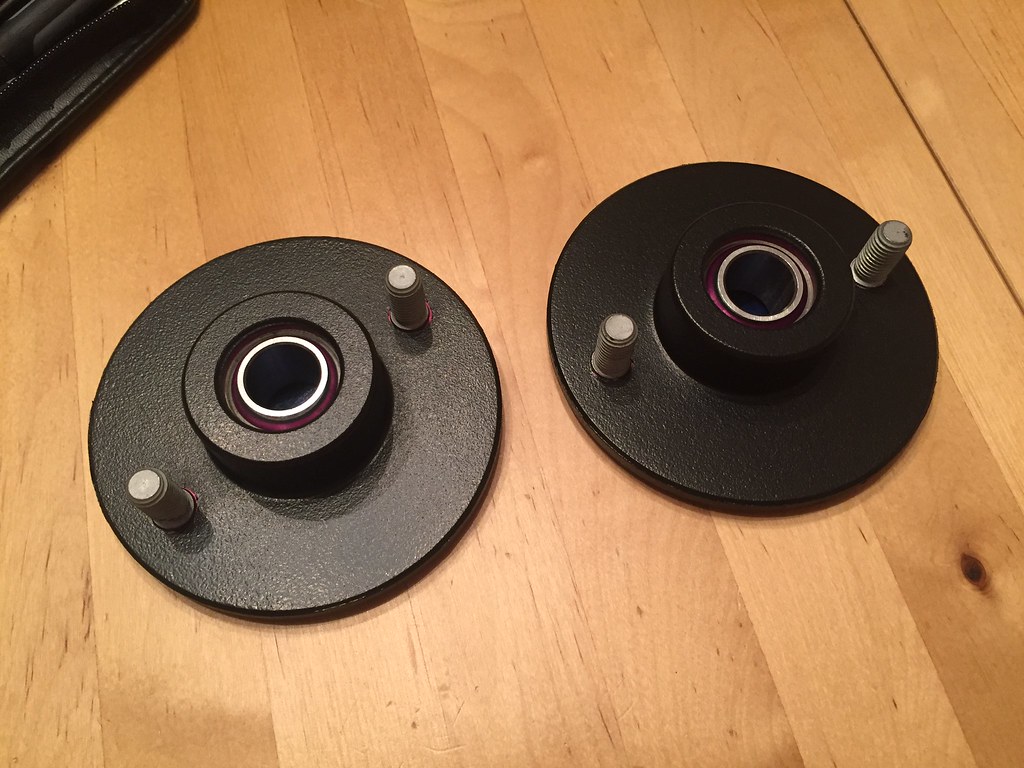

I was happy very with the results so it was time to put the coilovers back together. There is no plastidip in the areas that will contact the bearing in the top hat, and unless you put your face right up against the hat you won't see the purple that is left. I cleaned everything and then assembled them according to KW's documentation. Once the coilovers were together I set them aside while I tackled the other suspension updates. After installing them again they sit level, so I have to assume they were assembled differently as one of the shocks came from KW.
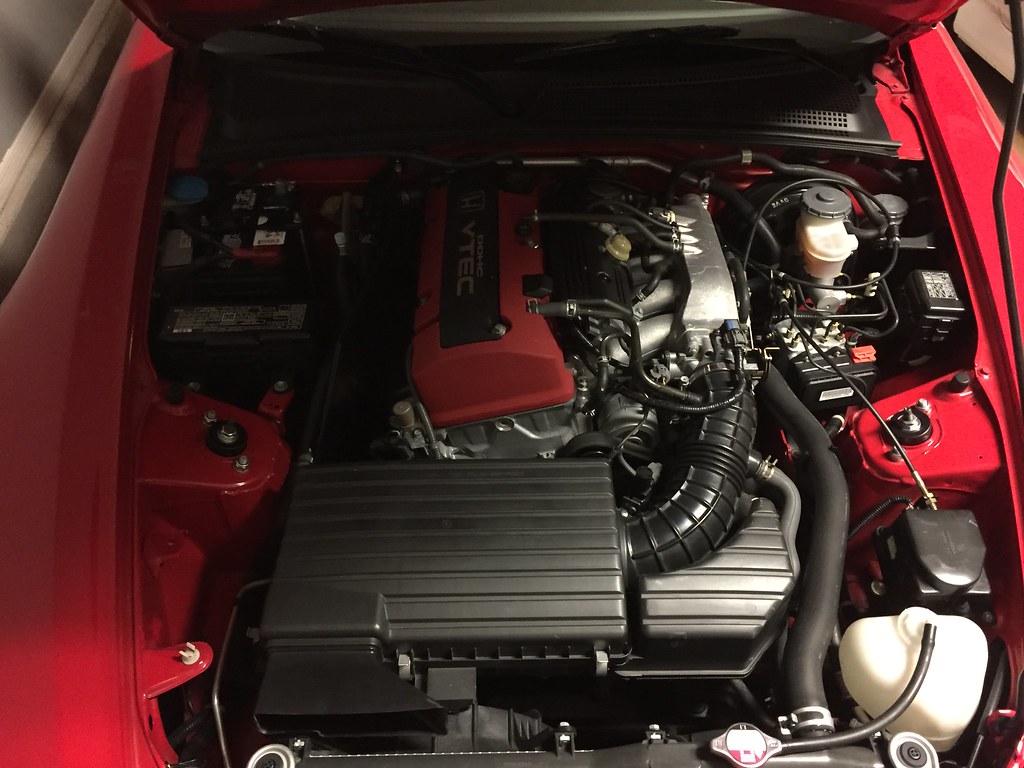
While we are here, these are a few low quality phone pictures of the newly painted hats in the engine bay. They blend in an give off an OEM vibe that I really couldn't be happier with.
I picked up a spare set of KW Clubsports that ADRS2K had three or four years ago, and they had been sitting in my closet ever since. I decide to get them installed in anticipation of putting the newly refinished Precedeos on the car. Install was simple as with any other coilover on these cars, however afterwards I had a couple of things I needed to sort out though. One of the coilovers was sitting uneven compared to the others. On a side to side comparison of the rear perches I had to have one of the perches almost 2 inches higher to have the car sit level. I couldn't figure out why so I let it be for the time being. The other issue I had was the purple top hats on the Clubsports. I know I'm entirely too picky but the purple top hats look terrible in the New Formula Red engine bay. I was trying to come up with a way to refinish them and figured anodizing them black would be the way to go, but I would have to wait until I removed them to do that.
Here is an example of how differently the rears were sitting:
We're going to jump ahead a bit for the sake of keeping the KW information together. To address the spring perch height disparity I reached out to KW's customer support. I explained the issue and sent a few pictures.They were incredibly helpful and provided me multiple documents of the parts and all of their assorted part numbers as well as some suggestions on what to check. We couldn't determine anything substantial with the shocks on the car so I decided to remove them. After pulling the shocks completely apart and comparing part numbers I determined that all the part numbers were correct and that the wrong part wasn't the culprit. I reached back out to KW and asked for the recommended assembling instructions. I had assembled coilovers several times before but I wanted to make sure I was doing everything by the book to eliminate that from the equation. KW send back their recommended instructions and I set them aside until it was time to reassemble.
With the coilovers apart I started looking into how I was going to change the color on the top hats. At first I was dead set on anodizing them, however once I got them apart and realized that I would have to press the bearings, and studs out, as well as find the tool to remove the clip holding the bearing in I wanted to make sure that making them black was really what I wanted. I decided to plastidip them in the mean time. This would let me visualize how it looked once it was installed, as well as be removable and completely reversible. The only issue was keeping the dip out of the bearing. I tried a few different iterations of painting them and I wasn't really happy with the results. I couldn't get a perfect tape line down around everything and I kept pulling the dip off to redo it. I finally tried getting some small rubber O rings and cutting them so that I could make them into the size I needed. I was able to use about one and a half O rings to completely seal off the bearing as well as leave an even paint line. I went and taped everything else off again and sprayed them one last time.
Masking and Prep
Finished
I was happy very with the results so it was time to put the coilovers back together. There is no plastidip in the areas that will contact the bearing in the top hat, and unless you put your face right up against the hat you won't see the purple that is left. I cleaned everything and then assembled them according to KW's documentation. Once the coilovers were together I set them aside while I tackled the other suspension updates. After installing them again they sit level, so I have to assume they were assembled differently as one of the shocks came from KW.
While we are here, these are a few low quality phone pictures of the newly painted hats in the engine bay. They blend in an give off an OEM vibe that I really couldn't be happier with.
11-27-2018, 12:37 PM
#468
Moderator
Keep the updates coming! We are still nowhere close to where the actual car sits today!! 
04-29-2019, 02:04 PM
#470
Moderator
Thread Starter
The CRs H emblems are plastidipped black as well. It hold up far better to chipping and snad blasting than paint does. I'm not normally a fan of it for large area, but for small things it does it's job pretty well.
I've also used it on several of the raw bolts in the engine bay on the CR to stop them from rusting when the engine bay gets rinsed down. Like everything else, there is a wrong way and a right way to go about doing things.
I've also used it on several of the raw bolts in the engine bay on the CR to stop them from rusting when the engine bay gets rinsed down. Like everything else, there is a wrong way and a right way to go about doing things.