Feezy's Build Thread - 2002 New Formula Red
 04-30-2019, 05:58 PM
#471
Moderator


Thread Starter


The following users liked this post:
S1 S2 (05-09-2019)
11-27-2019, 01:09 PM
#472
Moderator
Thread Starter
01.15.2018 - Titanium Silver Volk CE28N
As I spoiled in the picture above I ended up picking up a set of CE28N in Titanium Silver for the AP1. As I mentioned earlier after putting the larger tires on the Predeceos they just didn't fit the car the way I wanted and I was getting tired of compromising multiple aspects of the car over a set of wheels. I wasn't sure on moving away from the Precedeos at first, but I really think I made the right decision.
I was talking with a few guys about looking for a different set of wheels and was referred to Eddie at Gruppe-S. I contacted him on a whim about a set of CE's in 17x9.5 +47 in Titanium Silver. To my surprise he had a set in stock in those specs and color at a price I couldn't pass on so I bought them. While I was at it I ordered a set of RS4s in 255/40/17 to go onto the wheels.
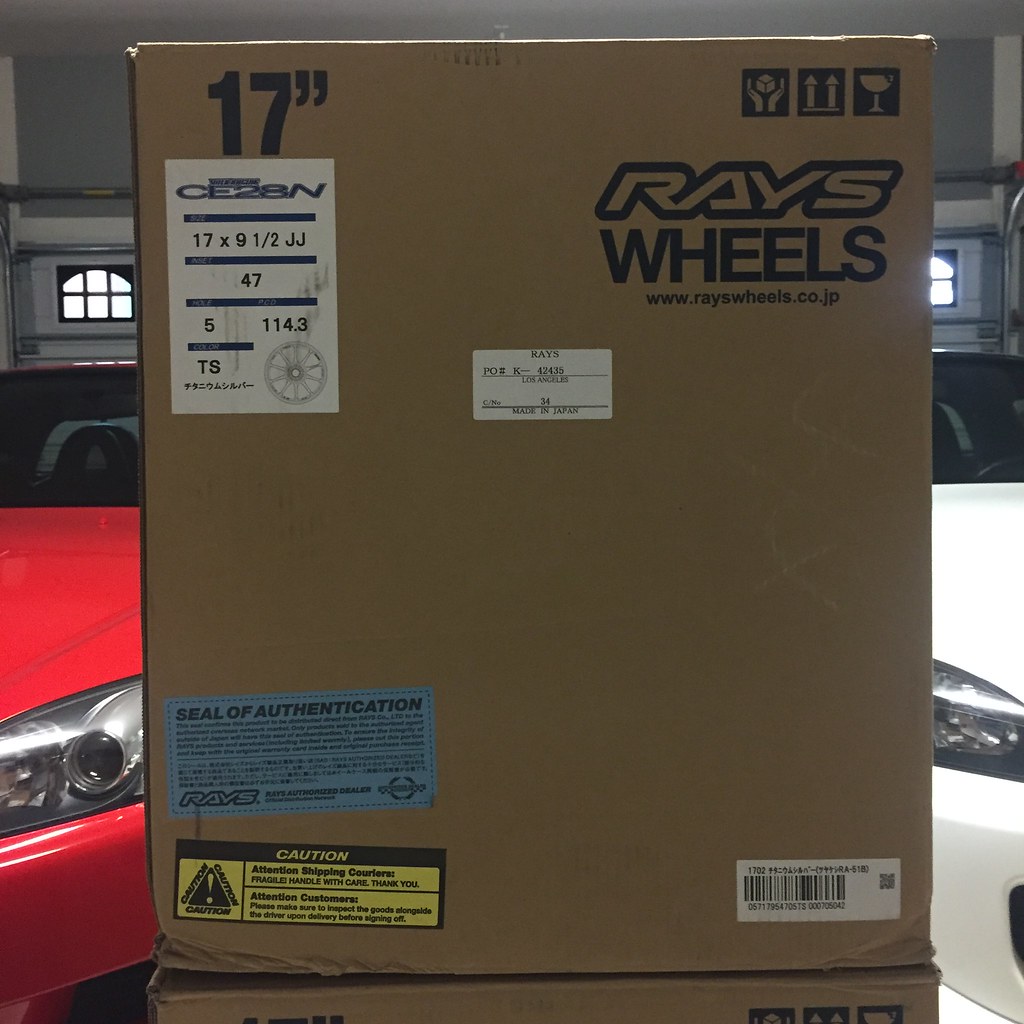
Once I got the wheels I went ahead and washed them, de-greased them, and hit them with a coat of Optimum Gloss Coat. At first I was a bit unsure on how the matte finish on the Titanium Silver would take it, but it came excellent. It added just a hint of sheen to the finish which I was very happy about. coated the caps at the same time and let everything sit for a few days. Once everything was cured I took it down and had the tires mounted.
I had the wife take a few pictures of everything all said and done:


And one from my phone:

As I spoiled in the picture above I ended up picking up a set of CE28N in Titanium Silver for the AP1. As I mentioned earlier after putting the larger tires on the Predeceos they just didn't fit the car the way I wanted and I was getting tired of compromising multiple aspects of the car over a set of wheels. I wasn't sure on moving away from the Precedeos at first, but I really think I made the right decision.
I was talking with a few guys about looking for a different set of wheels and was referred to Eddie at Gruppe-S. I contacted him on a whim about a set of CE's in 17x9.5 +47 in Titanium Silver. To my surprise he had a set in stock in those specs and color at a price I couldn't pass on so I bought them. While I was at it I ordered a set of RS4s in 255/40/17 to go onto the wheels.
Once I got the wheels I went ahead and washed them, de-greased them, and hit them with a coat of Optimum Gloss Coat. At first I was a bit unsure on how the matte finish on the Titanium Silver would take it, but it came excellent. It added just a hint of sheen to the finish which I was very happy about. coated the caps at the same time and let everything sit for a few days. Once everything was cured I took it down and had the tires mounted.
I had the wife take a few pictures of everything all said and done:
And one from my phone:
11-27-2019, 05:06 PM
#473
Moderator
Thread Starter
01.19.2018 - Origin Fab Offset Bushings - New UCA Paint, boot, clip.
When I purchased the car it came with a set of SPC ball joints installed on the front upper control arms. I've never really been a fan of them, and I decided to sell those arms and go back to stock. That worked great while I ran the Regamasters, but once I decided to sell them and move onto something else I wanted a bit more clearance up front and decided I was going to give the Origin Fab offset bushings a shot. I picked up a spare set of front upper control arms for them to be pressed into. I was hoping that this would visually help me run a non-staggered set up as most of the set ups I see the front wheels tend to aggressively bulge against the fenders and I'm not a huge fan of that.
While the arms were were off the car I might as well clean them up. I started by wire wheeling the arms bare, and then sent them off to have old bushings removed and the new bushings pressed in. While that was being done I put in an order for new replacement ball joint boots and clips, and then picked up a tube of grease.
Once I got the arms back I taped everything off and painted the arms with a nice simple satin black suspension paint. Once that was dried I pulled the old boots, and removed as much of the old grease as possible. I then repacked them with the new grease, installed the boot, and maneuvered the clip into place. I hit the boot with a quick coat of grease to protect it and installed the arm.

I was very pleased with the arms after install. They provided a significant amount of room over the stock bushings, and gave the exact visual look I was after. I have some direct before and after pictures. Keep in mind this is with the only the upper control arm change. The alignment will still need to be set, but this gives a good idea of the amount of room you gain with the bushings.
I've noted the relevant specs in the picture below so that it can be used for reference. I get asked about how much room these arms gave me fairly often, and this is the best demonstration of what they do that I have seen.

When I purchased the car it came with a set of SPC ball joints installed on the front upper control arms. I've never really been a fan of them, and I decided to sell those arms and go back to stock. That worked great while I ran the Regamasters, but once I decided to sell them and move onto something else I wanted a bit more clearance up front and decided I was going to give the Origin Fab offset bushings a shot. I picked up a spare set of front upper control arms for them to be pressed into. I was hoping that this would visually help me run a non-staggered set up as most of the set ups I see the front wheels tend to aggressively bulge against the fenders and I'm not a huge fan of that.
While the arms were were off the car I might as well clean them up. I started by wire wheeling the arms bare, and then sent them off to have old bushings removed and the new bushings pressed in. While that was being done I put in an order for new replacement ball joint boots and clips, and then picked up a tube of grease.
Once I got the arms back I taped everything off and painted the arms with a nice simple satin black suspension paint. Once that was dried I pulled the old boots, and removed as much of the old grease as possible. I then repacked them with the new grease, installed the boot, and maneuvered the clip into place. I hit the boot with a quick coat of grease to protect it and installed the arm.
I was very pleased with the arms after install. They provided a significant amount of room over the stock bushings, and gave the exact visual look I was after. I have some direct before and after pictures. Keep in mind this is with the only the upper control arm change. The alignment will still need to be set, but this gives a good idea of the amount of room you gain with the bushings.
I've noted the relevant specs in the picture below so that it can be used for reference. I get asked about how much room these arms gave me fairly often, and this is the best demonstration of what they do that I have seen.
The following users liked this post:
1993 (11-27-2019)
11-27-2019, 10:15 PM
#474
Registered User
 12-02-2019, 04:15 PM
#475
Moderator
Thread Starter
1.20.2018 - Alignment & Troubleshooting
Upon installing the KW Clubsports and CE’s I took the car for an alignment. After the alignment I noticed that the car was aggressively pulling to the right on acceleration, and then back to the left when I lifted off of the throttle. I spoke with the shop who did the alignment and they suggested it was a sticking brake caliper and that they didn’t see anything out of the ordinary. I drove it home and figured I’d poke around and see if I could see anything. I casually looked over everything and didn't see anything that stuck out. I drove it off an on for very short trips for the next week or two and the problem persisted. Thinking about what SOS told me, I borrowed a temperature gun and drove the car for a while in the hopes that one of the rotors would be much hotter than the rest, hopefully identifying the problem. After about 30 minutes of freeway driving the rotors temps seemed normal. Both front rotors temperatures were similar, and both rears were also similar. It wasn’t the brakes. I called it for the night and headed home to put the car back up on the lift and poke around some more.
At some point @Ricky_Flowers_ and @SHG_Mike to me to look at the compliance bushings, so I got under the car. From the bottom they looked fine, so I didn’t think anything of it. I checked all the bolts, torqued everything, and took the car to a different shop for an alignment. I explained the situation and they aligned the car. The car still pulled after the alignment so we had a discussion and they suggested I check the wheels and or tires for any issues. With both the CEs and the RS4s being brand new and the symptoms showing right around the time they went on I gave it a shot. I went home and swapped the Precedeos back onto the car and took it out, same problem. At this point I was pretty sure it wasn’t the wheels but a tried out a third set of wheels I had in the garage. Again, the car had the same symptoms.So it wasn't the wheels and tires if the car was behaving the same across three different set ups.
The car went back up on the lift and I started checking everything again. It was strongly suggested to check the compliance bushings again, so I did, but this time from the top side. As it turns out the bushings were completely shot. I’m talking having a solid ring around the entire bushing worn out and allowing the entire arm to shift. I sent a few pictures, received a bunch of “I told you so’s” and started looking at replacing the bushings. I had to capture it with a flash, but here's what I was working with on both sides:


It was pretty obvious that I was time for new bushings so in typical Feezy fashion I set out to replace them in the most overkill way I could imagine. The arms needed to come out, but the bolts through the compliance bushings were seized on both sides. I did a bit of research and everything I was reading said I basically just needed to saw through the bolts to remove the arms.
This whole process seemed like it was going to take a while so I contacted a friend and used an empty space in his garage to store the CR while I was working on the AP1s suspension. Once the CR was out of the way I put the AP1 in the middle of the garage on the EZ Lift and started pulling the lower arms. A Sawzall and a few blades did the trick. It was a little bit nerve racking at first but a relatively painless process. With the bolts cut I removed the lower arms.


As you can see upon removal the compliance bushings just fell right out of the arm. I was pretty sure I had found my problem. I was going to do some research on what bushings to replace my worn bushings with and I though that this would be a good time to pull all of the remaining arms and replace the bushings on everything.
Having already done the front upper control arms when I removed the SPC joints, I decided that the rest of the suspension arms needed the same treatment. The car had originally come from the mid-west and there was a bit of mild surface corrosion on everything which had always bothered me. I removed all of the arms and started researching bushings.
Here's everything out of the car:

Upon installing the KW Clubsports and CE’s I took the car for an alignment. After the alignment I noticed that the car was aggressively pulling to the right on acceleration, and then back to the left when I lifted off of the throttle. I spoke with the shop who did the alignment and they suggested it was a sticking brake caliper and that they didn’t see anything out of the ordinary. I drove it home and figured I’d poke around and see if I could see anything. I casually looked over everything and didn't see anything that stuck out. I drove it off an on for very short trips for the next week or two and the problem persisted. Thinking about what SOS told me, I borrowed a temperature gun and drove the car for a while in the hopes that one of the rotors would be much hotter than the rest, hopefully identifying the problem. After about 30 minutes of freeway driving the rotors temps seemed normal. Both front rotors temperatures were similar, and both rears were also similar. It wasn’t the brakes. I called it for the night and headed home to put the car back up on the lift and poke around some more.
At some point @Ricky_Flowers_ and @SHG_Mike to me to look at the compliance bushings, so I got under the car. From the bottom they looked fine, so I didn’t think anything of it. I checked all the bolts, torqued everything, and took the car to a different shop for an alignment. I explained the situation and they aligned the car. The car still pulled after the alignment so we had a discussion and they suggested I check the wheels and or tires for any issues. With both the CEs and the RS4s being brand new and the symptoms showing right around the time they went on I gave it a shot. I went home and swapped the Precedeos back onto the car and took it out, same problem. At this point I was pretty sure it wasn’t the wheels but a tried out a third set of wheels I had in the garage. Again, the car had the same symptoms.So it wasn't the wheels and tires if the car was behaving the same across three different set ups.
The car went back up on the lift and I started checking everything again. It was strongly suggested to check the compliance bushings again, so I did, but this time from the top side. As it turns out the bushings were completely shot. I’m talking having a solid ring around the entire bushing worn out and allowing the entire arm to shift. I sent a few pictures, received a bunch of “I told you so’s” and started looking at replacing the bushings. I had to capture it with a flash, but here's what I was working with on both sides:
It was pretty obvious that I was time for new bushings so in typical Feezy fashion I set out to replace them in the most overkill way I could imagine. The arms needed to come out, but the bolts through the compliance bushings were seized on both sides. I did a bit of research and everything I was reading said I basically just needed to saw through the bolts to remove the arms.
This whole process seemed like it was going to take a while so I contacted a friend and used an empty space in his garage to store the CR while I was working on the AP1s suspension. Once the CR was out of the way I put the AP1 in the middle of the garage on the EZ Lift and started pulling the lower arms. A Sawzall and a few blades did the trick. It was a little bit nerve racking at first but a relatively painless process. With the bolts cut I removed the lower arms.
As you can see upon removal the compliance bushings just fell right out of the arm. I was pretty sure I had found my problem. I was going to do some research on what bushings to replace my worn bushings with and I though that this would be a good time to pull all of the remaining arms and replace the bushings on everything.
Having already done the front upper control arms when I removed the SPC joints, I decided that the rest of the suspension arms needed the same treatment. The car had originally come from the mid-west and there was a bit of mild surface corrosion on everything which had always bothered me. I removed all of the arms and started researching bushings.
Here's everything out of the car:

 12-02-2019, 04:20 PM
#477
Moderator
Thread Starter

The following users liked this post:
1993 (12-03-2019)
12-02-2019, 05:13 PM
#478
Moderator
Thread Starter
11.01.2018 - Mugen Bushings & OEM Replacement Hardware
I looked through all the possible bushing options and settled on the Mugen bushings for a couple of reasons. They are the most “OEM” like bushings with a claimed 33% increase in stiffness, they don’t seem to require any additional maintenance or greasing than the OEM bushings do, and they are a direct swap. You simply press out the OEM bushing and then press in the Mugen. The bushings cost a bit more than some of the other options, but you save a bit on install. I ended up ordering the full Mugen bushing kit for an AP1.


With all the arms off the car and bushings in hand I sent everything over to the machinist that I use. He went ahead and sandblasted all the arms clean for me and then removed the old bushings and installed the new Mugen bushings. My machinist is great, but he's not exactly what I would call punctual. I knew I had some time while he was dealing with my arms so I started looking at what I was going to do with all of that OEM hardware. Long story short I decided to just replace everything with new components. I ended up sitting down and ordering every single nut, bolt, boot and clip I possibly could from Honda. I had made a spreadsheet of everything I would need. I think I went though everything four times to make sure I had accounted for everything and then made the order. It took several weeks to arrive as the dealer I ordered AFHKPARTS.com was on the east coast and currently dealing with snow storms.
After receiving the OEM hardware, so I laid it out on my table to take inventory. They had included everything but a single bolt. It was faster for me to call a local dealer and order a replacement than I would have been to have them send another. I ordered the replacement bolt and got back to organizing, the bolt would be here the next day and was less than $2.00 so I wasn't worried about it. With an order this large one bolt seemed like a very forgivable oversight. If you need to order any OEM parts I strong suggest you reach out to these guys. They were pretty great to deal with, and try to use them whenever I can now.


I looked through all the possible bushing options and settled on the Mugen bushings for a couple of reasons. They are the most “OEM” like bushings with a claimed 33% increase in stiffness, they don’t seem to require any additional maintenance or greasing than the OEM bushings do, and they are a direct swap. You simply press out the OEM bushing and then press in the Mugen. The bushings cost a bit more than some of the other options, but you save a bit on install. I ended up ordering the full Mugen bushing kit for an AP1.
With all the arms off the car and bushings in hand I sent everything over to the machinist that I use. He went ahead and sandblasted all the arms clean for me and then removed the old bushings and installed the new Mugen bushings. My machinist is great, but he's not exactly what I would call punctual. I knew I had some time while he was dealing with my arms so I started looking at what I was going to do with all of that OEM hardware. Long story short I decided to just replace everything with new components. I ended up sitting down and ordering every single nut, bolt, boot and clip I possibly could from Honda. I had made a spreadsheet of everything I would need. I think I went though everything four times to make sure I had accounted for everything and then made the order. It took several weeks to arrive as the dealer I ordered AFHKPARTS.com was on the east coast and currently dealing with snow storms.
After receiving the OEM hardware, so I laid it out on my table to take inventory. They had included everything but a single bolt. It was faster for me to call a local dealer and order a replacement than I would have been to have them send another. I ordered the replacement bolt and got back to organizing, the bolt would be here the next day and was less than $2.00 so I wasn't worried about it. With an order this large one bolt seemed like a very forgivable oversight. If you need to order any OEM parts I strong suggest you reach out to these guys. They were pretty great to deal with, and try to use them whenever I can now.
12-02-2019, 05:47 PM
#479
Moderator
Thread Starter
I'm trying to figure out how to add some tables into the above posts. I have all the part numbers for the bushing sets and complete suspension hardware order in case anyone ever wants/or needs it, but S2KI is not cooperating.
If you don't see the information there now check back later, I'll figure it out and get it updated.
If you don't see the information there now check back later, I'll figure it out and get it updated.
12-02-2019, 07:46 PM
#480
Moderator
Thread Starter
11.05.2018 - Suspension Component Refinishing
I had planned on refinishing everything while I was working on the suspension, so I went an ordered a full set of re-manufactured calipers to swap onto the car. If I was going through all this trouble I wanted everything on the suspension to be as fresh as possible. I don't think I have any pictures of the calipers before I refinished them, but the fronts and rears came in different finishes from the manufacturer. I decided it was best to just do them black for the time being so they would blend in with everything else. I was also due for rotors so I ordered a set of Centric premiums to go along with everything else.
Once I got the arms back I began the tedious process of preparing the arms for paint. I de-greased everything and then began taping off the mounting points as well as the exposed areas of the bushings. Once this was done I hung them up out back and started spraying away. It was winter time here in Arizona, so I had rigged up several heat lamps around the arms to help encourage the paint to cure a bit quicker than normal. Once the arms were done I started the same process with the re-manufactured calipers. I pulled them all apart, taped them off, and painted away. I think I only took one picture of an arm that was prepped and ready for paint:

I pulled the old clips and boots on all the control arm ball joints, and then removed the old grease. I repacked them with new grease and then installed the new boots with new clips. I made sure to grease the outside of the boots with some silicone grease to keep them fresh and set them aside. The calipers were then reassembled, making sure to grease the slider pins.
All said and done the arms looked fantastic. A far cry from what they looked like before:


I had planned on refinishing everything while I was working on the suspension, so I went an ordered a full set of re-manufactured calipers to swap onto the car. If I was going through all this trouble I wanted everything on the suspension to be as fresh as possible. I don't think I have any pictures of the calipers before I refinished them, but the fronts and rears came in different finishes from the manufacturer. I decided it was best to just do them black for the time being so they would blend in with everything else. I was also due for rotors so I ordered a set of Centric premiums to go along with everything else.
Once I got the arms back I began the tedious process of preparing the arms for paint. I de-greased everything and then began taping off the mounting points as well as the exposed areas of the bushings. Once this was done I hung them up out back and started spraying away. It was winter time here in Arizona, so I had rigged up several heat lamps around the arms to help encourage the paint to cure a bit quicker than normal. Once the arms were done I started the same process with the re-manufactured calipers. I pulled them all apart, taped them off, and painted away. I think I only took one picture of an arm that was prepped and ready for paint:
I pulled the old clips and boots on all the control arm ball joints, and then removed the old grease. I repacked them with new grease and then installed the new boots with new clips. I made sure to grease the outside of the boots with some silicone grease to keep them fresh and set them aside. The calipers were then reassembled, making sure to grease the slider pins.
All said and done the arms looked fantastic. A far cry from what they looked like before: