Giant Wing Abstinent...But Supercharged - CrewC23
 12-23-2014, 04:06 PM
#1
Registered User
Thread Starter

Join Date: Dec 2014
Location: Rogers, AR
Posts: 18
Likes: 0
Received 0 Likes
on
0 Posts
First Post (12/24/14):
Hey guys! I am starting this thread to show progress on my '03 AP1. I have a lot of plans for the car, and hopefully I'll be able to provide some helpful information for the community. I purchased the car 2 weeks ago, with 40k miles from the original owner. I was fortunate to find an AP1 in excellent condition. The car is completely stock right now, but not for long! I have included a list of intended mods below with expected ETA for each. I will provide pictures as soon as possible. I am currently traveling for Christmas.
The list below is just a preliminary outline, and is far from complete. I'll continue to provide updates.
Update (7/3/15):
Hey guys! I apologize for the long overdue update from my original post back in December. Yikes, what a slacker. Work has been incredibly busy & I have been traveling quite a bit, but enough with the excuses. Although I am not going to provide all updates now, I do intend to respond to this topic/post/blog (whatever you want to call it) with a review of each part I've purchased & installed on my car. I have performed all of the work myself, so if you have any questions, don't hesitate to ask. I'll try not to wait 6 months to answer. In addition to reviewing actual parts, I'll provide a review of each shop I've worked with, although the vast majority of my purchases have been made through Evasive Motorsports (Justin Espino). Just to note, I have no affiliation with any performance shop, so my reviews are completely unbiased.
The parts list below has been updated to include everything I've purchased/installed to date. My plans took a little bit of a turn when I decided to purchase a CT After-Cooled Supercharger (which I absolutely love). In addition to the parts, I have also outlined the shop I used for each purchase. It can sometimes be frustrating looking for parts, so hopefully this helps.
Car:
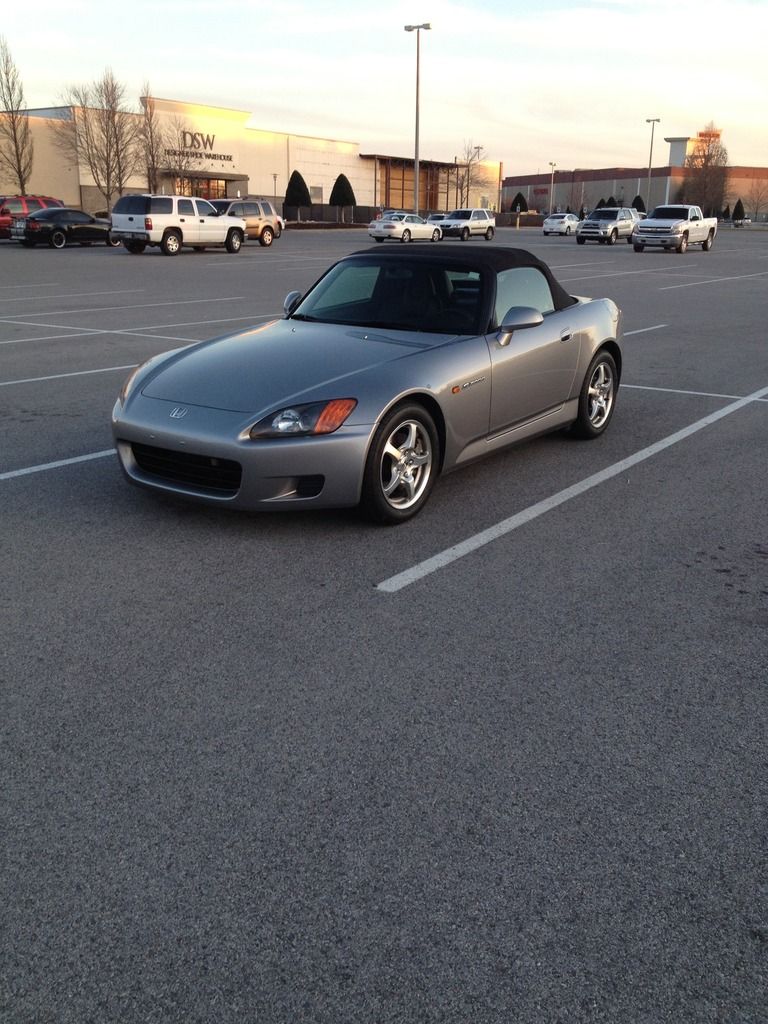
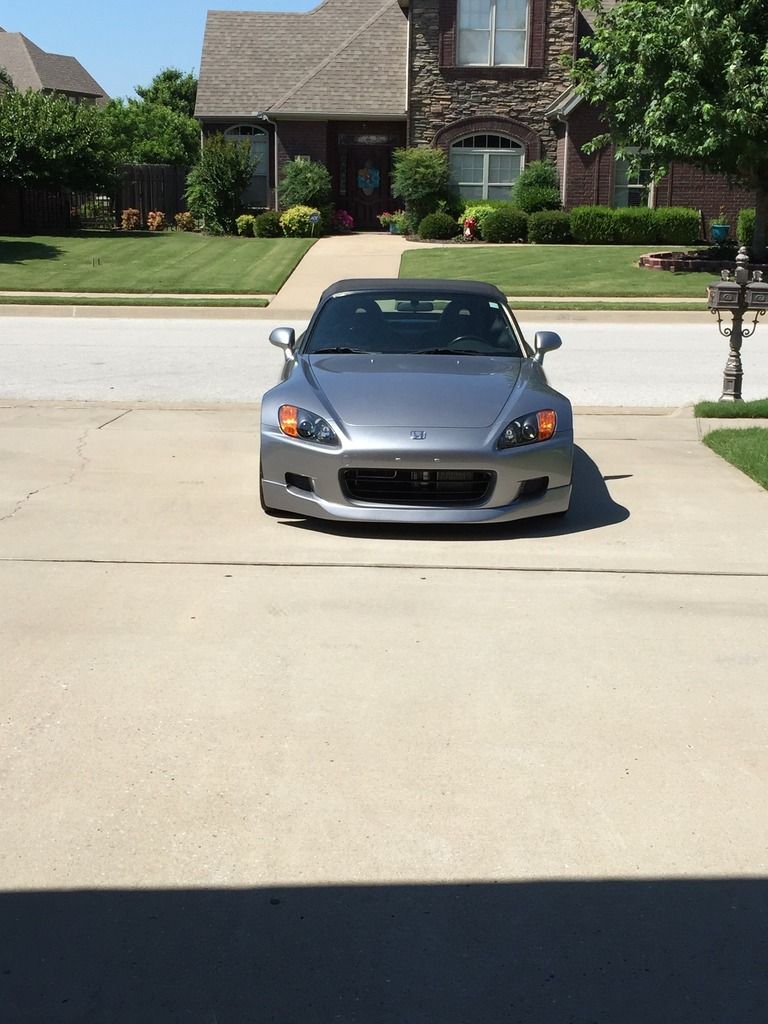
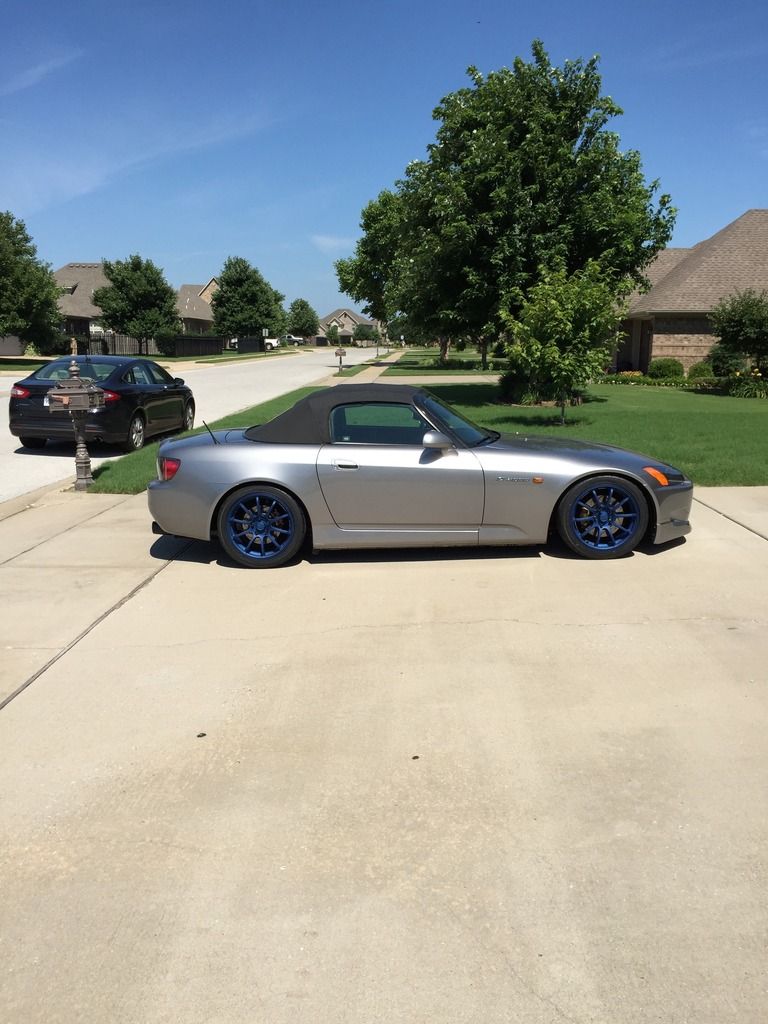
'03 AP1, Silverstone Metallic, Black Interior
Exterior:
Advan RS2 Wheels (Evasive)OEM AP1 Lip (Fingers crossed, WTB posted)
RSG Gears Lip (Rockstar Garage)
Spoon Or Volk Lug Nuts, Blue
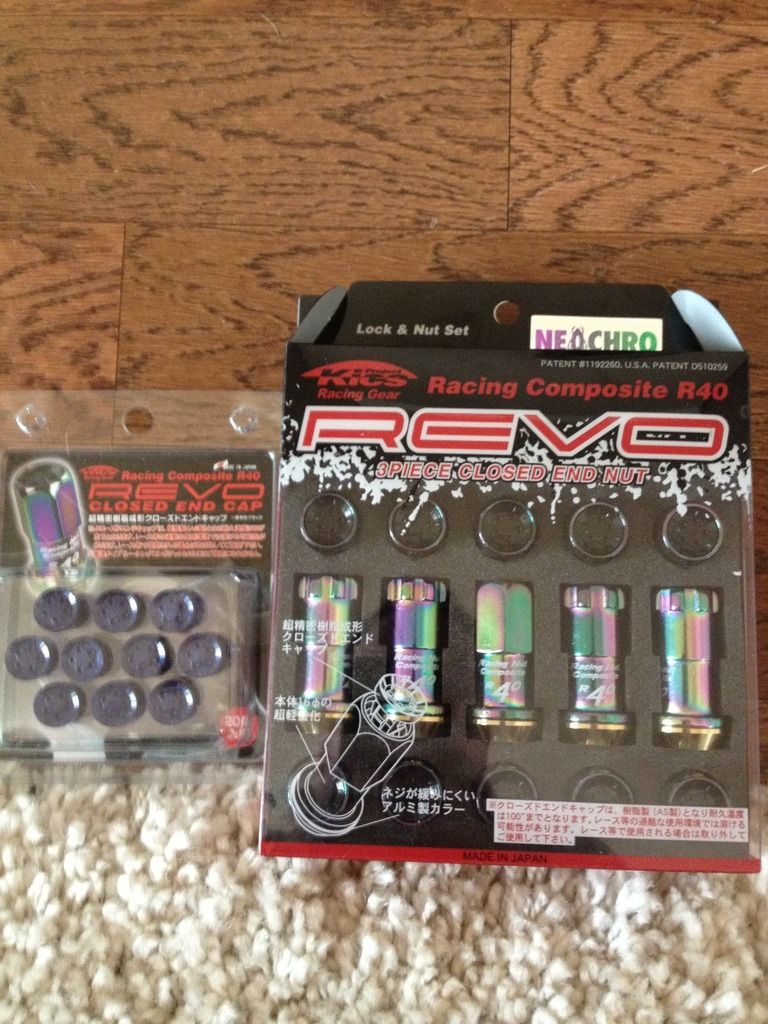
Project Kics REVO R40 Lug Nuts, Neo Chrome (Evasive)
New OEM AP1 Headlights (HondaAcuraOnline)
New Fender Liners (HondaAcuraOnline)
Interior:
Black Recaro Pole Position, Driver & Passenger
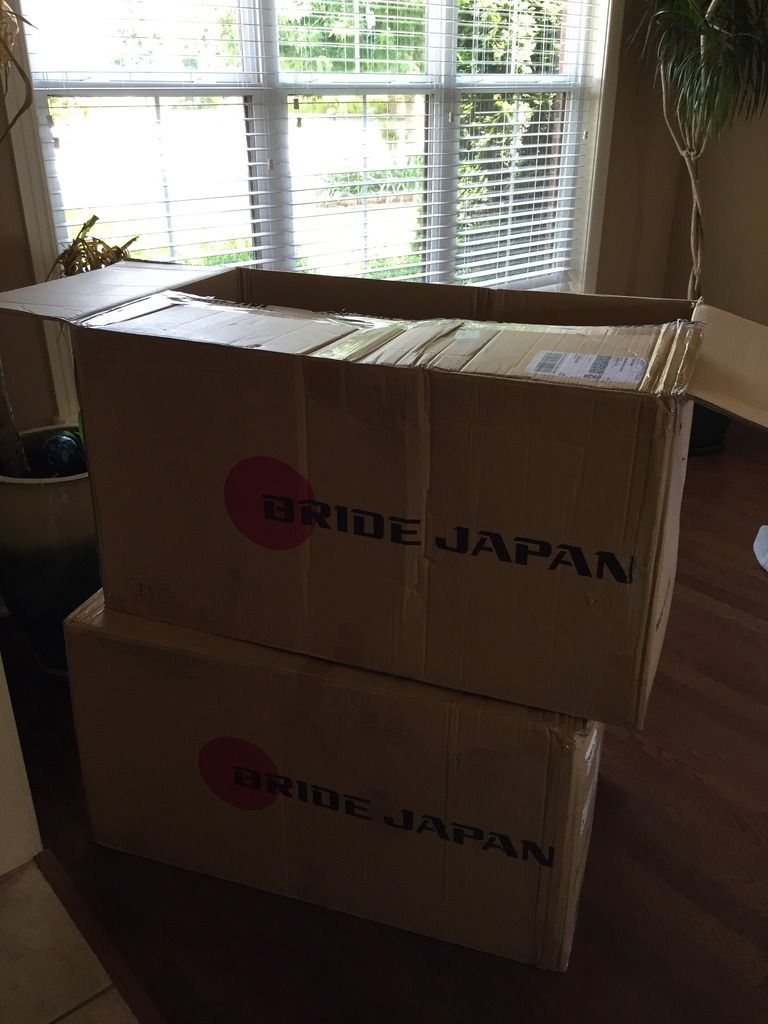
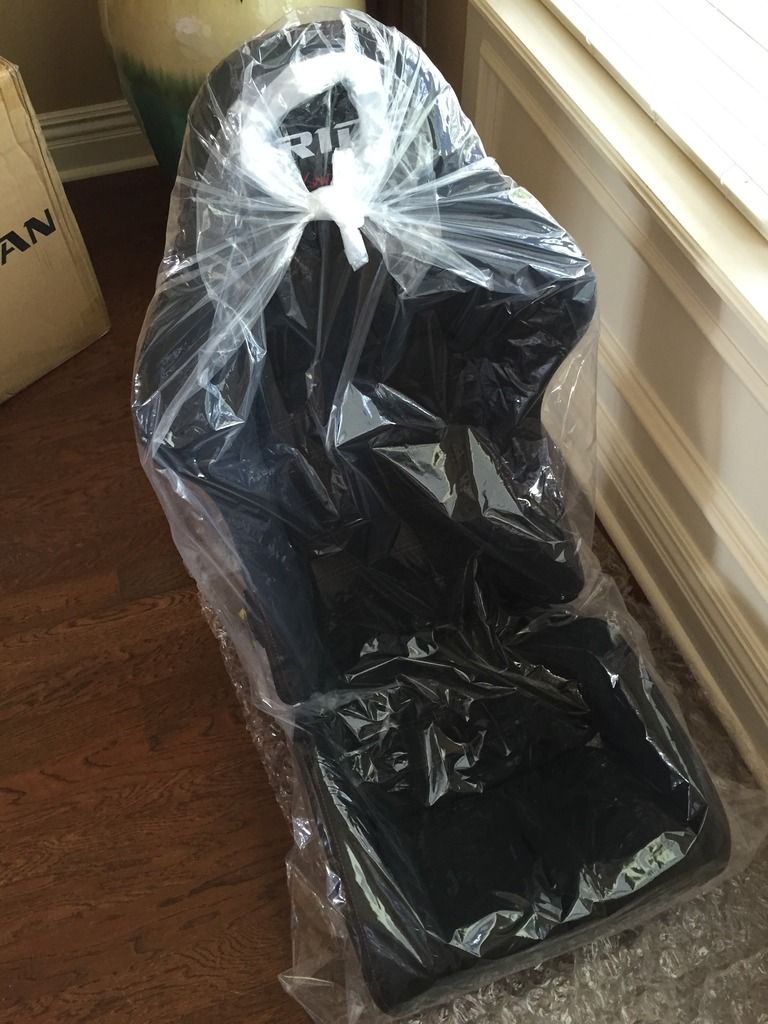
Bride Stradia II Sport (FRP), Driver & Passenger (Evasive)
Bride RO Seat Rails (Evasive)
Black Alcantara Center Console/Boot, Silver Stitching
Black Alcantara Door Panels, Silver Stitching
Black Bride Fabric Boot, Red Stitching (RedlineGoods)
Black Bride Fabric Visor Covers, Red Stitching (RedlineGoods)
Black Bride Fabric E-Brake Handle, Red Stitching (RedlineGoods)
New Black OEM Carpet (HondaAcuraOnline)
New Black OEM Floor Mats (HondaAcuraOnline)
Suspension/Brakes:
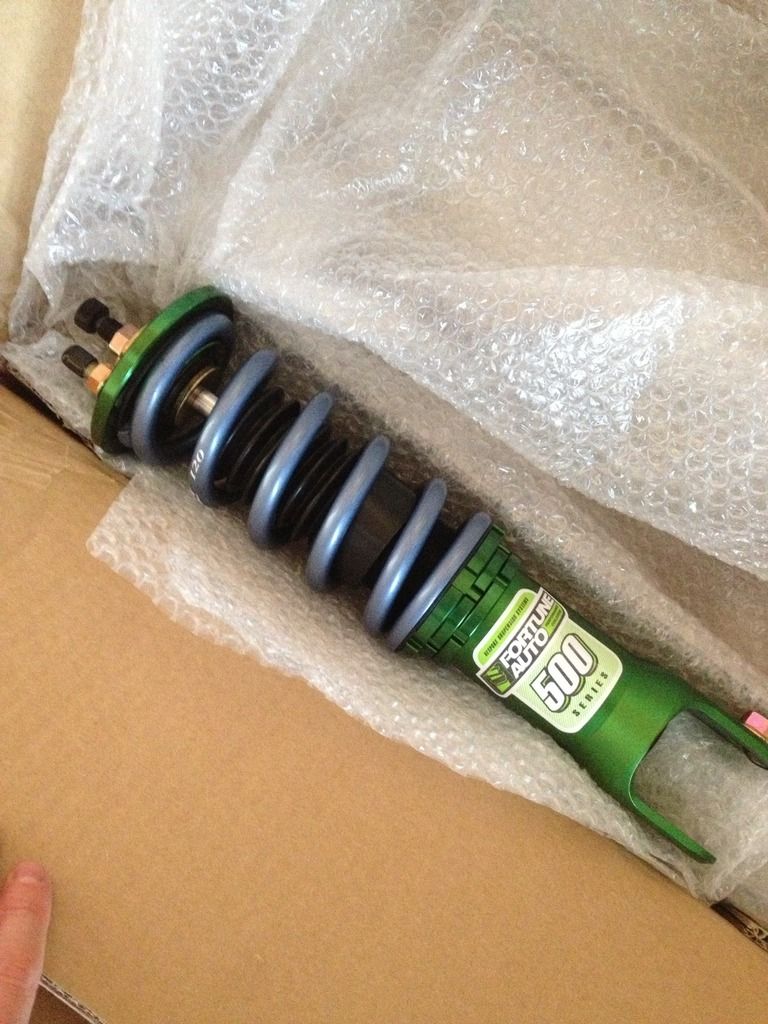
Fortune 510 Coilovers
Fortune 500 Coilovers, Swift Spring Upgrade (Evasive)
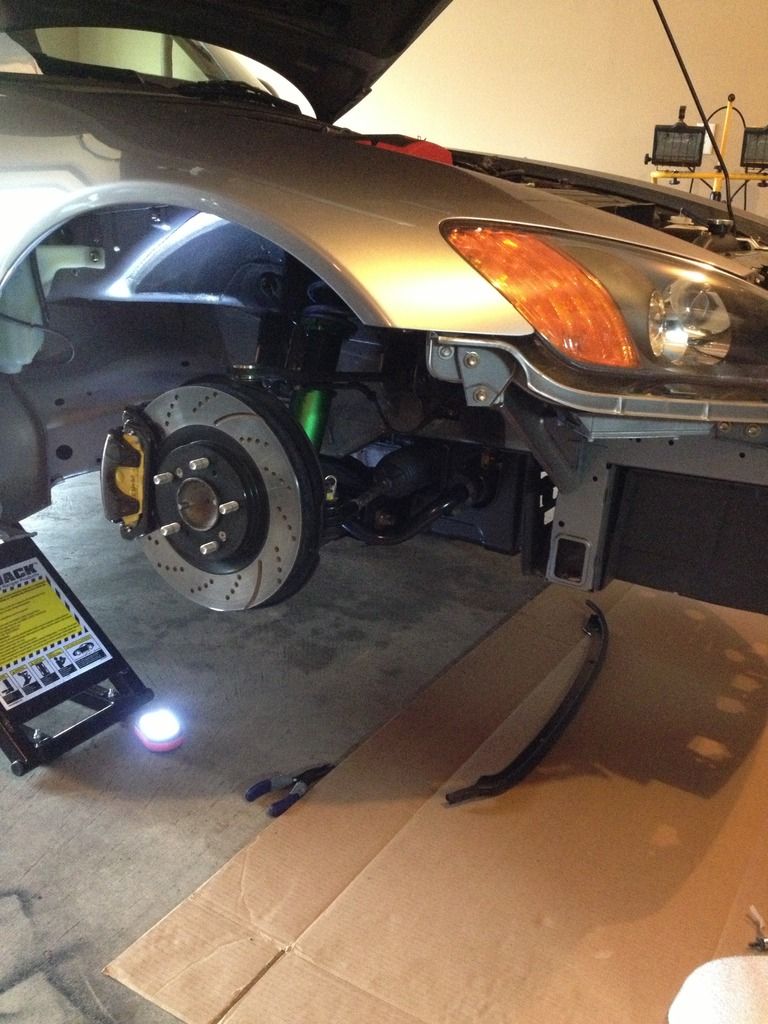
EBC Rotors, Front & Rear, Slotted & Dimpled (ShopEBCBrakes)
EBC Blue Stuff Pads, Front & Rear
EBC Yellow Stuff Pads, Front & Rear (ShopEBCBrakes)
Tarox Brake Kit
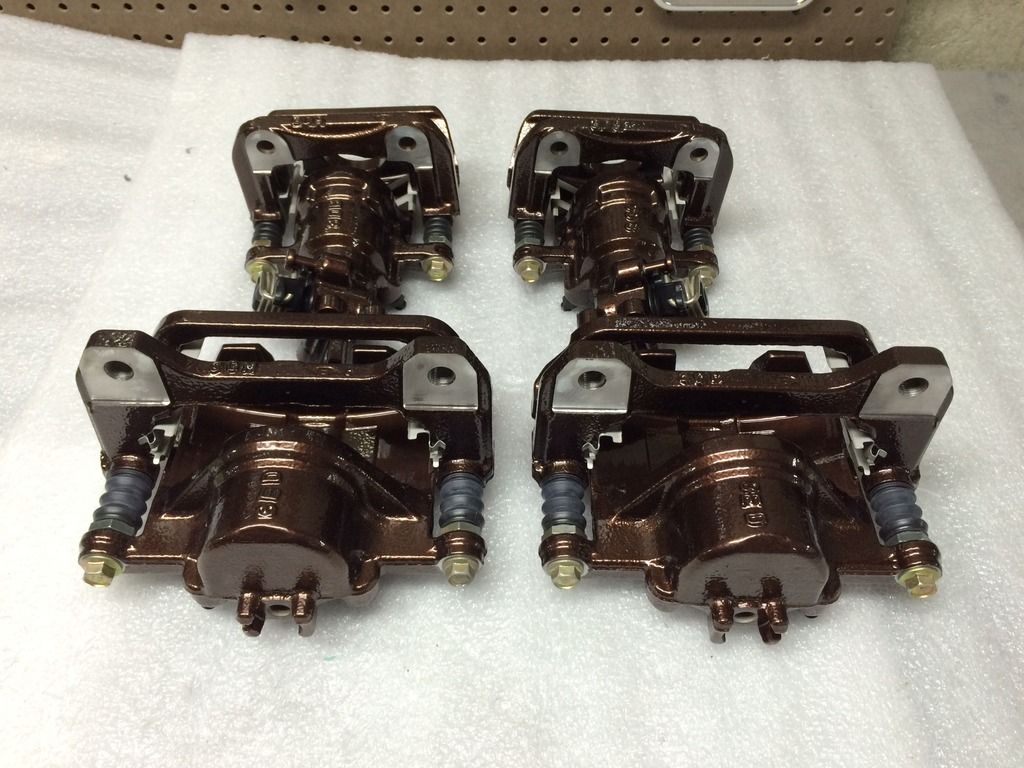
Custom Powder Coated & Rebuilt Stock Calipers, Root Beer Bronze (Renewed Finishes, PA - Dave)
Performance:
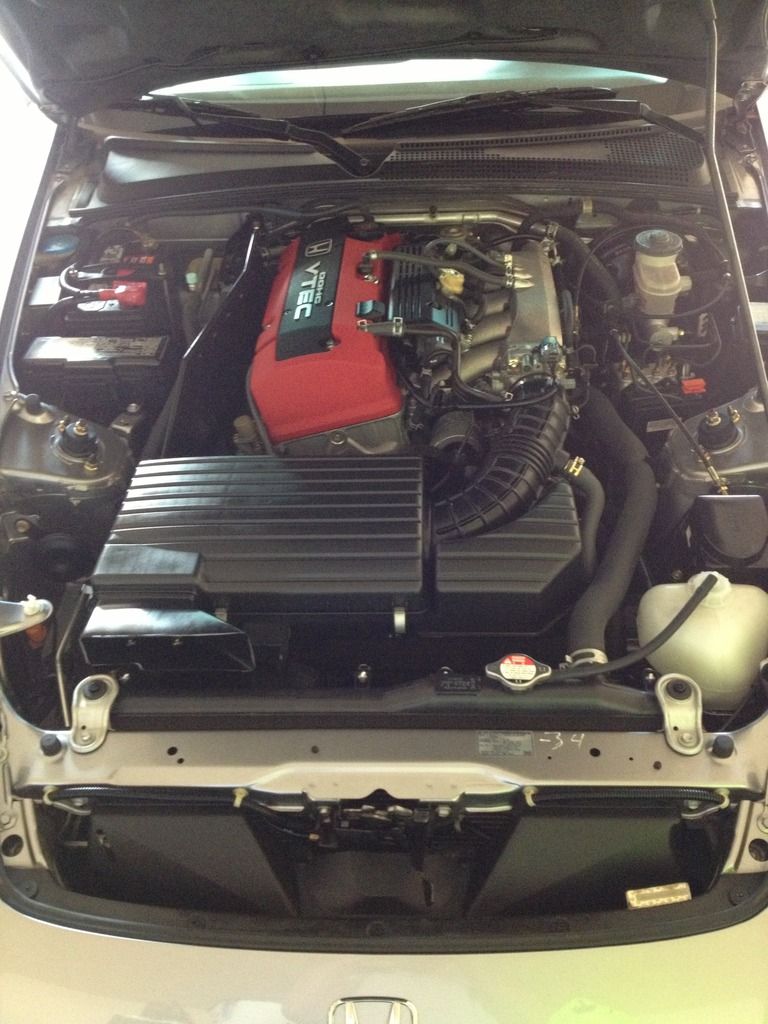
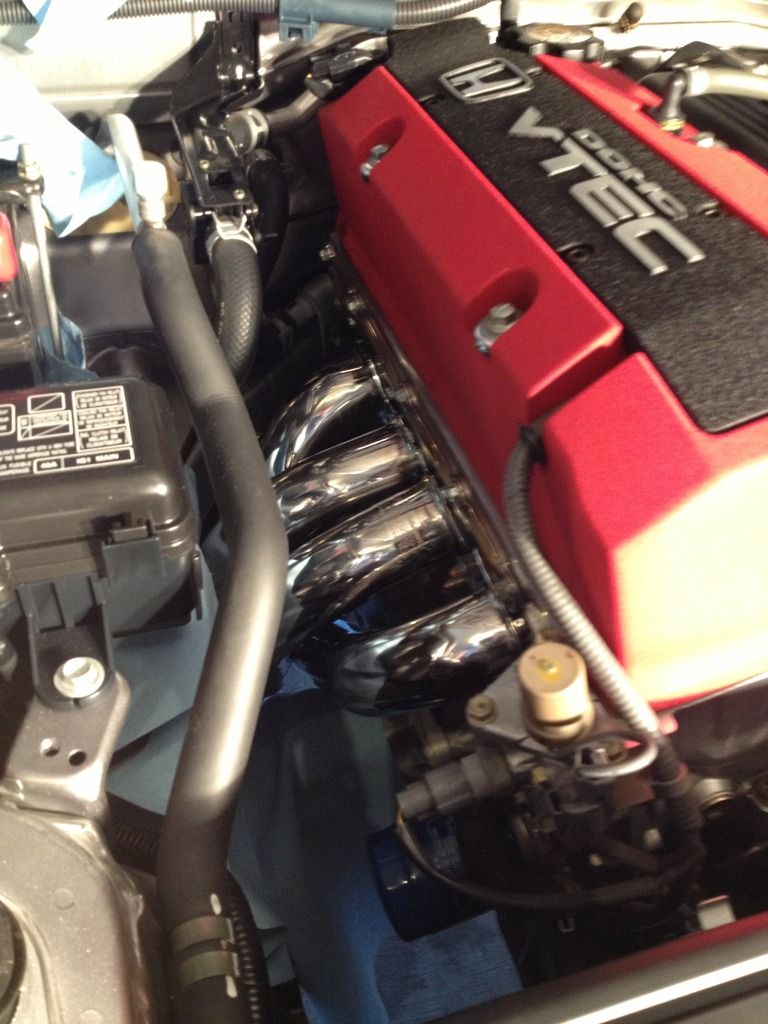
CT Engineering After-Cooled Supercharger, Standard Pulley/Boost (Evasive)
SOS Dual Gauge Pillar Pod (ScienceOfSpeed)
Tanabe Revel VLS Wideband A/F Gauge (Evasive)
Tanabe Revel VLS Boost Gauge (Evasive)
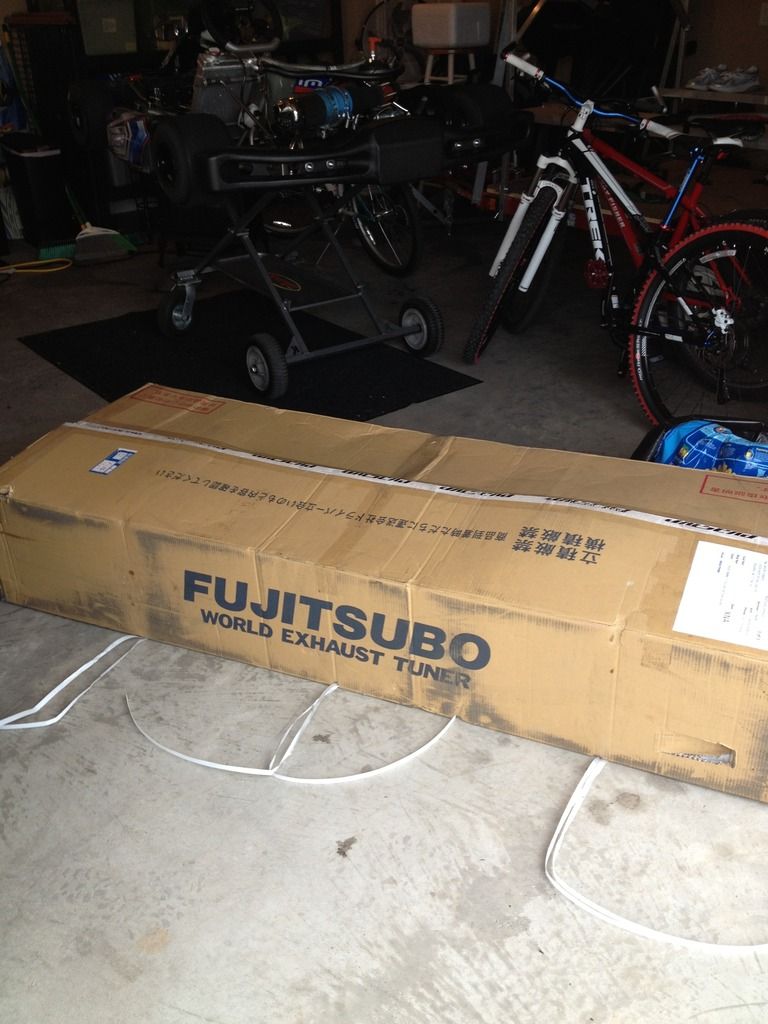
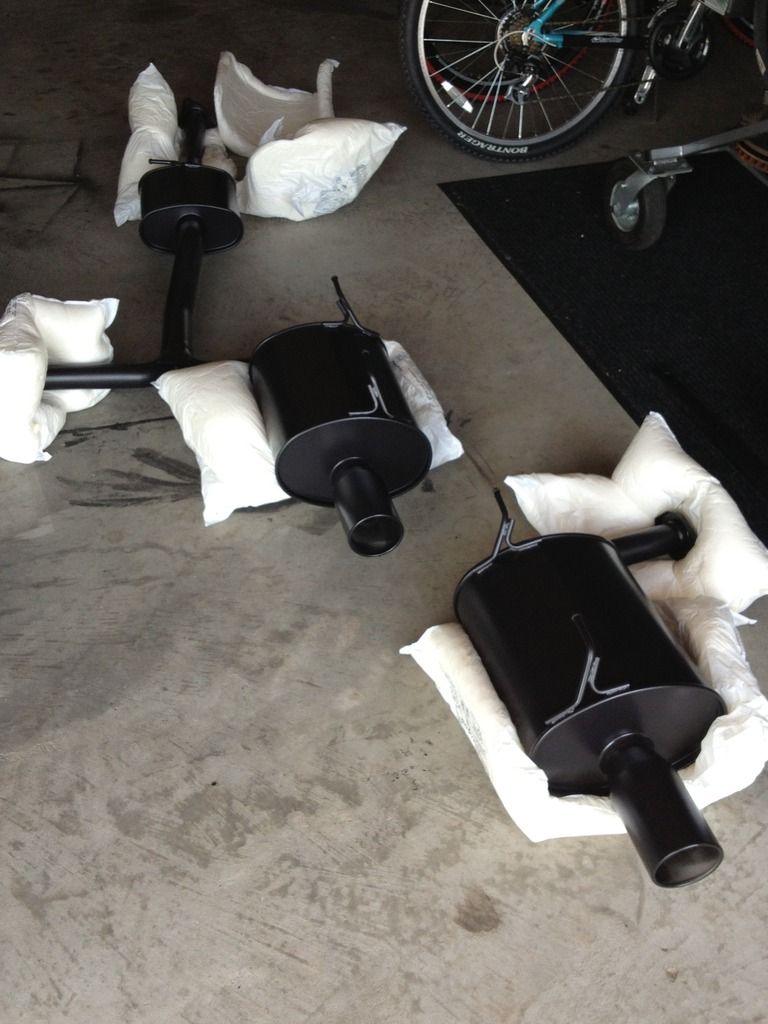
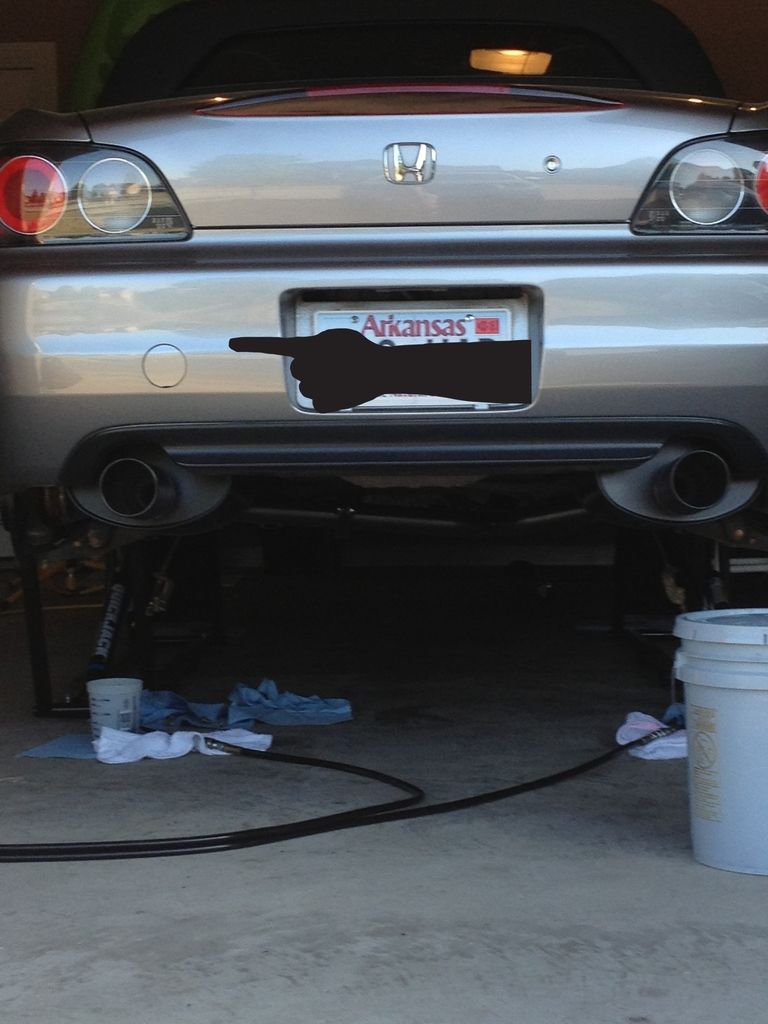
Fujitsubo Legalis R Exhaust, Ceramic Coated Black (Evasive & Custom Powder Coating Services, AR)
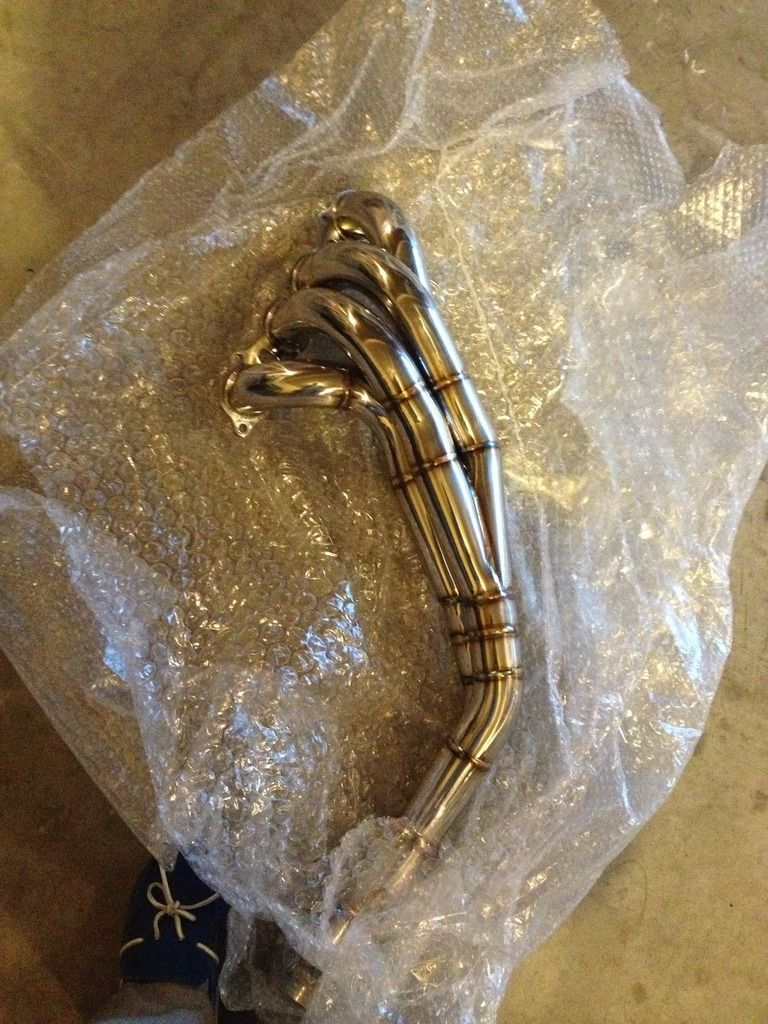
J's Racing Header, Stainless (Evasive)
Berk High Flow Catalytic Converter, 63.5 (Evasive)
Password:JDM Carbon Fiber Intake
Additional:
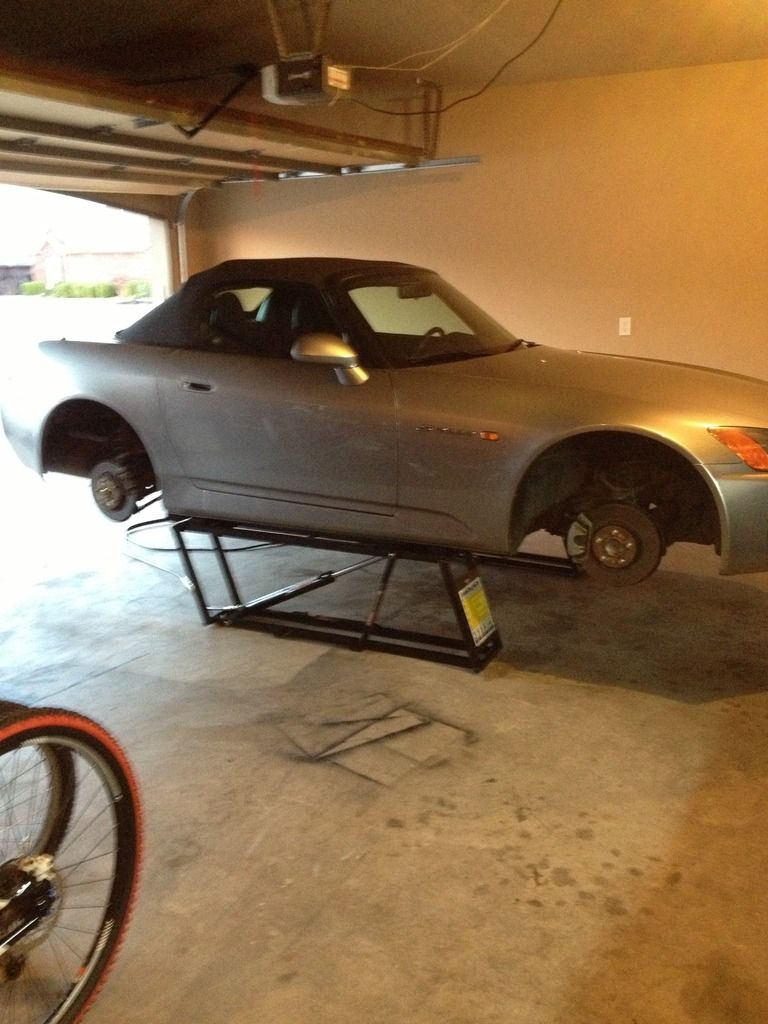
QuickJack BL-5000
Completely Stock:
Exhaust:
Suspension/Brakes/Wheels:
Supercharger Install:
Interior:
As She Sits:
Hey guys! I am starting this thread to show progress on my '03 AP1. I have a lot of plans for the car, and hopefully I'll be able to provide some helpful information for the community. I purchased the car 2 weeks ago, with 40k miles from the original owner. I was fortunate to find an AP1 in excellent condition. The car is completely stock right now, but not for long! I have included a list of intended mods below with expected ETA for each. I will provide pictures as soon as possible. I am currently traveling for Christmas.
The list below is just a preliminary outline, and is far from complete. I'll continue to provide updates.
Update (7/3/15):
Hey guys! I apologize for the long overdue update from my original post back in December. Yikes, what a slacker. Work has been incredibly busy & I have been traveling quite a bit, but enough with the excuses. Although I am not going to provide all updates now, I do intend to respond to this topic/post/blog (whatever you want to call it) with a review of each part I've purchased & installed on my car. I have performed all of the work myself, so if you have any questions, don't hesitate to ask. I'll try not to wait 6 months to answer.
In addition to reviewing actual parts, I'll provide a review of each shop I've worked with, although the vast majority of my purchases have been made through Evasive Motorsports (Justin Espino). Just to note, I have no affiliation with any performance shop, so my reviews are completely unbiased.The parts list below has been updated to include everything I've purchased/installed to date. My plans took a little bit of a turn when I decided to purchase a CT After-Cooled Supercharger (which I absolutely love). In addition to the parts, I have also outlined the shop I used for each purchase. It can sometimes be frustrating looking for parts, so hopefully this helps.
Car:
'03 AP1, Silverstone Metallic, Black Interior
Exterior:
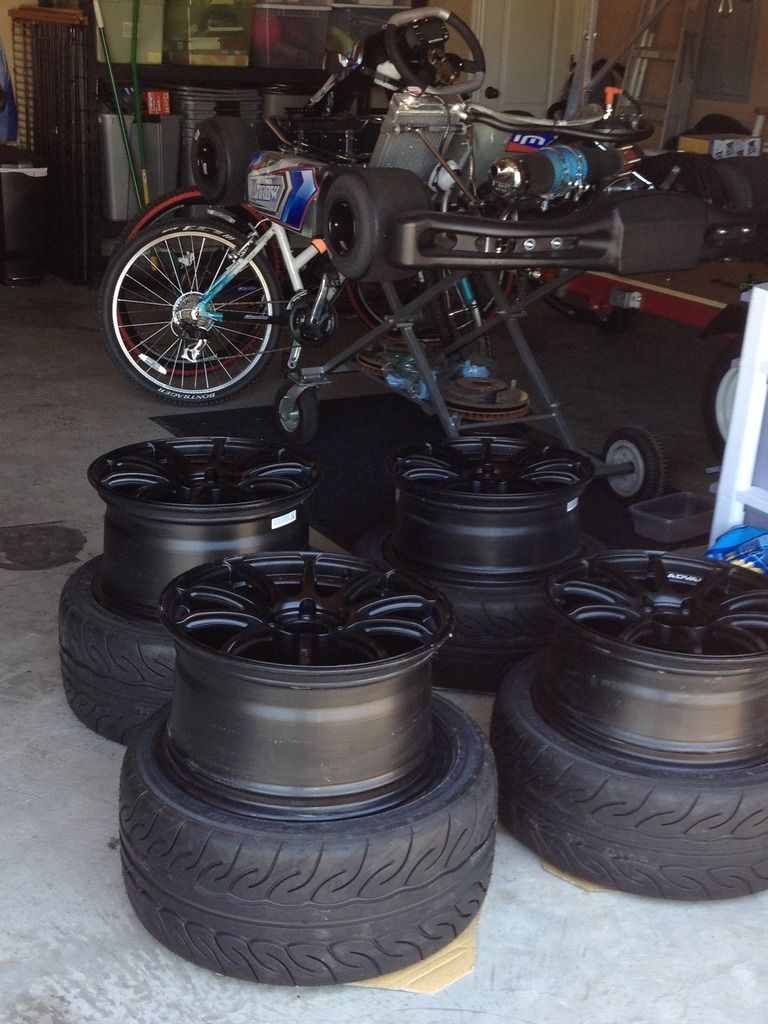
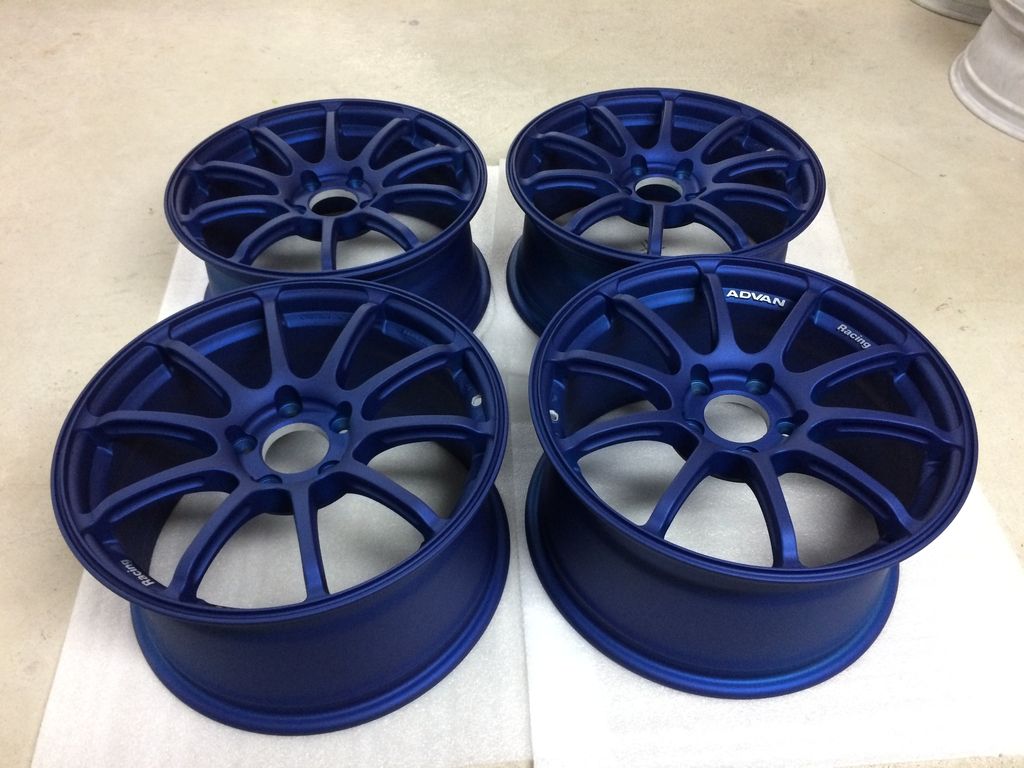
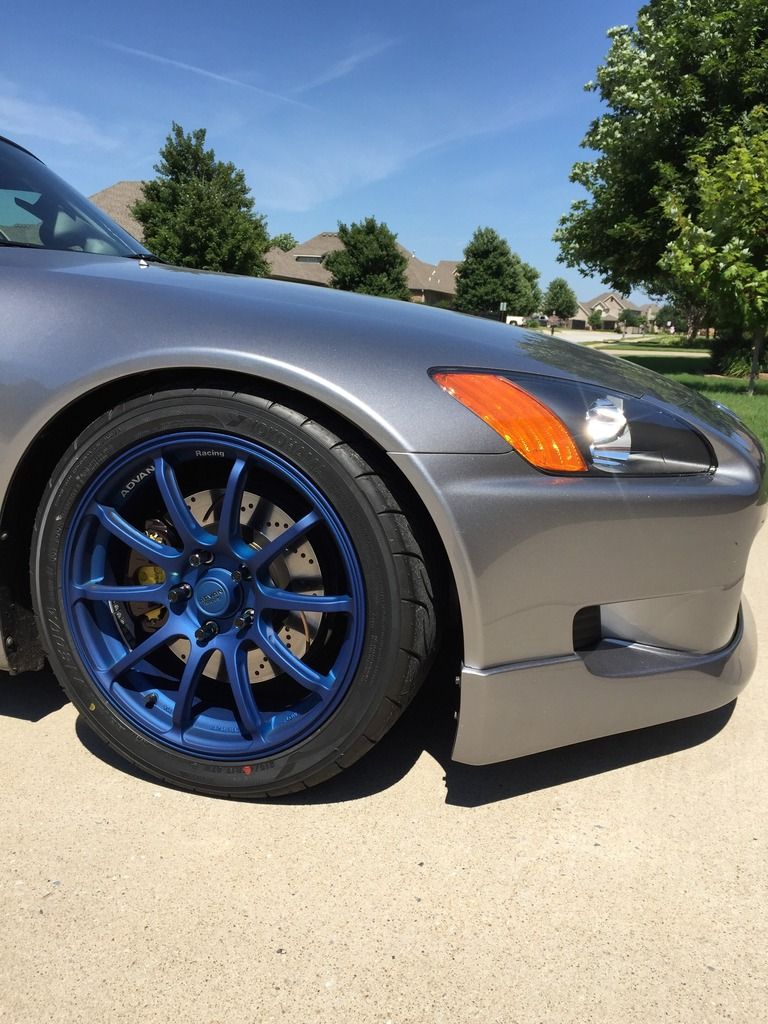
Advan RS2 Wheels (Evasive)
- 17x7.5 +48, 215/45/17
- 17x9.0 +63, 245/40/17
- I purchased the wheels in semi-gloss black, but had them powder coated in a custom metallic matte blue finish (Renewed Finishes, PA - Dave)
- I am running on Yokohama Advan AD08R tires (Evasive)
- You will not need to roll your fenders or modify your fender liners with this wheel & tire combination (my car is quite low, & I don't rub)
RSG Gears Lip (Rockstar Garage)
Project Kics REVO R40 Lug Nuts, Neo Chrome (Evasive)
New OEM AP1 Headlights (HondaAcuraOnline)
New Fender Liners (HondaAcuraOnline)
Interior:
Bride Stradia II Sport (FRP), Driver & Passenger (Evasive)
Bride RO Seat Rails (Evasive)
Black Bride Fabric Boot, Red Stitching (RedlineGoods)
Black Bride Fabric Visor Covers, Red Stitching (RedlineGoods)
Black Bride Fabric E-Brake Handle, Red Stitching (RedlineGoods)
New Black OEM Carpet (HondaAcuraOnline)
New Black OEM Floor Mats (HondaAcuraOnline)
Suspension/Brakes:
Fortune 500 Coilovers, Swift Spring Upgrade (Evasive)
EBC Rotors, Front & Rear, Slotted & Dimpled (ShopEBCBrakes)
EBC Yellow Stuff Pads, Front & Rear (ShopEBCBrakes)
Custom Powder Coated & Rebuilt Stock Calipers, Root Beer Bronze (Renewed Finishes, PA - Dave)
Performance:
CT Engineering After-Cooled Supercharger, Standard Pulley/Boost (Evasive)
SOS Dual Gauge Pillar Pod (ScienceOfSpeed)
Tanabe Revel VLS Wideband A/F Gauge (Evasive)
Tanabe Revel VLS Boost Gauge (Evasive)
Fujitsubo Legalis R Exhaust, Ceramic Coated Black (Evasive & Custom Powder Coating Services, AR)
J's Racing Header, Stainless (Evasive)
Berk High Flow Catalytic Converter, 63.5 (Evasive)
Additional:
QuickJack BL-5000
- This particular lift aligns with the S2000 jack points perfectly. I don't believe the BL-3500 is long enough to reach the correct jack points.
Completely Stock:


Exhaust:


Suspension/Brakes/Wheels:


Supercharger Install:


Interior:


As She Sits:


 07-03-2015, 06:48 PM
#5
Registered User
Thread Starter
Join Date: Dec 2014
Location: Rogers, AR
Posts: 18
Likes: 0
Received 0 Likes
on
0 Posts
Ok, so I fixed the pictures that were previously included & added updated pictures of the car. I will add additional shots as things progress. I still have a lot left to do. 
07-08-2015, 09:08 PM
#6
Registered User
Thread Starter
Join Date: Dec 2014
Location: Rogers, AR
Posts: 18
Likes: 0
Received 0 Likes
on
0 Posts
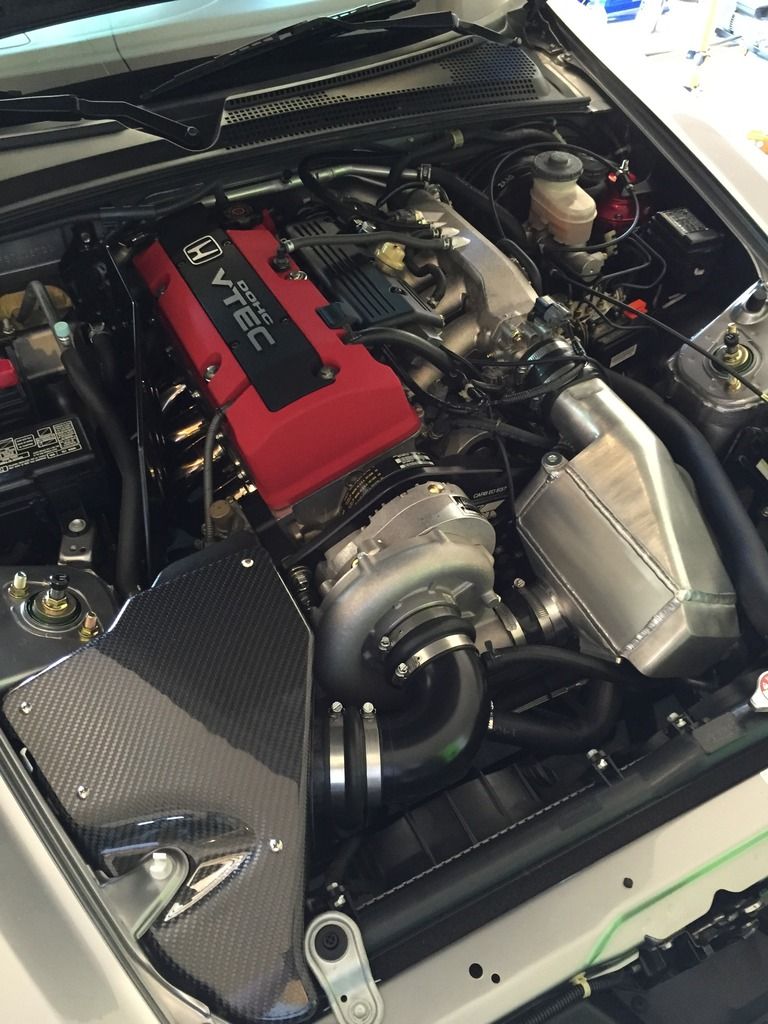
CT Engineering After-Cooled Supercharger Review:
I figured I would start my "reviews" with the most technical item included in my build, so here goes. The supercharger kit was purchased from Evasive Motorsports approximately 2.5 months ago. There was a 4-5 week lead time, so If you're interested in this kit, don't expect to have it delivered within a week. If you've seen CT (aka Comptech, CTE) supercharger kits before, you will obviously notice a visual difference. This is a new kit, so if you like the "old" polished look, you may be disappointed. I personally don't like shiny parts, which is evident from the fact that I had a brand new polished exhaust completely ceramic coated black, but to each their own. You will also notice from the pictures below, that there is no stamp on the after-cooler. I'm assuming CT has made the decision to simply not apply a CT, or historical Comptech, stamp on the after-cooler. I don't actually know why this change has been made, but it's completely irrelevant to performance, so who really cares. It is important to note that I essentially installed this kit myself, although I did have assistance with removing the crank pulley, but more about that later. The sections below are outlined to hopefully make reading a bit easier, & will act as highlights for my experience with both the installation & overall performance to date.
Overall Fitment Rating (1-10): Solid 9
Although this kit fits great, there are some questionable areas/claims, which is why I am awarding a 9 instead of a 10. First off, the claim "no cutting required" is technically true, but it's definitely in the gray area. Although you are not required to actually "cut" the car, you are required to drill 2 holes through the front support. Drilling is cuttings ugly cousin, so I consider this to be a bit, as I said, gray. In addition to this, you are required to cut & splice two wires on your factory fuel pump unit to allow fitment of the supplied fuel pump. The new fuel pump does not just "plug" in, as the connector is different from the factory unit. This is obviously not a huge issue, but it is not outlined in the instructions as being necessary, false. At the end of the day, this is a very high quality kit, & I would certainly recommend it to anyone.
Instruction Rating (1-10): Straight 4
Some may say I am being tough, but the instructions are sh*t. Can you get the job done with the supplied instructions, probably, but it should be a hell of a lot easier. The instructions, although very good in some areas, are completely vague & ambiguous in other areas. To cut some slack, the instructions do say to have this kit installed by a professional/competent mechanic, but I think that's just a shortcut to provide weak instructions. The instructions could, & should be a lot better. Again, can a competent/mechanically inclined person get the job done, probably, but I just think a little extra instructional support would be nice.
Can An Amateur Install This Kit?: I Did It
I am an amateur "wrencher", & I was able to perform this install with limited assistance. I am however mechanically inclined, so if you're wrench impaired, I would advise against an attempt, because it will likely be just that, an attempt. I would certainly recommend using the Helm's/Service Manual as a supplemental source for the install.
How Long Does It Take?: For Me, 2 Full Days
Obviously the install could probably be done quicker, but I took my time to ensure everything was correct. For a first timer, I would block off 2 full days.
Can The Entire Kit Be Installed By 1 Person?: A Big Ole Negative
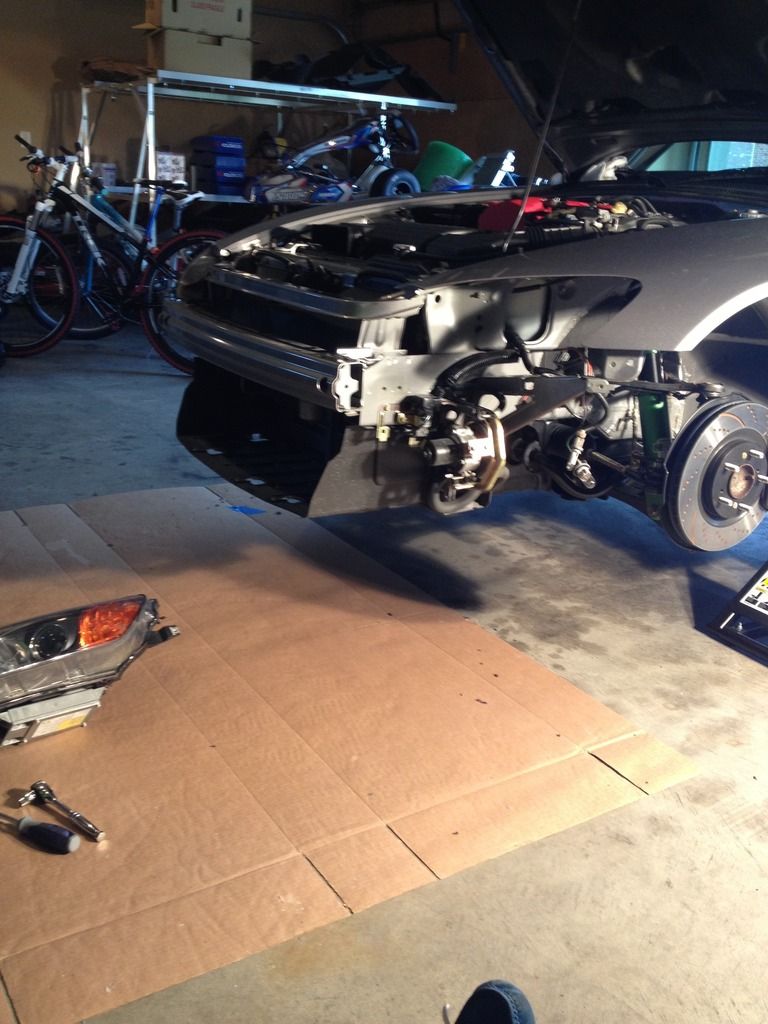
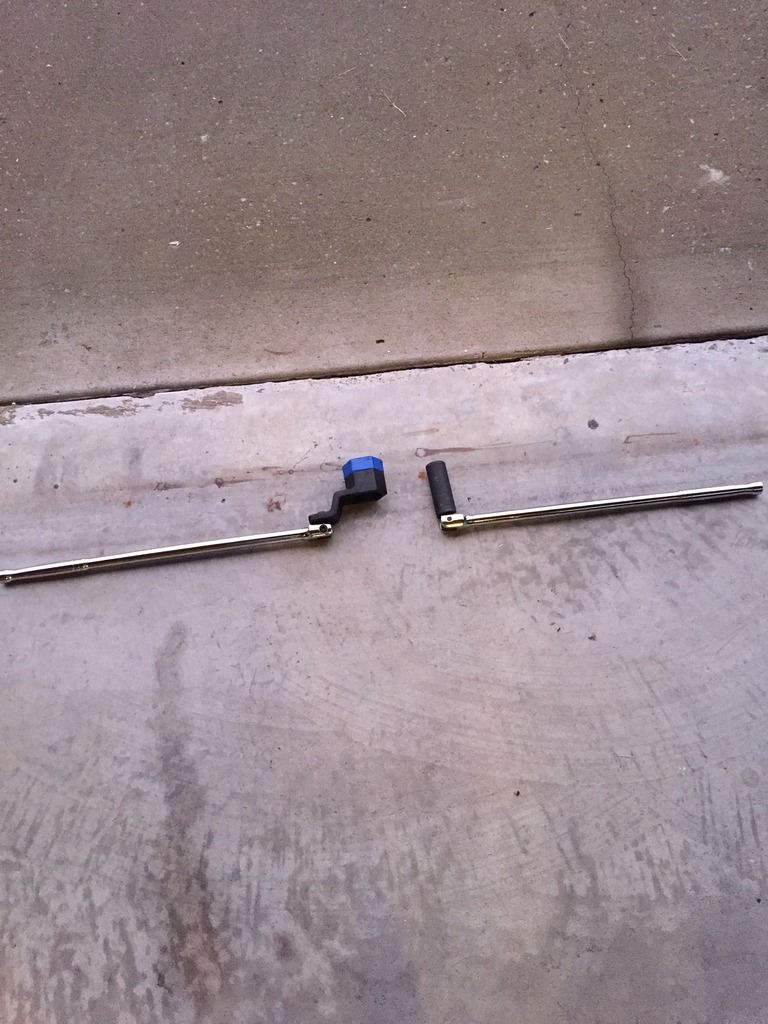
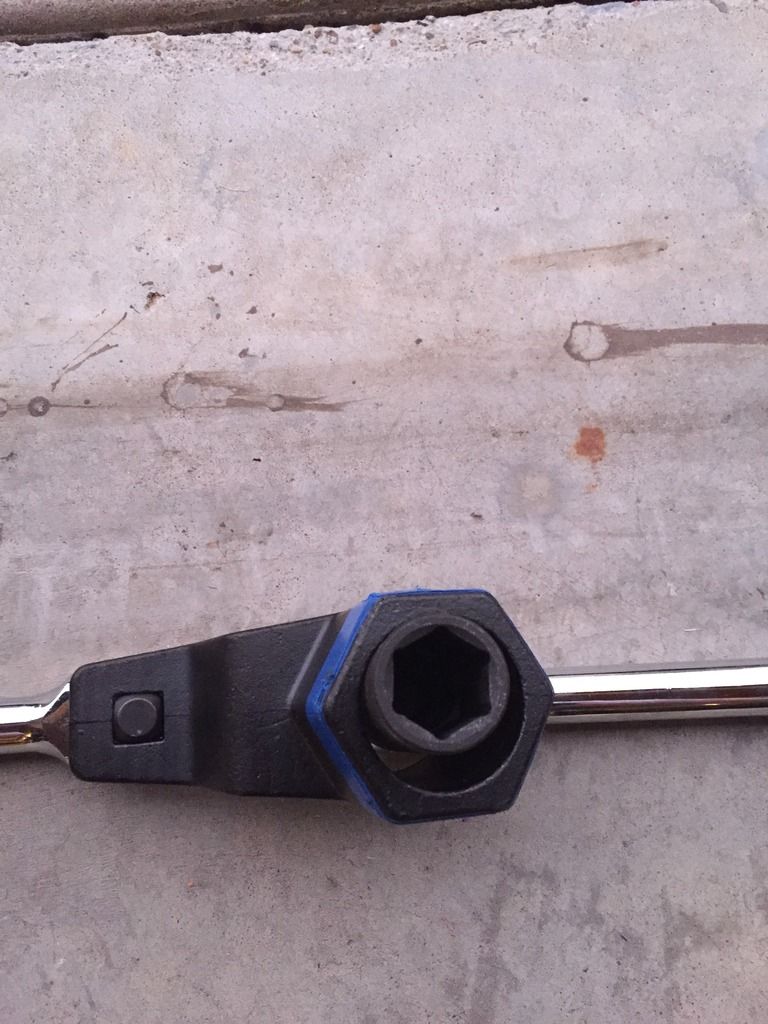
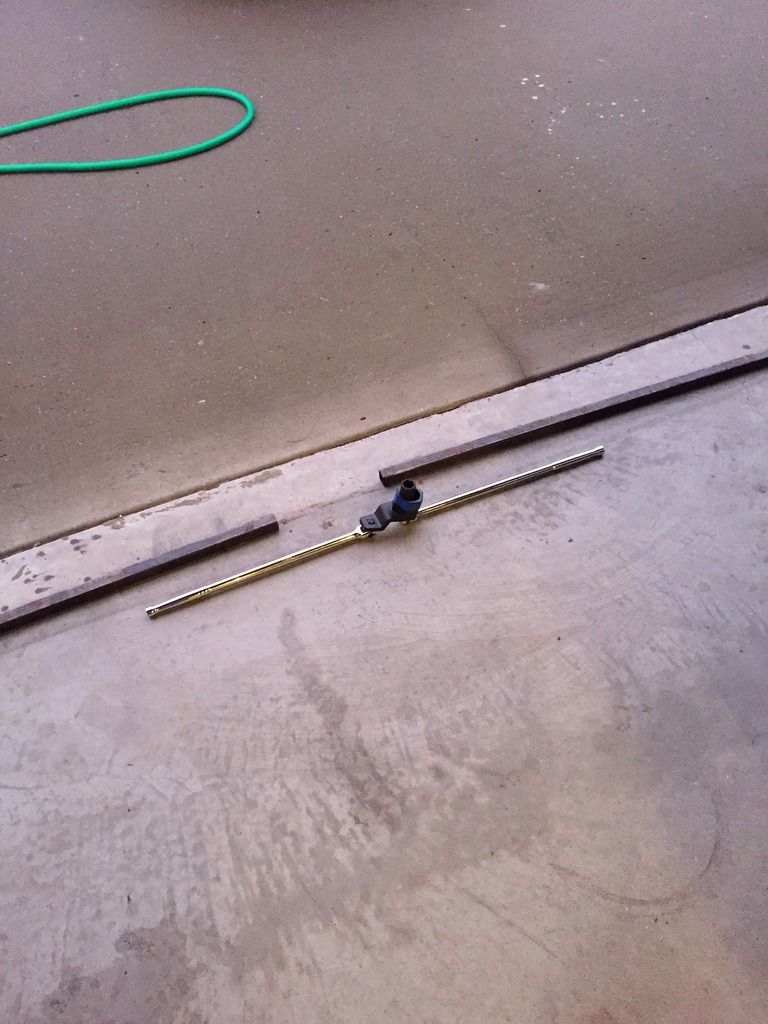
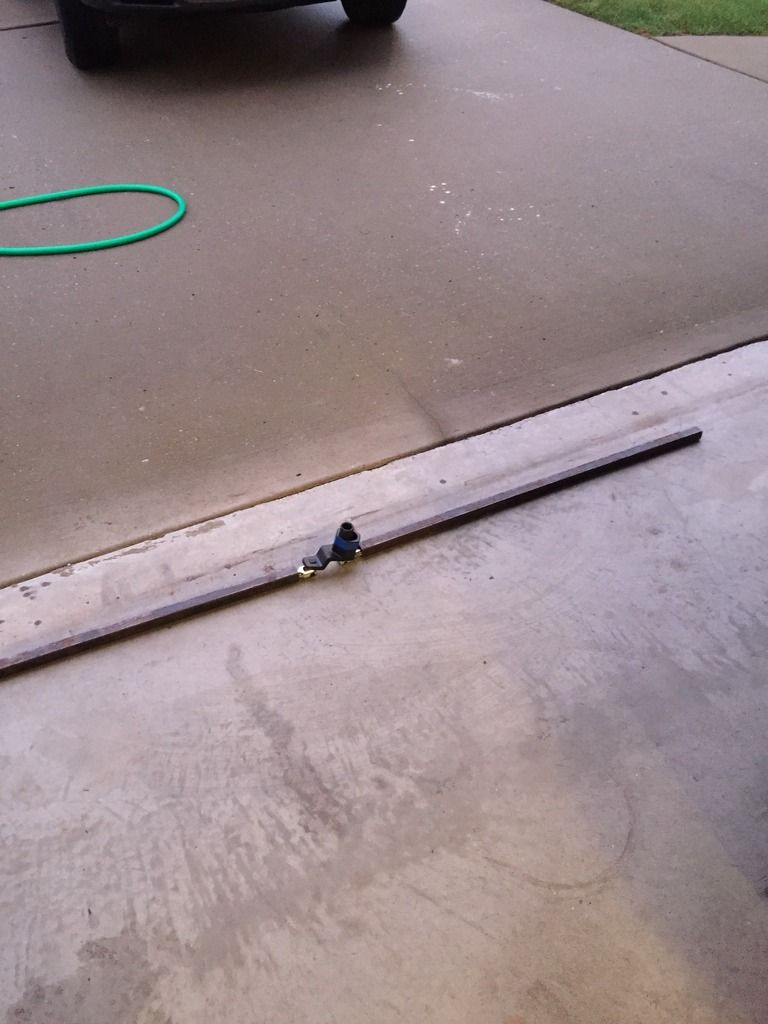
I've read of some people removing the crank pulley by themselves, but my advice would be to not attempt this. You will be in for a lot of heartache, & you will likely make a mess by trying to muscle the crank pulley alone. DON'T do it. I have provided pictures below that outline what you'll need to remove the crank pulley. It is on TIGHT TIGHT TIGHT.
Not In The Instructions, But You Will Need To Know:
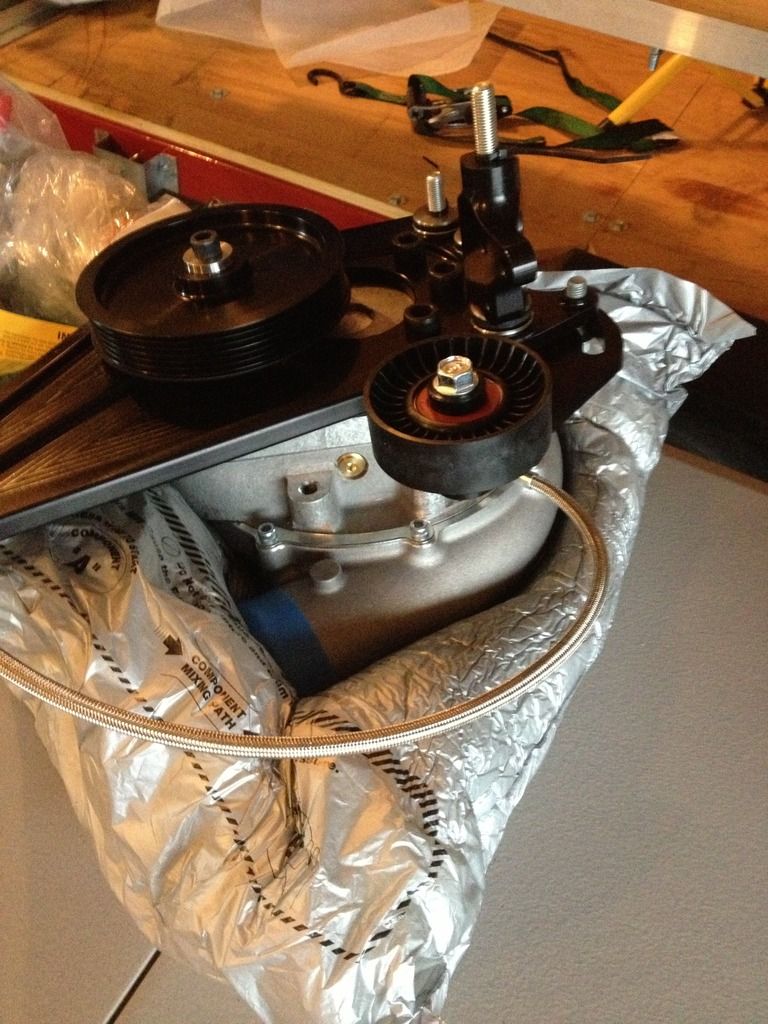
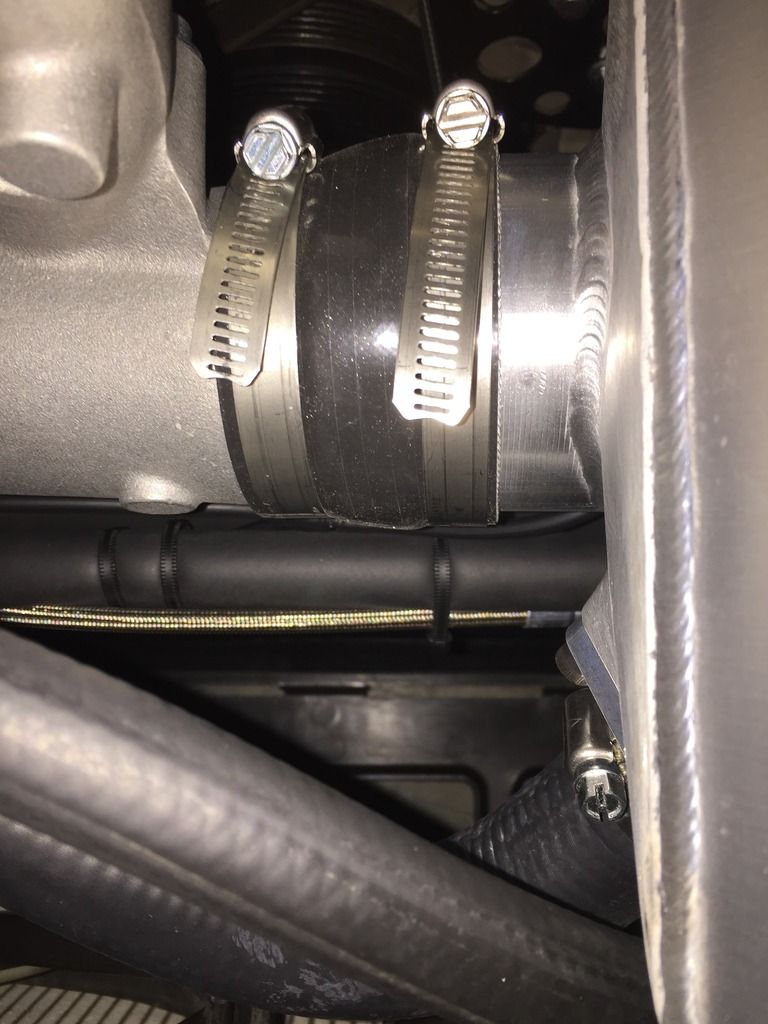
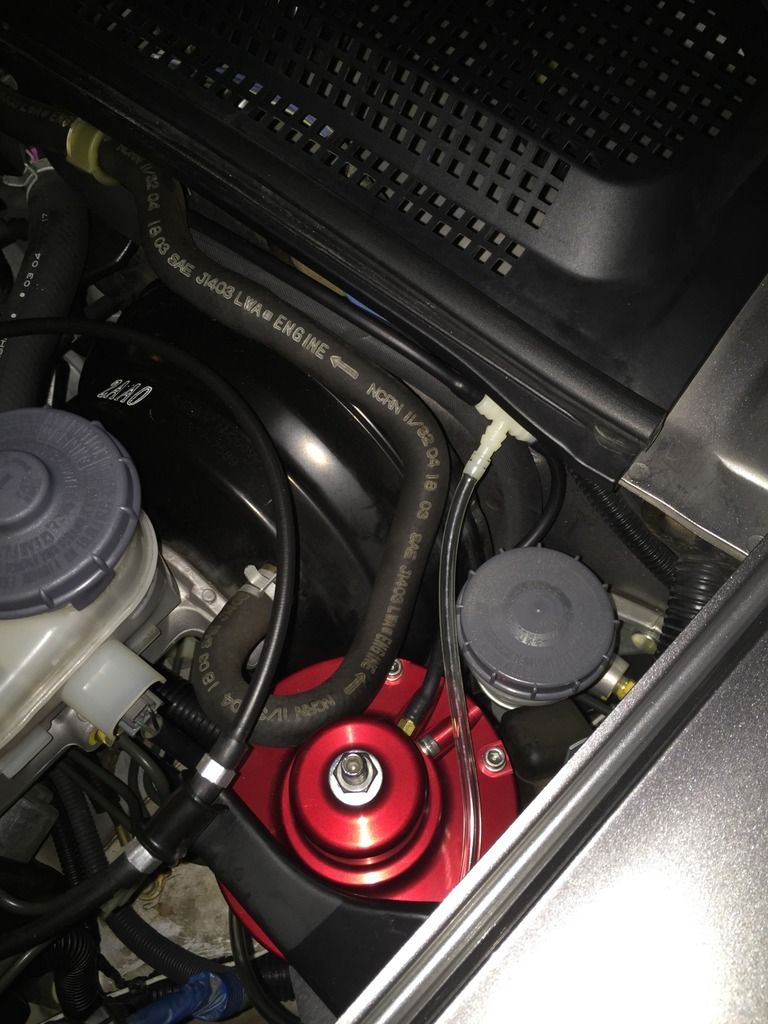
The blower (Paxton Novi 1220SL) comes with an oil drain line. This is not documented in the instructions, & there is no mention of where to route this line. Do NOT remove it! The blower supplied is a self-lubricating unit, that does NOT tap into the oil pan. This is important because the supplied braided hose appears as if it should tap into the oil pan, but it 100% does not. I ran this line under the frame support & then zip-tied it to the AC line. Pictures have been included below. In addition to the oil drain line, it is not 100% clear where to place the breather valve on the blower. It does not come installed. I have provided a picture below of where it should be placed.
Things You Will Need:
Tools, Wire Cutters, Crank Pulley Tool (purchased from Amazon-Powerbuilt 648796 50mm-$30), 19MM Deep Socket Wrench (6 point), Two 1/2 Inch Breaker Bars (Lowes), Two Steel Tubes/Rods?, Sharp Scissors
Extras & Recommendations:
Although not required, I would recommend the purchase of a wideband A/F ratio gauge as well as a boost gauge. I personally have Tanabe Revel VLS gauges. The wideband will obviously help monitor your air/fuel mix to ensure you are not running too lean. If you are not aware, installation of a wideband A/F gauge requires the use of an additional O2 sensor, bringing your total to 3. The Tanabe Revel VLS gauge comes with an additional O2 sensor & everything you will need. If you have a factory header, you will need to weld an additional mount (provided) for the 2nd O2 sensor on the header. I personally have a J's racing header, which fortunately has an extra port for a 2nd O2 sensor, so this was a simple step for me. Just to note, the CT supercharger kit comes with a "piggyback" ECU that simply plugs into your stock ECU. The "piggyback" corrects your air/fuel mix, so as stated, a wideband A/F gauge is not required, but it certainly doesn't hurt. In addition to the wideband, I am also running a boost gauge, which is good for monitoring belt slippage & boost leak. Again, not needed, but it certainly doesn't hurt. I have included pictures of the "tap-in" location for the boost gauge below.
Final Install Notes:
This kit was installed on my 2003 AP1, so I do not have any information as it relates to installation on an AP2 (sorry). Just to reiterate, this kit is 100% bolt on (mostly, read above). That said, you will be able to install this kit, & then go for a drive. You will NOT need to have the car tuned, as the "piggyback" ECU acts as your tune.
Start-Up:
Well the good news is, when I installed the kit, the car cranked on the first try! I'm not sure why I was surprised, but hey, it was my first time. Upon installation, you will notice that the car immediately jumps to 2K RPM at start-up, & will register 20 on your wideband. This happens every time I start the car, & continues for approximately 15-20 seconds. Following the first 15-20 seconds, the car returns to 1K RPM & sits nicely at 14.7 (which is stoic, or just right) on the wideband. You will also be registering vacuum on your boost gauge, which is normal at idle.
Performance & Drivability:
If you want your car to maintain a stock power curve, you will be very happy with this kit. For the most part, you will not notice this kit is even on the car under normal throttle/driving conditions. This is personally what I wanted from the kit, so I couldn't be happier. You will experience heat soak every now & again if sitting for long periods in hot weather. This is not a big deal, just rev your motor & clear the system. If you don't, you may experience the infamous "bucking bronco". So how is the car under aggressive throttle? Well, simply put, WICKED! The supercharger rips above 5K RPM, & provides a VERY noticeable bump in power over stock. It definitely improves the overall experience, & for me, delivers the right amount of power where & when you need it. I am registering 4psi at about 8.5K RPM, so I think this is realistic expectation for anyone installing this kit.
Final Thoughts:
If you want a bazillion hp, don't buy this kit. But if you want your car to feel like it has VTEC on some major, Barry Bonds type steroids, BUY this kit!
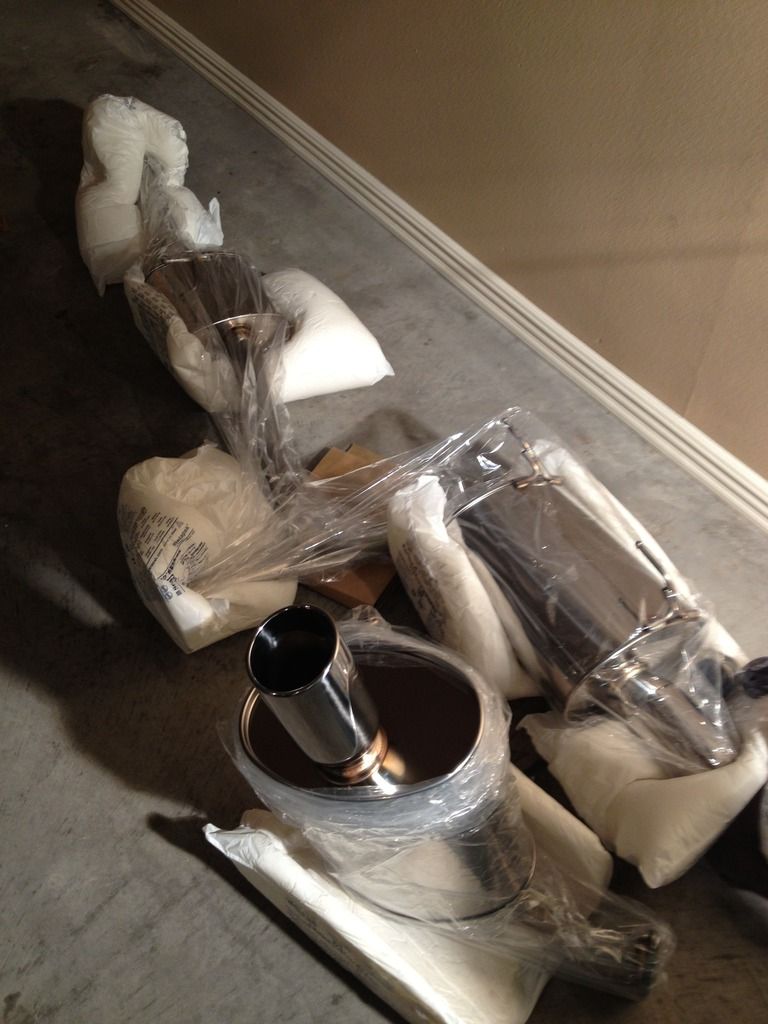
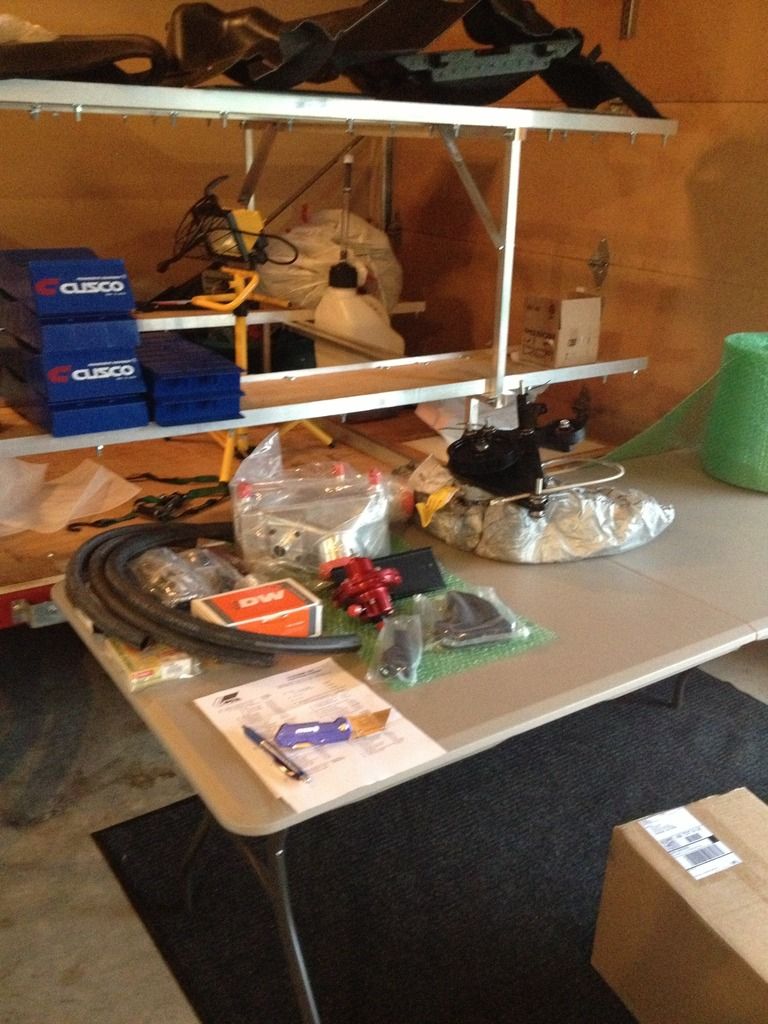
What's In The Box (Incomplete Pictures, But Close Enough):
Crank Pulley Removal:
Follow the tool setup below to remove your crank pulley. You will need one person torquing from one side of the car & another on the opposite side of the car.
Blower Oil Drain Line:
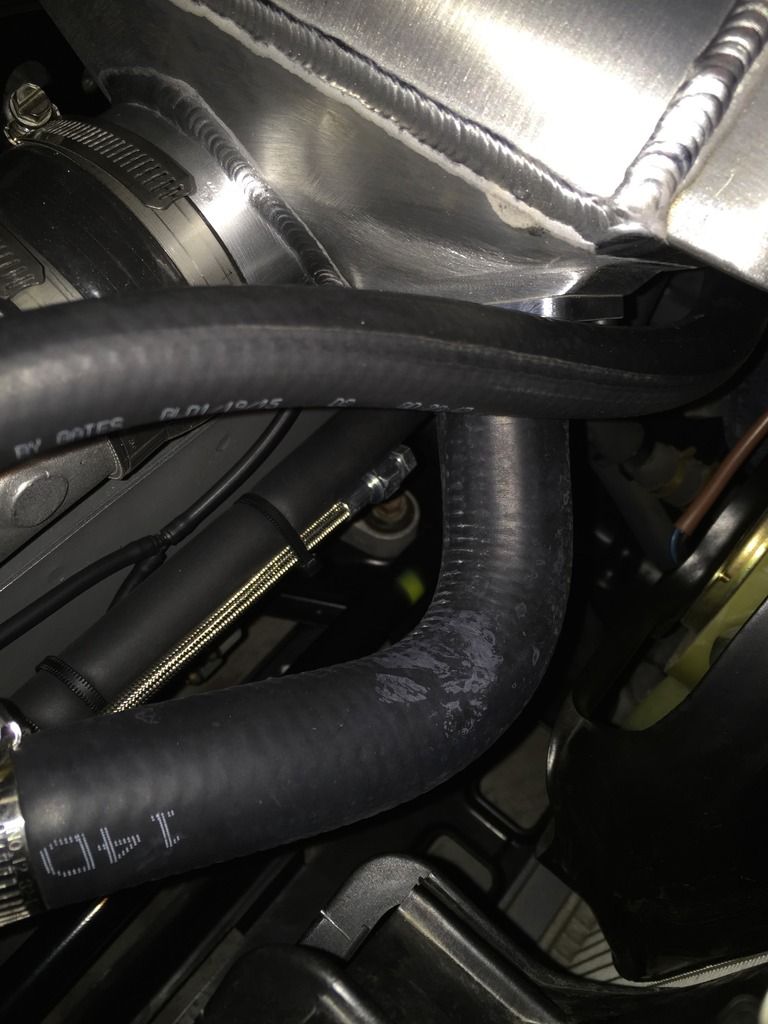
Blower Breather Valve:
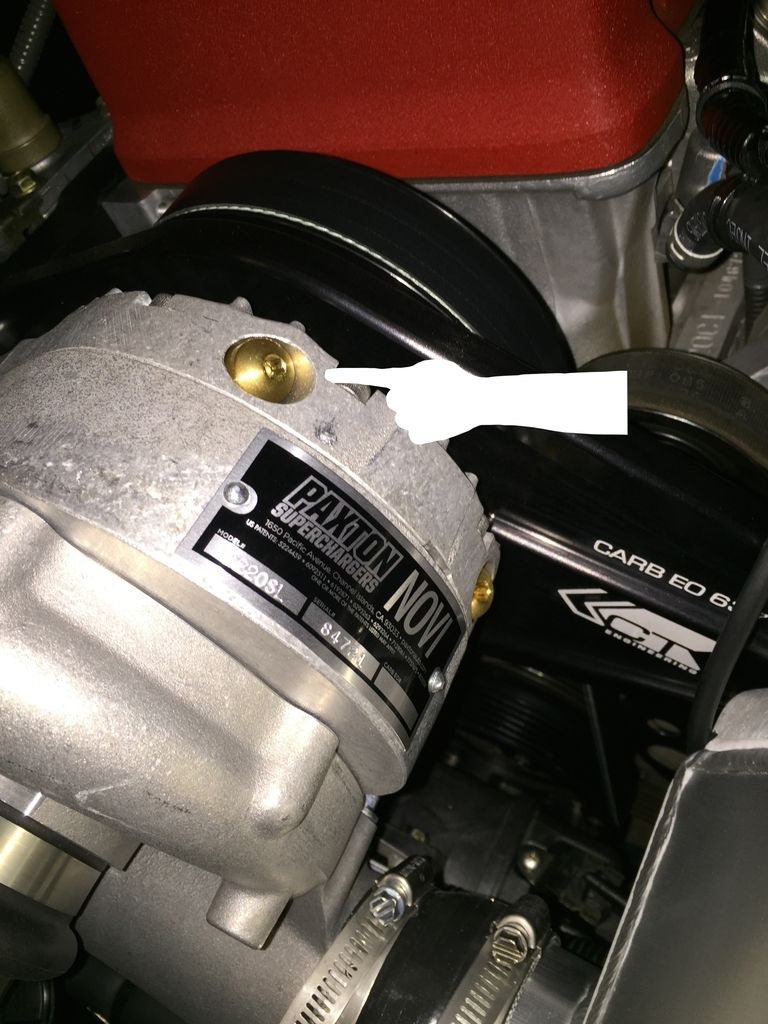
Boost Gauge "Tap-In" Location:
Install & Completion:
I figured I would start my "reviews" with the most technical item included in my build, so here goes. The supercharger kit was purchased from Evasive Motorsports approximately 2.5 months ago. There was a 4-5 week lead time, so If you're interested in this kit, don't expect to have it delivered within a week. If you've seen CT (aka Comptech, CTE) supercharger kits before, you will obviously notice a visual difference. This is a new kit, so if you like the "old" polished look, you may be disappointed. I personally don't like shiny parts, which is evident from the fact that I had a brand new polished exhaust completely ceramic coated black, but to each their own. You will also notice from the pictures below, that there is no stamp on the after-cooler. I'm assuming CT has made the decision to simply not apply a CT, or historical Comptech, stamp on the after-cooler. I don't actually know why this change has been made, but it's completely irrelevant to performance, so who really cares. It is important to note that I essentially installed this kit myself, although I did have assistance with removing the crank pulley, but more about that later. The sections below are outlined to hopefully make reading a bit easier, & will act as highlights for my experience with both the installation & overall performance to date.
Overall Fitment Rating (1-10): Solid 9
Although this kit fits great, there are some questionable areas/claims, which is why I am awarding a 9 instead of a 10. First off, the claim "no cutting required" is technically true, but it's definitely in the gray area. Although you are not required to actually "cut" the car, you are required to drill 2 holes through the front support. Drilling is cuttings ugly cousin, so I consider this to be a bit, as I said, gray. In addition to this, you are required to cut & splice two wires on your factory fuel pump unit to allow fitment of the supplied fuel pump. The new fuel pump does not just "plug" in, as the connector is different from the factory unit. This is obviously not a huge issue, but it is not outlined in the instructions as being necessary, false. At the end of the day, this is a very high quality kit, & I would certainly recommend it to anyone.
Instruction Rating (1-10): Straight 4
Some may say I am being tough, but the instructions are sh*t. Can you get the job done with the supplied instructions, probably, but it should be a hell of a lot easier. The instructions, although very good in some areas, are completely vague & ambiguous in other areas. To cut some slack, the instructions do say to have this kit installed by a professional/competent mechanic, but I think that's just a shortcut to provide weak instructions. The instructions could, & should be a lot better. Again, can a competent/mechanically inclined person get the job done, probably, but I just think a little extra instructional support would be nice.
Can An Amateur Install This Kit?: I Did It
I am an amateur "wrencher", & I was able to perform this install with limited assistance. I am however mechanically inclined, so if you're wrench impaired, I would advise against an attempt, because it will likely be just that, an attempt. I would certainly recommend using the Helm's/Service Manual as a supplemental source for the install.
How Long Does It Take?: For Me, 2 Full Days
Obviously the install could probably be done quicker, but I took my time to ensure everything was correct. For a first timer, I would block off 2 full days.
Can The Entire Kit Be Installed By 1 Person?: A Big Ole Negative
I've read of some people removing the crank pulley by themselves, but my advice would be to not attempt this. You will be in for a lot of heartache, & you will likely make a mess by trying to muscle the crank pulley alone. DON'T do it. I have provided pictures below that outline what you'll need to remove the crank pulley. It is on TIGHT TIGHT TIGHT.
Not In The Instructions, But You Will Need To Know:
The blower (Paxton Novi 1220SL) comes with an oil drain line. This is not documented in the instructions, & there is no mention of where to route this line. Do NOT remove it! The blower supplied is a self-lubricating unit, that does NOT tap into the oil pan. This is important because the supplied braided hose appears as if it should tap into the oil pan, but it 100% does not. I ran this line under the frame support & then zip-tied it to the AC line. Pictures have been included below. In addition to the oil drain line, it is not 100% clear where to place the breather valve on the blower. It does not come installed. I have provided a picture below of where it should be placed.
Things You Will Need:
Tools, Wire Cutters, Crank Pulley Tool (purchased from Amazon-Powerbuilt 648796 50mm-$30), 19MM Deep Socket Wrench (6 point), Two 1/2 Inch Breaker Bars (Lowes), Two Steel Tubes/Rods?, Sharp Scissors
Extras & Recommendations:
Although not required, I would recommend the purchase of a wideband A/F ratio gauge as well as a boost gauge. I personally have Tanabe Revel VLS gauges. The wideband will obviously help monitor your air/fuel mix to ensure you are not running too lean. If you are not aware, installation of a wideband A/F gauge requires the use of an additional O2 sensor, bringing your total to 3. The Tanabe Revel VLS gauge comes with an additional O2 sensor & everything you will need. If you have a factory header, you will need to weld an additional mount (provided) for the 2nd O2 sensor on the header. I personally have a J's racing header, which fortunately has an extra port for a 2nd O2 sensor, so this was a simple step for me. Just to note, the CT supercharger kit comes with a "piggyback" ECU that simply plugs into your stock ECU. The "piggyback" corrects your air/fuel mix, so as stated, a wideband A/F gauge is not required, but it certainly doesn't hurt. In addition to the wideband, I am also running a boost gauge, which is good for monitoring belt slippage & boost leak. Again, not needed, but it certainly doesn't hurt. I have included pictures of the "tap-in" location for the boost gauge below.
Final Install Notes:
This kit was installed on my 2003 AP1, so I do not have any information as it relates to installation on an AP2 (sorry). Just to reiterate, this kit is 100% bolt on (mostly, read above). That said, you will be able to install this kit, & then go for a drive. You will NOT need to have the car tuned, as the "piggyback" ECU acts as your tune.
Start-Up:
Well the good news is, when I installed the kit, the car cranked on the first try! I'm not sure why I was surprised, but hey, it was my first time. Upon installation, you will notice that the car immediately jumps to 2K RPM at start-up, & will register 20 on your wideband. This happens every time I start the car, & continues for approximately 15-20 seconds. Following the first 15-20 seconds, the car returns to 1K RPM & sits nicely at 14.7 (which is stoic, or just right) on the wideband. You will also be registering vacuum on your boost gauge, which is normal at idle.
Performance & Drivability:
If you want your car to maintain a stock power curve, you will be very happy with this kit. For the most part, you will not notice this kit is even on the car under normal throttle/driving conditions. This is personally what I wanted from the kit, so I couldn't be happier. You will experience heat soak every now & again if sitting for long periods in hot weather. This is not a big deal, just rev your motor & clear the system. If you don't, you may experience the infamous "bucking bronco". So how is the car under aggressive throttle? Well, simply put, WICKED! The supercharger rips above 5K RPM, & provides a VERY noticeable bump in power over stock. It definitely improves the overall experience, & for me, delivers the right amount of power where & when you need it. I am registering 4psi at about 8.5K RPM, so I think this is realistic expectation for anyone installing this kit.
Final Thoughts:
If you want a bazillion hp, don't buy this kit. But if you want your car to feel like it has VTEC on some major, Barry Bonds type steroids, BUY this kit!
What's In The Box (Incomplete Pictures, But Close Enough):
Crank Pulley Removal:
Follow the tool setup below to remove your crank pulley. You will need one person torquing from one side of the car & another on the opposite side of the car.


Blower Oil Drain Line:


Blower Breather Valve:

Boost Gauge "Tap-In" Location:

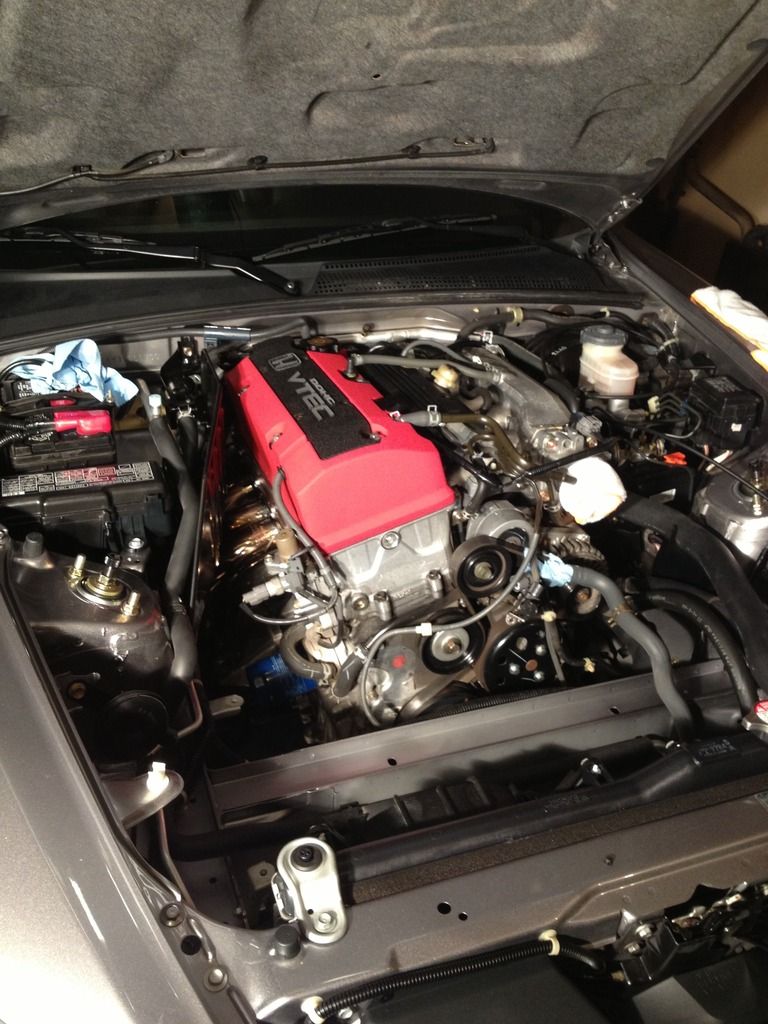
Install & Completion:


 Time to post some videos of this beast in action!
