
Spoon Caliper + Stoptech Brakeline DIY

Thread Starter


Joined: Oct 2008
Posts: 6,765
Likes: 2
From: Bay Area, California
**BIG thanks to Anish and Speed Freaks for providing the supply requested and to monkey.magicx for the assist!!**
SO as many are interested, nobody has really provided a detail DIY with photos of a Spoon Calipers and Stoptech Brakeline DIY. I have recently upgraded these so I figured, might as well make a DIY.. (also to fulfill Anish's request )
)
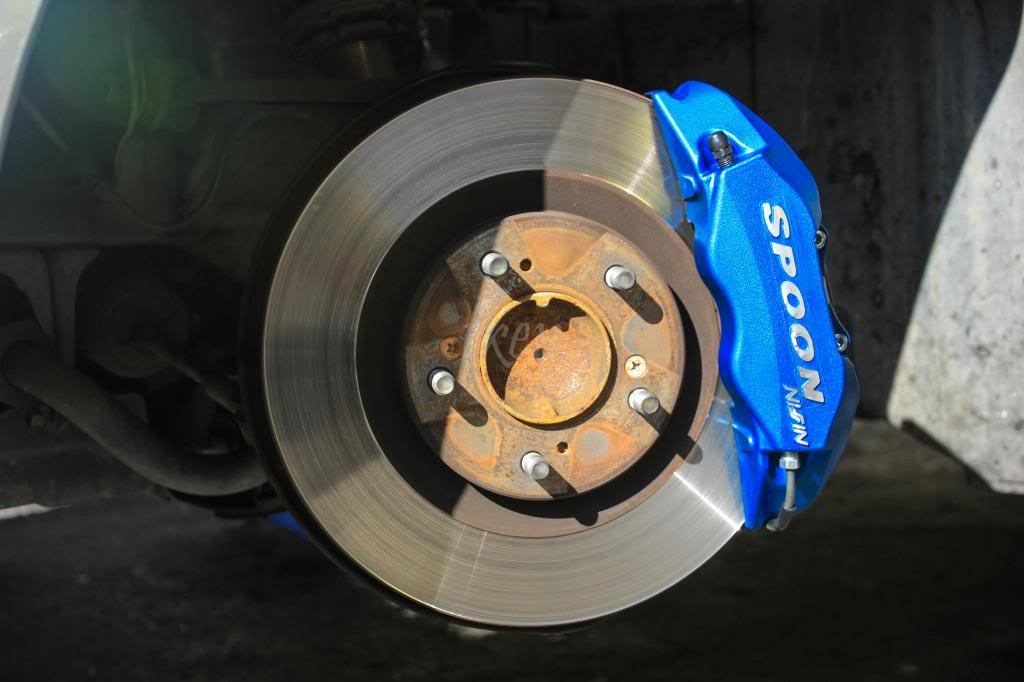
Install was done on MY01. From my knowledge, Spoon Calipers are for all MY.
Required Tools:
Pliers
12mm socket
17mm socket
breaker bar
Metric/Standard allen set
Dremel (optional but preferred)
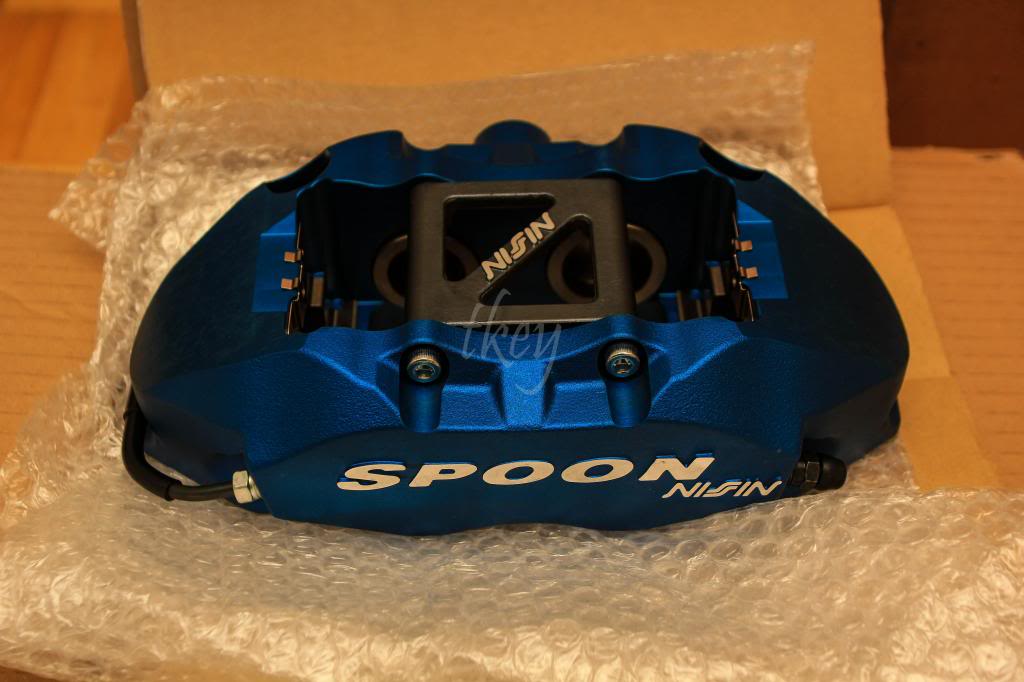
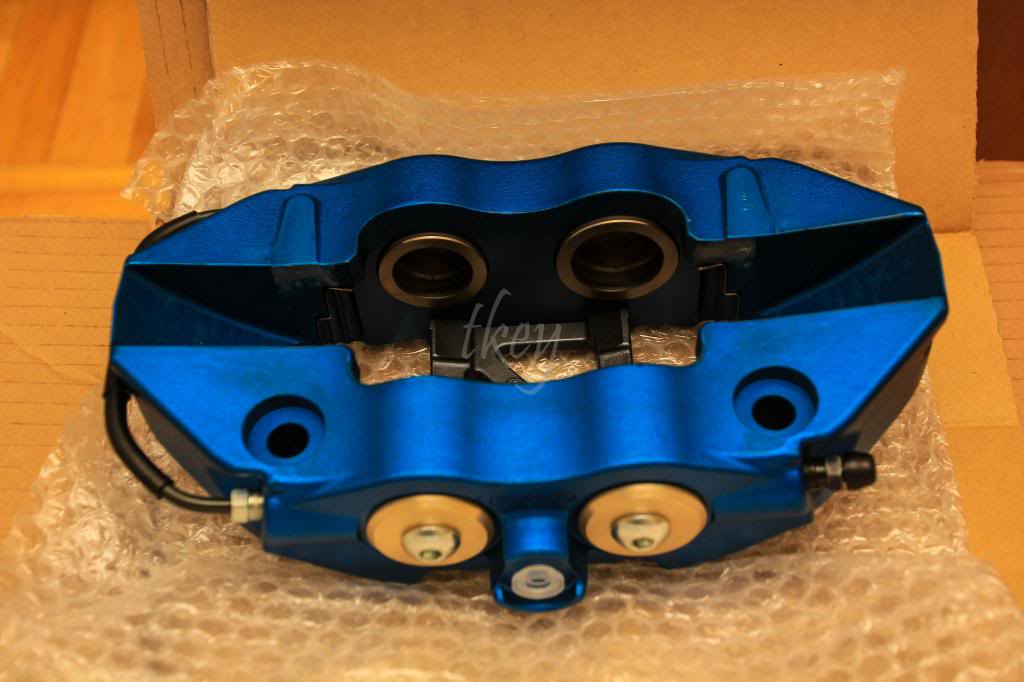
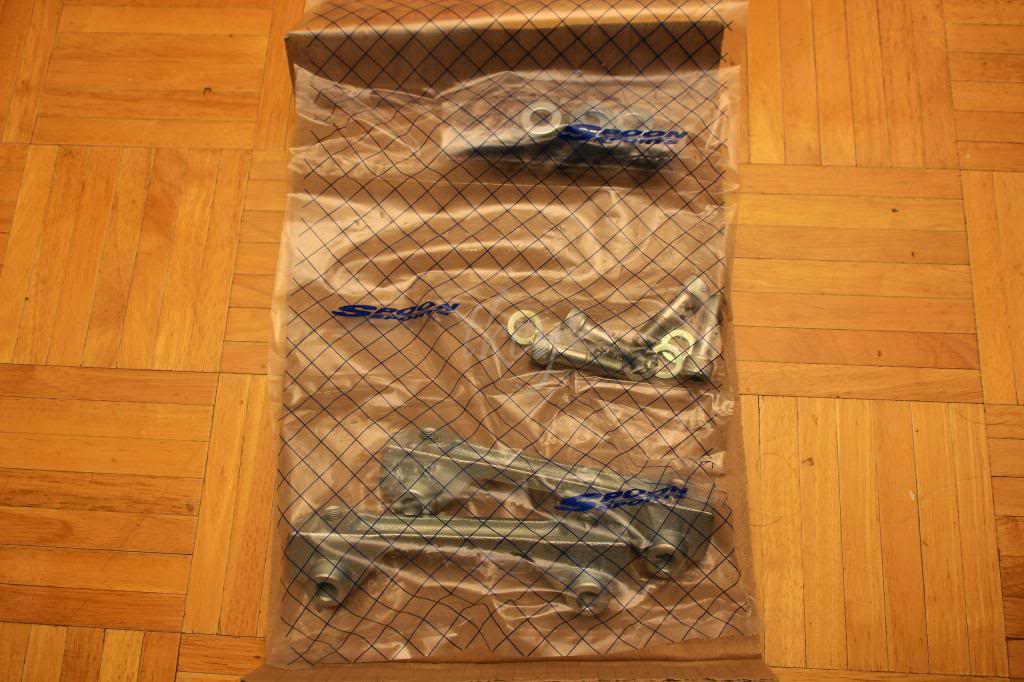
Spoon Caliper box consists of:
4 black 17mm bolts + 4 washers (for caliper bracket)
4 silver allen bolts + 4 washers (for caliper mounting to bracket)
2 brackets
2 Spoon calipers (FL + FR)
**Started on driver's side**
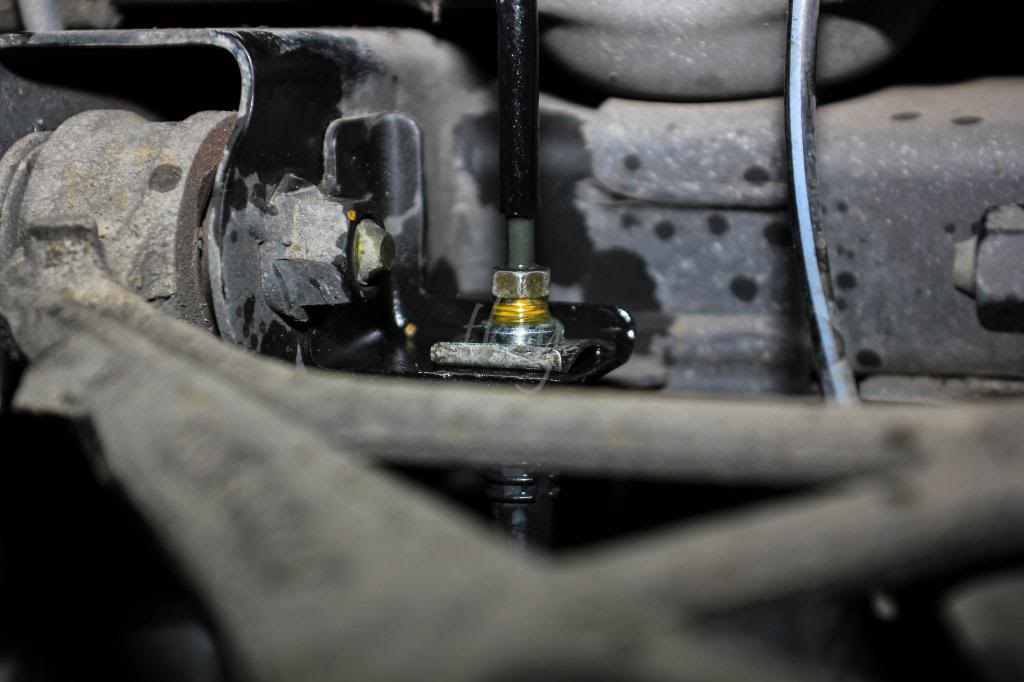
1. Remove the caliper with a 12mm socket. 2 bolts; 1 top, 1 bottom. Remove the brake pads and put them aside.
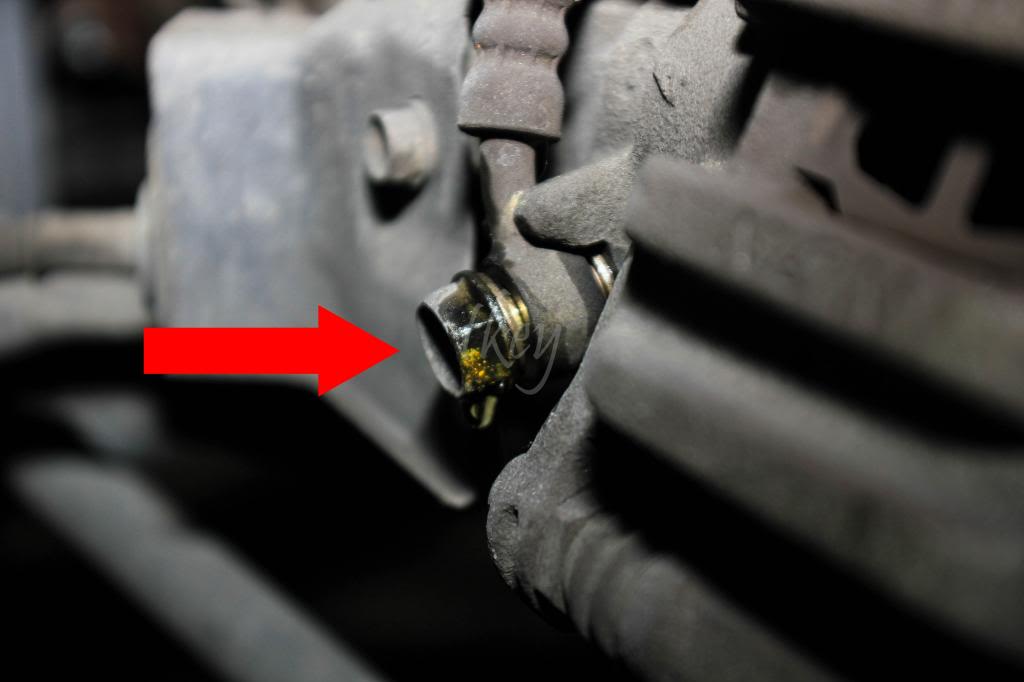
2. Remove the brake line from the caliper with a 12mm socket.
3. Remove the caliper bracket with a 17mm socket and possibly a breaker bar if required.
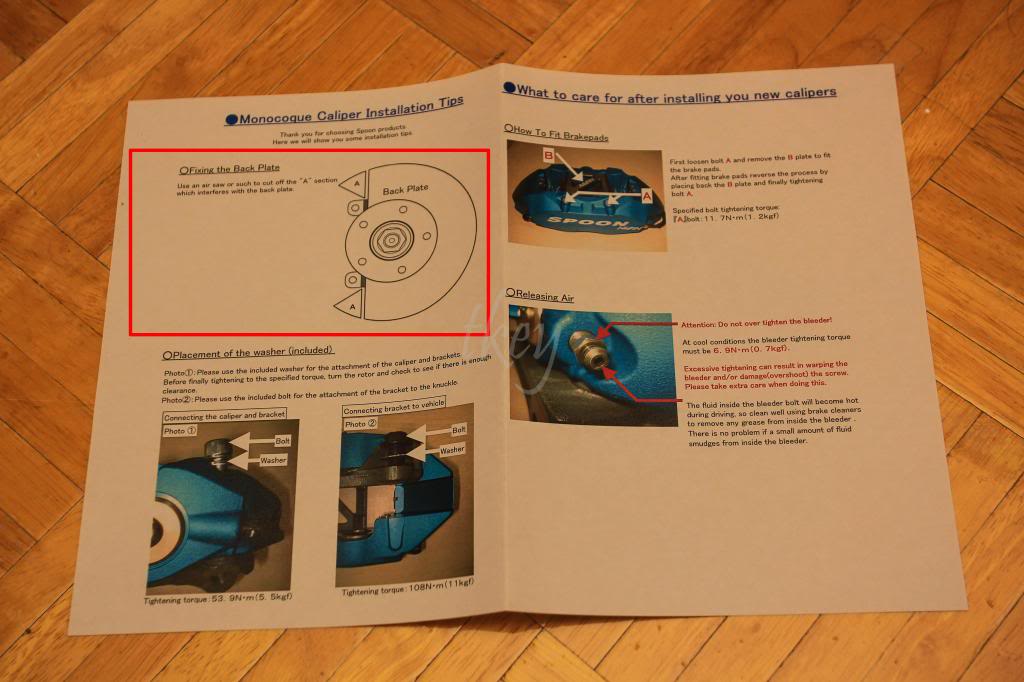
4. Bend back with pliers or cut off the dust shield using a dremel for the Spoon bracket to fit according to the diagram.
5. Use the 2 black 17mm bolts and washers to mount the Spoon caliper bracket. Bleeders facing upwards of course.
6. Test fit the Spoon calipers onto the bracket with the 2 Silver allen bolts and washers prior to mounting it to see if it clears the dust shield that was previously bent back or cut.
- Tighten the Spoon Caliper onto the bracket
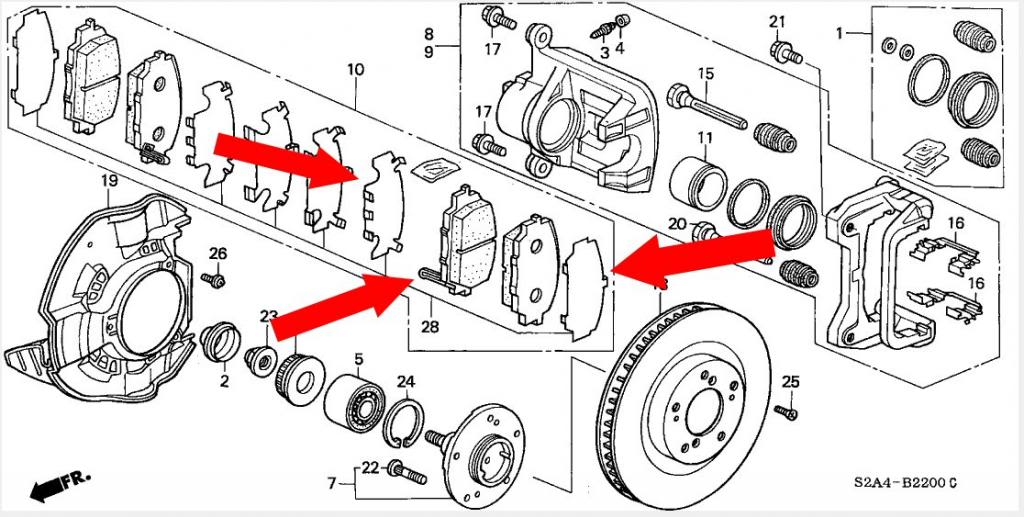
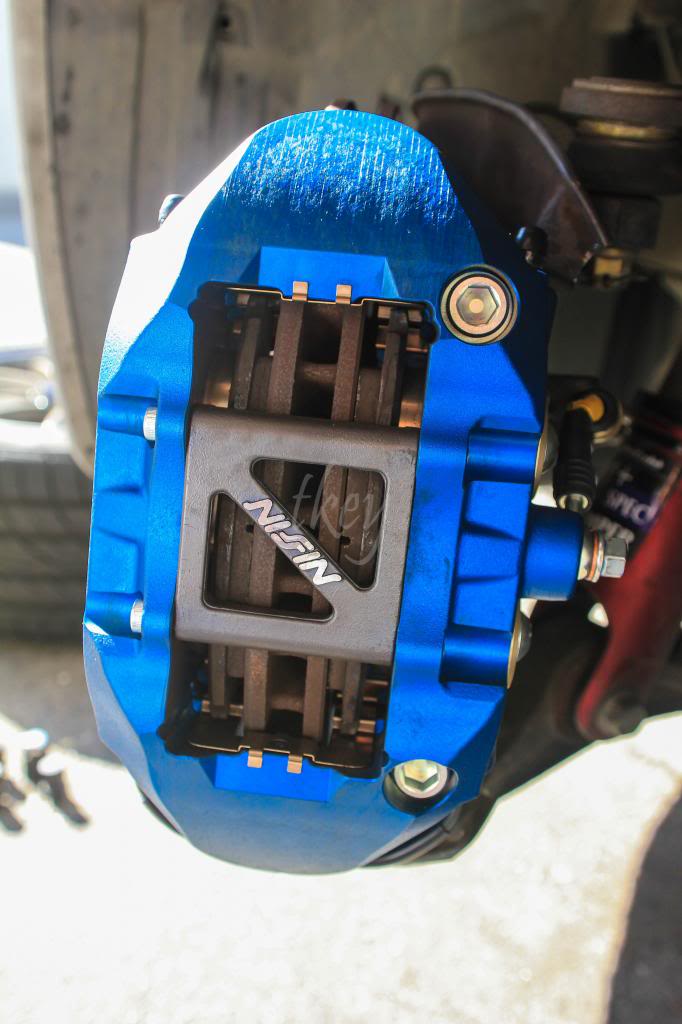
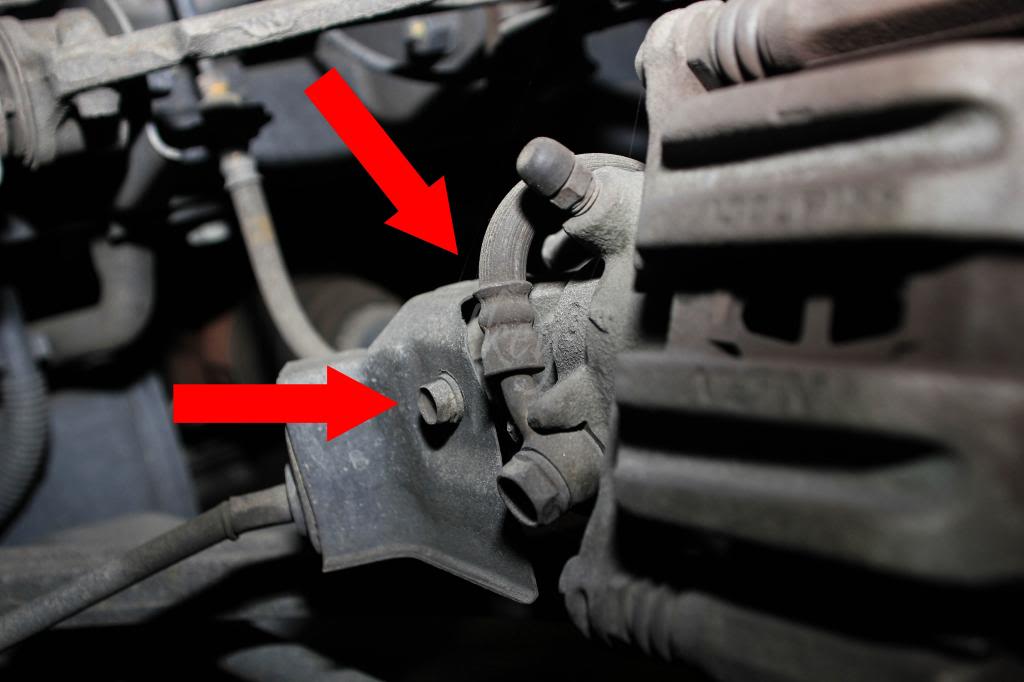
7. Remove the brake pad plate with the corresponding allen head.
8. Remove the "squeeler" or brake pad indicator and also remove the back-side of the brake pad (plastic). The plate WILL NOT sit properly if the plastic back piece of the pads are not removed.
- Insert brake pads and tighten with the allen. Make sure the plate is tightly secured!
- If the calipers were bought new, they need to be equivalent to how tight the allen bolts were to remove. If unsure, just tighten until the plate stops moving around.
 (Not my photo, however I did add some cool arrows)
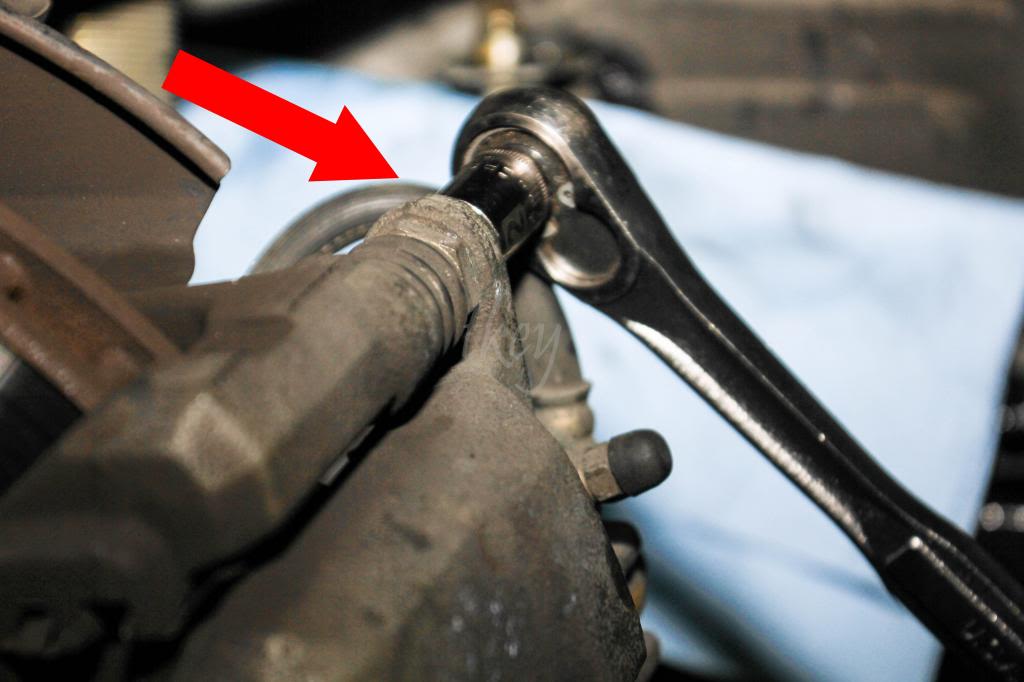
9. Reattach the brake line with the 12mm socket.
10. Make sure to bleed from inner bleeder to the outter. Besides hitting ABS a few times, as recommended by a few others, I also found air bubbles coming up after I hit the caliper numerous times with my palm at all angles. I'd highly recommend using a rubber mallet and a towel.
::Update::
I actually ended up going back and cutting off the bent areas of the dust shield so it's a cleaner look. I'll post additional photos once I decide to stop being lazy and take the wheels off again
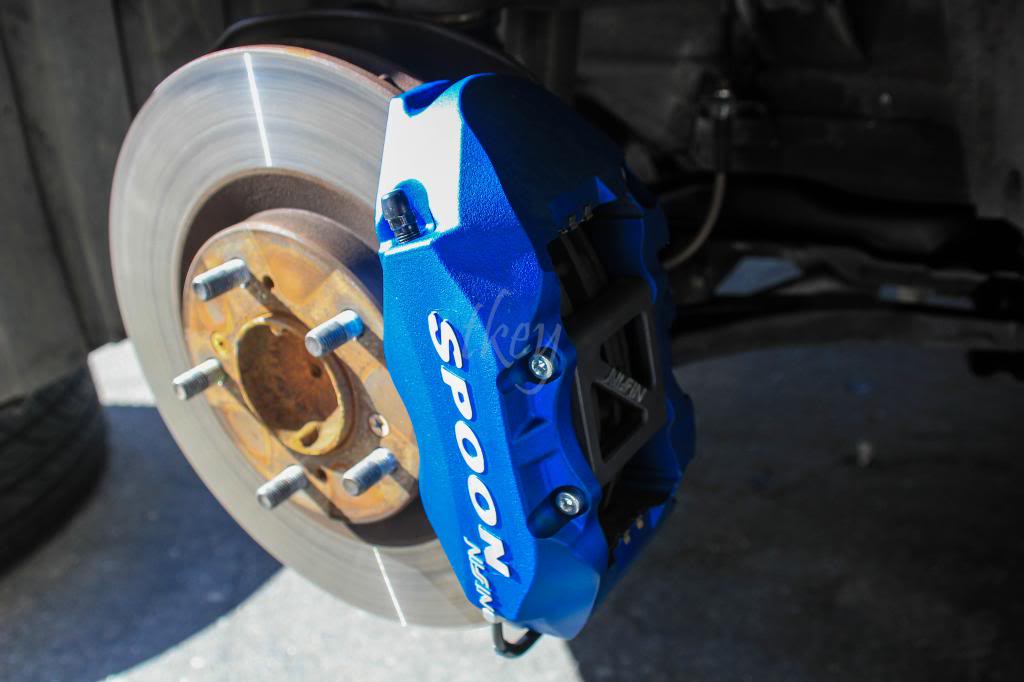
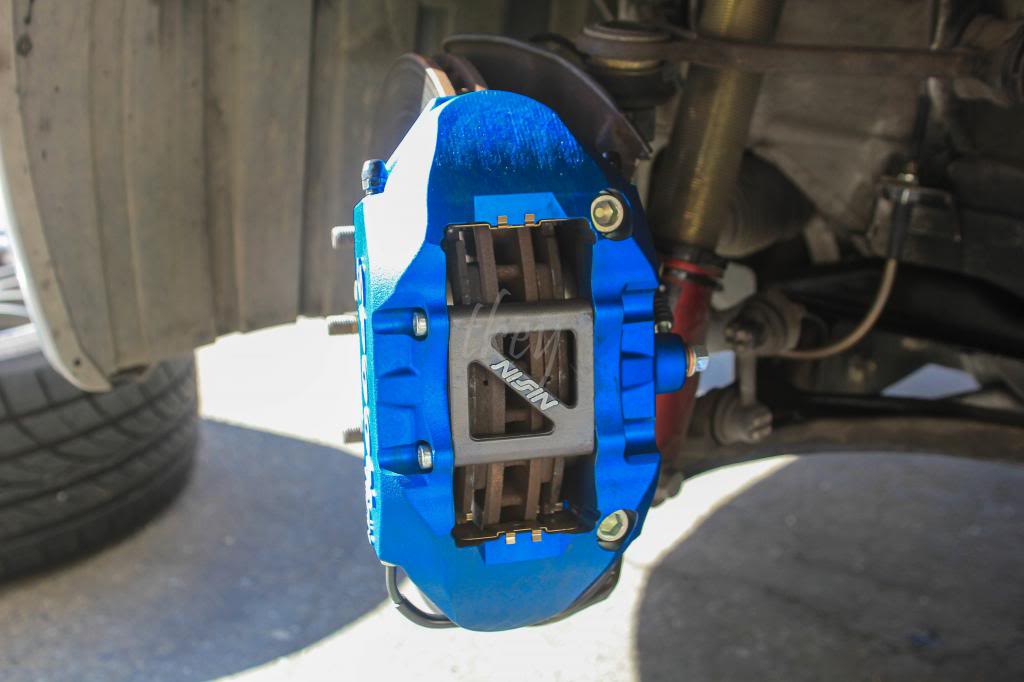
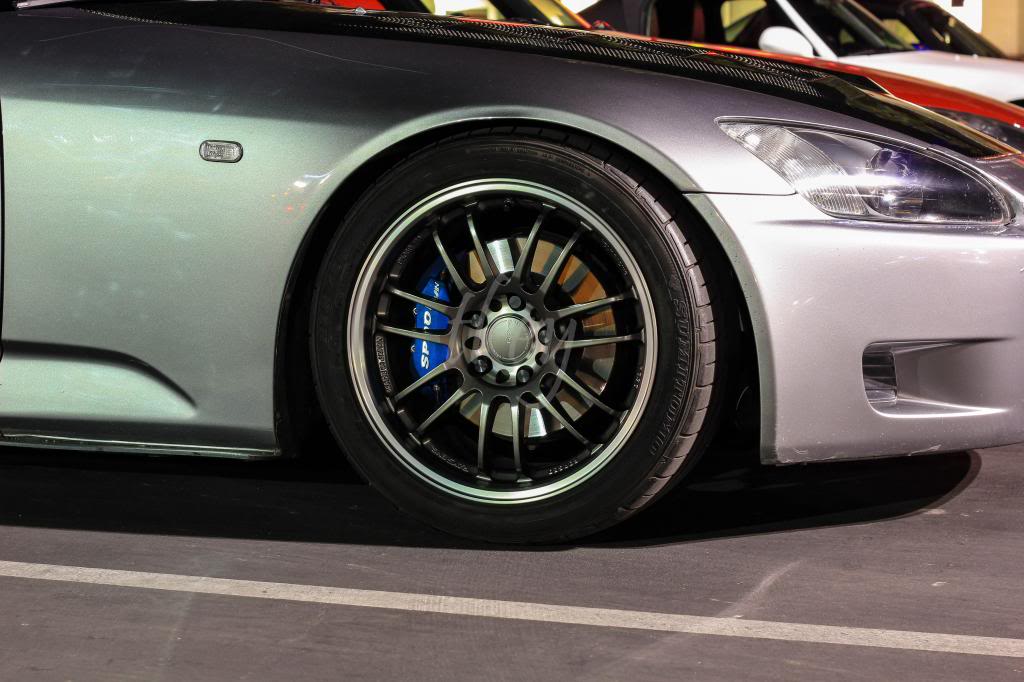
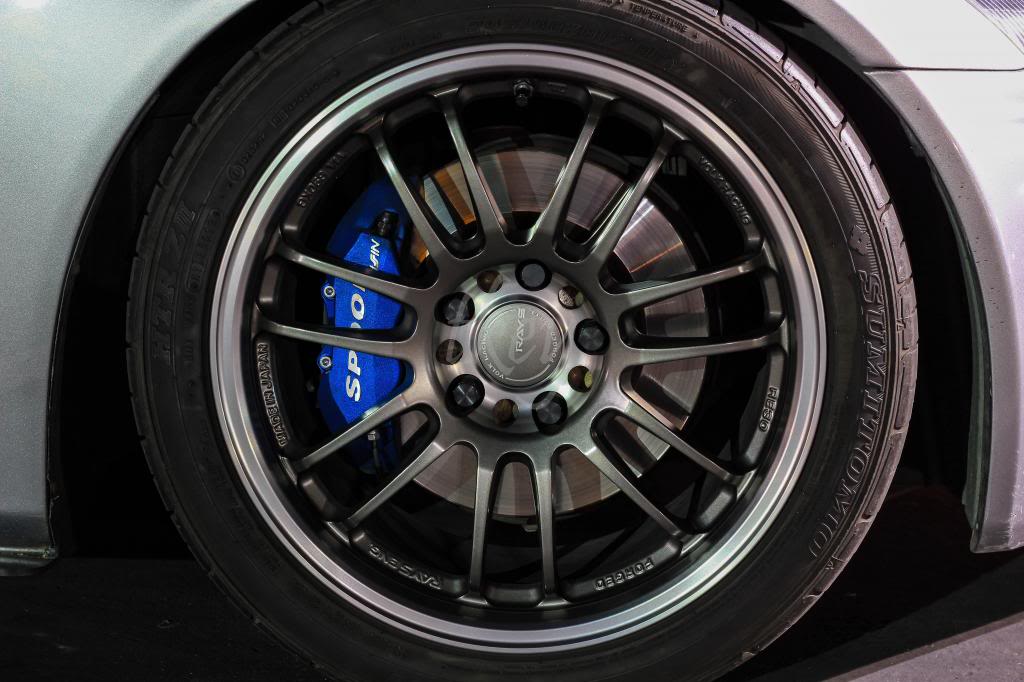
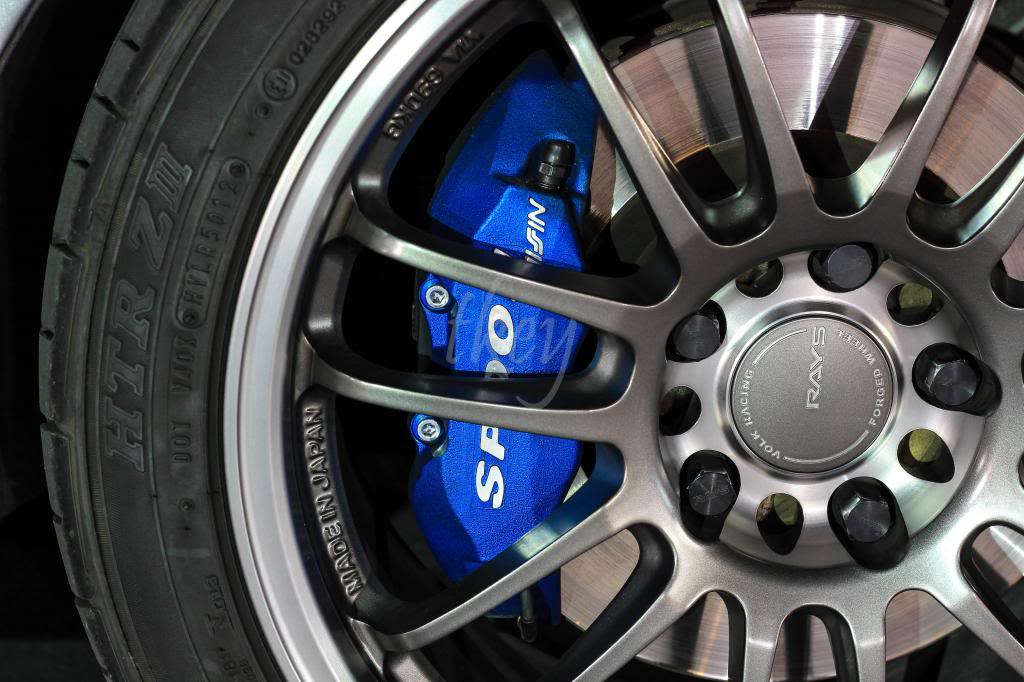
Enjoy your new Spoon Calipers
------------------------------------------------------------------------------------------------------------------------------------------------------------------
Stoptech Brakeline DIY
Required tools:
10mm flare nut wrench
Flathead screw driver or pliers
10mm socket
12mm socket or wrench
17mm wrench or crescent wrench
The part numbers below, are only for MY00-05.
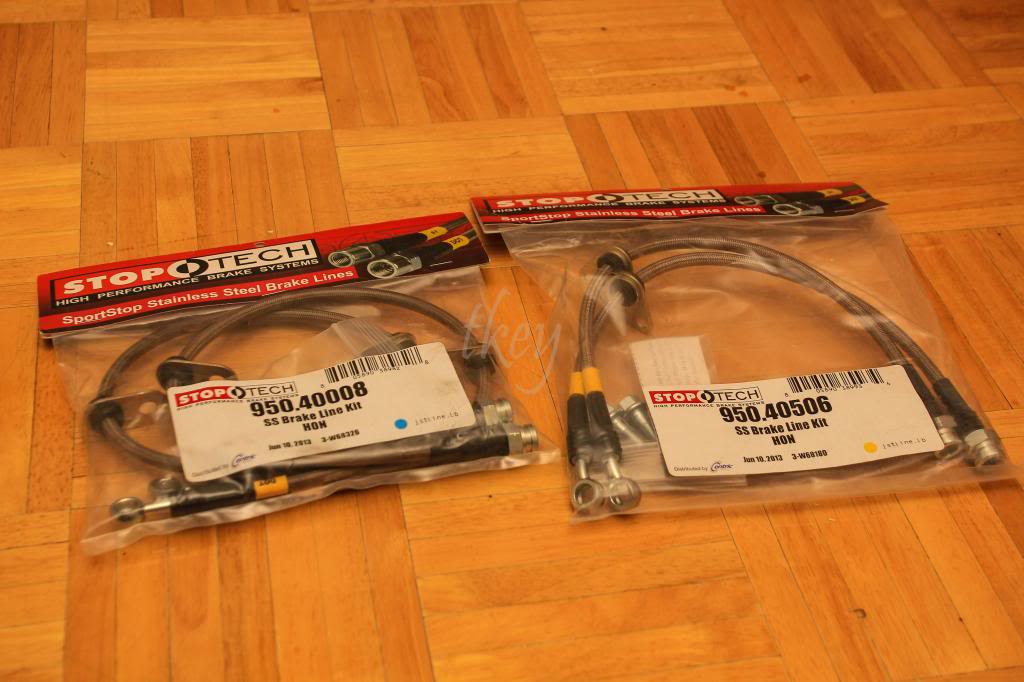
Stoptech Front(950-40008) consists of: 2 brake lines, 2 washers, and (2) 14mm bolt.
Stoptech Rear(950-40506) consists of: 2 brake lines, 2 washers, and (2) 14mm bolt.
**Started from the driver's rear**
1. Locate the main brake line. I found it easier to remove the clip after loosening the nut with the 10mm flare nut wrench a few turns.
- I didn't have pliers so I used 2 flathead screw drivers and used leverage against the wheel-well to remove the clip. If pliers are in hand, go ahead and grab the end and pull it off horizontally.

2. After removing the clip and loosening the flare nut, remove the brake line and make sure to have towels or some sort of container for the oil in those lines.

3. In order to remove the brake line from the holder, there is a metal shield held on by (2) 10mm bolts (1 is hidden in the photo). After the bolts are removed from the shield, go ahead and proceed to remove the brake holder with a 10mm and remove the 2 bolts (extension may be required).
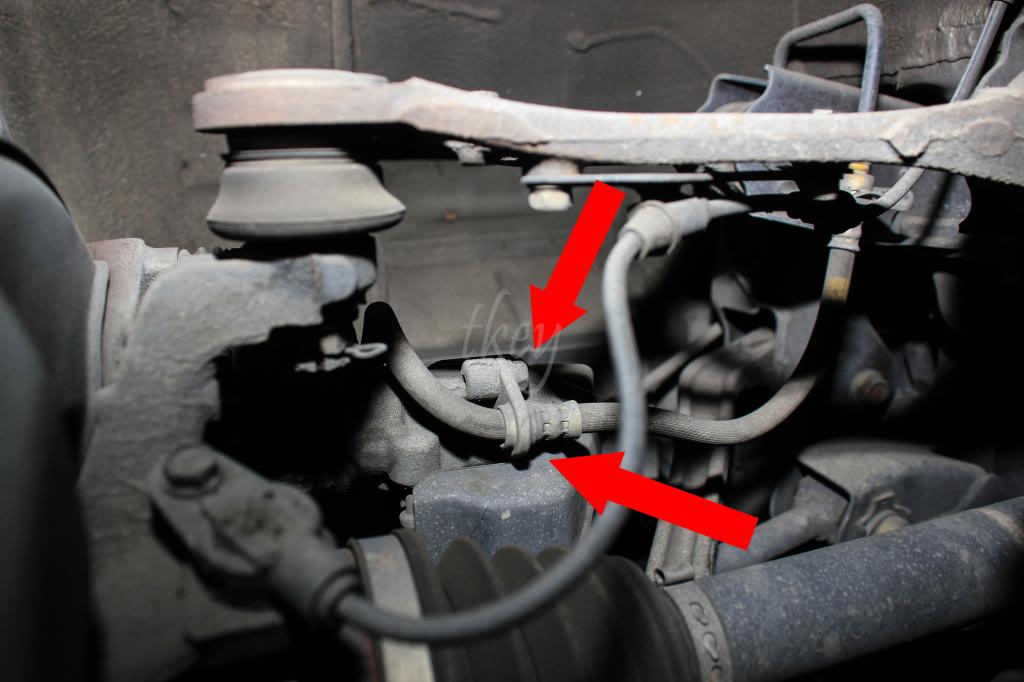
4. Use a 12mm socket and remove the bolt holding the brake line onto the caliper between the shield you just removed and the bleeder.
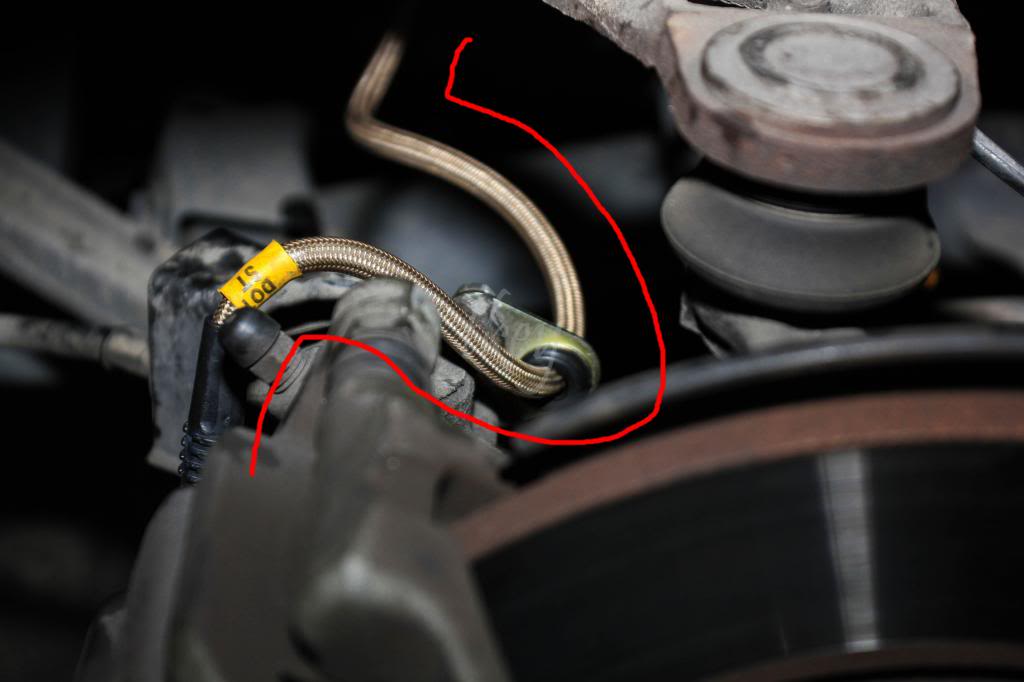
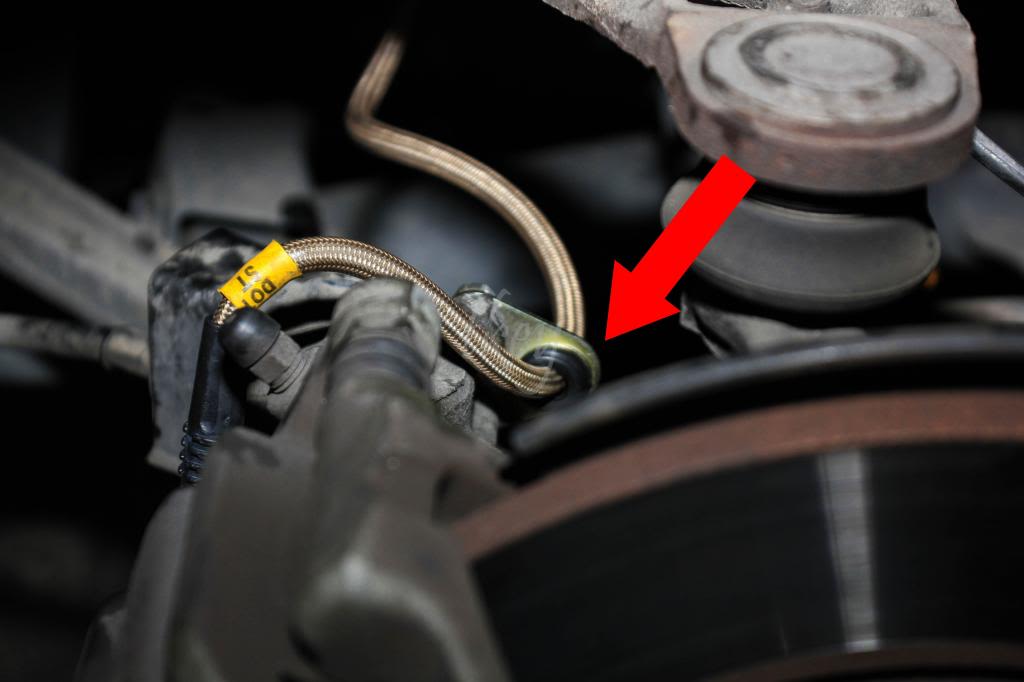
5. Make sure to feed the Stoptech line the same route the OEM brake line was passing through. Not necessary, but why not keep it the same? Also, make sure to have the end that goes to the caliper, sit almost flush with the caliper.
- Now go in reverse order.
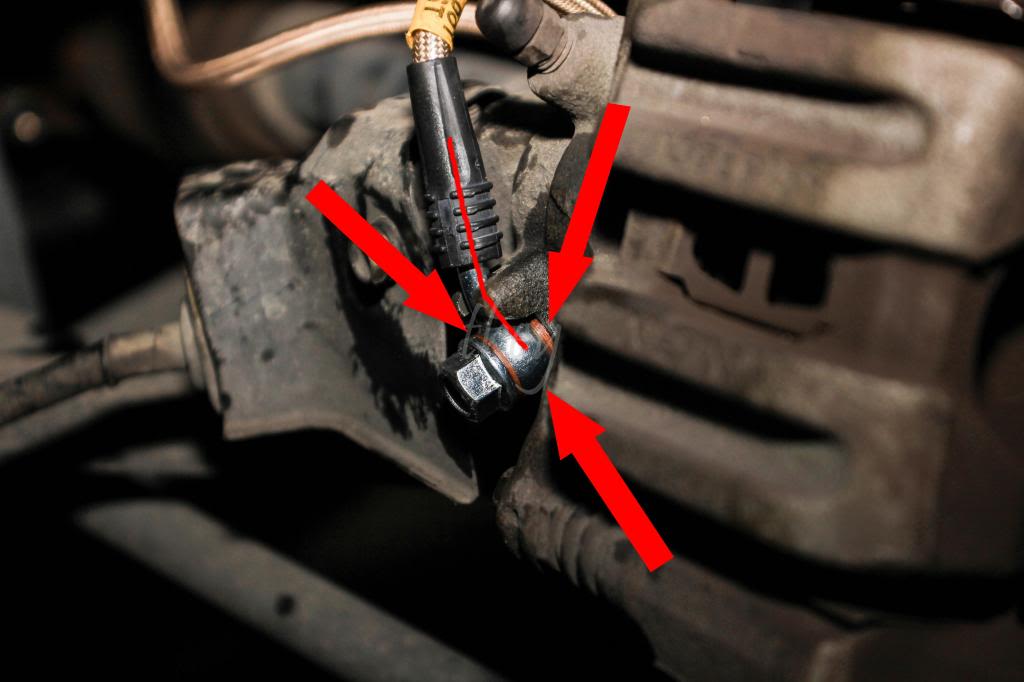
6. Tighten the 14mm bolt onto the caliper and make sure to have the 2 provided washers between the bolt, Stoptech line, and caliper. The washers will prevent the oil from leaking. Make sure it is torqued to specs. Otherwise, it will leak.
- ie. bolt - washer - brake line - washer - caliper.
7. Tighten the (2) 10mm bolts back onto the holder on the caliper.
- The new holder, that is already attached on the Stoptech line, is adjustable incase more slack is required.
8. Reattach the shield with the (2) 10mm bolts.
- Didn't really see the purpose of this shield, but I put it back on anyways.
9. Reattach the Stoptech line with the main brake line using your fingers. Doesn't need to be tightened quite yet.
10. Reinsert the clip so the brake lines are secure.
11. Tighten the brake line with the 10mm flare wrench and 17mm wrench for the Stoptech line.
- Didn't have a 17mm wrench so I used a crescent wrench, which works just as well.
For the fronts, it's a similar process minus the annoying shield. Same tools will be required.
Make sure to bleed your brakes!
Now admire your new Stoptech stainless steel brake lines.
SO as many are interested, nobody has really provided a detail DIY with photos of a Spoon Calipers and Stoptech Brakeline DIY. I have recently upgraded these so I figured, might as well make a DIY.. (also to fulfill Anish's request
)Install was done on MY01. From my knowledge, Spoon Calipers are for all MY.
Required Tools:
Pliers
12mm socket
17mm socket
breaker bar
Metric/Standard allen set
Dremel (optional but preferred)
Spoon Caliper box consists of:
4 black 17mm bolts + 4 washers (for caliper bracket)
4 silver allen bolts + 4 washers (for caliper mounting to bracket)
2 brackets
2 Spoon calipers (FL + FR)
**Started on driver's side**
1. Remove the caliper with a 12mm socket. 2 bolts; 1 top, 1 bottom. Remove the brake pads and put them aside.
2. Remove the brake line from the caliper with a 12mm socket.
3. Remove the caliper bracket with a 17mm socket and possibly a breaker bar if required.
4. Bend back with pliers or cut off the dust shield using a dremel for the Spoon bracket to fit according to the diagram.
5. Use the 2 black 17mm bolts and washers to mount the Spoon caliper bracket. Bleeders facing upwards of course.
6. Test fit the Spoon calipers onto the bracket with the 2 Silver allen bolts and washers prior to mounting it to see if it clears the dust shield that was previously bent back or cut.
- Tighten the Spoon Caliper onto the bracket
7. Remove the brake pad plate with the corresponding allen head.
8. Remove the "squeeler" or brake pad indicator and also remove the back-side of the brake pad (plastic). The plate WILL NOT sit properly if the plastic back piece of the pads are not removed.
- Insert brake pads and tighten with the allen. Make sure the plate is tightly secured!
- If the calipers were bought new, they need to be equivalent to how tight the allen bolts were to remove. If unsure, just tighten until the plate stops moving around.
(Not my photo, however I did add some cool arrows)9. Reattach the brake line with the 12mm socket.
10. Make sure to bleed from inner bleeder to the outter. Besides hitting ABS a few times, as recommended by a few others, I also found air bubbles coming up after I hit the caliper numerous times with my palm at all angles. I'd highly recommend using a rubber mallet and a towel.
::Update::
I actually ended up going back and cutting off the bent areas of the dust shield so it's a cleaner look. I'll post additional photos once I decide to stop being lazy and take the wheels off again
Enjoy your new Spoon Calipers
------------------------------------------------------------------------------------------------------------------------------------------------------------------
Stoptech Brakeline DIY
Required tools:
10mm flare nut wrench
Flathead screw driver or pliers
10mm socket
12mm socket or wrench
17mm wrench or crescent wrench
The part numbers below, are only for MY00-05.
Stoptech Front(950-40008) consists of: 2 brake lines, 2 washers, and (2) 14mm bolt.
Stoptech Rear(950-40506) consists of: 2 brake lines, 2 washers, and (2) 14mm bolt.
**Started from the driver's rear**
1. Locate the main brake line. I found it easier to remove the clip after loosening the nut with the 10mm flare nut wrench a few turns.
- I didn't have pliers so I used 2 flathead screw drivers and used leverage against the wheel-well to remove the clip. If pliers are in hand, go ahead and grab the end and pull it off horizontally.
2. After removing the clip and loosening the flare nut, remove the brake line and make sure to have towels or some sort of container for the oil in those lines.
3. In order to remove the brake line from the holder, there is a metal shield held on by (2) 10mm bolts (1 is hidden in the photo). After the bolts are removed from the shield, go ahead and proceed to remove the brake holder with a 10mm and remove the 2 bolts (extension may be required).
4. Use a 12mm socket and remove the bolt holding the brake line onto the caliper between the shield you just removed and the bleeder.
5. Make sure to feed the Stoptech line the same route the OEM brake line was passing through. Not necessary, but why not keep it the same? Also, make sure to have the end that goes to the caliper, sit almost flush with the caliper.
- Now go in reverse order.
6. Tighten the 14mm bolt onto the caliper and make sure to have the 2 provided washers between the bolt, Stoptech line, and caliper. The washers will prevent the oil from leaking. Make sure it is torqued to specs. Otherwise, it will leak.
- ie. bolt - washer - brake line - washer - caliper.
7. Tighten the (2) 10mm bolts back onto the holder on the caliper.
- The new holder, that is already attached on the Stoptech line, is adjustable incase more slack is required.
8. Reattach the shield with the (2) 10mm bolts.
- Didn't really see the purpose of this shield, but I put it back on anyways.
9. Reattach the Stoptech line with the main brake line using your fingers. Doesn't need to be tightened quite yet.
10. Reinsert the clip so the brake lines are secure.
11. Tighten the brake line with the 10mm flare wrench and 17mm wrench for the Stoptech line.
- Didn't have a 17mm wrench so I used a crescent wrench, which works just as well.
For the fronts, it's a similar process minus the annoying shield. Same tools will be required.
Make sure to bleed your brakes!
Now admire your new Stoptech stainless steel brake lines.


Thread Starter
Joined: Oct 2008
Posts: 6,765
Likes: 2
From: Bay Area, California
oops. here's the icing to the cake:
stoptech street pads. again, provided by Anish and Speed Freaks

didn't swap pads out though cause i was already using them before


Trending Topics

Former Sponsor
Joined: Oct 2013
Posts: 1,335
Likes: 6
From: Reno, Nevada
Great job with your first write up, the calipers look phenomenal
Pleasure helping you out with the parts and little advise, glad to see it all come together! How about a review on what the difference feels like (pedal feel, etc) after maybe a few hundred miles as a follow up/update? We'll look forward to it - should be relavent since you are using the same pads as you were on the stock calipers, If I am not mistaken.
Pleasure helping you out with the parts and little advise, glad to see it all come together! How about a review on what the difference feels like (pedal feel, etc) after maybe a few hundred miles as a follow up/update? We'll look forward to it - should be relavent since you are using the same pads as you were on the stock calipers, If I am not mistaken.

Joined: Jan 2011
Posts: 5,650
Likes: 104
From: Mt. ________
Definitely looking forward to upgrading to these in the future. I wish there were more wheel fitment options though. What do people with 4 piston calipers use to spread the pistons when swapping out pads?
I was looking at getting one of these: http://www.amazon.com/gp/product/B00...=ATVPDKIKX0DER
I was looking at getting one of these: http://www.amazon.com/gp/product/B00...=ATVPDKIKX0DER