Clutch Install DIY


 05-21-2014, 07:26 AM
#24


I would like to add to this thread. I just did a clutch on a members car and I did it a little differently than what was posted. I do not have pictures but this is what I did.
I did not drop the lower subframe and the reason why is because it is possible to knock the car out of alignment, also you would have to disconnect your steering shaft and if you do not know what you are doing, you can break the clock spring in the steering column for the airbag if the steering wheel gets turn 360 degrees. What I did was use two floor jacks and had the car up on four jack stands. I took off the header and the catalytic converter as he mentioned above along with everything else he posted. Then with one floor jack under the transmission and one under the engine, I unbolted both engine mounts(three nuts, one on top 17mm and two on the bottom 14mm) and engine mount brackets(four bolts all 14mm). Removed the brackets and the passenger side mount. I left the drivers side mount in since it did not have to come out and it was kind of a pain to remove it. By doing this, I lowered the engine and transmission down so I now can get at the two top bellhousing bolts. You cannot get these bolts just but unbolting the transmission crossmember mount. I lowered it slowly and had enough slack for all the wiring and hoses with no issues. I used a 17mm swivel socket attached to a 1/2" to 3/8" reducer attached to some 1/2" socket extensions. Use the 1/2" since it will put more torque on the bolt than the 3/8" extensions will. After that I put everything back together.
What I can tell you that this is not an easy job. It is even harder if you are a big person with big hands. I'm average size of 5'9" 185 with 15+ years as an auto technician and I could barely get my hands in most places. Doing it on your back does not help either.
Also, I HIGHLY recommend investing in 3/8" swivel sockets which you can get from Sears. Not a swivel with a socket at the end of it, one with the socket head incorporated in the swivel for those who are not that tool savvy. These will make your life easier, not just for this job but for any job you come across.
James
07-11-2014, 07:55 PM
#25
Registered User


Join Date: Jun 2013
Posts: 72
Likes: 0
Received 0 Likes
on
0 Posts
Just wanted to say thanks for the great write up here. Changed my clutch over the past week and this thread was very helpful. No lift so this was all done on stands.
Only thing i didn't do was remove the ac compressor. I only had to lower the sub frame about 2.5 inches so it didn't seem necessary.
Process was straight forward. I have never done a clutch before but it was rather simple. I would say the toughest part was the top 2 transmission bolts. Top starter bolt was easy.
Only thing i would add is make sure you grease everything properly while its apart.
Thanks again.
.
08-06-2014, 04:09 PM
#26
Registered User

Join Date: Sep 2013
Posts: 73
Likes: 0
Received 0 Likes
on
0 Posts
I am a noob in the purist form so bear with me and hear me out, cannot the engine pivot backwards enough, on its mounts, in order to reach the top tranny bolts without having to lower the subframe? In addition, is the exhaust manifold removed in order to gain access to the passenger side tranny bolts? I will be doing this myself in a few weeks, hence my question.
08-07-2014, 09:10 AM
#27

I am a noob in the purist form so bear with me and hear me out, cannot the engine pivot backwards enough, on its mounts, in order to reach the top tranny bolts without having to lower the subframe? In addition, is the exhaust manifold removed in order to gain access to the passenger side tranny bolts? I will be doing this myself in a few weeks, hence my question.
The Header does not need to be removed, but it only takes five minutes to take it off. It def did help alot in the process of removing the transmission.
Most important thing is that when loosening the starter bolt. Make sure you do NOT take it off. If you do.. GG You only want to loosen it.
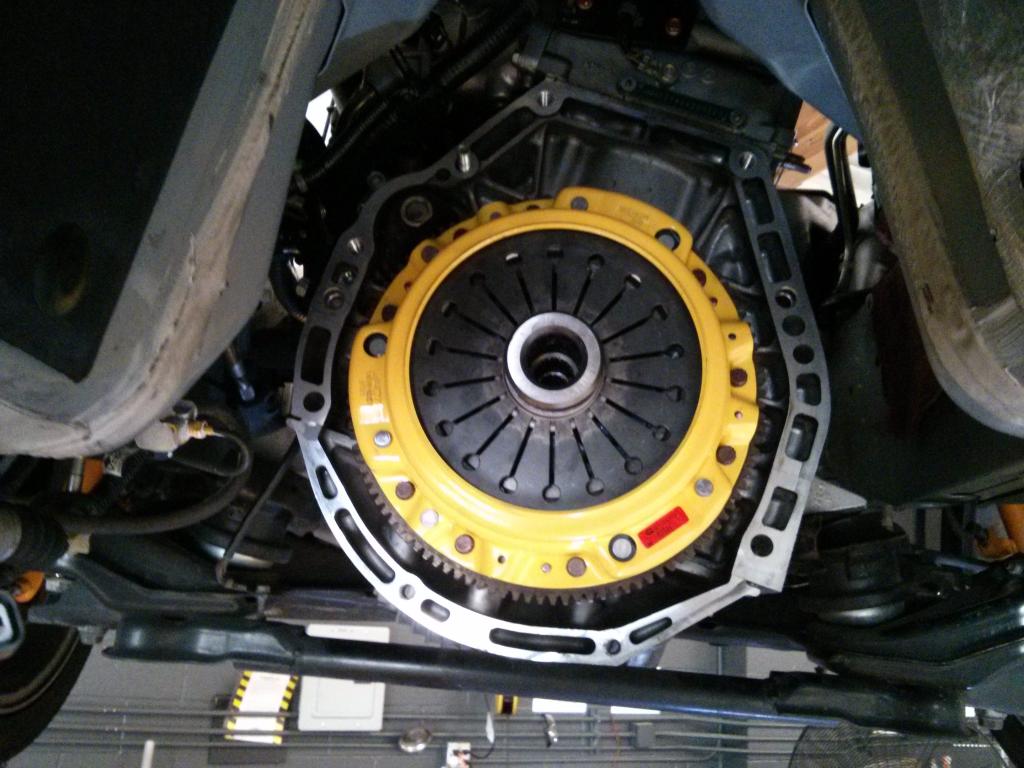
Also removing the trans is a bit of a violent affair as you will need to pry the damn thing off and twist it back and forth. Make sure you know you know the pattern of of the bolt holding on the flywheel.
08-08-2014, 07:34 AM
#29
Join Date: Mar 2008
Location: West Los Angeles
Posts: 448
Likes: 0
Received 0 Likes
on
0 Posts
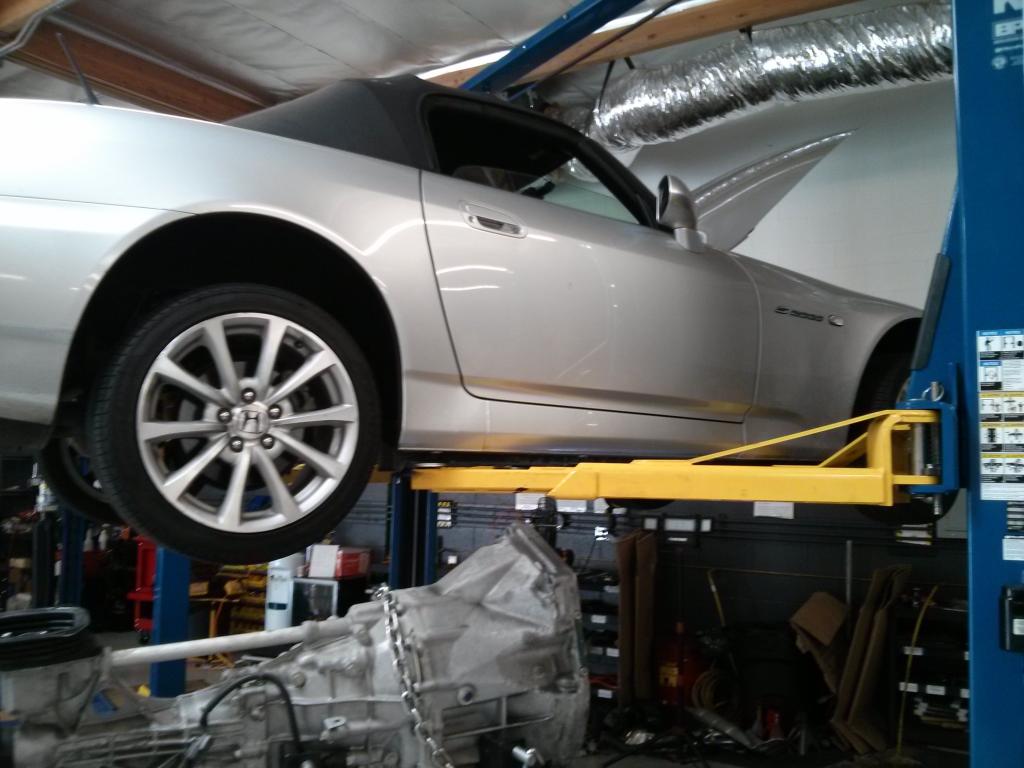
I did it myself at Your Dream Garage (where you can rent lift space by the hour.. I highly recommend them) and was able to do this in ~9 hours with the help of this DIY. Having a lift definitely helped get some of the bolts off, as I could attack them from either the top or the bottom.
The worst bolt was the bottom bolt on the Mugen header flange due to the way the runners are positioned. There was almost no room to get a wrench in there. Overall this wasn't too bad though, and definitely beat paying a shop.
The worst bolt was the bottom bolt on the Mugen header flange due to the way the runners are positioned. There was almost no room to get a wrench in there. Overall this wasn't too bad though, and definitely beat paying a shop.

 08-12-2014, 10:29 PM
#30
Registered User

Join Date: May 2014
Posts: 242
Likes: 0
Received 0 Likes
on
0 Posts
Hello everyone,
I'm planning to do this diy this weekend. Did you guys use the clutch alignment tools for the diy? it's recommended in the honda service manual and the guys at
http://www.hondatuningmagazine.com/t.../photo_17.html
used it as well.
This is gonna be my first clutch job
I'm planning to do this diy this weekend. Did you guys use the clutch alignment tools for the diy? it's recommended in the honda service manual and the guys at
http://www.hondatuningmagazine.com/t.../photo_17.html
used it as well.
This is gonna be my first clutch job