
JVC KD-NX5000 and Modifry DCI Installed


Thread Starter
Registered User
Joined: Feb 2007
Posts: 468
Likes: 1
I've installed JVC KD-NX5000 headunit with IR Modifry DCI this weekend.
I've sent my HU to modifry to have a wired unit configured.
However, after talking with Bob@Modifry, I have decided to go with IR DCI. With the IR DCI, Bob was able to program all the functions I wanted.
As everyone at s2ki already know, Bob was great to work with! I want to thank him again for taking the time to configure the DCI even with his busy schedule.
Now I know first hand why people rave about Modifry! I want to thank folks at electronics forum for giving me the courage to do my first HU swap.
Reference Links
https://www.s2ki.com/forums/index.ph...=486431&hl=jvc
https://www.s2ki.com/forums/index.ph...=469203&hl=jvc
JVC Instruction Manual http://books.jvcservice.com/download/38132...VT1627-001A.pdf
JVC Installation Manual http://books.jvcservice.com/download/38132...VT1627-002A.pdf
Website is VERY slow. Be patient!
Programmed DCI Commands
Mode: AV/SRC - "Hold and Release" Mode: Menu
CH: Enter - HnR CH: Map
VOL +/-: Volume +/-
Mute: ATT (About Half Vol)
Mode and Vol +/-: Left/Right (next/previous track)
CH and Vol +/-: Up/Down (next/previous folder)
Installation
1. Always disconnect negative battery wire before working on electronics in your car. (Not pictured)
2. I followed instruction from lucid's auto to mask off the area and remove radio door.
http://lucidauto.com/Merchant2/merchant.mv...ode=radioremove

3. With the radio door removed, remove 4 screws holding the head unit

4. Pull the OEM headunit out and unplug the OEM harness and Antennae plug.

5. Remove both brackets on the side of OEM hu. (only one pictured)

6. Notice the holes on the JVC unit is further back than OEM

7. Front holes compared.

8. JVC on top, OEM on the bottom

9. To solve the door non-closing issue, I drilled new holes on the bracket and installed the bracket.

10. Connect JVC harness to Honda harness(purchased from Modifry) to DCI

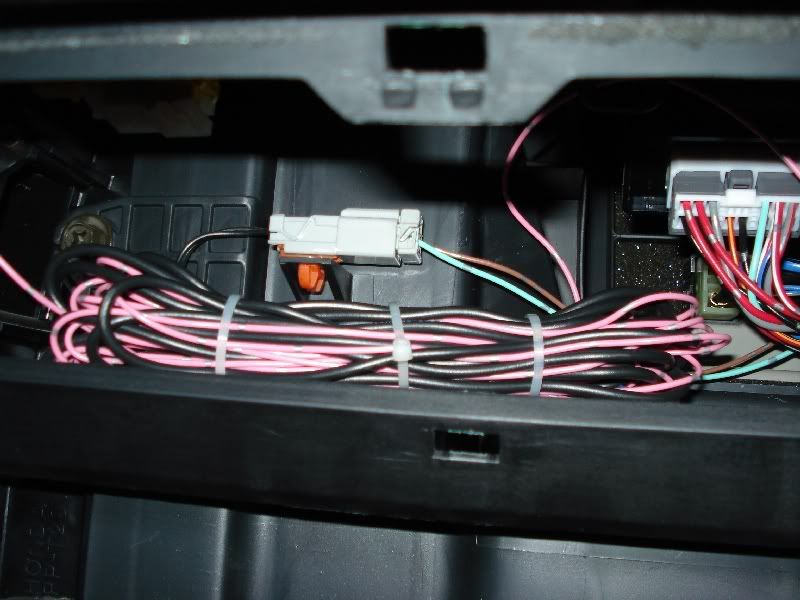
11. Find a suitable place for GPS antennae and pull wire to hu location

12. Connect Honda harness to OEM harness. Pull all necessary wires and route DCI to location of your choice.

13. Connect JVC harness to HU and test fit. Reconnect negative wire and test HU and DCI. Disconnect negative again.

14. I installed a switch for parking brake wire and grounded it. Reason???

15. I chose to mount DCI on pass side panel.

16. Using instructions provided by Modifry, connect pink wire from JVC and gray wire form DCI to vehicle speed sensor. (Not shown on picture)
Clean up your wiring.
17. Install HU in place and put all the panels back in place.
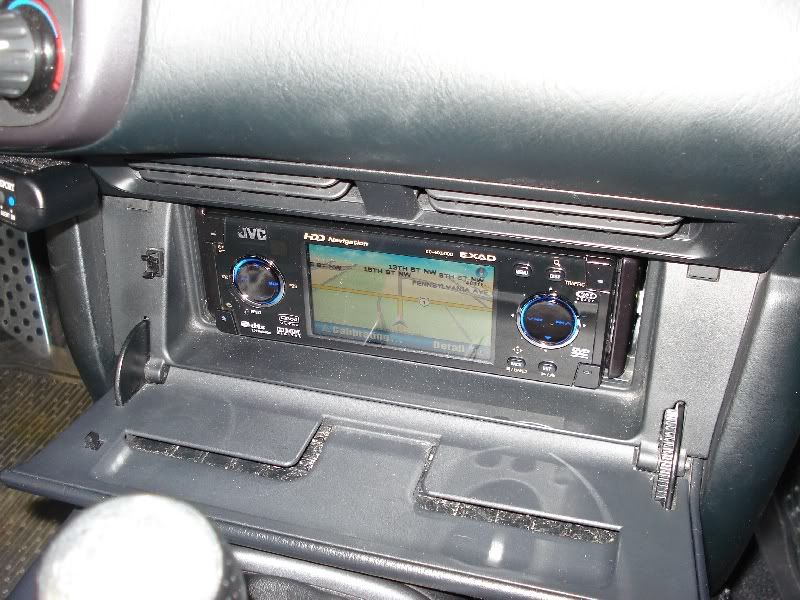
18. Final inspection of your work.

19. Yes, the door closes! (Upto tilt position 3)

Issues
1. I connected illumination wire to dimmer wire by mistake. Solved by connecting it to right wire.
2. GPS would not calibrate at first. Solved by reconnecting speed sensor wire and parking brake switch off(or disconnected), thanks to preilly44!
3. Face plate will not close all the way. It requires a tiny bit of a push. Will deal with this issue coming Saturday.
Impression
Overall I am very impressed with the unit. I still have OEM speakers and just by replacing the HU improved sound. I never had Alpine unit so I can't compare.
CD/MP3 sounds great. DVD/Divx movies look great. Picture can be hard to see with direct sunlight, but can be seen pretty well during daylight.
GPS functions well. I've always liked Navteq maps so, maps were good enough for me. However, there were many times that I wished it was touch screen. Inputting addresses were PIA.
There were times that I thought the screen was tad bit small but, I am used to seeing 7" screens.
I would definately recommend this unit to people wanting NAV units in their S but do not want to cut the dash. IT IS DEFINITELY WORTH THE MONEY!
I've sent my HU to modifry to have a wired unit configured.
However, after talking with Bob@Modifry, I have decided to go with IR DCI. With the IR DCI, Bob was able to program all the functions I wanted.
As everyone at s2ki already know, Bob was great to work with! I want to thank him again for taking the time to configure the DCI even with his busy schedule.
Now I know first hand why people rave about Modifry! I want to thank folks at electronics forum for giving me the courage to do my first HU swap.
Reference Links
https://www.s2ki.com/forums/index.ph...=486431&hl=jvc
https://www.s2ki.com/forums/index.ph...=469203&hl=jvc
JVC Instruction Manual http://books.jvcservice.com/download/38132...VT1627-001A.pdf
JVC Installation Manual http://books.jvcservice.com/download/38132...VT1627-002A.pdf
Website is VERY slow. Be patient!
Programmed DCI Commands
Mode: AV/SRC - "Hold and Release" Mode: Menu
CH: Enter - HnR CH: Map
VOL +/-: Volume +/-
Mute: ATT (About Half Vol)
Mode and Vol +/-: Left/Right (next/previous track)
CH and Vol +/-: Up/Down (next/previous folder)
Installation
1. Always disconnect negative battery wire before working on electronics in your car. (Not pictured)
2. I followed instruction from lucid's auto to mask off the area and remove radio door.
http://lucidauto.com/Merchant2/merchant.mv...ode=radioremove
3. With the radio door removed, remove 4 screws holding the head unit
4. Pull the OEM headunit out and unplug the OEM harness and Antennae plug.
5. Remove both brackets on the side of OEM hu. (only one pictured)
6. Notice the holes on the JVC unit is further back than OEM
7. Front holes compared.
8. JVC on top, OEM on the bottom
9. To solve the door non-closing issue, I drilled new holes on the bracket and installed the bracket.
10. Connect JVC harness to Honda harness(purchased from Modifry) to DCI
11. Find a suitable place for GPS antennae and pull wire to hu location
12. Connect Honda harness to OEM harness. Pull all necessary wires and route DCI to location of your choice.
13. Connect JVC harness to HU and test fit. Reconnect negative wire and test HU and DCI. Disconnect negative again.
14. I installed a switch for parking brake wire and grounded it. Reason???
15. I chose to mount DCI on pass side panel.
16. Using instructions provided by Modifry, connect pink wire from JVC and gray wire form DCI to vehicle speed sensor. (Not shown on picture)
Clean up your wiring.
17. Install HU in place and put all the panels back in place.
18. Final inspection of your work.
19. Yes, the door closes! (Upto tilt position 3)
Issues
1. I connected illumination wire to dimmer wire by mistake. Solved by connecting it to right wire.
2. GPS would not calibrate at first. Solved by reconnecting speed sensor wire and parking brake switch off(or disconnected), thanks to preilly44!
3. Face plate will not close all the way. It requires a tiny bit of a push. Will deal with this issue coming Saturday.
Impression
Overall I am very impressed with the unit. I still have OEM speakers and just by replacing the HU improved sound. I never had Alpine unit so I can't compare.
CD/MP3 sounds great. DVD/Divx movies look great. Picture can be hard to see with direct sunlight, but can be seen pretty well during daylight.
GPS functions well. I've always liked Navteq maps so, maps were good enough for me. However, there were many times that I wished it was touch screen. Inputting addresses were PIA.
There were times that I thought the screen was tad bit small but, I am used to seeing 7" screens.
I would definately recommend this unit to people wanting NAV units in their S but do not want to cut the dash. IT IS DEFINITELY WORTH THE MONEY!

Thread Starter
Registered User
Joined: Feb 2007
Posts: 468
Likes: 1
Originally Posted by starbai,May 29 2007, 11:10 PM
can you post a few pics from the driver seat?
great write up!!! i'm looking into doing this myself soon too
great write up!!! i'm looking into doing this myself soon too


Joined: Apr 2007
Posts: 2,363
Likes: 7
From: Orlando, FL
sweeeeeet
thats what 've been trying to picture in my head for the last month (i've only owned my S for a month :-p)
awesome setup bro--- let me know ur longer term impressions of it after youve played with it for a while
thanks!!
thats what 've been trying to picture in my head for the last month (i've only owned my S for a month :-p)
awesome setup bro--- let me know ur longer term impressions of it after youve played with it for a while
thanks!!


Trending Topics

Thread Starter
Registered User
Joined: Feb 2007
Posts: 468
Likes: 1
Originally Posted by S2KPUDDYDAD,Jun 1 2007, 10:44 PM
I was going to make new arm brackets for mine but will re-drill the holes like you did 
I have the JVC unit under this (no NAV) with the DVD
I have the JVC unit under this (no NAV) with the DVD
It turned out ok.
Originally Posted by DDuds2k,Jun 1 2007, 10:44 PM
excellent write up. first time installer? How difficult was it?