
89 Porsche 944 Turbo 2nd chance

Thread Starter


Joined: Mar 2008
Posts: 1,818
Likes: 3
From: SE Michigan, USA
ok guys so we all know we have our nice new sub forum, but with that i can't get any feedback, questions, comments, concerns, ideas, or advice.
Wanabe - if posting twice is a no no - then u can delete this post.
anyways fellas, here's the original repasted, now with feedback goodness!
__________________________________________________ _____________
Scott and I went to school together, and the guy loves cars as much as I do. Well not too long ago Scott's dad gives him a wonderful gift: his old 89 Porsche 944 Turbo (aka 951) with around 27,000 on the clock. The interior is not excellent - it's PERFECT. the exterior however... well... you'll see. This car was done free and Scott helped to gain some of the little knowledge I have. I'm hoping to use it to gain the attention of other owners.
My collection of products to use keeps growing, and the main thing i need to add is a rotary. might be looking into a mikita soon...
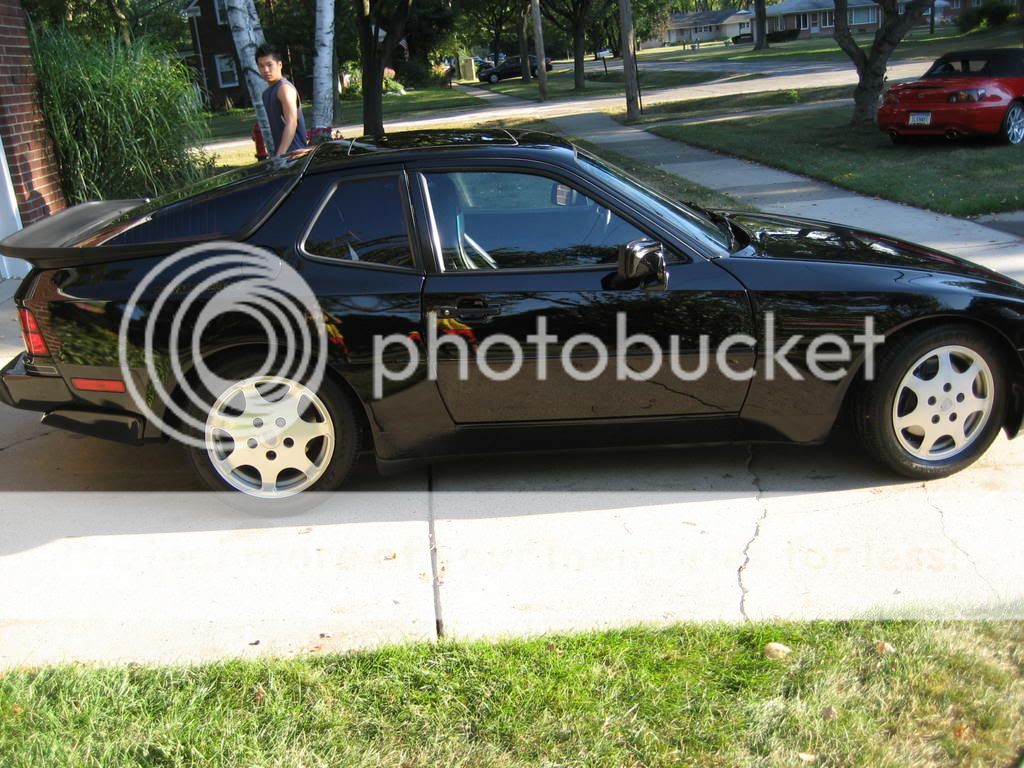
Black 1989 Porsche 944 Turbo with 27,6xx miles.
Two bucket wash system featuring lambs wool mitts
Meg's NXT2.0 car wash liquid
PalmOlive dish soap
Mother's Back to Black
Q-tips
Ton's of Mf's
DD Uber Mf's
JetSeal109
Adam's Clay
CG Luber
CG Liquid Leather Conditioner
Mother's Showtime quick detailer spray
Simple Green 1:10
CG Barebones
CG Grime Reaper 1:6
P21S Wheel Cleaner Gel
soft brissle tooth brush
PC 7424
Lake Country CCS orange/white/black
Menzerna PowerGloss/106
Einszett Cockpit Premium
Invisible Glass
3M painter's tape
twin 500w halogens
Rain-X
CG Fabric Guard
NoTouch tire cleaner
Black Magic Tire Shine
LSP: Lusso Oro
first thing was first, and i wanted to go over the whole car inside and out to see what i was getting into. as stated, the inside was flawless, and needed little other than leather conditioner, and the seals treated. The current owner (scott) keeps this baby waxed, but has little product knowledge nor a vast amount of stuff to try or experiment with.
initial inspection:


roof panel really shows how everything else looked after stripped:

emblems really were looking their age around the edges from lack of attention to detail when waxing.

let alone old wax build up on plastic that was removed with a soft brissle tooth brush later:

scuff in the driver's door:

the vehicle was holding up well of course... but the trim and rubber pieces were looking their age for sure:

notice the trim around the mirror:

the rims were in real bad shape. they needed a polish job which we didn't give them, and had bad pitting and such from brake dust sitting on them for extremely long periods of time. more about this picture later:

Well time to get to work! started with trusty P21S wheel cleaner gel to bite through a lot of the grim on the rims. The owner is getting boxter S rims for it soon, but didn't have them yet and these needed to be cleaned no matter what. Once the P21S sat for about 30-45 mins, it was time to rinse off and clean each rim using a towel.
pre-rinse with the P21S already going to work and brake dust and grim melting away:


The nastiness running off as soon as the water hits it:

These things didn't clean up nearly like I was hoping. Not even the mighty P21S can take on all of Mother Nature.
Once the rims were cleaned, I wet down the 944 and could see immediately how the wax was holding up:


this was not a totally abused car, just a finely aging one.
Knowing this was a complete project we wanted to start fresh on, next a light PalmOlive dish soap mixture was made to help strip off wax, and give a fresh start to this car's new beginning using the two bucket wash system of course.
After the strip down was complete, claying could begin.
I used Chemical Guys Luber, Mother's Showtime Quick Detailer Spray, and Adam's Claybar for this job.

I was suprised as the clay wasn't as bad as some other cars I've done. I'd rate the containination a 4/10
After the clay the vehicle got a quick bath in Meg's NXT2.0 car wash with a ratio of 1 oz per gallon of water to remove quick detailer and Luber, trying to make sure a good inspection of the paint could take place.
The inspection is where the real shocker kicked it. With all the wax and everything else laying on the paint, you couldn't truly see how bad it was. Once removed and in direct light....


including this big scuff on the driver's door which was now easier to spot and a real eye sore:

eeek... going to be a long job with the PC.
due to limited supplies, I went with Menzerna PowerGloss and an orange Lake Country CSS pad, followed by 106 on a white pad. The powergloss may be high cut, but the orange pad surely isn't the yellow, and ended working out well because the powergloss didn't cut as quickly nor to it's full potential as I think it would have with yellow.
here are a few panel vs panel shots:


As you can see, the results were real nice, and the paint was really coming around well.

This is what was left of the big scuff on the driver's door:

At the same time is when things got REALLY strange. maybe some of you guys can shed a little light?
We started with the front of the car and worked our way back. The first thing i noticed was the old dead oxidized paint coming off and turning my orange pad black. I had tried a less harsh pad with less-than-favorable results, but the same black paint on the pad, and figured cool...one step paint...this should be interesting. That is UNTIL i got back behind the doors. Once i hit the rear quart-panels and back, it was all clear coat. Thats when two and two came together. Reenter this photo:
look at the crazy amount of orange peel. the clarity, especially from that short of a distance, should be much better. Notice it's rear of the door. It seems the rear portion of the car was resprayed or at least cleared, while the front was not. At the same time, that answered how that amount of orange peel could get through Porsche quality control.
what do you guys think?
anyways, back to the job at hand....
Once buffing was finally finished, CG JetSeal109 was applied and left to cure overnight.
The next day, Scott came back to pick up the car. We decided to wait a day or two before waxing it. We had been working on the car for three days and it was a much needed break. We're both car nuts and loved the Porsche, but we were kind of Porsched-out.
Two days later, Scott comes back for the LSP and some pics.
a quick rinse down and wash using the two bucket wash system with NXT2.0 car wash (1 oz to 1gallon of water) and lambs wool mitts. special thanx to Phil for a past great deal on a bunch of goodies that led to the t-shirt!

Lusso Oro was then applied with a foam applicator.

here's a pick of my "Mr. Miagi's" as my friend Big Mike calls my wax swirls referring to my ability to create nice uniform paterns vs his "Daniel-Sons" or lop-sided ugly wax swirls.

Scott Q-Tipped a few minor trim areas once the wax was removed with Back to Black to make sure everything looked nice and was treated

And finally:
leather treated with CG Liquid Leather Conditioner. This was my first time using it and so far I'd say it's not bad.

trim and rubber having a second chance at life


^yea I know...tough times to be a Michigan fan.


thanx for looking. any questions or comments are always welcome.
p.s. mirrored post from autopia
Wanabe - if posting twice is a no no - then u can delete this post.
anyways fellas, here's the original repasted, now with feedback goodness!
__________________________________________________ _____________
Scott and I went to school together, and the guy loves cars as much as I do. Well not too long ago Scott's dad gives him a wonderful gift: his old 89 Porsche 944 Turbo (aka 951) with around 27,000 on the clock. The interior is not excellent - it's PERFECT. the exterior however... well... you'll see. This car was done free and Scott helped to gain some of the little knowledge I have. I'm hoping to use it to gain the attention of other owners.
My collection of products to use keeps growing, and the main thing i need to add is a rotary. might be looking into a mikita soon...
Black 1989 Porsche 944 Turbo with 27,6xx miles.
Two bucket wash system featuring lambs wool mitts
Meg's NXT2.0 car wash liquid
PalmOlive dish soap
Mother's Back to Black
Q-tips
Ton's of Mf's
DD Uber Mf's
JetSeal109
Adam's Clay
CG Luber
CG Liquid Leather Conditioner
Mother's Showtime quick detailer spray
Simple Green 1:10
CG Barebones
CG Grime Reaper 1:6
P21S Wheel Cleaner Gel
soft brissle tooth brush
PC 7424
Lake Country CCS orange/white/black
Menzerna PowerGloss/106
Einszett Cockpit Premium
Invisible Glass
3M painter's tape
twin 500w halogens
Rain-X
CG Fabric Guard
NoTouch tire cleaner
Black Magic Tire Shine
LSP: Lusso Oro
first thing was first, and i wanted to go over the whole car inside and out to see what i was getting into. as stated, the inside was flawless, and needed little other than leather conditioner, and the seals treated. The current owner (scott) keeps this baby waxed, but has little product knowledge nor a vast amount of stuff to try or experiment with.
initial inspection:
roof panel really shows how everything else looked after stripped:
emblems really were looking their age around the edges from lack of attention to detail when waxing.
let alone old wax build up on plastic that was removed with a soft brissle tooth brush later:
scuff in the driver's door:
the vehicle was holding up well of course... but the trim and rubber pieces were looking their age for sure:
notice the trim around the mirror:
the rims were in real bad shape. they needed a polish job which we didn't give them, and had bad pitting and such from brake dust sitting on them for extremely long periods of time. more about this picture later:
Well time to get to work! started with trusty P21S wheel cleaner gel to bite through a lot of the grim on the rims. The owner is getting boxter S rims for it soon, but didn't have them yet and these needed to be cleaned no matter what. Once the P21S sat for about 30-45 mins, it was time to rinse off and clean each rim using a towel.
pre-rinse with the P21S already going to work and brake dust and grim melting away:
The nastiness running off as soon as the water hits it:
These things didn't clean up nearly like I was hoping. Not even the mighty P21S can take on all of Mother Nature.
Once the rims were cleaned, I wet down the 944 and could see immediately how the wax was holding up:
this was not a totally abused car, just a finely aging one.
Knowing this was a complete project we wanted to start fresh on, next a light PalmOlive dish soap mixture was made to help strip off wax, and give a fresh start to this car's new beginning using the two bucket wash system of course.
After the strip down was complete, claying could begin.
I used Chemical Guys Luber, Mother's Showtime Quick Detailer Spray, and Adam's Claybar for this job.
I was suprised as the clay wasn't as bad as some other cars I've done. I'd rate the containination a 4/10
After the clay the vehicle got a quick bath in Meg's NXT2.0 car wash with a ratio of 1 oz per gallon of water to remove quick detailer and Luber, trying to make sure a good inspection of the paint could take place.
The inspection is where the real shocker kicked it. With all the wax and everything else laying on the paint, you couldn't truly see how bad it was. Once removed and in direct light....
including this big scuff on the driver's door which was now easier to spot and a real eye sore:
eeek... going to be a long job with the PC.
due to limited supplies, I went with Menzerna PowerGloss and an orange Lake Country CSS pad, followed by 106 on a white pad. The powergloss may be high cut, but the orange pad surely isn't the yellow, and ended working out well because the powergloss didn't cut as quickly nor to it's full potential as I think it would have with yellow.
here are a few panel vs panel shots:
As you can see, the results were real nice, and the paint was really coming around well.
This is what was left of the big scuff on the driver's door:
At the same time is when things got REALLY strange. maybe some of you guys can shed a little light?
We started with the front of the car and worked our way back. The first thing i noticed was the old dead oxidized paint coming off and turning my orange pad black. I had tried a less harsh pad with less-than-favorable results, but the same black paint on the pad, and figured cool...one step paint...this should be interesting. That is UNTIL i got back behind the doors. Once i hit the rear quart-panels and back, it was all clear coat. Thats when two and two came together. Reenter this photo:
look at the crazy amount of orange peel. the clarity, especially from that short of a distance, should be much better. Notice it's rear of the door. It seems the rear portion of the car was resprayed or at least cleared, while the front was not. At the same time, that answered how that amount of orange peel could get through Porsche quality control.
what do you guys think?
anyways, back to the job at hand....
Once buffing was finally finished, CG JetSeal109 was applied and left to cure overnight.
The next day, Scott came back to pick up the car. We decided to wait a day or two before waxing it. We had been working on the car for three days and it was a much needed break. We're both car nuts and loved the Porsche, but we were kind of Porsched-out.
Two days later, Scott comes back for the LSP and some pics.
a quick rinse down and wash using the two bucket wash system with NXT2.0 car wash (1 oz to 1gallon of water) and lambs wool mitts. special thanx to Phil for a past great deal on a bunch of goodies that led to the t-shirt!
Lusso Oro was then applied with a foam applicator.
here's a pick of my "Mr. Miagi's" as my friend Big Mike calls my wax swirls referring to my ability to create nice uniform paterns vs his "Daniel-Sons" or lop-sided ugly wax swirls.
Scott Q-Tipped a few minor trim areas once the wax was removed with Back to Black to make sure everything looked nice and was treated
And finally:
leather treated with CG Liquid Leather Conditioner. This was my first time using it and so far I'd say it's not bad.
trim and rubber having a second chance at life
^yea I know...tough times to be a Michigan fan.
thanx for looking. any questions or comments are always welcome.
p.s. mirrored post from autopia


Thread Starter
Joined: Mar 2008
Posts: 1,818
Likes: 3
From: SE Michigan, USA
Originally Posted by TSC17,Sep 18 2008, 09:00 AM
Nice recovery! That thing was hammered. And doing it with a PC...been there, done that, and then went out and bought the Makita rotary! 

Joined: Feb 2004
Posts: 4,943
Likes: 3
From: Philadelphia
I am looking into the rotary switch when I can afford it. Products don't need to be changed, and pads you have can still be used. I do belive you will need new backing plates though. Plus, I heard they make some nice wool pads for rotary!!
Trending Topics

Registered User
Joined: Jan 2007
Posts: 2,683
Likes: 0
From: Tampa, FL
I would pick up a Makita and a 3m backing plate(from what I hear this will save you miles of headaches!). All of your pads should be able to be used. Mostly need a PFW, Orane, White, Black or Blue. The most common from what I have seen is the PFW, White, Black. And 5.5" seems to be most common.

Registered User
Joined: Jan 2007
Posts: 1,511
Likes: 1
From: NC
Originally Posted by MuttGrunt,Sep 18 2008, 12:23 PM
thats what i'm looking into now. any advice with it or pointers for making the switch? anything i need to be concerned with once i switch or new products i'll need? i'm really looking for rotary advice here for anyone that would like to chime in!
I started learning on my "spare" car, a 1989 CRX, and I hurt the paint pretty good in some spots. I'd say do what I did (though I did it one step too late), and go to a body shop, and ask them for some donor panels to practice on. I took home the front left fender from a friend of mine's VW road racer after it got flipped over at Road Atlanta a couple months ago. A front fender from pretty much anything should get you some contours to work on, yet won't take up the amount of space in your garage that something like a door would. I've got a couple front VW fenders now, and they stack in the corner nicely.
Probably wouldn't be a bad idea to pick up something plastic, like a bumper cover or a mirror housing, while you're at the body shop. That would let you practice on metal and plastic before doing it for real.
Thread Starter
Joined: Mar 2008
Posts: 1,818
Likes: 3
From: SE Michigan, USA
most def appreciate the help, i have my old girl over here and she says i can try things out on her first. trusty 94 geo prism LSI. shes a beast! (ok not really but i love her still)
so from what i understand the main difference is much more powerful, which means cuts much quicker and easier for much faster results. the flip side of course is more dangerous and more prone to heat inducted troubles. would that about sum it up or is there more to be concerned about with a rotary?
so from what i understand the main difference is much more powerful, which means cuts much quicker and easier for much faster results. the flip side of course is more dangerous and more prone to heat inducted troubles. would that about sum it up or is there more to be concerned about with a rotary?