The Unofficial GT3076R Greddy Turbo Kit Upgrade
 06-05-2009, 06:30 PM
#1
Registered User

Thread Starter
Join Date: May 2006
Location: Dodging bullets in L.A. Calif
Posts: 430
Likes: 0
Received 1 Like
on
1 Post
A couple of people have pioneered this upgrade already with good results:
Revenganator
S2kadl
I thought I'd start this thread to post what is involved in this upgrade. It will still be a good month before I get all the parts together for the install and eventual tune
So, even before installing my Greddy kit (thanks to Reveganator and his post), I went ahead and ordered the GT30 from ATP Turbo - Their webserver sure is slow, so be patient. I decided to go for the 0.64 A/R since I'm more interested in low-mid power gains and as fast spool as I can get out of a GT30.
We all know the Greddy kit is not the best, there are way better kits for about the same money, so please don't post about how good company's XYZ turbo kit is. Many have chosen the Greddy kit because it's the only CARB-approved turbo kit for the S2000. Yes, we all know modifying it, even just re-tuning the kit's stock map, will make this kit "illegal" but I'm doing this for testing purposes only.
Banjo fittings for coolant are needed for this turbo as well as an oil restrictor
Banjo fittings for coolant
Oil inlet fitting with built-in restrictor
Later, I'll add descriptions of the 3" intake pipe, intake filter, and turbo to intercooler pipe (if needed)
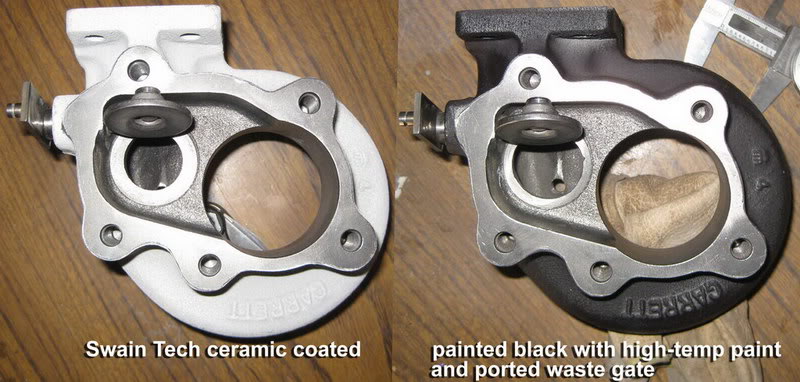
I sent the turbine housing to Swain Tech coatings to have ceramic-coated. I already had the header, downpipe and T518Z housing coated by Swain Tech, so I gotta get the GT30 coated as well. The only drawback is that it takes too darn long (up to 4-5 weeks from when you send it off) and it's a bit prices (about $120 just for the turbo whne you include shipping) But, the ceramic coating Swain Tech uses is the best I've used, and I've used Jet Hot - Fail - flaked off after 1 year, and HPC which is good, but also had some flaking happen in an uppipe for my Subaru STI. They re-coated for free, but I had to pay shipping and remove the uppipe from the car + downtime.
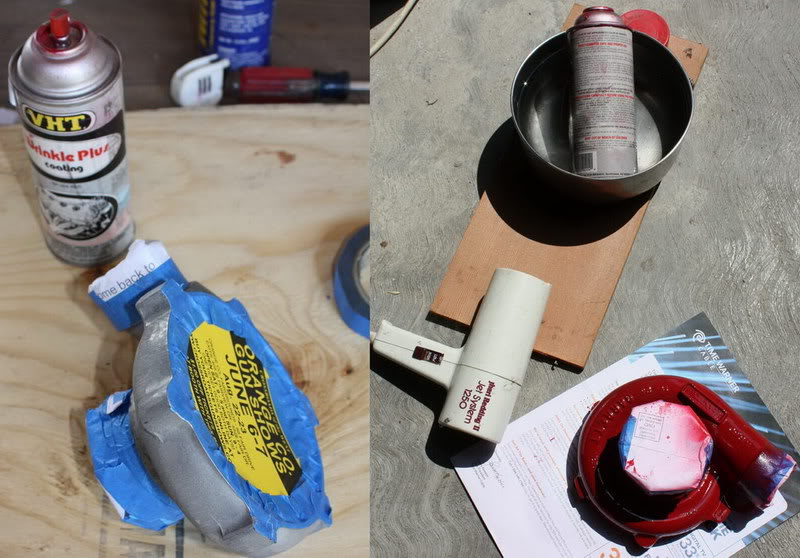
Pic of the GT30 & T518Z - I'll need to order some more VHT crinkle red and black ceramic paint !
I think I'll also port the WG on the GT30, it looks as small as the T518Z's before I ported it. Notice the WG flapper valve, it opens opposite as the T518Z's. I like the
Greddy's turbo flapper valve mechanism, lever, and actuator assembly better.
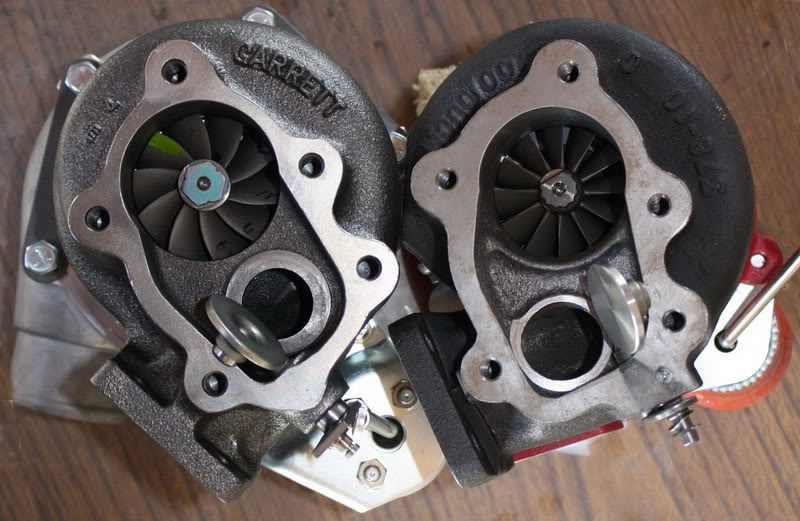
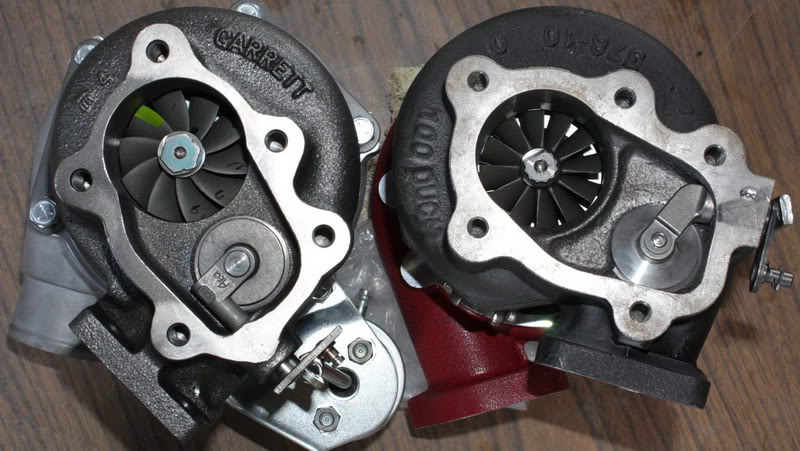
Amazingly, the turbos looks very similar in size
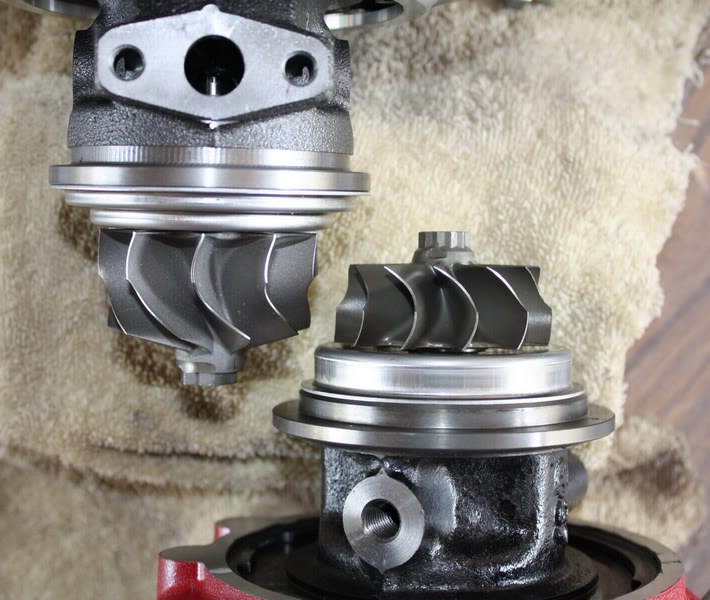
But when you see the guts.... the Garrett GT3076R's turbine impeller (top) is beefier
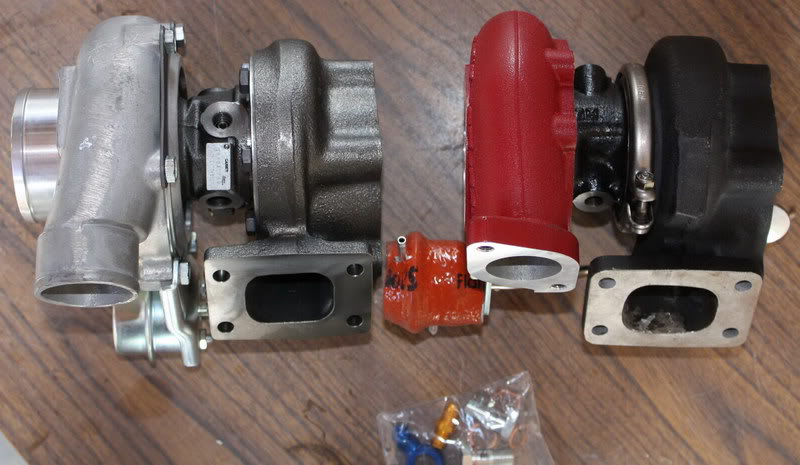
I like my turbos red, so I masked & painted
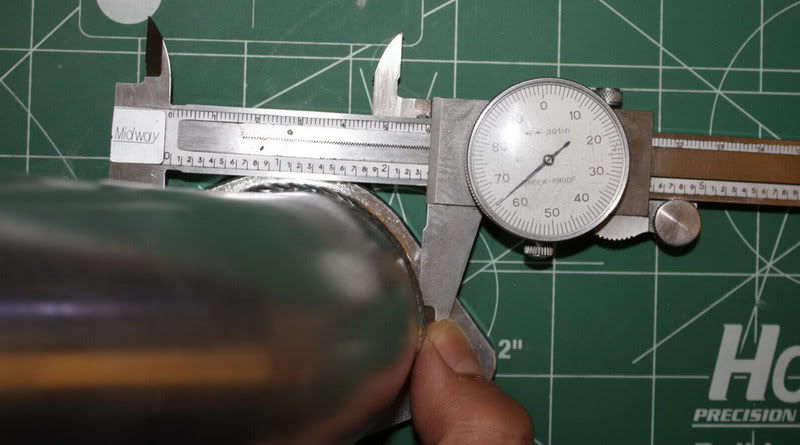
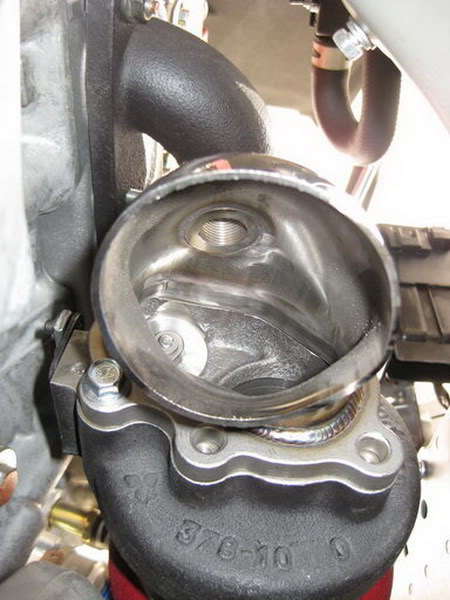
The compressor outlet to intercooler pipe is 2" O.D. The inlet is 2.36" so if you use this pipe a 3" to 2.25" silicone reducer will be needed

One of my buddies had a Tomei SR20DET downpipe he was going to use for a custom dpipe in his 240sx. I got it for free... perfect timing. Since those don't work well with the Greddy kit, I had to make a spacer from a T25 flange in order to rotate the turbo CCW (when viewed from the outlet) I'll have to use 2 gaskets for proper sealing. The spacer is shaped like a wedge, it wasn't that easy, I used an angle grinder to get a close as possible to the desired shape, then I used a band / circular sander for the to get the flat final shape, then checked with a straight edge to make sure the surface was flat. I couldn't pass on a freebie and having a Tomei part in the car! :

With the spacer, it just clears the transmission/engine. I'll weld a bracket on the dpipe so it bolts onto the block firmly
I'm using the T518Z to mock-up the dpipe. I'm still waiting on delivery of the GT30 housing from Swaintech
3" piping = good flow
The Tomei dpipe has an odd O.D. of 2.88". I'll use my buddy's pipe-expander to make it more round and closer to 3"
Revenganator
S2kadl
I thought I'd start this thread to post what is involved in this upgrade. It will still be a good month before I get all the parts together for the install and eventual tune
So, even before installing my Greddy kit (thanks to Reveganator and his post), I went ahead and ordered the GT30 from ATP Turbo - Their webserver sure is slow, so be patient. I decided to go for the 0.64 A/R since I'm more interested in low-mid power gains and as fast spool as I can get out of a GT30.
We all know the Greddy kit is not the best, there are way better kits for about the same money, so please don't post about how good company's XYZ turbo kit is. Many have chosen the Greddy kit because it's the only CARB-approved turbo kit for the S2000. Yes, we all know modifying it, even just re-tuning the kit's stock map, will make this kit "illegal" but I'm doing this for testing purposes only.
Banjo fittings for coolant are needed for this turbo as well as an oil restrictor
Banjo fittings for coolant
Oil inlet fitting with built-in restrictor
Later, I'll add descriptions of the 3" intake pipe, intake filter, and turbo to intercooler pipe (if needed)
I sent the turbine housing to Swain Tech coatings to have ceramic-coated. I already had the header, downpipe and T518Z housing coated by Swain Tech, so I gotta get the GT30 coated as well. The only drawback is that it takes too darn long (up to 4-5 weeks from when you send it off) and it's a bit prices (about $120 just for the turbo whne you include shipping) But, the ceramic coating Swain Tech uses is the best I've used, and I've used Jet Hot - Fail - flaked off after 1 year, and HPC which is good, but also had some flaking happen in an uppipe for my Subaru STI. They re-coated for free, but I had to pay shipping and remove the uppipe from the car + downtime.
Pic of the GT30 & T518Z - I'll need to order some more VHT crinkle red and black ceramic paint !

I think I'll also port the WG on the GT30, it looks as small as the T518Z's before I ported it. Notice the WG flapper valve, it opens opposite as the T518Z's. I like the
Greddy's turbo flapper valve mechanism, lever, and actuator assembly better.

Amazingly, the turbos looks very similar in size

But when you see the guts.... the Garrett GT3076R's turbine impeller (top) is beefier

I like my turbos red, so I masked & painted


The compressor outlet to intercooler pipe is 2" O.D. The inlet is 2.36" so if you use this pipe a 3" to 2.25" silicone reducer will be needed


One of my buddies had a Tomei SR20DET downpipe he was going to use for a custom dpipe in his 240sx. I got it for free... perfect timing. Since those don't work well with the Greddy kit, I had to make a spacer from a T25 flange in order to rotate the turbo CCW (when viewed from the outlet) I'll have to use 2 gaskets for proper sealing. The spacer is shaped like a wedge, it wasn't that easy, I used an angle grinder to get a close as possible to the desired shape, then I used a band / circular sander for the to get the flat final shape, then checked with a straight edge to make sure the surface was flat. I couldn't pass on a freebie and having a Tomei part in the car! :

With the spacer, it just clears the transmission/engine. I'll weld a bracket on the dpipe so it bolts onto the block firmly

I'm using the T518Z to mock-up the dpipe. I'm still waiting on delivery of the GT30 housing from Swaintech

3" piping = good flow

The Tomei dpipe has an odd O.D. of 2.88". I'll use my buddy's pipe-expander to make it more round and closer to 3"

 06-05-2009, 06:30 PM
#2
Registered User
Thread Starter
Join Date: May 2006
Location: Dodging bullets in L.A. Calif
Posts: 430
Likes: 0
Received 1 Like
on
1 Post
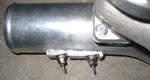
Got the GT30 housing back from Swain Tech. Their "White Lightning" ceramic coating is one of the best coatings. I've used it in my Subaru STI and after a couple of years it still looks the same as it did on day 1.
I went ahead and ported the waste gate. I ended up with the port the same size as the ported T518Z ~ 28mm diameter. Most likely this turbo won't have the boost creep issue as the T518Z. However, I decided to port it now before I install it - just in case.
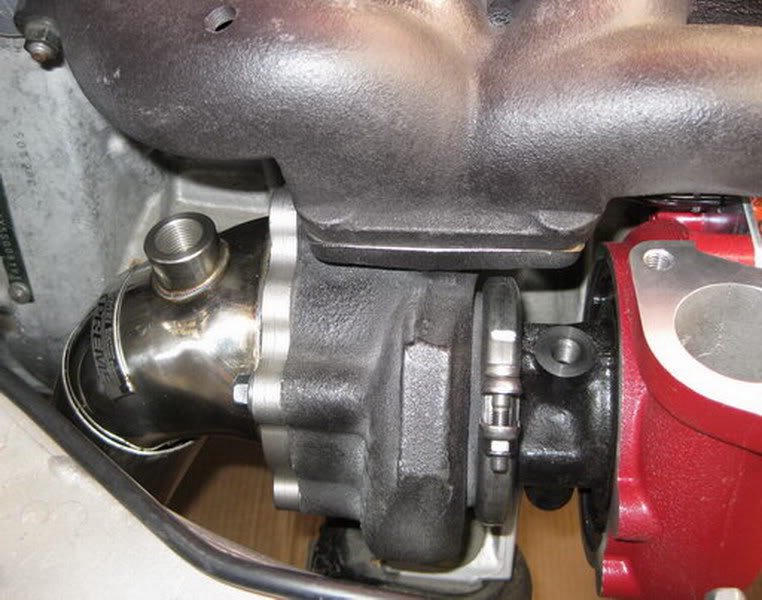
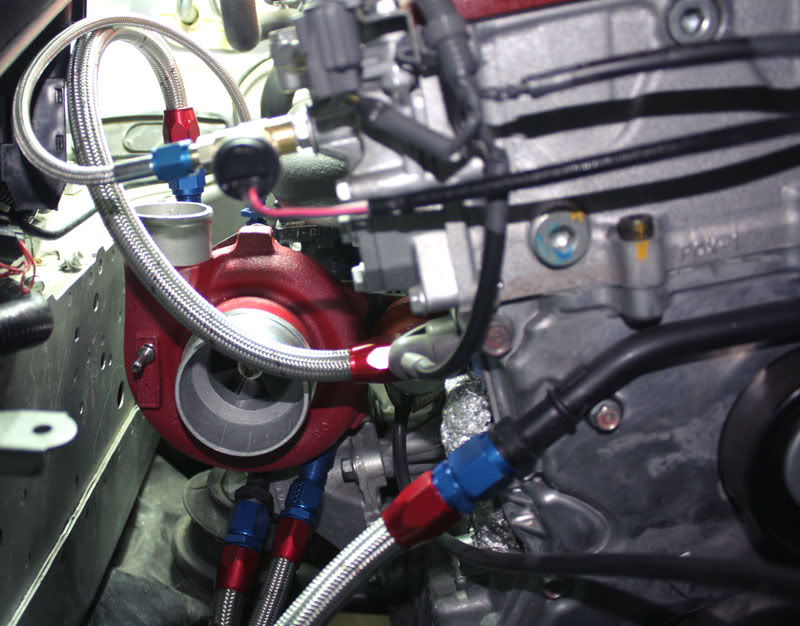
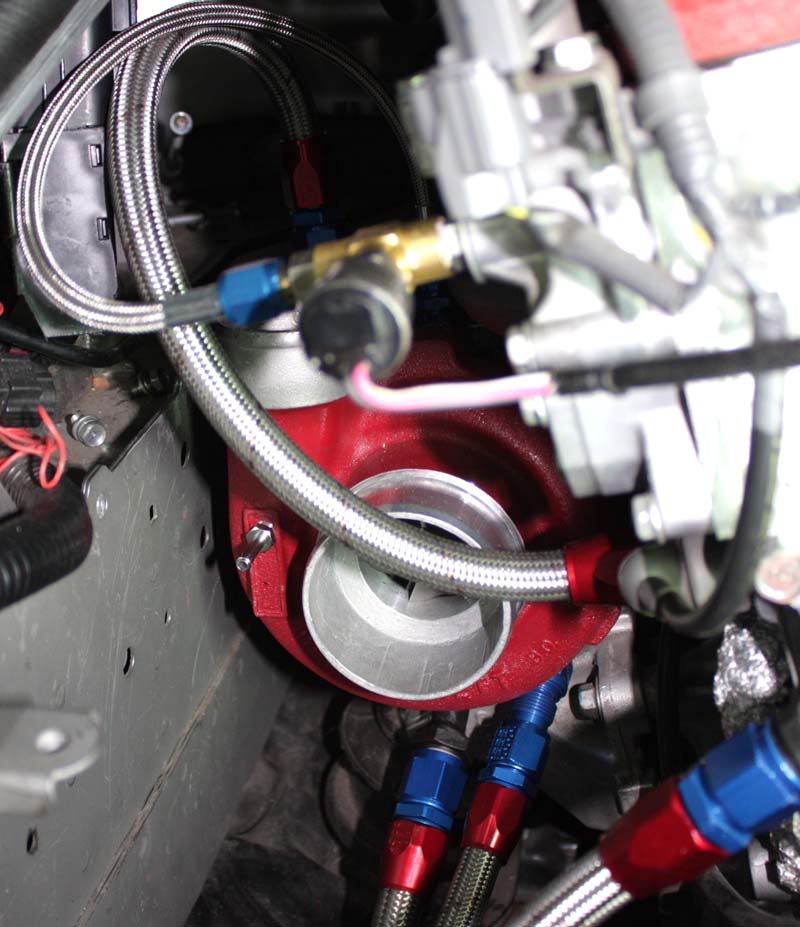
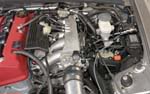
The GT30 fits OK !
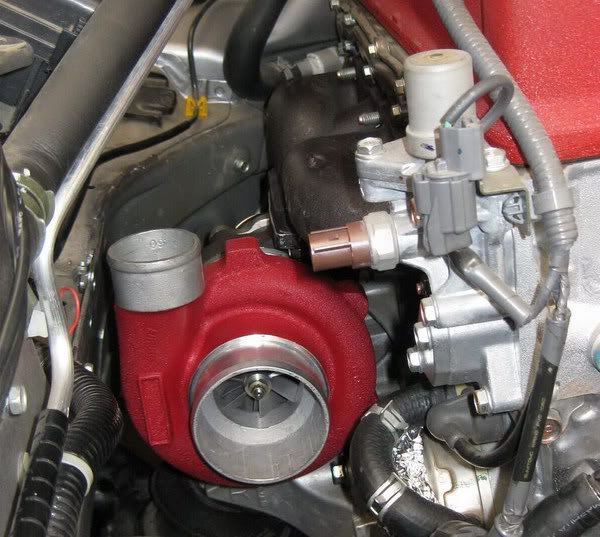
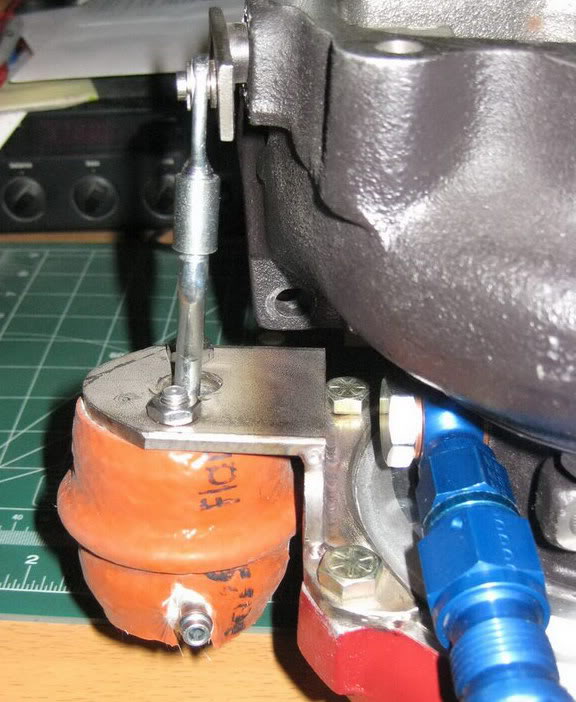
However, the WG actuator doesn't clear the engine block !
I'll have to modify the bracket to move the actuator closer to the compressor housing and fab a lever-arm extension for the WG actuator rod.
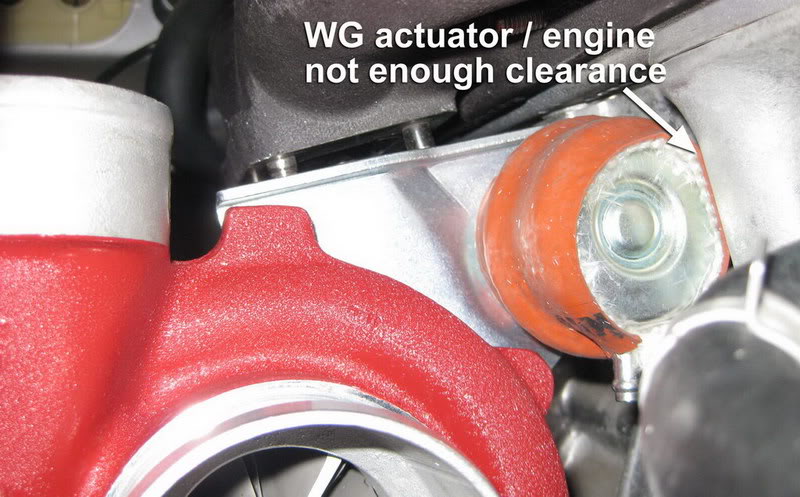
I went to the local Industrial Metal Supply to buy some stainless to fab a bracket for the WG actuator. $6.75 for 3 lbs of stainless bar.
.... 3 hours of measuring, test-fitting, cutting and grinding with a cut-out wheel tool....now I just have to detail-finish and weld it
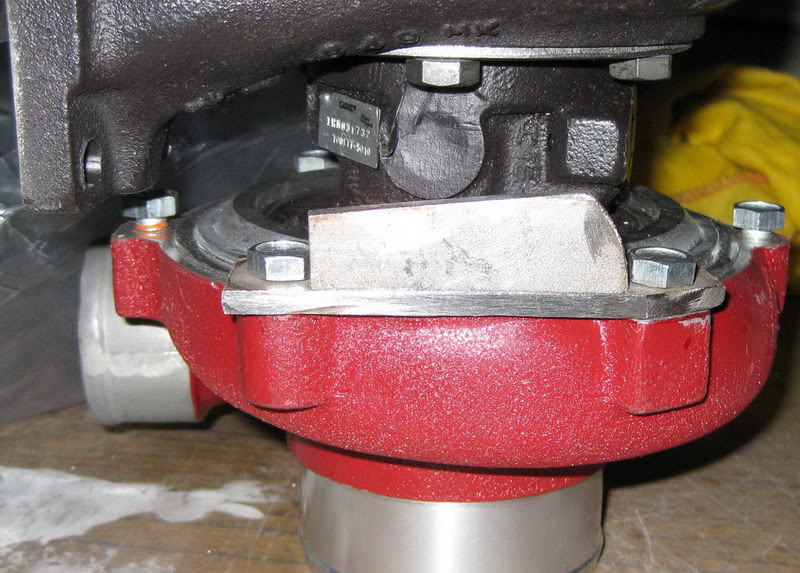
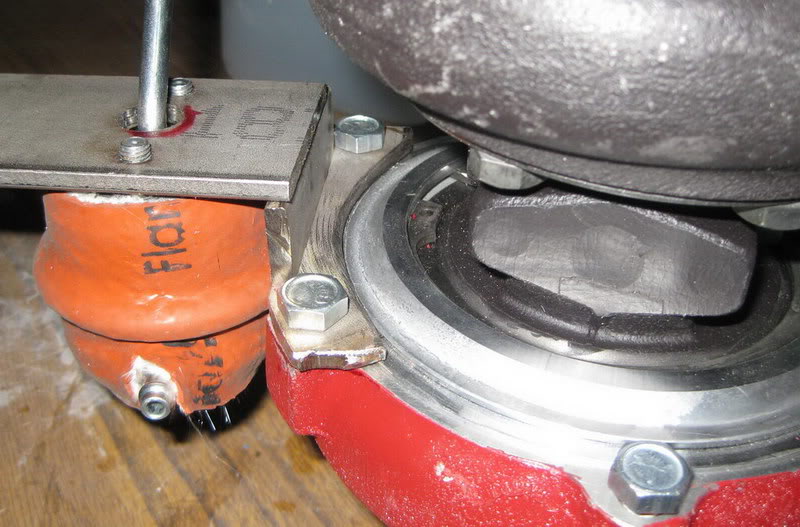
This bracket will locate the WG actuator closer to the compressor housing and it will clear the engine block
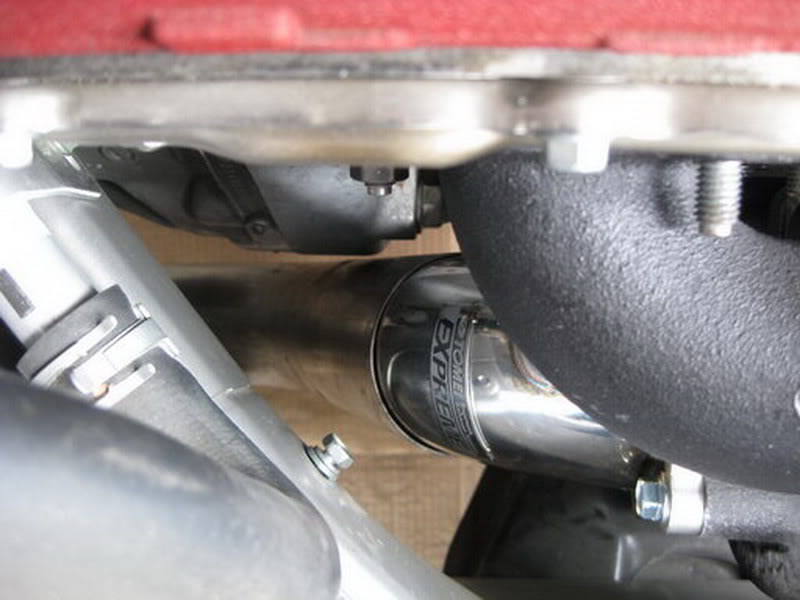
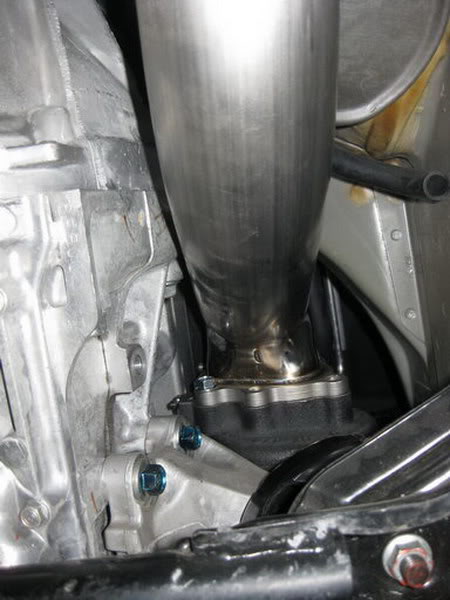
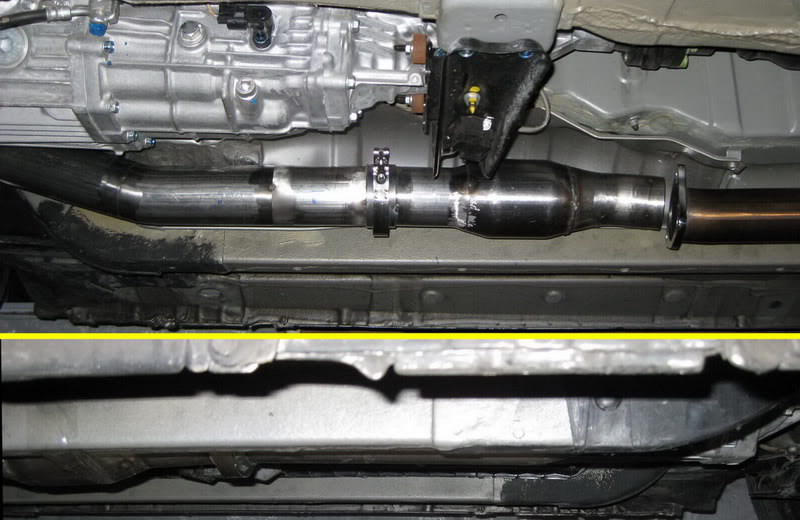
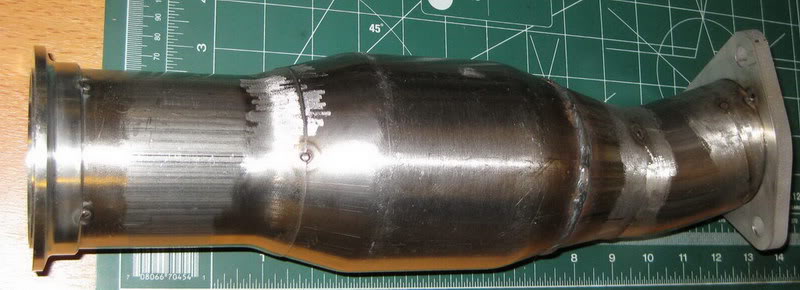
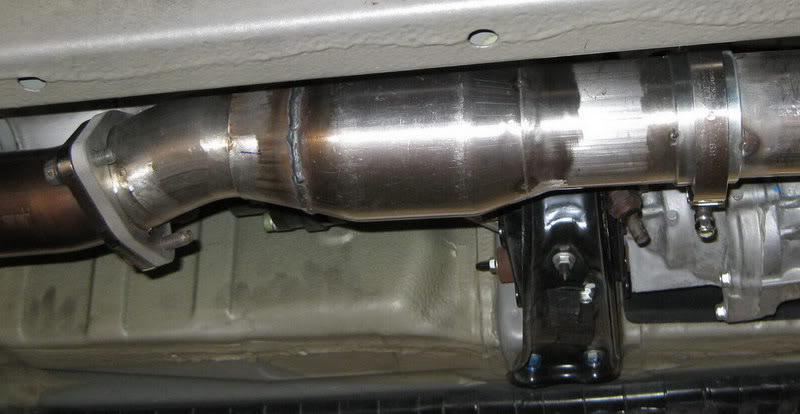
Test-fitting dpipe and locating Hi-flow cat
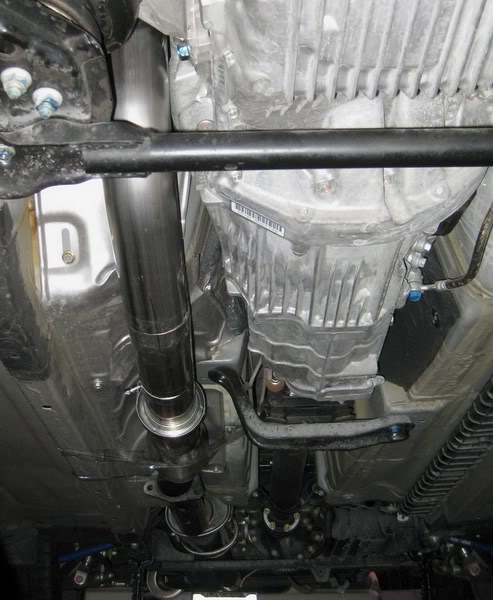
Ground clearance is very good, the HFC is barely lower than the body frame rails and the 3" dpipe is nicely tucked in.
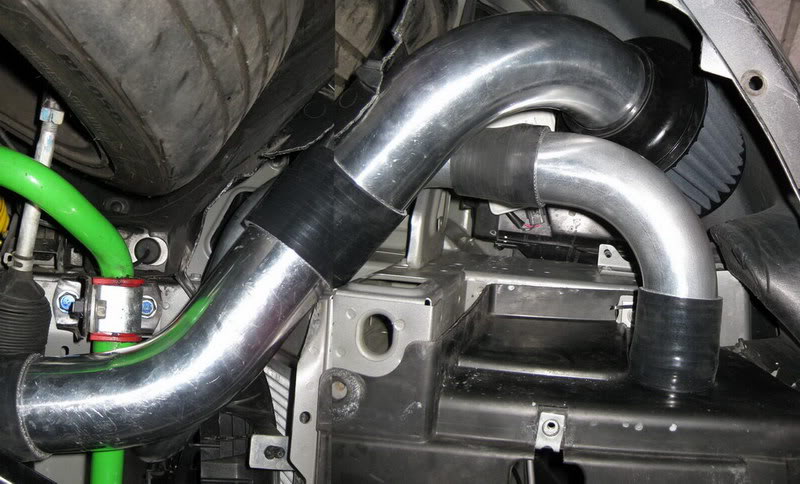
I decided to fab up a CAI, it should help reduce induction charge temperature
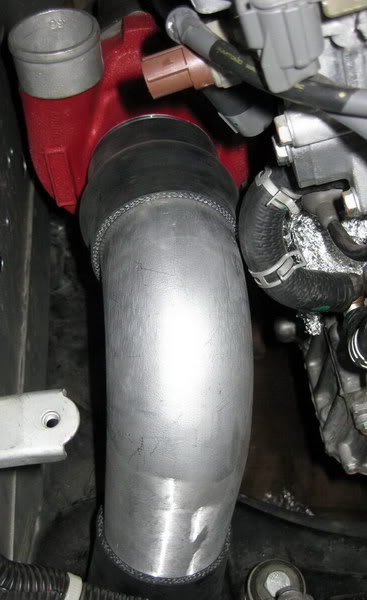
The CAI pipes just clear the steering rack. The 11mm steering rack bumpsteer spacers I made a few months ago make just enough room for the 3" pipe to be routed underneath
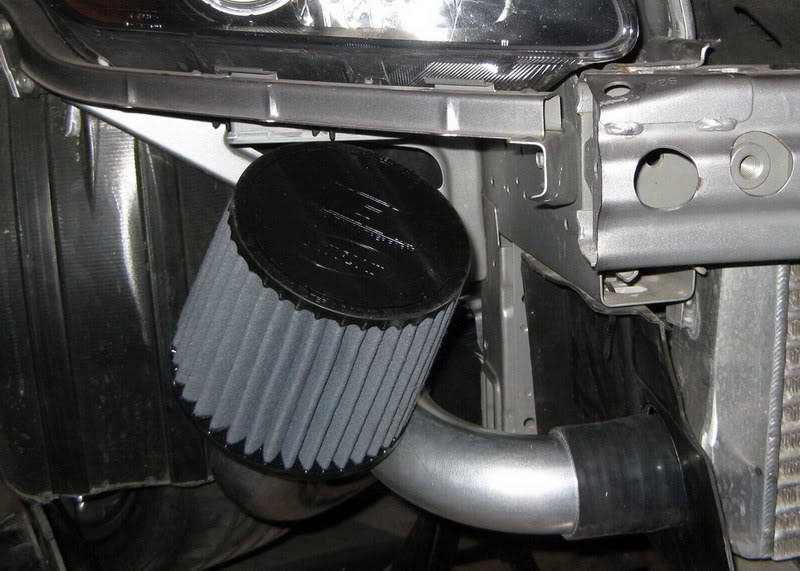
The AEM DryFlow filter fits nicely behind the bumper under the headlight. I'm going to make a hole in the fake airduct to route fresh air to the filter
I went ahead and ported the waste gate. I ended up with the port the same size as the ported T518Z ~ 28mm diameter. Most likely this turbo won't have the boost creep issue as the T518Z. However, I decided to port it now before I install it - just in case.

The GT30 fits OK !

However, the WG actuator doesn't clear the engine block !
I'll have to modify the bracket to move the actuator closer to the compressor housing and fab a lever-arm extension for the WG actuator rod.

I went to the local Industrial Metal Supply to buy some stainless to fab a bracket for the WG actuator. $6.75 for 3 lbs of stainless bar.
.... 3 hours of measuring, test-fitting, cutting and grinding with a cut-out wheel tool....now I just have to detail-finish and weld it


This bracket will locate the WG actuator closer to the compressor housing and it will clear the engine block

Test-fitting dpipe and locating Hi-flow cat

Ground clearance is very good, the HFC is barely lower than the body frame rails and the 3" dpipe is nicely tucked in.

I decided to fab up a CAI, it should help reduce induction charge temperature

The CAI pipes just clear the steering rack. The 11mm steering rack bumpsteer spacers I made a few months ago make just enough room for the 3" pipe to be routed underneath

The AEM DryFlow filter fits nicely behind the bumper under the headlight. I'm going to make a hole in the fake airduct to route fresh air to the filter
 06-05-2009, 06:31 PM
#3
Registered User
Thread Starter
Join Date: May 2006
Location: Dodging bullets in L.A. Calif
Posts: 430
Likes: 0
Received 1 Like
on
1 Post
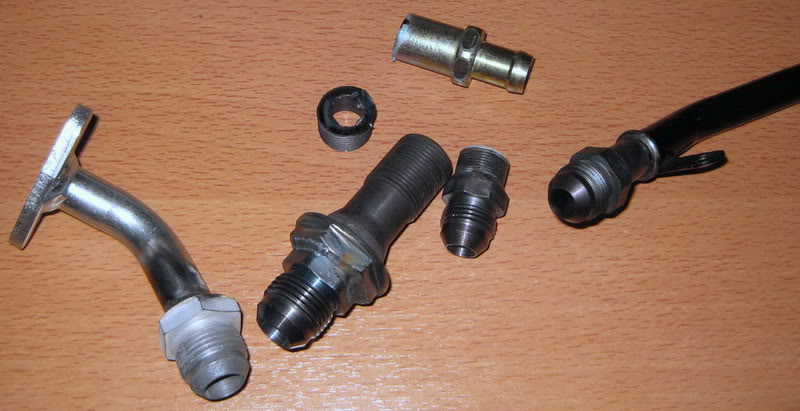
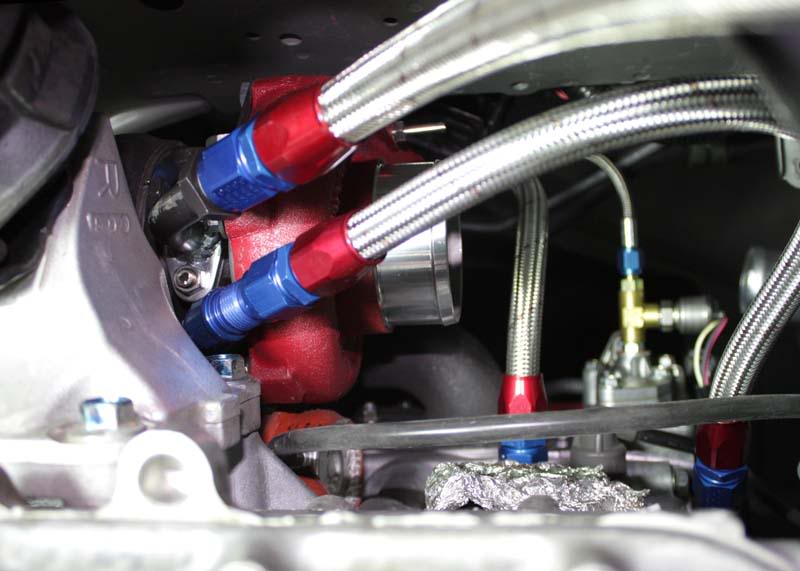
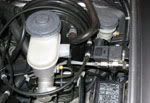
Welded AN fittings for turbo coolant and oil lines
from left to right: oil return, oil filter take-off, coolant fitting from block, coolant pipe from thermostat location.
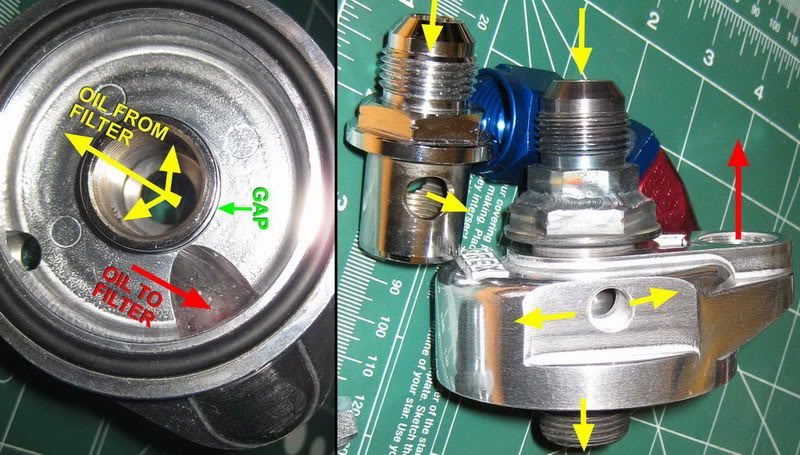
i'm deleting the heat exchanger, I'm going to use the stock threaded pipe with the Greddy remote filter adapter. Still need a gasket to have effective seal. I don't like the Greddy part that has the AN fitting. There are 2 holes that allow oil from the return line to supply oil for a sensor location on the take off plate. I don't like the fact that there's no seal between the return line and the supply side (shown as "gap" in the pic), it doesn't make sense! (filtered oil mixing with unfiltered oil, albeit at low rates perhaps) The gap is fairly small, but there's no reason to have the supply & return flow mix. The pic below is my attempt to show this. It may not have any ill effects after all, but I just don't like it, so I'm not going to use it.
Finally got the 70mm 304 stainless catback flange made at the water jet shop
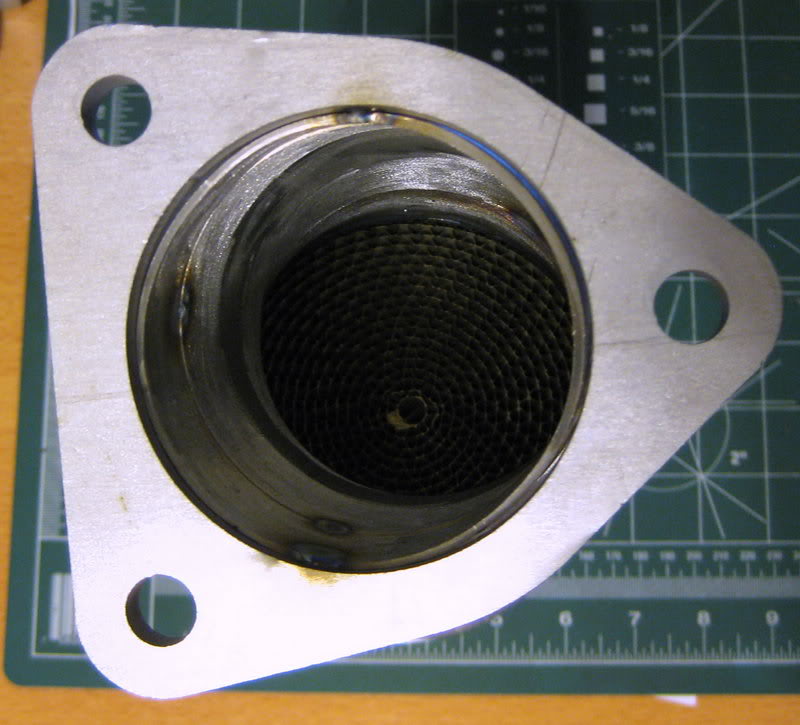
The HFC cat is now done! - just need to complete the welds after confirming fitment
Fitment was good !
Something interesting about Cats:
Yep, none of the aftermarket HFC's are "legal" unless you adhere to the magnanimous E.P.A. rules. You can still be issued a ticket for tampering with the exhaust emission devices in your S2000. The one good advantage is that HFC's do get rid of almost all of the smelly exhaust so you will be issued citation for other stuff, like BOV's, breathers, CAI's, etc...
http://www.epa.gov/OMS/cert/factshts/catcvrts.pdf
Rules for Replacing Converters
In 1986, the U.S. Environmental Protection Agency issued new guidelines for the construction, efficiency and installation of aftermarket catalytic converters. All CleanAir converters listed in this catalog have been designed, tested and manufactured to meet this policy.
In addition, CleanAir converter listed in this catalog is appropriate for use under the current requirements of the California Air Resources Board (C.A.R.B.).
E.P.A. guidelines state that replacement converters may be installed only in the following situations:
1. The vehicle is missing a converter
2. A state or local inspection program has determined that the existing converter needs replacement
3. Vehicles manufactured prior to 1996 must have more than 50,000 miles, and a legitimate need for replacement must be established and documented
4. In cases of OBD Il-equipped vehicles (1996 and later), the O.E. manufacturer's 8-year/80,000-mile warranty must have expired and a legitimate need for replacement must be established and documented.
Please note that Federal law prohibits removal or replacement of a properly functioning O.E. converter.
When replacement of the converter is appropriate (as outlined above), the E.P.A. further requires that:
1. It be installed in the same location as the original
2. It be the same type as the original (i.e., two-way, three-way, three-way plus air/three-way plus oxidation)
3. It be the proper model for the vehicle application as determined and specified by the manufacturer
4. It be properly connected to any existing air injection components on the vehicle
5. It be installed with any other required converter for a particular application
6. It be accompanied by a warranty information card to be completed by the installer.
I used AN female couplers and bulkhead fittings to make "extension" fittings so that the coolant and oil hoses are located farther away from the turbine center section, just to keep them away from the heat. I like how they turned out and it was relatively cheap. female couplers are about $7 and bulkhead fittings cost $6 for straight and $11 for 45*
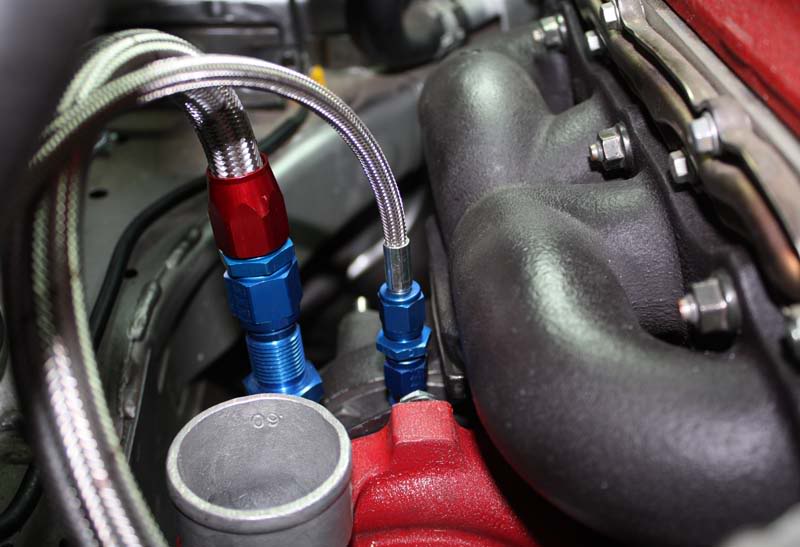
Luckily, the 45* -8AN bulkhead fitting for the coolant line fit just right thru the gap between turbo and engine mount
from left to right: oil return, oil filter take-off, coolant fitting from block, coolant pipe from thermostat location.

i'm deleting the heat exchanger, I'm going to use the stock threaded pipe with the Greddy remote filter adapter. Still need a gasket to have effective seal. I don't like the Greddy part that has the AN fitting. There are 2 holes that allow oil from the return line to supply oil for a sensor location on the take off plate. I don't like the fact that there's no seal between the return line and the supply side (shown as "gap" in the pic), it doesn't make sense! (filtered oil mixing with unfiltered oil, albeit at low rates perhaps) The gap is fairly small, but there's no reason to have the supply & return flow mix. The pic below is my attempt to show this. It may not have any ill effects after all, but I just don't like it, so I'm not going to use it.

Finally got the 70mm 304 stainless catback flange made at the water jet shop

The HFC cat is now done! - just need to complete the welds after confirming fitment

Fitment was good !

Something interesting about Cats:
Yep, none of the aftermarket HFC's are "legal" unless you adhere to the magnanimous E.P.A. rules. You can still be issued a ticket for tampering with the exhaust emission devices in your S2000. The one good advantage is that HFC's do get rid of almost all of the smelly exhaust so you will be issued citation for other stuff, like BOV's, breathers, CAI's, etc...
http://www.epa.gov/OMS/cert/factshts/catcvrts.pdf
Rules for Replacing Converters
In 1986, the U.S. Environmental Protection Agency issued new guidelines for the construction, efficiency and installation of aftermarket catalytic converters. All CleanAir converters listed in this catalog have been designed, tested and manufactured to meet this policy.
In addition, CleanAir converter listed in this catalog is appropriate for use under the current requirements of the California Air Resources Board (C.A.R.B.).
E.P.A. guidelines state that replacement converters may be installed only in the following situations:
1. The vehicle is missing a converter
2. A state or local inspection program has determined that the existing converter needs replacement
3. Vehicles manufactured prior to 1996 must have more than 50,000 miles, and a legitimate need for replacement must be established and documented
4. In cases of OBD Il-equipped vehicles (1996 and later), the O.E. manufacturer's 8-year/80,000-mile warranty must have expired and a legitimate need for replacement must be established and documented.
Please note that Federal law prohibits removal or replacement of a properly functioning O.E. converter.
When replacement of the converter is appropriate (as outlined above), the E.P.A. further requires that:
1. It be installed in the same location as the original
2. It be the same type as the original (i.e., two-way, three-way, three-way plus air/three-way plus oxidation)
3. It be the proper model for the vehicle application as determined and specified by the manufacturer
4. It be properly connected to any existing air injection components on the vehicle
5. It be installed with any other required converter for a particular application
6. It be accompanied by a warranty information card to be completed by the installer.
I used AN female couplers and bulkhead fittings to make "extension" fittings so that the coolant and oil hoses are located farther away from the turbine center section, just to keep them away from the heat. I like how they turned out and it was relatively cheap. female couplers are about $7 and bulkhead fittings cost $6 for straight and $11 for 45*


Luckily, the 45* -8AN bulkhead fitting for the coolant line fit just right thru the gap between turbo and engine mount

 06-05-2009, 06:32 PM
#4
Registered User
Thread Starter
Join Date: May 2006
Location: Dodging bullets in L.A. Calif
Posts: 430
Likes: 0
Received 1 Like
on
1 Post
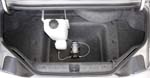
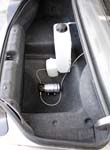
Installed Aquamist HFS-3 methanol injection
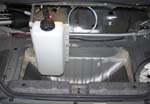
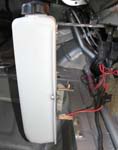
I added a small 1 Qt tank as a surge tank to prevent the meth from sloshing and sucking air. The main tank is 6 Qt.
I installed the gauge in the dash , where the radio controls are.

Video of testing Aquamist HFS-3 with HydraEMS controlling water injection via a 2d PWM map and an auxiliary map. When the Aquamist is switched on, the HydraEMS switches to auxiliary maps (fuel & timing) Any faults revert the HydraEMS back to the base map. Nice Failsafe!
[media]http://www.youtube.com/watch?v=OshKY9UwpMY [/media][media]http://www.youtube.com/watch?v=lM8T9QtVkA0 [/media]
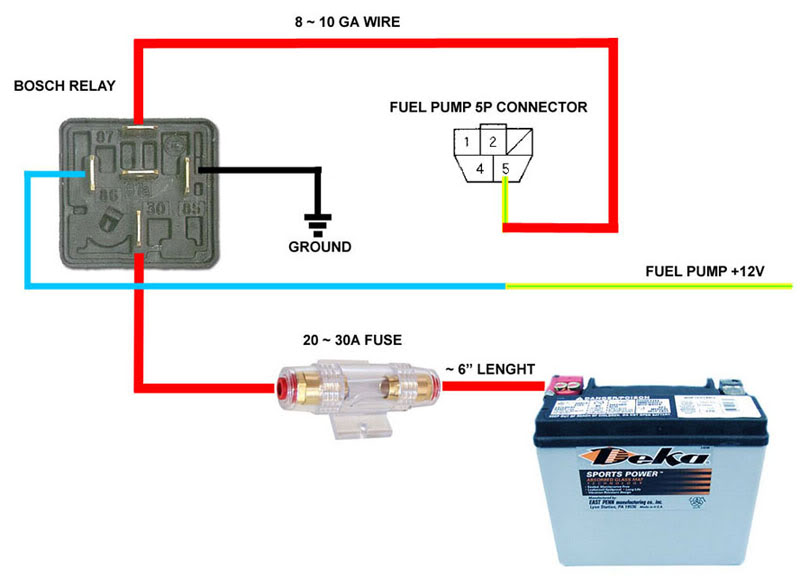
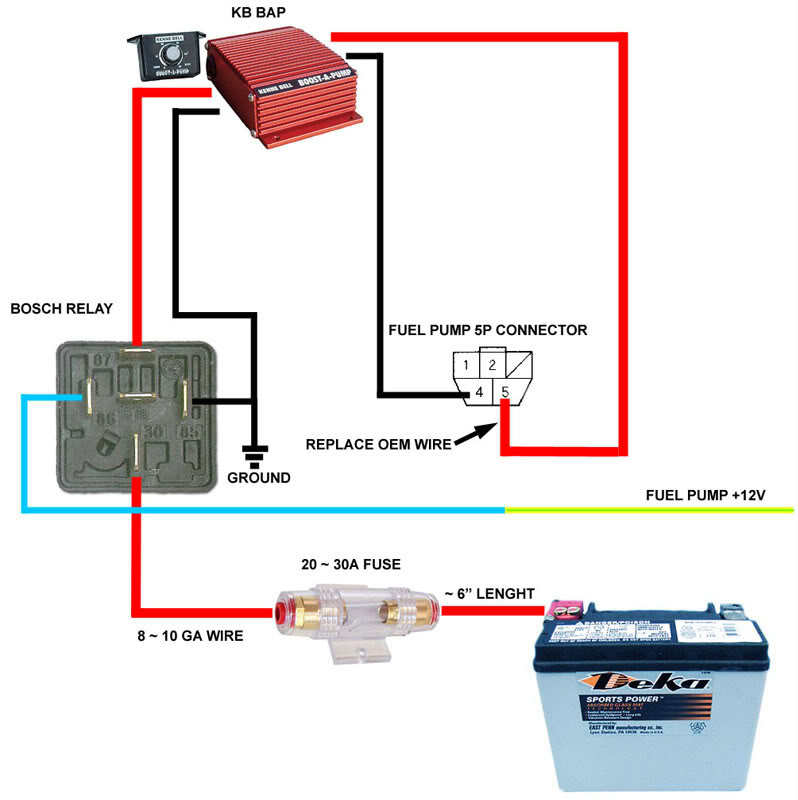
Rewired fuel pump
I've been asked several times how to re-wire the fuel pump and BAP, so here' are some simple diagrams


I added a small 1 Qt tank as a surge tank to prevent the meth from sloshing and sucking air. The main tank is 6 Qt.
I installed the gauge in the dash , where the radio controls are.


Video of testing Aquamist HFS-3 with HydraEMS controlling water injection via a 2d PWM map and an auxiliary map. When the Aquamist is switched on, the HydraEMS switches to auxiliary maps (fuel & timing) Any faults revert the HydraEMS back to the base map. Nice Failsafe!
[media]http://www.youtube.com/watch?v=OshKY9UwpMY [/media][media]http://www.youtube.com/watch?v=lM8T9QtVkA0 [/media]
Rewired fuel pump
I've been asked several times how to re-wire the fuel pump and BAP, so here' are some simple diagrams


 06-05-2009, 10:47 PM
#7
Registered User
Thread Starter
Join Date: May 2006
Location: Dodging bullets in L.A. Calif
Posts: 430
Likes: 0
Received 1 Like
on
1 Post
No, it's a Greddy T518Z from the Greddy kit.
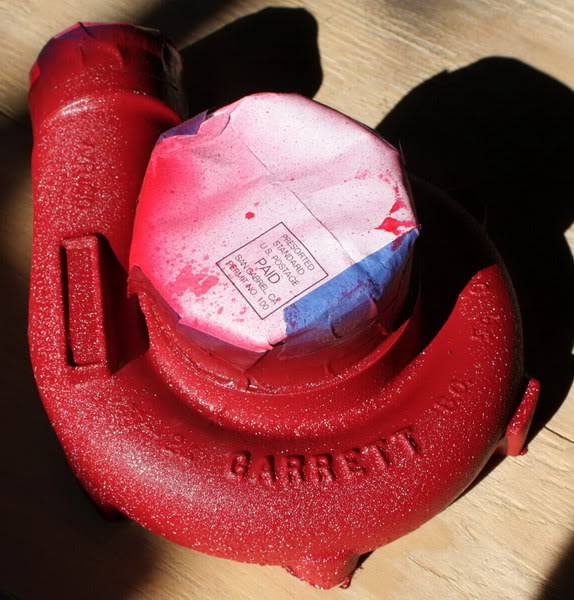
I painted it with VHT wrinkle red paint on the compressor housing
and Swain Tech ceramic coating + VHT flat black exhaust paint on the turbine housing
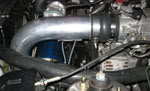
Once installed you can't really see the turbo since it sits under the header, too bad because I made it look mighty purty !
I painted it with VHT wrinkle red paint on the compressor housing
and Swain Tech ceramic coating + VHT flat black exhaust paint on the turbine housing
Once installed you can't really see the turbo since it sits under the header, too bad because I made it look mighty purty !
Trending Topics
06-06-2009, 12:25 AM
#8
Registered User
Join Date: Jun 2006
Location: california
Posts: 2,433
Likes: 0
Received 0 Likes
on
0 Posts
Originally Posted by EngineerX,Jun 5 2009, 10:47 PM
No, it's a Greddy T518Z from the Greddy kit.
I painted it with VHT wrinkle red paint on the compressor housing
and Swain Tech ceramic coating + VHT flat black exhaust paint on the turbine housing
Once installed you can't really see the turbo since it sits under the header, too bad because I made it look mighty purty !
I painted it with VHT wrinkle red paint on the compressor housing
and Swain Tech ceramic coating + VHT flat black exhaust paint on the turbine housing
Once installed you can't really see the turbo since it sits under the header, too bad because I made it look mighty purty !
 you still got the Subie?
