MGA 1600 Race Engine - Part 2 - And other Misadventures
 11-09-2017, 06:47 PM
#11

Thread Starter
If not an F20C, then can a Miata engine fit into that engine bay? It's not a lot more HP where you have to upgrade the suspension and wheels and brakes, but enough power to startle quite a few cars on track. I know the VSCCA would frown on that - are there other friendly vintage car associations that would be welcoming of such a car?

My better option would be to sell the MG as a roller and use the proceeds to buy a first generation Miata Spec racecar. I might have money left over. SVRA and maybe VDCA are letting first generation Miatas run in vintage. Not much of that racing close by though.
 11-09-2017, 06:53 PM
#12
Thread Starter
Did a little more work tearing down the engine, but still haven't reached the crankshaft.
The rocker assembly looks OK from the outside.
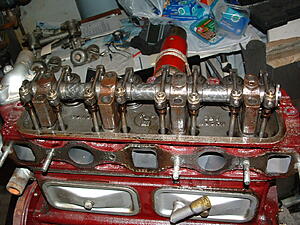
Photo to remind me of the orientation of the rocker assembly.

Pushrods look OK in situ.

But on removal, #7 pushrod may have the slightest of bends in it. Hard to tell and I may just buy a replacement.
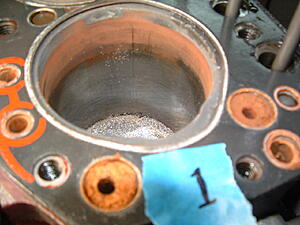
Number 4 bore looks OK.
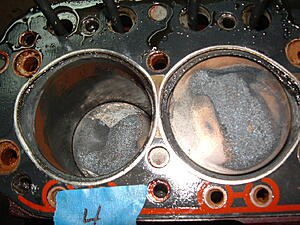
But the bores have this light rusty color along the top. This is #1 and #2.
Number 1 bore may have some slight scoring. I think the white carbon deposits and "dust particles" are from running leaded gas.
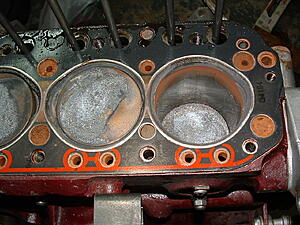
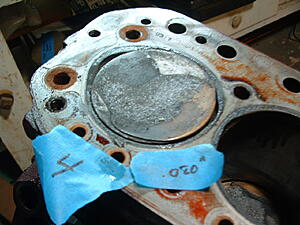
Pretty good imprint on the combustion chamber on the top of piston #4. This piston also extends above the deck by .080" on the side next to piston #3. It is uneven, with the piston being deck high on the opposite side. I hope that this is just from a bent crankshaft.
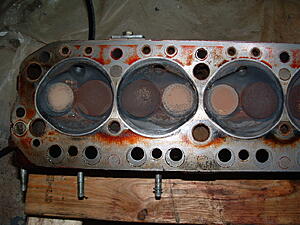
I couldn't see anything wrong with the head. It does not look like the #4 piston made contact with the valves or the head. Once again, I see that light rust color on the underside of the head, but I wonder if that wasn't some sort of copper gasket adhesive.

I'm having a very hard time removing the dog nut from the front of the crankshaft. I may have to drop the engine block down to the floor to obtain better leverage. Maybe I need to rent an air impact gun.
The rocker assembly looks OK from the outside.

Photo to remind me of the orientation of the rocker assembly.

Pushrods look OK in situ.


But on removal, #7 pushrod may have the slightest of bends in it. Hard to tell and I may just buy a replacement.
Number 4 bore looks OK.

But the bores have this light rusty color along the top. This is #1 and #2.

Number 1 bore may have some slight scoring. I think the white carbon deposits and "dust particles" are from running leaded gas.

Pretty good imprint on the combustion chamber on the top of piston #4. This piston also extends above the deck by .080" on the side next to piston #3. It is uneven, with the piston being deck high on the opposite side. I hope that this is just from a bent crankshaft.

I couldn't see anything wrong with the head. It does not look like the #4 piston made contact with the valves or the head. Once again, I see that light rust color on the underside of the head, but I wonder if that wasn't some sort of copper gasket adhesive.


I'm having a very hard time removing the dog nut from the front of the crankshaft. I may have to drop the engine block down to the floor to obtain better leverage. Maybe I need to rent an air impact gun.
11-10-2017, 12:45 AM
#13

That orange stuff looks like rust in the cylinder bore. Any chance you had a blown head gasket and some coolant leaked into the cylinder and caused a Hydrolock ?
https://en.wikipedia.org/wiki/Hydrolock
It was a common problem on our early jetski's and the result was always the same, bent rod or broken crank.
https://en.wikipedia.org/wiki/Hydrolock
It was a common problem on our early jetski's and the result was always the same, bent rod or broken crank.
11-10-2017, 06:27 PM
#14
I agree with Greg that it looks like rust. The cylinder bores and valves look rusty. It's hard to tell from the pics, but it kind of looks like there are a few areas where there were possible leaks. Piston tops also look oxidized, which would also be the result of water leaks into the chambers. You may also want to have the head checked to see if it is flat and checked for cracks.
11-11-2017, 04:12 AM
#15
Thread Starter
I agree. It looks like rust to me. I will crack test the block and head, but I'm not sure what that might show. Perhaps I can have the head pressure tested. The engine is overbored to 1645 and the head is aggressively ported. My fear is that the metal is so thin that water is oozing, perhaps through microscopic voids in the metal, through and into the combustion chamber. A few MG engine builders are watching my progress on the MGA boards, however, and so far they don't seem concerned.
I worked some more on breaking down the engine. But for the life of me, I wasn't able to remove the dog nut on the face of the crankshaft. I may have to see if I can rent an air impact gun with a 1 5/16 impact socket to do that job.
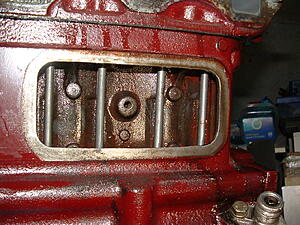
Removed most of the peripherals on either side of the engine, including Hap Waldrop's special core plug retainers.
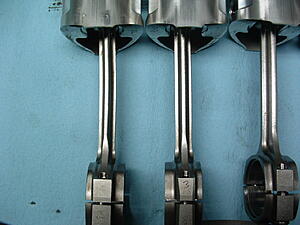
Then the moment of truth came for the removal of the pistons. It wasn't so easy to break apart the rod caps as there is a little sleeve that engages the opposite side. But with gentle tapping and some prying with my shoemaker's knife. I pulled them out one by one. Keeping the orientation front to back was a little tricky, and I had to go back to Hap's build photos to verify that I marked the correct orientation.
After the fact, I'm told me that I should have just backed off the rod bolts a few turns and tapped on them to split the caps from the rods.
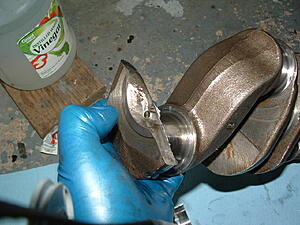
The sad news is that the #4 rod is bent, the head of the piston is imprinted with the bottom of the combustion chamber and the piston is rather stiff on the wrist pin, suggesting that the wrist pin is bent.
Another photo of the broken crankshaft.
The rod journals looked good, although the rod bearings, especially #1 seemed drier than I might have expected, perhaps due to failure of the oil pump at the very end.
The bores also seemed drier than I might have expected
.
Attachment 157557
Attachment 157558
I worked some more on breaking down the engine. But for the life of me, I wasn't able to remove the dog nut on the face of the crankshaft. I may have to see if I can rent an air impact gun with a 1 5/16 impact socket to do that job.
Removed most of the peripherals on either side of the engine, including Hap Waldrop's special core plug retainers.
Then the moment of truth came for the removal of the pistons. It wasn't so easy to break apart the rod caps as there is a little sleeve that engages the opposite side. But with gentle tapping and some prying with my shoemaker's knife. I pulled them out one by one. Keeping the orientation front to back was a little tricky, and I had to go back to Hap's build photos to verify that I marked the correct orientation.
After the fact, I'm told me that I should have just backed off the rod bolts a few turns and tapped on them to split the caps from the rods.
The sad news is that the #4 rod is bent, the head of the piston is imprinted with the bottom of the combustion chamber and the piston is rather stiff on the wrist pin, suggesting that the wrist pin is bent.


Another photo of the broken crankshaft.

The rod journals looked good, although the rod bearings, especially #1 seemed drier than I might have expected, perhaps due to failure of the oil pump at the very end.

The bores also seemed drier than I might have expected
.
Attachment 157557
Attachment 157558
11-11-2017, 04:58 PM
#16
Are those Pauter rods? If so, they can probably make one for you to match the set, but they should first all be checked to see if they are straight. Sometimes rods can be straightened, but not sure what the limit is and if it was me I would just put it up the wall (I have a very bent TR3 rod on the wall already). The piston is trash. Pressure testing the head is a good idea.
To get the dog nut off, have you tried putting the block on the floor, jamb something (long bar, 2x4) in, between the crank and the block, and using a large breaker bar (4' pipe on a breaker bar) on the nut? Not that i've done anything like that before.
To get the dog nut off, have you tried putting the block on the floor, jamb something (long bar, 2x4) in, between the crank and the block, and using a large breaker bar (4' pipe on a breaker bar) on the nut? Not that i've done anything like that before.
11-11-2017, 07:19 PM
#17
Thread Starter
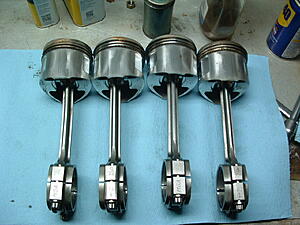
Joe, yes those are Pauter rods. The pistons are Venolia. I have to call both to verify the details, but the plan is to send the three ostensibly good rods to Pauter with the request that they make a new one and "refresh" the other three. I suspect that means crack testing and new rod bolts. Venolia will make a single matching piston provided that I send one back. In all honesty, that is why I used both Pauter and Venolia - to avoid having to purchase all new sets of rods and pistons in the event of just this sort of failure.
The dog nut is an odd 1 5/16" nut and I couldn't get it off with a big box wrench. So I went to Sears and found a socket in that size with a 3/4 inch drive. But I still couldn't get it off even with a 24" long ratchet wrench.
As a last resort, I went to the rent-a-tool place and rented a impact gun and a 1/2" to 3/4" adapter for my socket. It made fairly short work of the dog nut - Thank God! I shoved a 2 x 3 piece of lumber between the crankshaft and the block to keep the crank from spinning while I worked the dog nut.
With the dog nut removed, I gently pried off the pulley / harmonic balancer.
Then I pulled off the timing chain cover and the oil thrower piece that sits behind it. I then attempted to remove the nut holding the cam sprocket. That also called for the 1 5/16" sized socket - but again I wasn't man enough to budge the nut even with the 24" ratchet wrench and a 5 pound persuader hammer. (I'Il need to start working out!


The nut was marked "102" and I puzzled if that was the torque that Hap had applied when he assembled the thing. Out came the impact gun once again, and the camshaft nut quickly came loose. I think I'm going to have to buy one of those tools!
As for the 102, perhaps it more likely that represents the cam timing - perhaps 10.2 degrees before top dead center at .50" of lift.
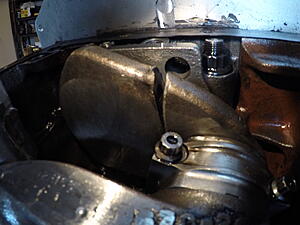
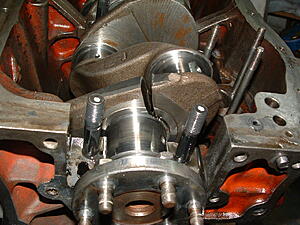
In the above picture, the crankshaft sprocket is on top (small) and the camshaft sprocket in on the bottom, with the timing chain tensioner on the right. The block is upside down. You can see the timing dimple on the crankshaft sprocket at the very top, Hap made a very slight timing 'nick" on the camshaft sprocket but it is under the chain and not visible.
Earlier, I had attempted to measure crankshaft end float with a feeler gauge at the thrust washers with both the connecting rods and the dog nut in place. I came up with .018", but looking at the engine upside down, that was at the top (i.e., bottom) of the thrust washer. The spacing seemed to get tighter as I tried to measure deeper down, suggesting a possible alignment problem, possibly from a bent crankshaft.
Now, I attempted to measure the end float on the camshaft using a dial indicator. My first effort with a dial indication, but I bought the device knowing that I'm going to need it to set cam timing on the rebuild. After multiple measurements, the camshaft end float was .014", although I did get a few readings of .0135"
I'm not sure how either end float compares with the specifications for the engine, but at least I've recorded the numbers for what they're worth.
Next, I took off the timing chain tensioner. This is a French made unit for Jaguars. It had very little wear on the riding surface - but watch out, it's spring loaded!

There was also a gasket and a rear plate to the timing chain tensioner remaining on the front engine plate after the unit was removed. The timing chain tensioner looks like it might get lubricated through a hole in the front engine plate.
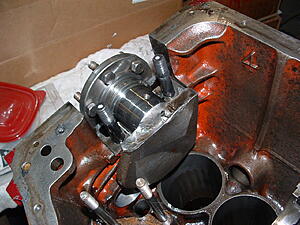
Here, although the block is upside down, I'm trying to reference the key slots on the two shafts for future timing. It seems that when the crankshaft key is straight down, the camshaft key is at either 4:00 or 10:00 depending on the rotation cycle.


Speaking of the camshaft, it looks OK. I don't see anything but the very slightest roughness on one tooth of the gear that drives the oil pump and the distributor. But I will try to determine if the camshaft is straight, perhaps asking the machine shop to make that assessment. Probably crack test it as well.


The camshaft is an [Advance Performance Technologies] APT VP16 camshaft. I went on the APT website, but couldn't find the camshaft timing sheet or specifications anywhere. The timing sheet was not available on the website, and indeed, they may not grind this camshaft any longer except by special order. I'll call APT, but in the absence of a timing sheet, I hope Hap can enlighten me.
I was going to order up one of the lightweight MGB V series pushrods to replace the one that was bent. But I held off. Close examination of the bent pushrod shows a service mark "Arrow" and "6/14" right under it (I presume a date). I found a company called Arrow Engines that looked like it made parts for industrial engines, but no reference to sport car pushrods. And no website for consumer purchases. Suspecting that the pushrod I planned to order would not match, I removed the pushrod from my order.
11-12-2017, 04:52 PM
#18
Jeff, usually the crankshaft gear and camshaft gears have marks that line up at #1 cylinder TDC. Your cam gear is adjustable, so those marks (if they are there) may not line up perfectly.
11-13-2017, 05:12 AM
#19
Thread Starter
There is a little tick on the camshaft sprocket that Hap made for timing purposes. .
He says that the 102 marking on the camshaft nut is the cam timing. I don't know if that means 102 degrees or 10.2 degrees. I'll need to find out. Hap also says (after the fact, I might add) that when you are doing a repair, or refresh, you can wire the cam gears together between the gears and keep it exactly where it was timed, and reinstall it again in the same exact place.
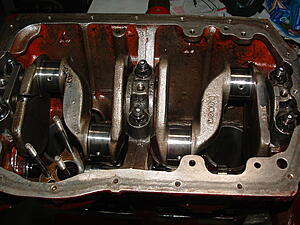
But, now it was time to attack the main caps and remove the crankshaft which, since removal of piston #4, spins nice and freely.
This is now as deep as I've ever gotten into an engine. When I started this affair in about 2009, I was afraid to dismantle anything for fear that I wouldn't be able to put it back together. Now, I still have that fear.
He says that the 102 marking on the camshaft nut is the cam timing. I don't know if that means 102 degrees or 10.2 degrees. I'll need to find out. Hap also says (after the fact, I might add) that when you are doing a repair, or refresh, you can wire the cam gears together between the gears and keep it exactly where it was timed, and reinstall it again in the same exact place.
But, now it was time to attack the main caps and remove the crankshaft which, since removal of piston #4, spins nice and freely.
But first, I attempted to re-measure end float at the thrust bearings. When the pistons were still in the motor, I measured end float at .018", but I seemed to have more end float at the "tab" on top (actually bottom) than I did deeper down. I felt that the crank was misaligned. Now with crank spinning freely, I re-measured and came up with .008". But I am also uncertain whether this measurement is valid.
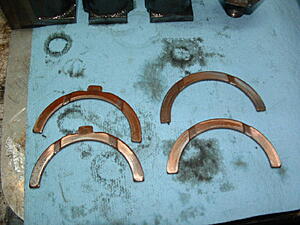
The thrust bearings came out and had this reddish hue on one side. Every used thrust bearing in my parts bin is light gunmetal grey.
In some areas of the thrust bearings this reddish hue has been worn through - especially the one on the upper right.
With the rear main cap off, I could see the break more clearly. "It's just a flesh wound" that I can easily repair with JB Weld epoxy. bananafinger:
All of the journals look very nice.
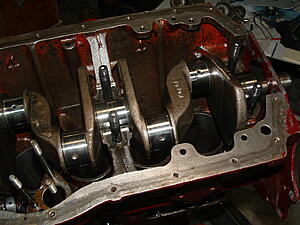
The thrust bearings came out and had this reddish hue on one side. Every used thrust bearing in my parts bin is light gunmetal grey.
In some areas of the thrust bearings this reddish hue has been worn through - especially the one on the upper right.

With the rear main cap off, I could see the break more clearly. "It's just a flesh wound" that I can easily repair with JB Weld epoxy. bananafinger:


All of the journals look very nice.

This is now as deep as I've ever gotten into an engine. When I started this affair in about 2009, I was afraid to dismantle anything for fear that I wouldn't be able to put it back together. Now, I still have that fear.
11-13-2017, 06:11 AM
#20
Former Moderator


El Jefe - you’re an inspiration. To see you delve so deep is an adventure. I’m happy that you aren’t letting fear paralyze you and are moving ahead. So contrary to the title of this thread you are having an adventure not misadventures. Keep up the good work.

