MGA Off Season Folly & Misadventure
 01-25-2017, 05:15 AM
#21

Thread Starter
Episode 6: Front Spindles.
When I acquired my 1600 in 2009, the right front tire was worn in a very odd way – basically one large wear scuff in just one large spot on the tire. Didn’t look right, so I pulled the hub. The inner bearing stayed on the spindle. To get that bearing off, I had to detach the plate that holds the brake caliper and pull from there and the bearing came off.
Then, examination of the hub revealed that the outer bearing race was completely broken. A major failure! I didn’t know how that could possibly happen. Later, I found on line photos showing the car racing at Schenley Park. Now I suspect that the car had been run into a curb while racing.
In any event, a few years later, I had occasion to change the rotor. Seized calipers, overheated brakes, seemed to change the metallurgy of the right front rotor. Hard braking and the right front brake would lock up. Not such a big deal. I’d slide straight until I released pressure and the wheels would again turn. To eliminate this problem, I thought a new rotor might help. But alas, when I pulled the hub the second time to replace the rotor, the inner bearing once again stayed on the spindle. Perhaps, I need a new hub …
So now we are in winter 2016-2017 and I have recently purchased Minilite wheels. The tire studs are rather short for these wheels, the calipers need a refresh and maybe it’s time to closely examine my front spindles for damage. So for the third time, I remove the hubs from the front suspension.
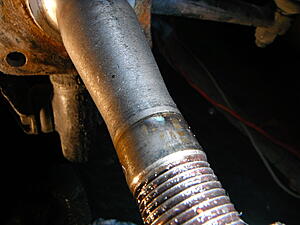
I’m concerned that the spindle was damaged from the injury to the outside bearing. It sort of looks o.k. but … well, lets just say I don’t really know what I’m looking at.
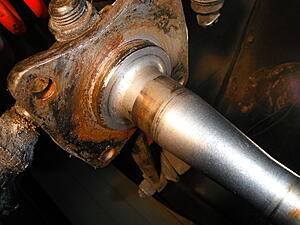
Here I have marked my areas of concern. The first picture was taken in November. Those rusty spots on the next picture are, in fact, rusty spots from sitting for two months.
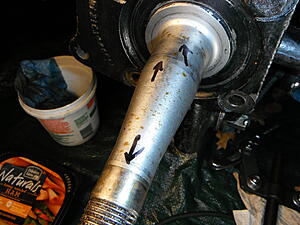
This is the driver’s side spindle, that also has its own area of concern.
I had purchased a used Spot Crack Tester kit quite a few years ago, had never used it and didn’t know if it had outlived its shelf life.
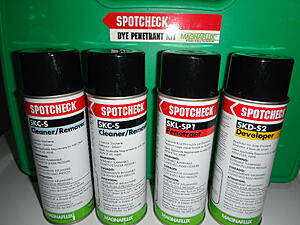
I cleaned up the spindles with acetone and then the kit cleaning solution. Then I applied the dye and let it sit for about 20 minutes.

It was still wet after that time and I wiped the dye off with a paper towel in accordance with the directions. The spindles were left with a mild red hue.
I then applied the “developer” and let it dry. I don’t think you are supposed to apply too heavily, and any cracks or voids are supposed to appear.
I really didn’t see anything, which I means, I suppose, that my spindles are OK pending more elaborate testing that I’m not planning to do.
When I acquired my 1600 in 2009, the right front tire was worn in a very odd way – basically one large wear scuff in just one large spot on the tire. Didn’t look right, so I pulled the hub. The inner bearing stayed on the spindle. To get that bearing off, I had to detach the plate that holds the brake caliper and pull from there and the bearing came off.
Then, examination of the hub revealed that the outer bearing race was completely broken. A major failure! I didn’t know how that could possibly happen. Later, I found on line photos showing the car racing at Schenley Park. Now I suspect that the car had been run into a curb while racing.
In any event, a few years later, I had occasion to change the rotor. Seized calipers, overheated brakes, seemed to change the metallurgy of the right front rotor. Hard braking and the right front brake would lock up. Not such a big deal. I’d slide straight until I released pressure and the wheels would again turn. To eliminate this problem, I thought a new rotor might help. But alas, when I pulled the hub the second time to replace the rotor, the inner bearing once again stayed on the spindle. Perhaps, I need a new hub …
So now we are in winter 2016-2017 and I have recently purchased Minilite wheels. The tire studs are rather short for these wheels, the calipers need a refresh and maybe it’s time to closely examine my front spindles for damage. So for the third time, I remove the hubs from the front suspension.
I’m concerned that the spindle was damaged from the injury to the outside bearing. It sort of looks o.k. but … well, lets just say I don’t really know what I’m looking at.

Here I have marked my areas of concern. The first picture was taken in November. Those rusty spots on the next picture are, in fact, rusty spots from sitting for two months.

This is the driver’s side spindle, that also has its own area of concern.

I had purchased a used Spot Crack Tester kit quite a few years ago, had never used it and didn’t know if it had outlived its shelf life.

I cleaned up the spindles with acetone and then the kit cleaning solution. Then I applied the dye and let it sit for about 20 minutes.

It was still wet after that time and I wiped the dye off with a paper towel in accordance with the directions. The spindles were left with a mild red hue.

I then applied the “developer” and let it dry. I don’t think you are supposed to apply too heavily, and any cracks or voids are supposed to appear.


I really didn’t see anything, which I means, I suppose, that my spindles are OK pending more elaborate testing that I’m not planning to do.


 01-25-2017, 08:35 AM
#23
Thread Starter
Jeff, have you considered changing to HS6 carbs? Floats are plastic. Seems like a lot of the Triumph racers ditched their H6 carbs for the HS6 carbs. Still need to find the correct orientation float bowls, so that the floats do not hang up when cornering. I found the H6 carbs more prone to leaks, than the HS6 carbs. The seals where the H6 floats attach to the carb body can sometimes be a problem.
SU float bowls can be subject to fuel frothing, resulting in fuel starvation. Do you have the carbs solidly mounted to the intake manifold? If so, you may want to try longer mounting studs and then use compression springs under the mounting nuts. This helps to reduce carb vibration.
SU float bowls can be subject to fuel frothing, resulting in fuel starvation. Do you have the carbs solidly mounted to the intake manifold? If so, you may want to try longer mounting studs and then use compression springs under the mounting nuts. This helps to reduce carb vibration.
Joe, I have not considered changing to HS6 carbs. They probably wouldn't notice in the VSCCA, but it does involve an additional expense. I'm operating on the idea that I should use what I have. I do get leaks where the float bowl attached to the carb body, but I can deal with it fairly easily. Viton seals and the washers need to be cupped. I am hoping to rebuild a set of H4 SUs as I still sometimes have that nagging misfire - although mostly cured. I do have a history of fuel starvation. That's why I was using the smaller floats last year. Reminds me to try to re-plumb my fuel line and add a pressure regulator.
I do have a direct mount of the carbs to the manifold. Used to have some phenolic carb spacers that were fairly soft. Now I'm using a hard plastic spacer. Maybe I should see if I can find some of those phenolic spacers again.
Aashish, I'm still undecided on new longer wheel studs. The spline count on the existing studs is 41. Most replacement studs seem to be something like 16. Interestingly the Honda studs might have a knerl count close to 41, but they are metric. Story of my life: Indecision.
01-25-2017, 06:04 PM
#24

When I had Weber carbs on my TR3, they came with a soft mount kit to reduce fuel frothing. The spacer plate between the carb and the manifold was an aluminum plate with a half O-ring attached to each side. Also had springs under the mounting nuts. When I went back to SU's, I made my own version. I machined O-ring grooves into both sides of the phenolic spacer. Worked well.
Have you looked at any of the new Nitrophyl SU floats? They look like they should work well.
Have you looked at any of the new Nitrophyl SU floats? They look like they should work well.
01-26-2017, 05:01 AM
#25
Thread Starter
Have you looked at any of the new Nitrophyl SU floats?
02-07-2017, 04:49 AM
#27
Thread Starter
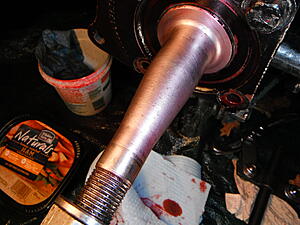
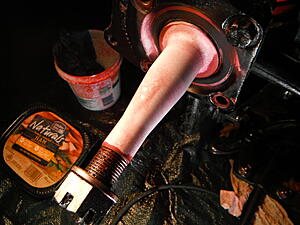
The MGA utilizes an Archimedes scroll in lieu of a rear oil seal. Consequently the engine leaks from the crankshaft rather profusely. Maybe when everything was new, not so much, but after 55 years the original clearances are probably shot. So at some point, I'm planning to modify the rear engine plates for a retrofit oil seal.
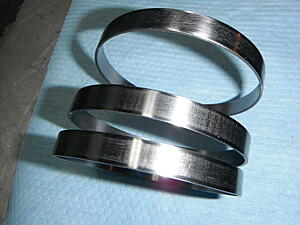
The first step was to make some slip rings to fit over the crankshaft flange. Took me quite a while to figure how to do it, but now I have made some slip ring blanks.
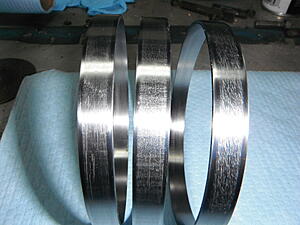
I spent some time trying to polish them up. They are numbered 1, 2 and 3 starting on the left or from the top.
I cut all of these in a chop saw and then ground down the edges to get to about .44" width. You can see that the middle ring #2 is a little wide, probably .45". I'll need to grind that down a bit more. I think the high spots on the edges are distortions caused by the saw or the grinder.
On #3, I think I made the mistake of starting with a new 80 grit flap sander. I think that was too rough and the result is a somewhat pitted ring.
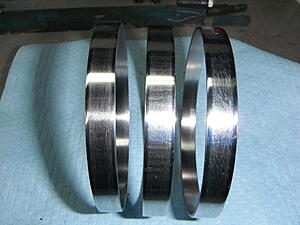
Number 1 and #2 I started some weeks ago with my worn 60 grit flap sander. I also used a new 100 grit flap sander of all three (again, I think that might have been a mistake), then hand sanded with 120, 240, 320, 500, 1000, 1500, and 2000 grits all by hand. At the 1500 grit level, I could feel tiny ridges in the direction of sanding and I cross sanded to try to flatten them out, with some success. They feel very smooth, but still I could not eliminate the visible scratches. Rubbing against one of my lower teeth seemed to be the most sensitive scratch test.
Then I buffed with a buffing wheel. Still could not eliminate the micro scratches. I don't think the buffing made much difference.
Without the flash, the rings look better. The flash highlights the fine scratching.
Before buffing
After buffing

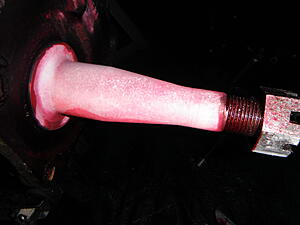
I test fit one of the rings to the seal. It was very tight and I could not spin the ring by hand. No oil or other lubricant. So a nice tight fit.
Despite the scratched rings, I'm still planning to proceed with the modification. I'll use #1 and #2 most likely. Rather than cut my steel rear plates, I'm having new rear plates cut out of aluminium. They should be done at some point this spring.
The first step was to make some slip rings to fit over the crankshaft flange. Took me quite a while to figure how to do it, but now I have made some slip ring blanks.
I spent some time trying to polish them up. They are numbered 1, 2 and 3 starting on the left or from the top.
I cut all of these in a chop saw and then ground down the edges to get to about .44" width. You can see that the middle ring #2 is a little wide, probably .45". I'll need to grind that down a bit more. I think the high spots on the edges are distortions caused by the saw or the grinder.
On #3, I think I made the mistake of starting with a new 80 grit flap sander. I think that was too rough and the result is a somewhat pitted ring.
Number 1 and #2 I started some weeks ago with my worn 60 grit flap sander. I also used a new 100 grit flap sander of all three (again, I think that might have been a mistake), then hand sanded with 120, 240, 320, 500, 1000, 1500, and 2000 grits all by hand. At the 1500 grit level, I could feel tiny ridges in the direction of sanding and I cross sanded to try to flatten them out, with some success. They feel very smooth, but still I could not eliminate the visible scratches. Rubbing against one of my lower teeth seemed to be the most sensitive scratch test.
Then I buffed with a buffing wheel. Still could not eliminate the micro scratches. I don't think the buffing made much difference.
Without the flash, the rings look better. The flash highlights the fine scratching.
Before buffing


After buffing


I test fit one of the rings to the seal. It was very tight and I could not spin the ring by hand. No oil or other lubricant. So a nice tight fit.
Despite the scratched rings, I'm still planning to proceed with the modification. I'll use #1 and #2 most likely. Rather than cut my steel rear plates, I'm having new rear plates cut out of aluminium. They should be done at some point this spring.
Last edited by blueosprey90; 02-07-2017 at 04:55 AM.
02-07-2017, 05:10 PM
#28
Be sure to use Locktite sleeve retainer when you press the ring onto the crank. You don't want it coming loose. I'm surprised that the MG tuners have not come up with an improved rear main seal. Maybe you can start selling yours to MG builders, once it is perfected? There are 2 replacement rear main seal kits for Triumph TR3-4 engines. One involves grinding the scroll off and then fitting a split seal. The newest version uses a viton seal with the original scroll still in place.
02-07-2017, 05:21 PM
#29
Thread Starter
The newest version uses a viton seal with the original scroll still in place.
I tracked down a guy in New Zealand who had a variation of what I'm planning, but requires a more machining of parts - which is my challenge. There aren't a lot of machine shops around here.