MGA Race Engine - Resurection - Ghost Main :)-D
 03-07-2019, 07:17 PM
#21

Thread Starter
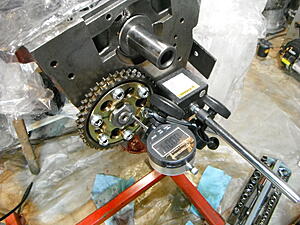
Set up to measure camshaft end float on the engine with a dial indicator. Measured .005.5". Factory Manual calls for .003' to .007". So I hope I am O.K.
I see a lot of threads (MGB & MIdget) where the target seems to be .003" to .004".
The machine shop paperwork indicates that the shop installed new DuraBond cam bearings, but no clearances indicated. I can't measure the clearances with any accuracy. The clearances are supposed to be .001" to .002"
The camshaft feels tight - much tighter that the crankshaft which spins like a knife through warm butter. I can spin it with the cam timing gear fairly easily, but not without. Not sure what approach to take on this. May need to return to the machine shop.
 03-11-2019, 09:57 AM
#22
Thread Starter
Not the way you are supposed to do it, but I decided to try honing the camshaft bearings by hand with a green Scotch-Brite pad. I worked slowly from both the top and the bottom of the engine with many test fittings. It now spins nicely on a film of oil without apparent binding. Hope it's right.
03-11-2019, 07:15 PM
#23
Thread Starter
Another adventure in measurements: Piston ring gaps.
I’m using Venolia custom pistons #10690 as originally specified by my builder on the prior build. The piston ring gaps are thin: top 1.0mm, 2nd 1.2 mm and oil 2.8.
I’m also using a set of TotalSeal custom piston rings, also as specified by the original builder.
The top ring is part #102588. The end gap on all pistons, without any adjustment by me, came to 0.028”. This is well above the guidance provided by TotalSeal of 0.0137”, and well above the shop manual spec of .008” to .013”.
The second ring is the gapless ring, consisting of two rings, parts numbered # 204996 and #002953. The TotalSeal guidance for these rings for my bore size of 3.054” was an end gap between .010” to .020”. An end gap of .010” looked awfully tight. I ended up gapping the top and bottom rings as follows by piston: #1 - .016” and .020”; #2 - .015” and .020”; #3 .017” and .018” and #4 - .018” and .018”.
The third ring is the oil ring, part # 02128. Not sure how to describe it, but there are two thin top and bottom rail rings with a corrugated, accordion shaped, expander ring in the middle. The expander ring does not fit in the bore, but the instructions say in bold letters: “Do not attempt to modify expander in any way”. I’m assuming, therefore, that the expander ring will compress when installed. As for the rings that constituted the rails, I gapped these as follows: #1 - .020” and .020”; #2 .020” and .020”; #3 .020” and .025” and #4 - .022” and .026”.
I’d be nervous about gapping everything too wide, but all of my gaps are well within the parameters of the rings that I removed from the engine, even recognizing that they were worn with two race seasons on them. Hoping that I'll be OK.
03-13-2019, 04:54 AM
#24
Thread Starter
Not much progress last night. Mostly figuring out what additional parts to buy.
I'll need an MGB pressure plate to balance to the flywheel and a 23 spline clutch to go with the new transmission. And some U-Joints to rehab a new driveshaft that I need because of the new transmission.
Of course, I am a bit flummoxed over what bolts and washers to use for mounting the flywheel. The circumference of my grade 8 washers is too large and the washers won't sit flat. I suppose I could shave one side. Then my grade 8 bolts are threaded their entire length. I have 1" and 1 1/4" lengths. With flywheel about 1/2" thick, I think the 1" is too short and was a bit worried about the 1 1/4 bottoming out - especially if no washers used.
I plan to check out the Pegassus Racing AN7 bolts inasmuch as they have an unthreaded portion of the shank. I still have time for making that decision.
03-18-2019, 06:03 PM
#25

Jeff, did you look at ARP bolts? I am using ARPs on for my TR3 flywheel and I think MGBs may use the same. Since I have an aluminum flywheel, I use the ARP washers too, but be careful with the washers. They are chamfered on one side and you want the chamfer facing the bolt head (there is a chamfer where the bolt shank meets the head).
 03-19-2019, 01:23 PM
#26
Thread Starter
Joe, Hap Waldrop who originally built my engine, advised me to get the ARP 200-2802 bolts, but to forego the washer. These bolts seem short at 1" under the head, but he should know what he is doing.
(of course, APT Fast says to use a particular washer for an aluminium flywheel)
(of course, APT Fast says to use a particular washer for an aluminium flywheel)
03-21-2019, 04:48 AM
#27
Thread Starter
Last night, I started to assemble the engine, attacking the big pieces.
Installed a total of 7 oil gallery plugs, using Hap’s old plugs and Permatex Black. I think Hap must have used a metric sized plug because the plugs screw in much further than an 1/4 NPT plug.
Installed the camshaft, but just as I was putting on the camshaft thrust plate, I noticed that it was somewhat damaged on the wear side. In all the handling, I guess I hadn’t noticed that before. Thought about it overnight, and this morning I found what looks like an undamaged camshaft thrust plate in my boxes of spares. (“Spares” is actually a glorified name for piles of old stuff that I haven’t taken in for recycling!)
It appears that I will need to re-measure the camshaft end float with the new plate.
I also installed the crankshaft and torque it down to 70 ft. lbs.
03-22-2019, 04:06 AM
#28
Thread Starter
Made a little more progress last night.
I started by replacing the camshaft thrust plate. It was worn in three places as if the camshaft was wobbling.
Although the wear wasn't as bad as I originally thought, my spare was in better shape.
I then attached the camshaft sprocket wheel and remeasured the camshaft end float. It came out at .004" which is within spec.
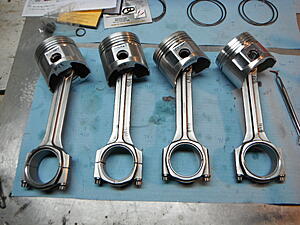
I spent the rest of the evening fitting the pistons onto the connecting rods. The pistons all weighed in at 414 grams with the grudgeon pins. The rods all weighted 648 grams. I wasn't able to measure the big and small ends, but that was apparently done by the machine shop, as they were all marked. The small ends weighed 188 (3) and 187 (1), while the big ends came in at 460 (2) and 461 (2).
Before starting, I triple checked to insure that I oriented the parts correctly.
I started by replacing the camshaft thrust plate. It was worn in three places as if the camshaft was wobbling.

Although the wear wasn't as bad as I originally thought, my spare was in better shape.
I then attached the camshaft sprocket wheel and remeasured the camshaft end float. It came out at .004" which is within spec.

I spent the rest of the evening fitting the pistons onto the connecting rods. The pistons all weighed in at 414 grams with the grudgeon pins. The rods all weighted 648 grams. I wasn't able to measure the big and small ends, but that was apparently done by the machine shop, as they were all marked. The small ends weighed 188 (3) and 187 (1), while the big ends came in at 460 (2) and 461 (2).
Before starting, I triple checked to insure that I oriented the parts correctly.
 03-25-2019, 04:46 AM
#29
Thread Starter
I was making slow but steady progress - that is, until things came to a screeching halt!
I got the piston rings inserted and the conrods with pistons installed. Some more piston drag than anticipated, but the engine still spun relatively easily with the wrench.
I got the front plate installed.
I had to chamfer the inside edge of the crankshaft sprocket with a file to get it to fit, but once I figured that out, the crank and camshaft pulleys lined up nicely.
I set up the sprockets for installing the distributor drive gear - and that was when my crisis occurred.
In addition to the oil pump boss and pump clearance issue, I found that the distributor drive gear does not fit between the #6 and #7 counterweights.
The distributor drive comes across from the opposite side of the engine block and seats into a hole in the bottom of the oil pump housing, but the gear itself is outside of the housing.
The distributor dive gear is 1" in diameter and 5/8" deep.
I'm not sure of my solution, but I assume that I will need to take the crank back to the machine shop to have the #6 and #7 counterweights shaved deeper towards the centerline of the crankshaft. I think the forward side of the counterweights will need to be shaved almost down to the ghost main.
The more troubling issue, I suppose, is that the back side of the #6 and #7 counterweights will also need to be shaved. This means removing metal behind where the rod journals start So I'm concerned that this modification might impair the integrity of the crankshaft itself.
I may have to ask the machine shop if they might be able to taper the back end of the distributor drive gear so as to leave more metal on the crank. But I'm not sure that is possible.
I was too depressed to do much more. I'll have to take everything apart and since everything is drenched in sticky engine-build lube, I'll have to clean up all of that. I couldn't face it yesterday.
I went outside and spent a few fruitless hours trying to fix the parking brake on the '57 Volvo - pretty much of a fail, but I think I know why.
Then I went to the barn where I store the race car. Brought the car home. The bright spot in my day was how pretty it looked when I glanced out at it from my kitchen window.
03-25-2019, 06:36 PM
#30
Jeff, sorry to hear. It sucks. What are other's doing?
Can you use a crank fire ignition with SVRA and ditch the dizzy? I have an Electromotive crank fire ignition in my TR3, since it is allowed in the SCCA. If it is permitted, it can save you a lot of machine shop work, if it can even be done. I added the trigger wheel onto the harmonic dampner.
Can you use a crank fire ignition with SVRA and ditch the dizzy? I have an Electromotive crank fire ignition in my TR3, since it is allowed in the SCCA. If it is permitted, it can save you a lot of machine shop work, if it can even be done. I added the trigger wheel onto the harmonic dampner.