Ohlins Road & Track Coilovers - adjusting ride height and preload
#11
As far as my difficulties making the adjustments, I have everything under control now. I don't know what I was doing wrong, but I'm blaming it on baking in the hot sun all weekend. My car lost its garage spot for the time being, so I have no shade unfortunately.
After a fresh start today, everything is working correctly now. As far as how much preload the Ohlins should have, I'm really not qualified to comment on that. I'm just doing what others have done until I have more experience setting up suspension.
After a fresh start today, everything is working correctly now. As far as how much preload the Ohlins should have, I'm really not qualified to comment on that. I'm just doing what others have done until I have more experience setting up suspension.
#12
Okay, I just got the back shocks finished, but I have a question. I set the preload to the same measurement on both sides, with the ride height adjustments bottomed out on each side. When I put the back end down, one side was higher than the other by 3/8". I then used the ride height adjustment to raise the lower side. Did I do that correctly?
I'm guessing it's just from tolerances or tolerance stacking of the manufacturing process that one side can be that much different than the other?
I'm guessing it's just from tolerances or tolerance stacking of the manufacturing process that one side can be that much different than the other?

#13
Oh, and I was only able to get about 3/16" of preload before my ride height was too high. And my ride height is at 13.5" from hub center to fender. I have no idea how you could go any lower on these shocks and still have any compression travel.
#14


I am at 12.5" to 12.75" arch to wheel center length with a little room to go lower. Pretty much dead even heights on my first try.
2mm preload. Bottom brackets have like..5 or 10mm left, IIRC?
I think there's a way to mod the bottom bracket to allow more thread engagement...but I'm not sure. I'll take it apart after I do this one last ditch attempt track day to break into my new time bracket at Gingerman lol.


arch to center measurements are notoriously inaccurate. Try frame to ground on a level surface.
LEVEL. Your garage is probably not very level..but may work. Your street or driveway certainly is not level and won't work.
An alignment rack or leveled floor is best.
2mm preload. Bottom brackets have like..5 or 10mm left, IIRC?
I think there's a way to mod the bottom bracket to allow more thread engagement...but I'm not sure. I'll take it apart after I do this one last ditch attempt track day to break into my new time bracket at Gingerman lol.


arch to center measurements are notoriously inaccurate. Try frame to ground on a level surface.
LEVEL. Your garage is probably not very level..but may work. Your street or driveway certainly is not level and won't work.
An alignment rack or leveled floor is best.
#15


Does Ohlins list a spec for static compression travel before contacting the bump stops? I had a similar situation with my konis. I ended up cutting some bump stop away to make sure I had about 1.25 issues of travel. Because the Ohlins has the option of shortening the body, I would almost say you should shorten that as much as possible. Then use the preload to set the ride height. I would target around an inch of clear travel. If you hit more, then decrease preload and add to the shock length.
.6" seems to little.
.6" seems to little.
On some corners (T3 at gingerman, and "patience" or the 'S' at Autobahn CC full, for example), with "street" shock damping settings, my LSD does open up on acceleration. I am at Ohlins' recommended preload setting. So I am reluctant to go much further.
Clicking the dampers a bit stiffer does help that issue quite a bit.
My car is a 00 AP1 that has never had the rear bar disconnected. May try disconnecting it...but it will make that particular problem a bit worse.
#16
That's a great point about extension. That's why I am wondering if they list clear travel compression spec.
It may be they have factored the bumpstop heavily in the shock tuning. Depending on the density and shape of the bumpstop, it may be their way of turning a linear rate spring into a somewhat progressive rate at the end of compression.
Regardless, the shocks seem to work.
It may be they have factored the bumpstop heavily in the shock tuning. Depending on the density and shape of the bumpstop, it may be their way of turning a linear rate spring into a somewhat progressive rate at the end of compression.
Regardless, the shocks seem to work.
#17

__________________
SAKEBOMB GARAGE > Click here to contact Us
Check some of our most popular products for the S2000:
- Ohlins DFV Billet Lower Mount
- Rear BBK RX-8 Caliper Conversion
- Front BBK AP Competition
- Setrab Oil Cooler Kit
SAKEBOMB GARAGE > Click here to contact Us
Check some of our most popular products for the S2000:
- Ohlins DFV Billet Lower Mount
- Rear BBK RX-8 Caliper Conversion
- Front BBK AP Competition
- Setrab Oil Cooler Kit
#18
Originally Posted by Holeshot121' timestamp='1472345017' post='24049296
I'm a little confused here. I thought I read that you had to adjust the preload after you installed them, not before. Granted, I have poly bushings now, so it's probably a moot point, as they rotate rather freely.
I tried to set my preload first, then adjust my ride height. This was impossible for me, as once the spring is loaded, I was no longer able to turn the shock body to adjust ride height. So I took the preload off, set my ride height, then set the preload again. This worked PERFECT on the fronts. Ride height was almost exactly where I wanted it.
The rears are a different story. I copied Gernby's specs from his post about the R&T's HERE
He used 0.6" of preload on the rear springs, and the height adjustment was completely bottomed out. I bottomed out my rear ride height, then tried to set preload. One side had no trouble setting 0.6" of preload, but the other side, I was only able to get about 0.5" before I ran out of threads on the shock body. So I readjusted the other side to be equal.
Just looking at the droop, I knew it was going to be WAY off. I set the car down on the wheels, and my ride height was like 17" from hub center to fender. LOL!! I don't know if I misinterpreted Gernby's post or what. I have to look at my math again and make sure I didn't do something stupid, but I'm all out of daylight and patience for today.
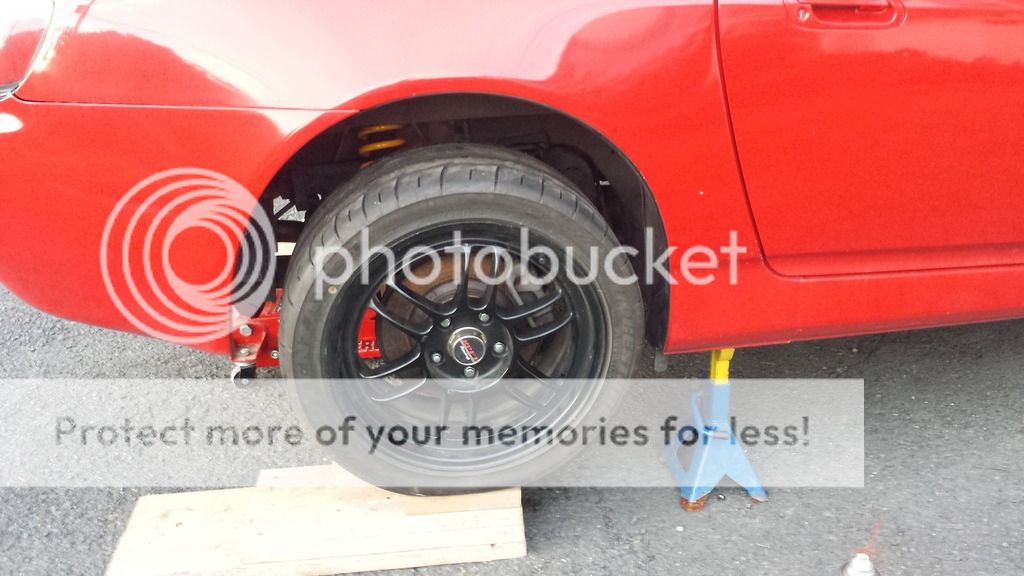
Here was the droop:
Here is the ride height. My driveway is on an incline, so the blocks make the car sit close to level.
I tried to set my preload first, then adjust my ride height. This was impossible for me, as once the spring is loaded, I was no longer able to turn the shock body to adjust ride height. So I took the preload off, set my ride height, then set the preload again. This worked PERFECT on the fronts. Ride height was almost exactly where I wanted it.
The rears are a different story. I copied Gernby's specs from his post about the R&T's HERE
He used 0.6" of preload on the rear springs, and the height adjustment was completely bottomed out. I bottomed out my rear ride height, then tried to set preload. One side had no trouble setting 0.6" of preload, but the other side, I was only able to get about 0.5" before I ran out of threads on the shock body. So I readjusted the other side to be equal.
Just looking at the droop, I knew it was going to be WAY off. I set the car down on the wheels, and my ride height was like 17" from hub center to fender. LOL!! I don't know if I misinterpreted Gernby's post or what. I have to look at my math again and make sure I didn't do something stupid, but I'm all out of daylight and patience for today.
Here was the droop:

Here is the ride height. My driveway is on an incline, so the blocks make the car sit close to level.

I don't know that Gernby's install method is accurate.
He talks about setting preload after installing the suspension. With rubber bushings, that doesn't work.
It may explain why he needed to add so much preload.
I installed according to Öhlins' specs BEFORE installing to the car, in order to get a baseline. I got 39mm (1.53") of damper compression at ride height. He got like 2.25" or something.
He said he'd need about 1.125" (28mm) of preload. I *think* I'll need about 6-10mm total. Again...I think we may end up with the same spring lengths...but if you preload after installing, the added bushing bind will make it SEEM like you're adding more preload.
Its hard to explain. Follow the directions on the box if you're fine with about .50 to .60" of travel before bumpstop (assuming 2.125" of available travel before bumpstop).
I'm sure the suspension is designed to use bumpstops as helpers...just like almost any small honda suspension is (including stock).
On a track, that travel is likely fine.
On the street, you'll be using the bumpstops a lot.
You can add more preload from there and take measurements to make adjustments.
Install them sans dust boot at first. That way you can SEE the travel.
You turn the shock body using the wrenches. Not your hands.
I am happy with my settings this year...and have already set a personal best lap time that I think is respectable. I am trying to shave about 0.8 seconds further...which I think is possible with better driving. So...I'm not making any change or taking anything apart til about October or November when the car goes to storage.
__________________
SAKEBOMB GARAGE > Click here to contact Us
Check some of our most popular products for the S2000:
- Ohlins DFV Billet Lower Mount
- Rear BBK RX-8 Caliper Conversion
- Front BBK AP Competition
- Setrab Oil Cooler Kit
SAKEBOMB GARAGE > Click here to contact Us
Check some of our most popular products for the S2000:
- Ohlins DFV Billet Lower Mount
- Rear BBK RX-8 Caliper Conversion
- Front BBK AP Competition
- Setrab Oil Cooler Kit
#19
Originally Posted by B serious' timestamp='1472403529' post='24049545
[quote name='Holeshot121' timestamp='1472345017' post='24049296']
I'm a little confused here. I thought I read that you had to adjust the preload after you installed them, not before. Granted, I have poly bushings now, so it's probably a moot point, as they rotate rather freely.
I tried to set my preload first, then adjust my ride height. This was impossible for me, as once the spring is loaded, I was no longer able to turn the shock body to adjust ride height. So I took the preload off, set my ride height, then set the preload again. This worked PERFECT on the fronts. Ride height was almost exactly where I wanted it.
The rears are a different story. I copied Gernby's specs from his post about the R&T's HERE
He used 0.6" of preload on the rear springs, and the height adjustment was completely bottomed out. I bottomed out my rear ride height, then tried to set preload. One side had no trouble setting 0.6" of preload, but the other side, I was only able to get about 0.5" before I ran out of threads on the shock body. So I readjusted the other side to be equal.
Just looking at the droop, I knew it was going to be WAY off. I set the car down on the wheels, and my ride height was like 17" from hub center to fender. LOL!! I don't know if I misinterpreted Gernby's post or what. I have to look at my math again and make sure I didn't do something stupid, but I'm all out of daylight and patience for today.
Here was the droop:
Here is the ride height. My driveway is on an incline, so the blocks make the car sit close to level.
I'm a little confused here. I thought I read that you had to adjust the preload after you installed them, not before. Granted, I have poly bushings now, so it's probably a moot point, as they rotate rather freely.
I tried to set my preload first, then adjust my ride height. This was impossible for me, as once the spring is loaded, I was no longer able to turn the shock body to adjust ride height. So I took the preload off, set my ride height, then set the preload again. This worked PERFECT on the fronts. Ride height was almost exactly where I wanted it.
The rears are a different story. I copied Gernby's specs from his post about the R&T's HERE
He used 0.6" of preload on the rear springs, and the height adjustment was completely bottomed out. I bottomed out my rear ride height, then tried to set preload. One side had no trouble setting 0.6" of preload, but the other side, I was only able to get about 0.5" before I ran out of threads on the shock body. So I readjusted the other side to be equal.
Just looking at the droop, I knew it was going to be WAY off. I set the car down on the wheels, and my ride height was like 17" from hub center to fender. LOL!! I don't know if I misinterpreted Gernby's post or what. I have to look at my math again and make sure I didn't do something stupid, but I'm all out of daylight and patience for today.
Here was the droop:

Here is the ride height. My driveway is on an incline, so the blocks make the car sit close to level.

I don't know that Gernby's install method is accurate.
He talks about setting preload after installing the suspension. With rubber bushings, that doesn't work.
It may explain why he needed to add so much preload.
I installed according to Öhlins' specs BEFORE installing to the car, in order to get a baseline. I got 39mm (1.53") of damper compression at ride height. He got like 2.25" or something.
He said he'd need about 1.125" (28mm) of preload. I *think* I'll need about 6-10mm total. Again...I think we may end up with the same spring lengths...but if you preload after installing, the added bushing bind will make it SEEM like you're adding more preload.
Its hard to explain. Follow the directions on the box if you're fine with about .50 to .60" of travel before bumpstop (assuming 2.125" of available travel before bumpstop).
I'm sure the suspension is designed to use bumpstops as helpers...just like almost any small honda suspension is (including stock).
On a track, that travel is likely fine.
On the street, you'll be using the bumpstops a lot.
You can add more preload from there and take measurements to make adjustments.
Install them sans dust boot at first. That way you can SEE the travel.
You turn the shock body using the wrenches. Not your hands.
I am happy with my settings this year...and have already set a personal best lap time that I think is respectable. I am trying to shave about 0.8 seconds further...which I think is possible with better driving. So...I'm not making any change or taking anything apart til about October or November when the car goes to storage.
[/quote]
I kind of interested in what the motion ratio you've measured is. By my math I get a rear motion ration of about 0.62, which is also a fair bit lower than everything else I've read.
#20


You can plot MR's. Don't forget the angle correction.
Then you can either get the car corner weighted to get the weights...or just assume them/find other weights on the internet that may correspond with yours.
Then make calculations and stay up at night wondering if you did it right. Doubt yourself for years and eventually end up like Jim Carrey in "23".
Or you can remove the boot for the initial install and just measure with measuring tape. Then remove and reinstall the boot. You only have to do this with ONE of the rears. Once you know which static-height final spring length corresponds with the travel you want/need....you can just mimic the setting on the other shock.


