CR Wing Install on a Non-CR trunk lid
 07-27-2017, 06:31 PM
#1
Community Organizer


Thread Starter
So you want to install a CR Wing (or the Seibon carbon fiber version) on a original S2000 trunk lid? Here is my guide which has been updated from its original thread (https://www.s2ki.com/forums/californ...unklid-978019/) in Sep 2012.

Background:
Installing a CR wing on the original S2000 trunk lid poses many challenges. The factory CR has its wing installed on a trunk lid specifically made for it, with the holes pre-made and extra bracing installed. It also has several extra cushions installed around the bottom of the trunk lid. The original trunk lid has no bracing or markings to guide where many of the extras are to be installed. I used a lot of references, from seeing an actual CR trunk, to seeing others on S2KI attempt the same on their S2000. My OEM CR wing was bought from a S2KI member on here and was originally Berlina Black. I advised a body shop to install the wing on my trunk lid after requesting them to paint it GPW. They were the ones who actually drilled the 6 holes required for the bolts/washer nuts to go through the trunk lid and into the bottom of the wing stand (3 on each side). After taking it home, I worked on adding the appropriate bracing on the lid itself and installing the extra cushions.
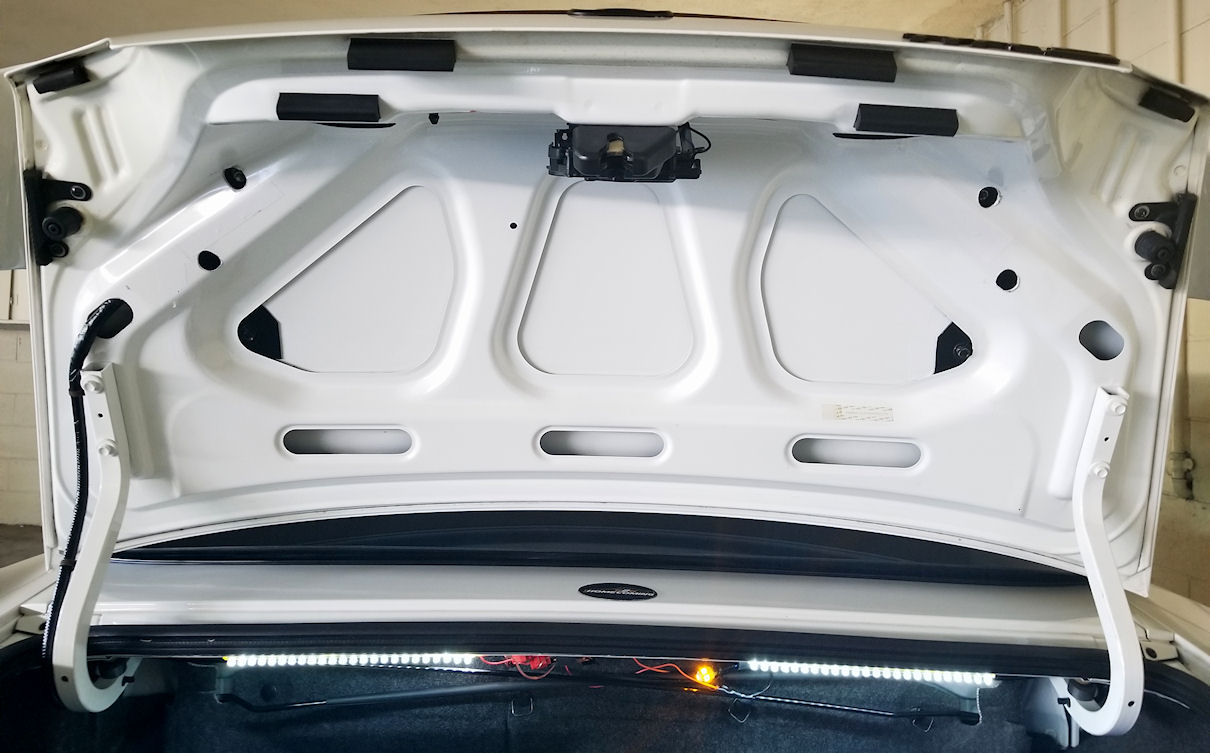
Drilling the holes on the lid:
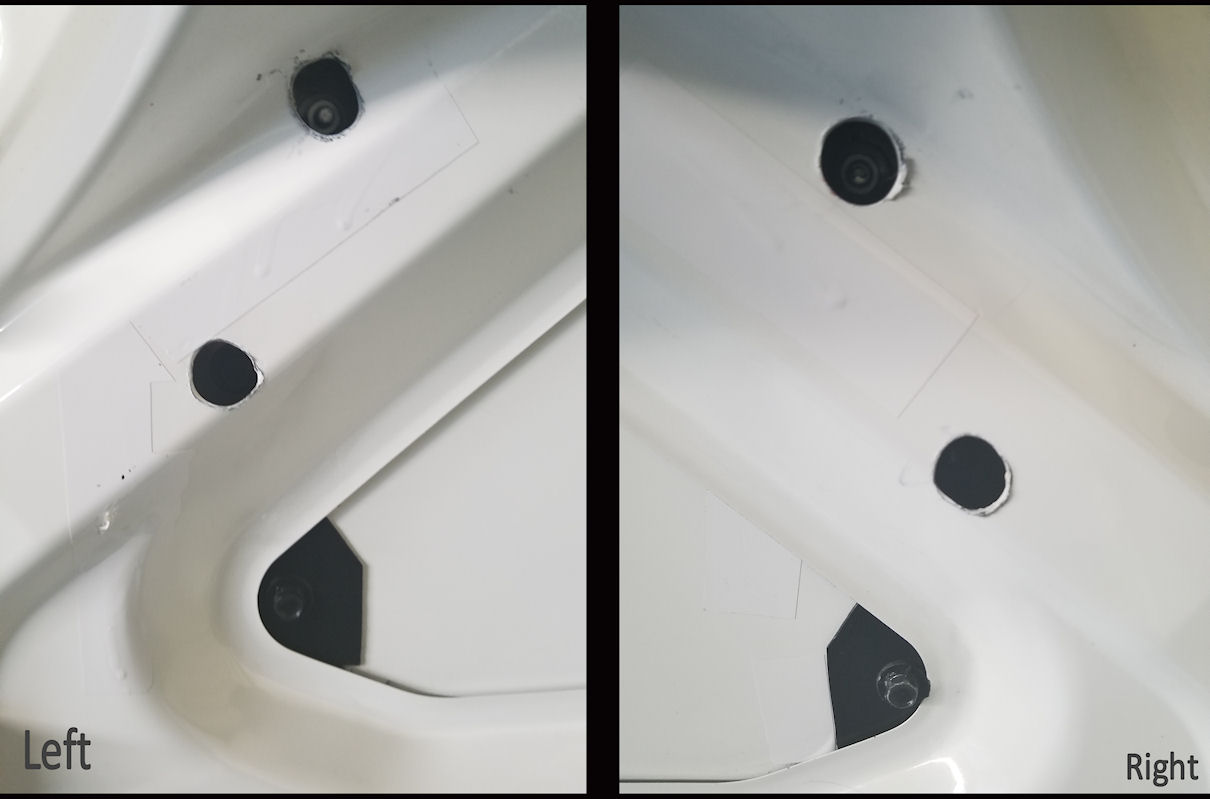
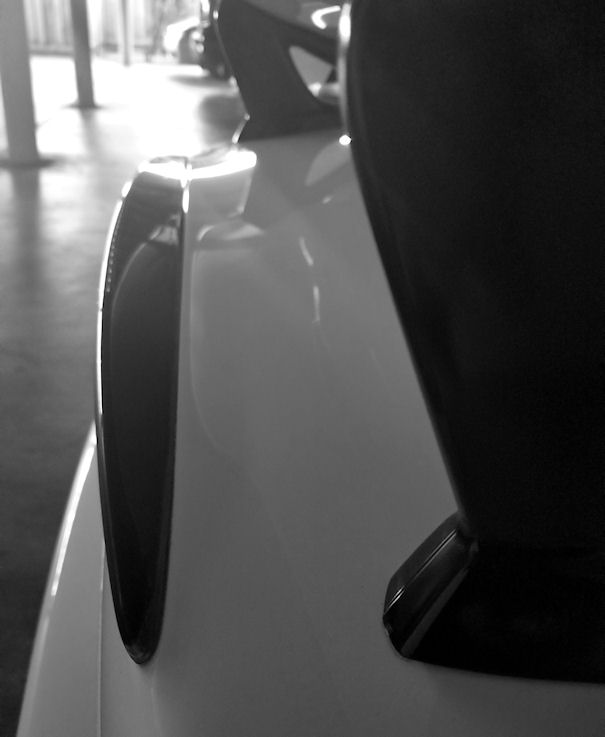
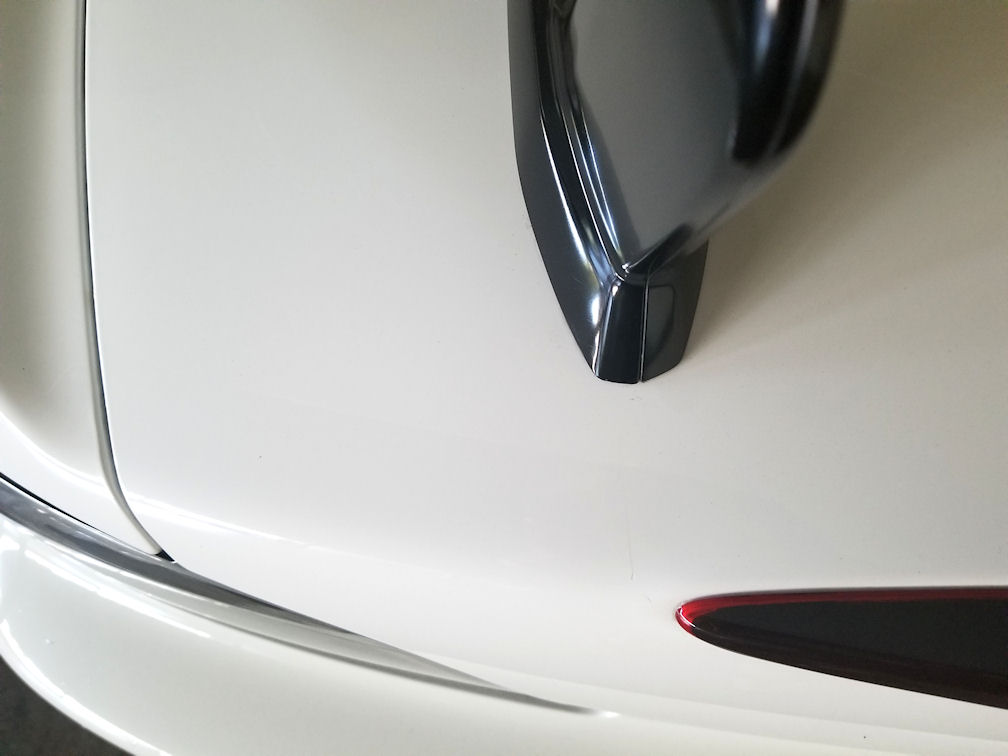
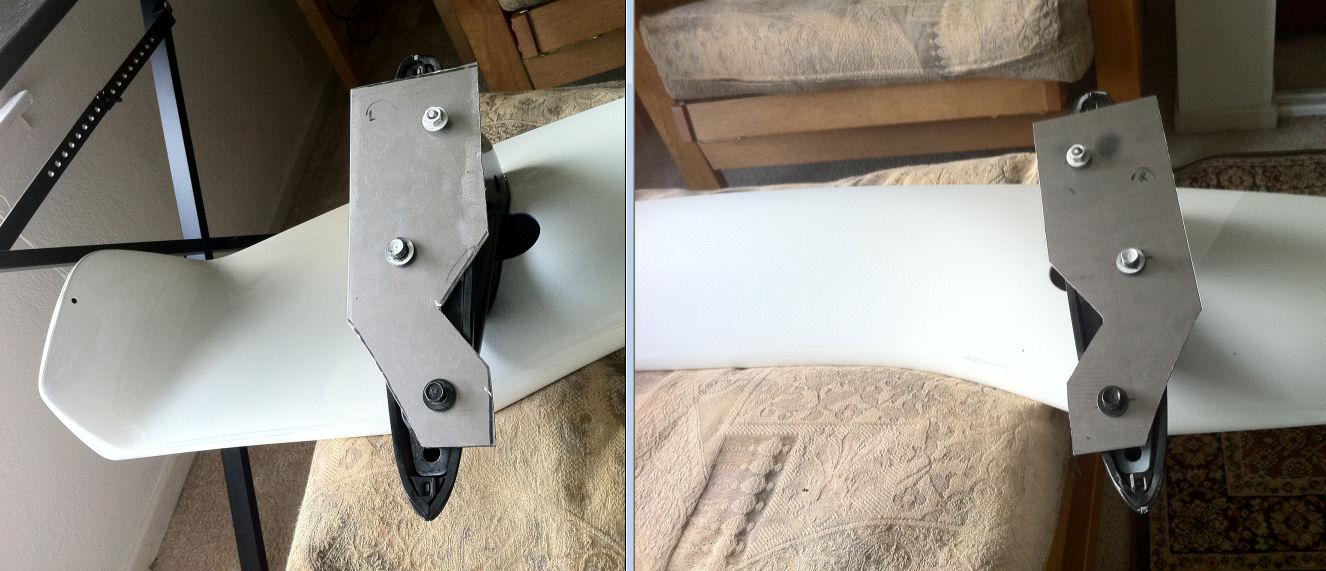
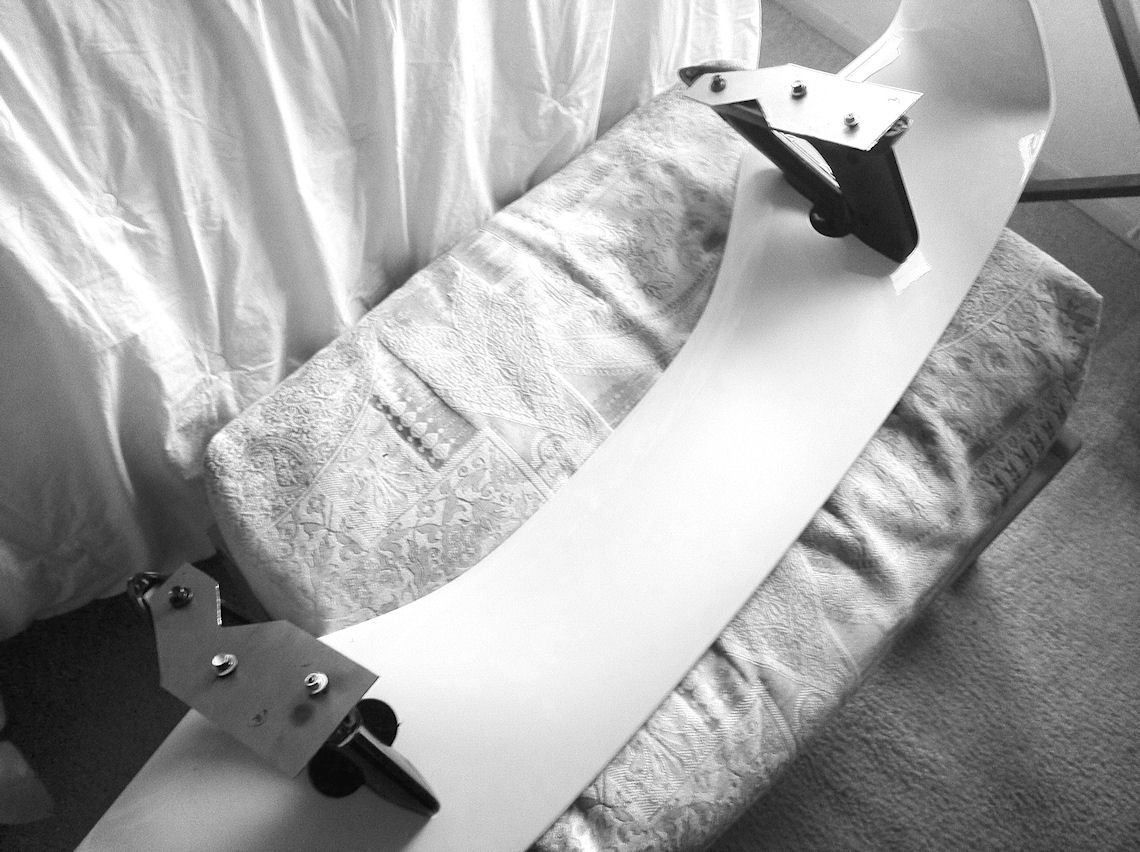
If you will be drilling the holes yourself, keep in mind on where the holes should begin. The best advice I can give is to have the bottom bolts (which attach toward the front of the wing stands) placed at the outermost corners of the inner triangles. I've seen other cars where these bottom bolts are much higher from the floor, which causes the wing to be closer to the back end of the car. OEM CR's have the wing pretty much where mine sits. These 6 holes are critical to where the wing is to be placed, so if you are going to a body shop to install it, give them a firm understanding where you want the drill points to be. The bottom two holes on each side correspond to a bolt that installs to the bottom-side of the wing stand, and the top-most hole on each side is a washer nut which installs into a protruding bolt already on the wingstand itself.
The Metal Bracing
If you are installing the carbon fiber version made by Seibon, their wing is fairly light and may not need this step. A few friends of mine have that type of CR wing installed and have not had issues with the trunk lid warping. For an OEM wing like mine, I wanted to have that peace of mind to protect the curvature of the trunk lid. Making the bracing requires some metal work, may not be for everyone. I used a dremel with a cutting wheel to make the bracing. The metal came in a long sheet, about 16 GSA, which is thin enough but still strong to protect the trunk. You will be able to slide this directly into the trunk lid, which I would put some painters tape to protect against scratches if you are inclined to do so. I finally made a template for those who have been asking for it:
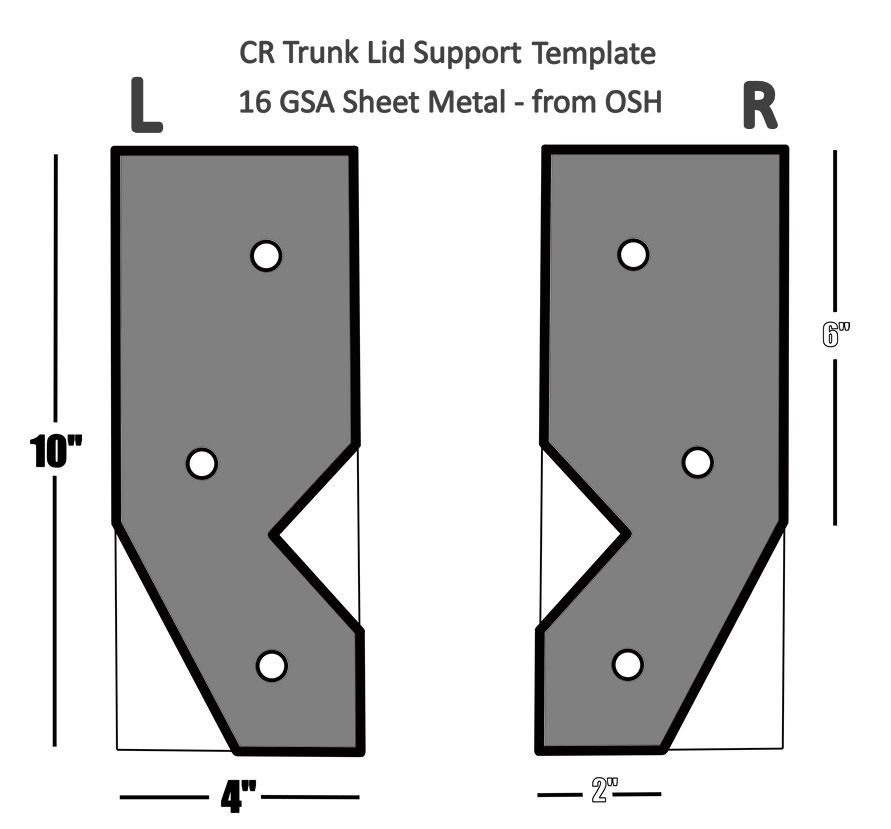
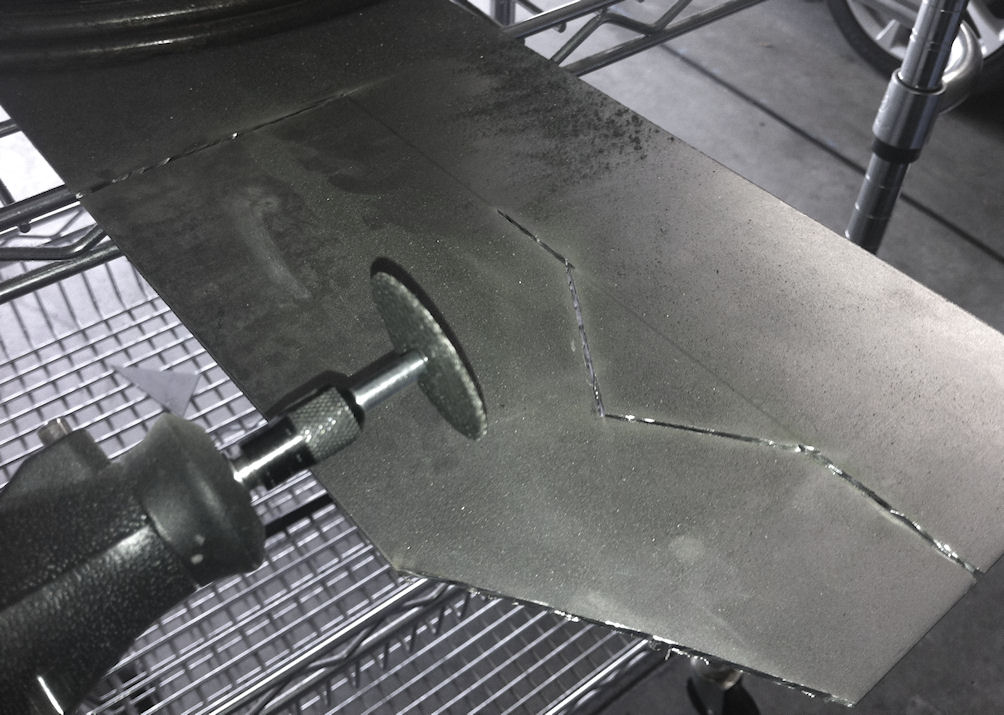
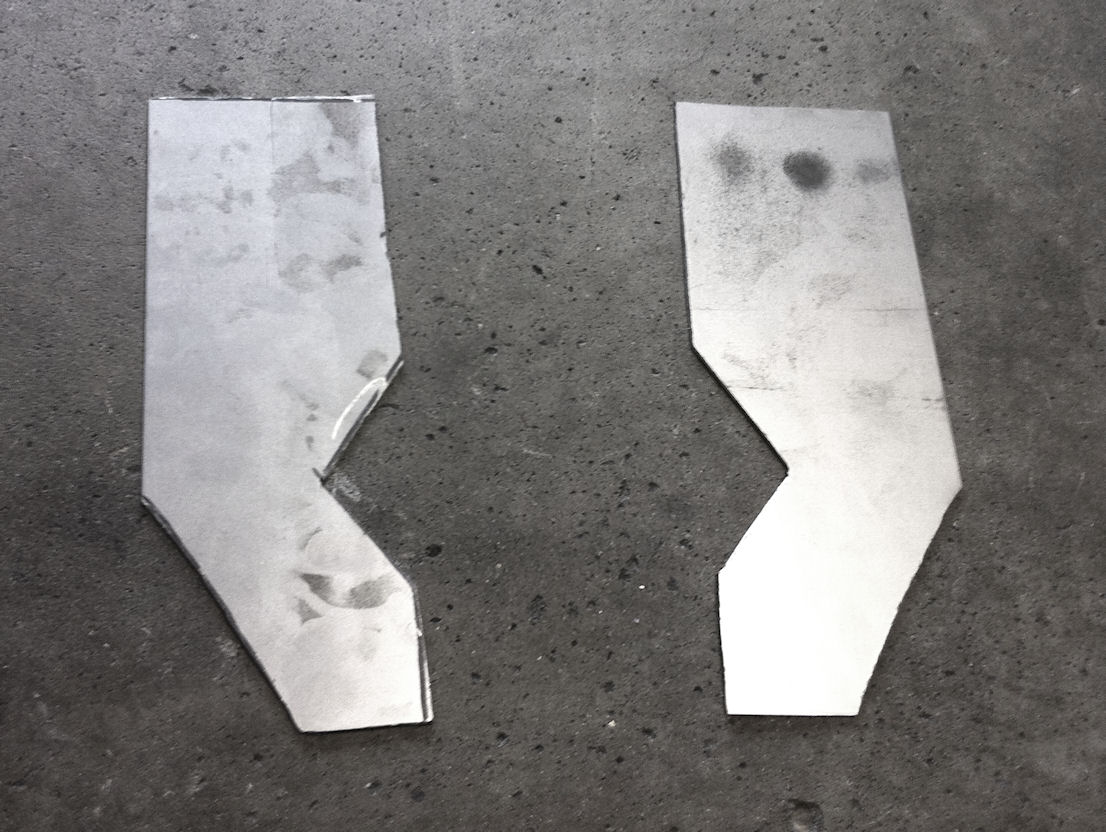
For the placement of the holes, it does not have to be exact, it simply just has to be drilled so that all the bolts line up with the bottom of the wing stand. Test it here on the wing before installing it on the trunk lid. You may want to paint or plastidip the metal now to prevent rust on the bracing. When you insert the bracing into the trunk lid, bend it a little bit to match the curve the trunk lid. As you can see, the bottom two holes are bolts, while the top most hole is a 6mm nut.
Once the bolts are lined up and the bracing is ready to go, slide the metal braces into the trunk lid, then line up the holes on the brace to the holes on your trunk lid. You should be able to then use the bolts to lock the wing onto the trunk.
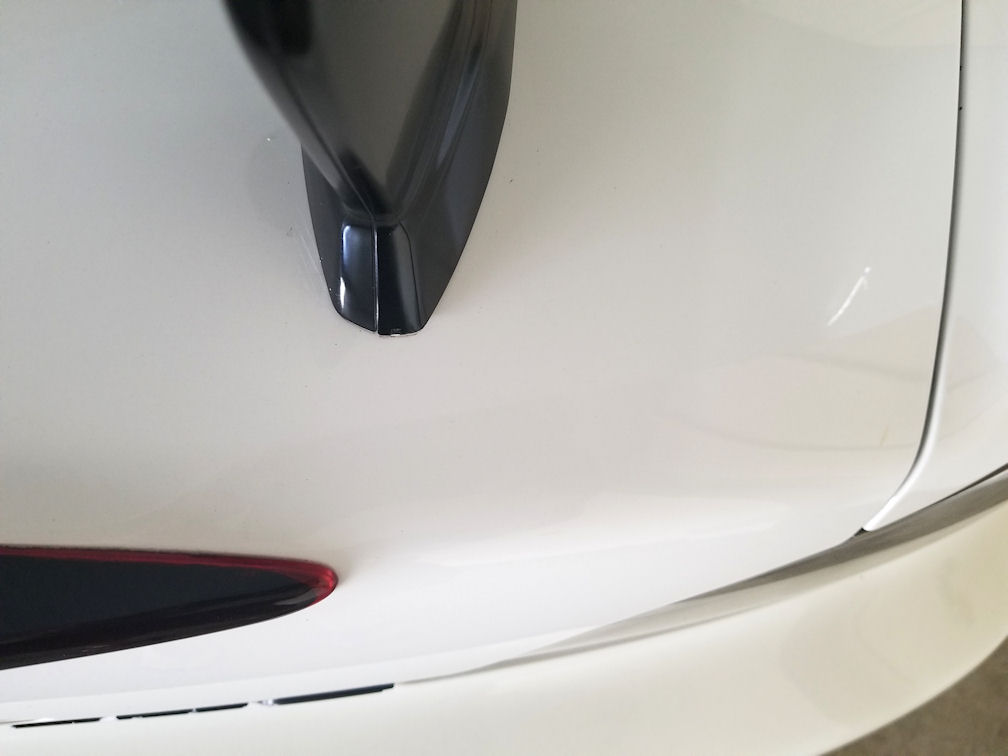
Cushion Install
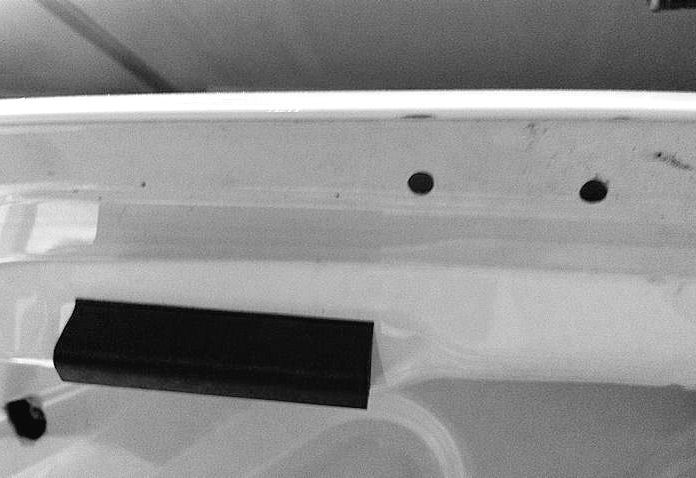
For the CR trunk lid, there are 6 main pieces that are to be installed. Two long rubber stoppers are to be installed on the very top of the lid (your view when opening the trunk) which would line up with the bumper when installed. These two cushions use double-sided tape to install, and comes with two protruding studs. You'll have to drill into the trunk lid to install these, so that they will have the strength to hold up the trunk lid against the bumper.
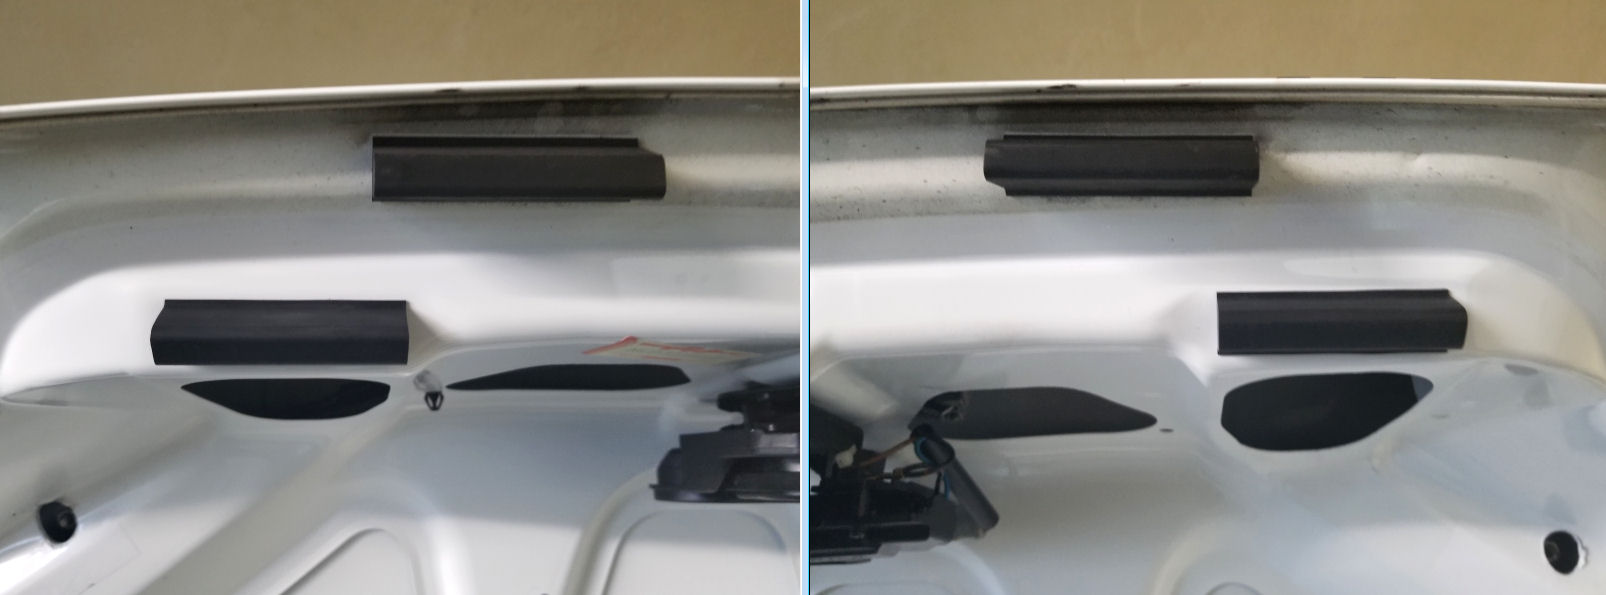
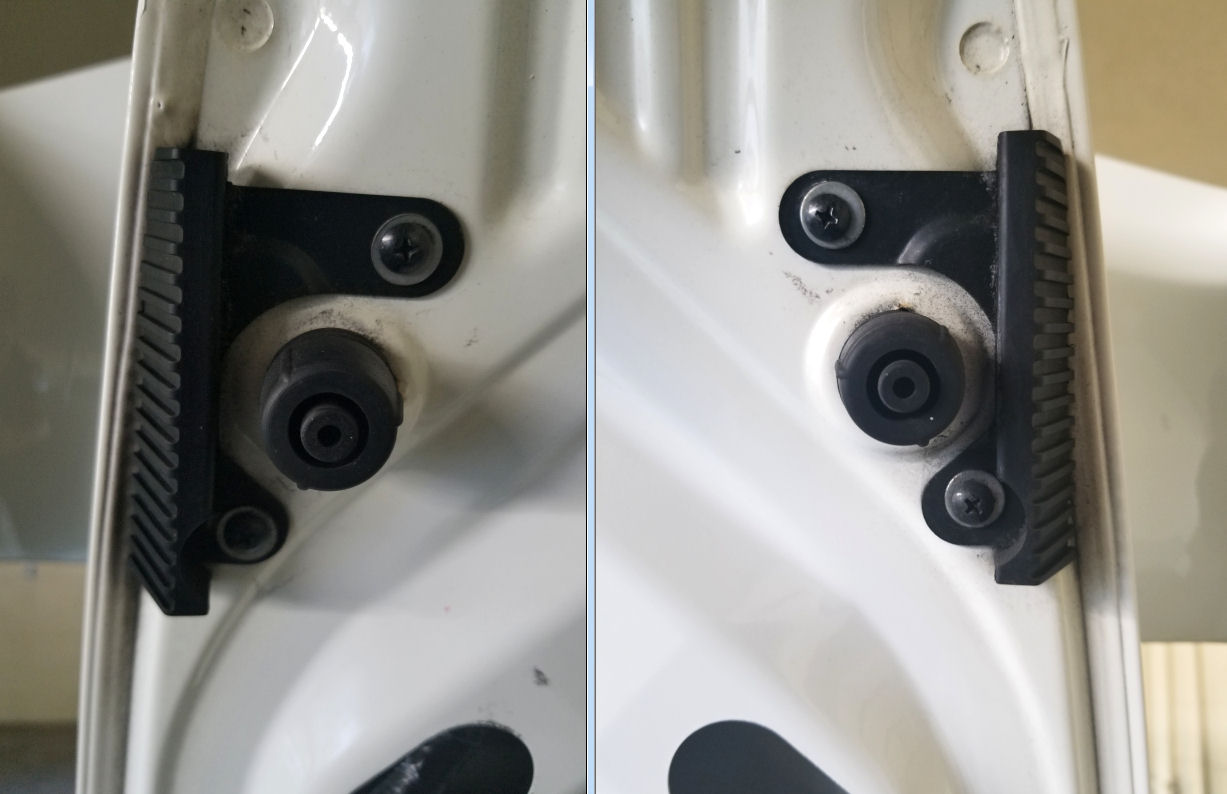
The next two are the L-shaped pieces on each side of the trunk lid. Install these around the stock cushion that's already on the trunk lid. The actual CR has the trunk lid come with bolts protruding already, and you would secure these with nuts. Since the original trunk lid does not have this, you need to drill some self-tapping screws into the trunk lid, making sure they are not too long, so that they will hold the cushions in place.
The last two cushions are on the body of the car itself. Same with the first two cushions, these will need to have two holes drilled on each side for the cushion's studs to be inserted, and apply with double stick tape.
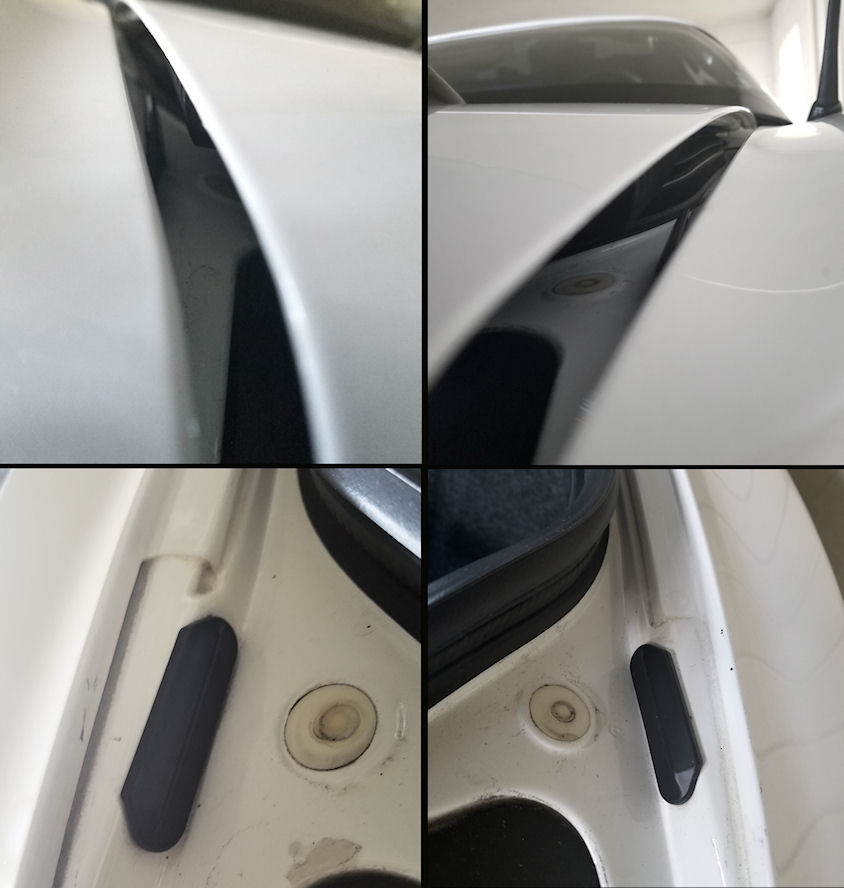
The cushions should line up perfectly, but won't touch when the car is not in motion. They should be able to touch once the car reaches a certain speed (~60mph) which the cushions then do their job bracing the trunk lid against the body.
-------Part Numbers---------
Part Number Part Name Quantity
WING PARTS (this is assuming you have the CR wing with stands already assembled)
90116-S2A-A00 BOLT-WASHER (6X16) 4
90321-S2A-A00 NUT WASHER (6mm) 2
CUSHIONS
93913-14280 SCREW, TAPPING (4X12) (PO) 4
74827-S2A-A00 STOPPER, TRUNK LID (LOWER) 2
74492-S2A-A00 STOPPER, L. TRUNK SIDE 1
74442-S2A-A00 STOPPER, R. TRUNK SIDE 1
74443-S2A-A00 PROTECTOR, TRUNK SIDE 2
Don't forget to order the CR trunk springs if you want to have the trunk lift up easier. You will need the trunk spring tool or you can use a long screwdriver to install them. I had the body shop install the trunk springs so I didn't have to do this on my own.
TRUNK SPRINGS
74871-S2A-A00 SPRING, R. TRUNK OPENER 1
74872-S2A-A00 SPRING, L. TRUNK OPENER 1
Hope my new guide helps!
Background:
Installing a CR wing on the original S2000 trunk lid poses many challenges. The factory CR has its wing installed on a trunk lid specifically made for it, with the holes pre-made and extra bracing installed. It also has several extra cushions installed around the bottom of the trunk lid. The original trunk lid has no bracing or markings to guide where many of the extras are to be installed. I used a lot of references, from seeing an actual CR trunk, to seeing others on S2KI attempt the same on their S2000. My OEM CR wing was bought from a S2KI member on here and was originally Berlina Black. I advised a body shop to install the wing on my trunk lid after requesting them to paint it GPW. They were the ones who actually drilled the 6 holes required for the bolts/washer nuts to go through the trunk lid and into the bottom of the wing stand (3 on each side). After taking it home, I worked on adding the appropriate bracing on the lid itself and installing the extra cushions.
Drilling the holes on the lid:
If you will be drilling the holes yourself, keep in mind on where the holes should begin. The best advice I can give is to have the bottom bolts (which attach toward the front of the wing stands) placed at the outermost corners of the inner triangles. I've seen other cars where these bottom bolts are much higher from the floor, which causes the wing to be closer to the back end of the car. OEM CR's have the wing pretty much where mine sits. These 6 holes are critical to where the wing is to be placed, so if you are going to a body shop to install it, give them a firm understanding where you want the drill points to be. The bottom two holes on each side correspond to a bolt that installs to the bottom-side of the wing stand, and the top-most hole on each side is a washer nut which installs into a protruding bolt already on the wingstand itself.
The Metal Bracing
If you are installing the carbon fiber version made by Seibon, their wing is fairly light and may not need this step. A few friends of mine have that type of CR wing installed and have not had issues with the trunk lid warping. For an OEM wing like mine, I wanted to have that peace of mind to protect the curvature of the trunk lid. Making the bracing requires some metal work, may not be for everyone. I used a dremel with a cutting wheel to make the bracing. The metal came in a long sheet, about 16 GSA, which is thin enough but still strong to protect the trunk. You will be able to slide this directly into the trunk lid, which I would put some painters tape to protect against scratches if you are inclined to do so. I finally made a template for those who have been asking for it:
For the placement of the holes, it does not have to be exact, it simply just has to be drilled so that all the bolts line up with the bottom of the wing stand. Test it here on the wing before installing it on the trunk lid. You may want to paint or plastidip the metal now to prevent rust on the bracing. When you insert the bracing into the trunk lid, bend it a little bit to match the curve the trunk lid. As you can see, the bottom two holes are bolts, while the top most hole is a 6mm nut.
Once the bolts are lined up and the bracing is ready to go, slide the metal braces into the trunk lid, then line up the holes on the brace to the holes on your trunk lid. You should be able to then use the bolts to lock the wing onto the trunk.
Cushion Install
For the CR trunk lid, there are 6 main pieces that are to be installed. Two long rubber stoppers are to be installed on the very top of the lid (your view when opening the trunk) which would line up with the bumper when installed. These two cushions use double-sided tape to install, and comes with two protruding studs. You'll have to drill into the trunk lid to install these, so that they will have the strength to hold up the trunk lid against the bumper.
The next two are the L-shaped pieces on each side of the trunk lid. Install these around the stock cushion that's already on the trunk lid. The actual CR has the trunk lid come with bolts protruding already, and you would secure these with nuts. Since the original trunk lid does not have this, you need to drill some self-tapping screws into the trunk lid, making sure they are not too long, so that they will hold the cushions in place.
The last two cushions are on the body of the car itself. Same with the first two cushions, these will need to have two holes drilled on each side for the cushion's studs to be inserted, and apply with double stick tape.
The cushions should line up perfectly, but won't touch when the car is not in motion. They should be able to touch once the car reaches a certain speed (~60mph) which the cushions then do their job bracing the trunk lid against the body.
-------Part Numbers---------
Part Number Part Name Quantity
WING PARTS (this is assuming you have the CR wing with stands already assembled)
90116-S2A-A00 BOLT-WASHER (6X16) 4
90321-S2A-A00 NUT WASHER (6mm) 2
CUSHIONS
93913-14280 SCREW, TAPPING (4X12) (PO) 4
74827-S2A-A00 STOPPER, TRUNK LID (LOWER) 2
74492-S2A-A00 STOPPER, L. TRUNK SIDE 1
74442-S2A-A00 STOPPER, R. TRUNK SIDE 1
74443-S2A-A00 PROTECTOR, TRUNK SIDE 2
Don't forget to order the CR trunk springs if you want to have the trunk lift up easier. You will need the trunk spring tool or you can use a long screwdriver to install them. I had the body shop install the trunk springs so I didn't have to do this on my own.
TRUNK SPRINGS
74871-S2A-A00 SPRING, R. TRUNK OPENER 1
74872-S2A-A00 SPRING, L. TRUNK OPENER 1
Hope my new guide helps!
Last edited by darkfalcon; 07-28-2017 at 03:11 PM.

The following 9 users liked this post by darkfalcon:
01-S2k (05-22-2022),
adrs2k (07-28-2017),
Carlo Xavier (02-09-2020),
ficoy (05-06-2021),
liybzd (01-07-2019),
and 4 others liked this post.
07-27-2017, 08:03 PM
#3
Community Organizer
Thread Starter
07-27-2017, 08:05 PM
#4

The following users liked this post:
darkfalcon (07-29-2017)

The following users liked this post:
darkfalcon (07-29-2017)

 Love GPW CR look-alikes!

