CD7SirAccord's '03 GPW Supercharged Build
 05-14-2012, 07:21 PM
#1


Thread Starter

Well now that I have a little down time with the car apart, I figured I would share my build.
Current Mod List:
ENGINE:
- Unopened F20C, 45,000ish miles
- SOS upgraded Novi 1200 Blower For Comptech Kit Novi 1000
- Comptech Aftercooler
- Frozenboost 26”X7”X2” Heat Exchanger
- AEM 1052U Engine Management
- SOS 3 Bar MAP sensor
- Injector Dynamics 2200cc/min injectors w/ PnP Clips
- Full Blown 340LPH Fuel Pump
- Hondata Intake Manifold Thermal Gasket
- J's Racing Baffled Oil Pan
- Turbonetics Godzilla Blow-off Valve
- Inline Pro Race Timing Chain Tensioner
- Woodruff Cam Keys, +2 EXH, -1 INT
- Ferrea Valve Seals
- Ferrea Beehive Valve Springs
- Ferrea Titanium Retainers
- Ferrea Valve Locks
- ATI Super Damper
- SOS 70mm Big Bore Throttle Body
- J’s Racing 70RS
- Puddymod EGR Delete
- 04-05 AP2 Valve Cover
COOLING:
- Full Blown Motorsports Radiator
- Full Blown Motorsports Slim Fans
- Spoon Sports Thermostat
- Spoon Sports Fan Switch
- TiTek Carbon Fiber Radiator Cooling Plate
DRIVETRAIN:
- Full Blown S2K To V160 Adaptor Kit
- Clutchmasters Twin Disk Clutch
- Toyota V160 6 Speed Transmission
- Driveshaft Shop Aluminum Driveshaft
- Full Blown Ford 8.8 Rear Diff Kit
- Ford Racing Aluminum Housing
- Richmond Gear 4.10 Gears
- Eaton Posi LSD
- Ford Racing Upgraded Rear Diff Cover
- Driveshaft Shop Stage 5.9 Axles w/Chromoly Hubs
- TRD Urethane Transmission Mount
- Hasport 70A Race Motor Mounts
- Hasport 75A Race Rear Differential Mounts
SUSPENSION:
- Bilstein PSS9 Coilovers
- Hardrace Front Roll Center Adjuster w/Offset Camber
- Hardrace Rear Roll Center Adjuster
- Hardrace Rear Adjustable Toe Link
- Hardrace Pillowball Bushing Kit
- Hardrace Upper Ball Joints
- SFRE Front Anti-Roll Bar
- Spoon Sports Rigid Collar Kit
- Spoon Sports Rigid Steering Bushing Kit
- Spoon Sports Zero Bumpsteer Kit - Front
WHEELS/BRAKES:
- 17x8 +45 Enkei RPF-1
- 17x9 +45 Enkei RPF-1
- ARP Extended Wheel Studs Rear
- ARP Extended Wheel Studs Front
- Muteki Burnt Blue Lug Nuts
- Muteki Wheel Locks
- Essex/AP Racing Big Brake Kit
- AP Racing S100 (Street) S300 (Track) Pads
- Custom Line Lock Setup
- Motorsports Performance Group Rear Big Brake Kit
- Quantum Motorsports Brake Duct Kit For AP1
- Spiegler Stainless Steel Brake Lines
EXTERIOR:
- ZTEC Industries Exhaust Cap
- OEM Front Lip Spoiler
- OEM Rear Spoiler
- OEM Hardtop
INTERIOR:
- SOS Single Gauge Pod
- AEM Serial Data Stream Gauge
- Kenwood eXcelon KDC-X891 Head Unit
- Moddiction Titanium Shift Knob
- Recaro Pole Position Red X2
- Buddyclub Super Low Down Seat Rails
- AP2 Black Door Panels
- New Black OEM Carpet
- Password JDM Dry Carbon Center Console
- 2007 AP2 Center Console
- ASM Red Sisal Floor Mats
- Hybrid Audio Technologies Imagine I61-2 6.5" Components
- Kenwood Excelon XR-4S 4 Channel Amplifier
- Custom Secret Compartment Sub: Kicker CVT65 (Made by Darkknight1999)
- PAS2KNut Custom Amplifier Rack
- Rockstar Garage Roll Bar (Will be modified to be NHRA Legal)
- Zoom TS Carbon Rear View Mirror
- NSX-R Steering Wheel With Horn Button & Trim Ring
- Works Bell Rapfix II Red Quick Release With Works Bell Short Hub
MISCELANEOUS:
- AB Speed Combo Breather Tank/Radiator Overflow
- Krank Vents
- Speedohealer V.4
- Modifry DCI
- Modifry Camera Mount
- AFE Air Filter
- Spoon Sports Magnetic Drain Plug
- Full Blown Motorsports Billet Radiator Brackets
- Moddiction Titanium Engine Dress Up Kit
- ARP Exhaust Manifold Studs w/Nordlock Washers
- Downforce Carbon Fiber Header Heat Shield
- Gladman Performance Fabrication Stealth Hitch
- JS2K LED Conversion Kit (Brake Light, Dome Light, License Plate Light, Sidemarker Light (Amber), Trunk Light,
Reverse Light
- JS2K 6000K HID Blubs
Currently Waiting On:
- Hytech Long Tube Supercharger Header
- Hytech 3.0" Test pipe
- Custom 6" Crank Pulley for ATI Super Damper
First things first.
I bought the car in Austin Texas June 6, 2006. I had been looking for the car off of Auto Trader with strict criteria, 1st owner, low mileage, 2002-2003 Grand Prix White with tan interior, OEM spoiler and OEM front lip. The car had a little over 10,400 miles on it when I picked it up and began my journey home back to Colorado.
Here's a pic the day it arrived back in Colorado.


I kept it stock for the first year I had it.
4/2/2007
First modification was a set of Swift springs, Motorklasse half shaft spacers, and some Enkei RPF-1's (17X8 +45, 17X9 +45)


Swift Springs Installed

Wheels Mounted

4/23/2007
After my first auto X with the colorado region SCCA, I found that the Swift springs were great for street driving, but not exactly what I wanted for auto X, so I ordered a set of Bilstein PSS9's


4/29/2007
SCCA Autocross Summer Series #1 World Arena, Colorado Springs

8/27/2007
After working all summer, it was back to buying more parts for the auto x craze, I purchased a Gendron Bar front sway bar 1.250" wall

9/11/2007
I was also able to score a clean set of AP2 V1 wheels locally, that I could mount R compounds to. I decided to basically mimic the A Stock tire setup with 245/45/17 and 275/40/17 Kumho V710's


6 months later I started getting the itch for a little more power. With Tax returns coming I was able to pull the trigger on a slightly used Comptech Supercharger with the aftercooler purchase from a member on here. I also started buying some more parts to compliment the supercharger.

Cusco Catch Can

Invidia 70mm Testpipe

ZTEC Industries exhaust cap for the J's Racing 70RS I ordered back in January

Turbonetics Godzilla BOV, It was the only one that bolted directly to the Comptech aftercooler. I couldn't believe how damn big this thing was!

Well I figured I was going to have to pull the pan off to put a fitting in for the return, so I opted for the J's Racing Baffled oil pan, as I still planned to use this for track duty.

3/13/2008 Spring Break
I went back home for Spring Break and got started on the install
Last picture of the stock engine bay

Comptech kit ready for install

3/14/2008
Supercharger and Aftercooler installed

3/15/2008
Supercharger is finally installed, just a little wiring for the water pump

Current Mod List:
ENGINE:
- Unopened F20C, 45,000ish miles
- SOS upgraded Novi 1200 Blower For Comptech Kit Novi 1000
- Comptech Aftercooler
- Frozenboost 26”X7”X2” Heat Exchanger
- AEM 1052U Engine Management
- SOS 3 Bar MAP sensor
- Injector Dynamics 2200cc/min injectors w/ PnP Clips
- Full Blown 340LPH Fuel Pump
- Hondata Intake Manifold Thermal Gasket
- J's Racing Baffled Oil Pan
- Turbonetics Godzilla Blow-off Valve
- Inline Pro Race Timing Chain Tensioner
- Woodruff Cam Keys, +2 EXH, -1 INT
- Ferrea Valve Seals
- Ferrea Beehive Valve Springs
- Ferrea Titanium Retainers
- Ferrea Valve Locks
- ATI Super Damper
- SOS 70mm Big Bore Throttle Body
- J’s Racing 70RS
- Puddymod EGR Delete
- 04-05 AP2 Valve Cover
COOLING:
- Full Blown Motorsports Radiator
- Full Blown Motorsports Slim Fans
- Spoon Sports Thermostat
- Spoon Sports Fan Switch
- TiTek Carbon Fiber Radiator Cooling Plate
DRIVETRAIN:
- Full Blown S2K To V160 Adaptor Kit
- Clutchmasters Twin Disk Clutch
- Toyota V160 6 Speed Transmission
- Driveshaft Shop Aluminum Driveshaft
- Full Blown Ford 8.8 Rear Diff Kit
- Ford Racing Aluminum Housing
- Richmond Gear 4.10 Gears
- Eaton Posi LSD
- Ford Racing Upgraded Rear Diff Cover
- Driveshaft Shop Stage 5.9 Axles w/Chromoly Hubs
- TRD Urethane Transmission Mount
- Hasport 70A Race Motor Mounts
- Hasport 75A Race Rear Differential Mounts
SUSPENSION:
- Bilstein PSS9 Coilovers
- Hardrace Front Roll Center Adjuster w/Offset Camber
- Hardrace Rear Roll Center Adjuster
- Hardrace Rear Adjustable Toe Link
- Hardrace Pillowball Bushing Kit
- Hardrace Upper Ball Joints
- SFRE Front Anti-Roll Bar
- Spoon Sports Rigid Collar Kit
- Spoon Sports Rigid Steering Bushing Kit
- Spoon Sports Zero Bumpsteer Kit - Front
WHEELS/BRAKES:
- 17x8 +45 Enkei RPF-1
- 17x9 +45 Enkei RPF-1
- ARP Extended Wheel Studs Rear
- ARP Extended Wheel Studs Front
- Muteki Burnt Blue Lug Nuts
- Muteki Wheel Locks
- Essex/AP Racing Big Brake Kit
- AP Racing S100 (Street) S300 (Track) Pads
- Custom Line Lock Setup
- Motorsports Performance Group Rear Big Brake Kit
- Quantum Motorsports Brake Duct Kit For AP1
- Spiegler Stainless Steel Brake Lines
EXTERIOR:
- ZTEC Industries Exhaust Cap
- OEM Front Lip Spoiler
- OEM Rear Spoiler
- OEM Hardtop
INTERIOR:
- SOS Single Gauge Pod
- AEM Serial Data Stream Gauge
- Kenwood eXcelon KDC-X891 Head Unit
- Moddiction Titanium Shift Knob
- Recaro Pole Position Red X2
- Buddyclub Super Low Down Seat Rails
- AP2 Black Door Panels
- New Black OEM Carpet
- Password JDM Dry Carbon Center Console
- 2007 AP2 Center Console
- ASM Red Sisal Floor Mats
- Hybrid Audio Technologies Imagine I61-2 6.5" Components
- Kenwood Excelon XR-4S 4 Channel Amplifier
- Custom Secret Compartment Sub: Kicker CVT65 (Made by Darkknight1999)
- PAS2KNut Custom Amplifier Rack
- Rockstar Garage Roll Bar (Will be modified to be NHRA Legal)
- Zoom TS Carbon Rear View Mirror
- NSX-R Steering Wheel With Horn Button & Trim Ring
- Works Bell Rapfix II Red Quick Release With Works Bell Short Hub
MISCELANEOUS:
- AB Speed Combo Breather Tank/Radiator Overflow
- Krank Vents
- Speedohealer V.4
- Modifry DCI
- Modifry Camera Mount
- AFE Air Filter
- Spoon Sports Magnetic Drain Plug
- Full Blown Motorsports Billet Radiator Brackets
- Moddiction Titanium Engine Dress Up Kit
- ARP Exhaust Manifold Studs w/Nordlock Washers
- Downforce Carbon Fiber Header Heat Shield
- Gladman Performance Fabrication Stealth Hitch
- JS2K LED Conversion Kit (Brake Light, Dome Light, License Plate Light, Sidemarker Light (Amber), Trunk Light,
Reverse Light
- JS2K 6000K HID Blubs
Currently Waiting On:
- Hytech Long Tube Supercharger Header
- Hytech 3.0" Test pipe
- Custom 6" Crank Pulley for ATI Super Damper
First things first.
I bought the car in Austin Texas June 6, 2006. I had been looking for the car off of Auto Trader with strict criteria, 1st owner, low mileage, 2002-2003 Grand Prix White with tan interior, OEM spoiler and OEM front lip. The car had a little over 10,400 miles on it when I picked it up and began my journey home back to Colorado.
Here's a pic the day it arrived back in Colorado.
I kept it stock for the first year I had it.
4/2/2007
First modification was a set of Swift springs, Motorklasse half shaft spacers, and some Enkei RPF-1's (17X8 +45, 17X9 +45)
Swift Springs Installed
Wheels Mounted
4/23/2007
After my first auto X with the colorado region SCCA, I found that the Swift springs were great for street driving, but not exactly what I wanted for auto X, so I ordered a set of Bilstein PSS9's
4/29/2007
SCCA Autocross Summer Series #1 World Arena, Colorado Springs
8/27/2007
After working all summer, it was back to buying more parts for the auto x craze, I purchased a Gendron Bar front sway bar 1.250" wall
9/11/2007
I was also able to score a clean set of AP2 V1 wheels locally, that I could mount R compounds to. I decided to basically mimic the A Stock tire setup with 245/45/17 and 275/40/17 Kumho V710's
6 months later I started getting the itch for a little more power. With Tax returns coming I was able to pull the trigger on a slightly used Comptech Supercharger with the aftercooler purchase from a member on here. I also started buying some more parts to compliment the supercharger.
Cusco Catch Can
Invidia 70mm Testpipe
ZTEC Industries exhaust cap for the J's Racing 70RS I ordered back in January
Turbonetics Godzilla BOV, It was the only one that bolted directly to the Comptech aftercooler. I couldn't believe how damn big this thing was!
Well I figured I was going to have to pull the pan off to put a fitting in for the return, so I opted for the J's Racing Baffled oil pan, as I still planned to use this for track duty.
3/13/2008 Spring Break
I went back home for Spring Break and got started on the install
Last picture of the stock engine bay
Comptech kit ready for install
3/14/2008
Supercharger and Aftercooler installed
3/15/2008
Supercharger is finally installed, just a little wiring for the water pump
 05-14-2012, 07:22 PM
#2
Thread Starter
8/19/2008
Finally after an 8 month wait, my J's Racing 70RS finally arrived!

Finally was able to put on the exhaust cap

9/8/2008
After nearly 5 months of scratching my head, why it felt like it was down on power, we were finally able to hook a wideband up to it and found it was running way lean. After doing some research I found that it was a common problem on the Comptech kits and thankfully I didn't hurt anything. So another round of fun.
Decided to go AEM and got the 1052U with the built in wideband.

AEM Serial Datastream Gauge

RC 750cc Injectors with PnP Clips

Science of Speed Single Gauge Pod

9/10/2008
Before I was getting ready to head to Colorado Springs for a tune and race, I figured it would be a good time to get the car corner balanced and aligned before it hit the dyno.
Corner Balance & Alignment @ SCR Performance Loveland, CO


9/10/2008 Dyno Day @ Revolutions Performance Colorado Springs, CO
Well the day finally came to get tuned. I didn't grab the Dyno sheet, but the car was dyno'ed on a Dyno Dynamics and made 278 RWHP & 168 lb/ft uncorrected at 6500' elevation on 7 PSI

For about 3 years I was pretty happy with the setup, made for a great car driving around town and occasional trips over the Grand Mesa and Colorado National Monument.
Fast forward 3 years... This is where it starts getting fun
I got too complacent with the car and that made me wanting more power. I was browsing the forum and came across a proposed group buy for the Science of Speed Novi 1200 Conversion kit for the Comptech kit in April. Long story short, the group buy fell through, but I still wanted to do this, so I gave Chris at SOS a call to see if it was still possible to do the conversion kit. At the time I was looking to do maybe around 12-14 PSI. Well it was about December of last year when I finally got the kit. I got to thinking that maybe there were other things I needed to upgrade to with the added power.
1/12/2012
SOS Novi 1200 Conversion Kit for Comptech Kit

Well, with more power comes more fuel, so I decided I wanted to do E85 because it's readily available where I live, so I ordered some Injector Dynamics 2000cc injectors with PNP clips and a Full Blown 340LPH pump


Another addition to more power, is the increased chance of breaking the differential, so I decided to go with the Full Blown 8.8 Rear End Kit with the Driveshaft Shop 5.9 Axles and Aluminum Driveshaft. After I ordered the rear end kit, the gears started turning again, the next weak link was going to be the transmission. I was lucky enough to come across the V160 thread and decided that was the best option to go with, although it was as good chunk of change, but with spending a lot of time in North Dakota, I could save enough money to do this. so I had LJ make me the custom length 8.8 to v160 driveshaft, so it was at the point of no return. I had originally bought the Eaton Tru-trac differential for the Ford 8.8 but decided against it and ordered the Eaton Posi unit, along with Richmond 4.10 gears. The gears are cheap enough, if I desire something different, it wouldn't be too difficult to change.
Eaton Tru-Trac Limited Slip

Richmond Gear 4.10 Ring & Pinion

1/14/2012
The Full Blown Ford 8.8 Mounting Kit has arrived

2/27/2012
I also ordered the Ford Racing Aluminum Case with the upgraded rear cover, I didn't really have the time to sift through junkyards for a used housing, so I was able to buy it new for around $600. I should have just went with the OEM housing, because I had some issues with the rear end, which you can read about here https://www.s2ki.com/s2000/topic/932...#entry21459689

3/1/2012
Well I also decided with the added boost, the stock heat exchanger just wasn't going to cut it. so I purchase a larger heat exchanger(26X7X2) from Frozen Boost. Now that I look back at it, I should have opted for the thicker one. But we'll see how this one works out.


3/5/2012
In the process of waiting for parts to come in, I decided now would also be the best time to fix many issues that the S2000 has such as the Timing Chain Tensioner, so I went with the Inline Pro Race Tensioner

3/6/2012
The rest of the Full Blown Ford 8.8 rear end kit finally arrived!
Driveshaft Shop Stage 5.9 Axles, Aluminum Driveshaft, Chromoly hubs and ARP extended wheel studs.

I was also able to finally save up the cheddar for the V160, so I ordered a brand new one from Supra Store
3/29/2012
Doing some more looking around I found the cam timing thread put up by Phil (Sideways) and decided I might give these woodruff keys a try.

3/29/2012
I guess I didn't look hard enough, but I figured might as well change the rear diff mounts while everything was out. It was only until after I purchased the Hasport 75A diff mounts I found the Avid/Full Blown mounts. Full Blown has done nothing but great things for me and I try to support them as much as possible, but apparently I skimmed by it.

3/29/2012
While waiting for the V160 to arrive, I figured I could start piecing together all the additional parts I would need to complete the swap. So here are all brand new parts from Toyota for the shifter assembly and TRD Urethane transmission mount.

Finally after an 8 month wait, my J's Racing 70RS finally arrived!
Finally was able to put on the exhaust cap
9/8/2008
After nearly 5 months of scratching my head, why it felt like it was down on power, we were finally able to hook a wideband up to it and found it was running way lean. After doing some research I found that it was a common problem on the Comptech kits and thankfully I didn't hurt anything. So another round of fun.
Decided to go AEM and got the 1052U with the built in wideband.
AEM Serial Datastream Gauge
RC 750cc Injectors with PnP Clips
Science of Speed Single Gauge Pod
9/10/2008
Before I was getting ready to head to Colorado Springs for a tune and race, I figured it would be a good time to get the car corner balanced and aligned before it hit the dyno.
Corner Balance & Alignment @ SCR Performance Loveland, CO
9/10/2008 Dyno Day @ Revolutions Performance Colorado Springs, CO
Well the day finally came to get tuned. I didn't grab the Dyno sheet, but the car was dyno'ed on a Dyno Dynamics and made 278 RWHP & 168 lb/ft uncorrected at 6500' elevation on 7 PSI
For about 3 years I was pretty happy with the setup, made for a great car driving around town and occasional trips over the Grand Mesa and Colorado National Monument.
Fast forward 3 years... This is where it starts getting fun
I got too complacent with the car and that made me wanting more power. I was browsing the forum and came across a proposed group buy for the Science of Speed Novi 1200 Conversion kit for the Comptech kit in April. Long story short, the group buy fell through, but I still wanted to do this, so I gave Chris at SOS a call to see if it was still possible to do the conversion kit. At the time I was looking to do maybe around 12-14 PSI. Well it was about December of last year when I finally got the kit. I got to thinking that maybe there were other things I needed to upgrade to with the added power.
1/12/2012
SOS Novi 1200 Conversion Kit for Comptech Kit
Well, with more power comes more fuel, so I decided I wanted to do E85 because it's readily available where I live, so I ordered some Injector Dynamics 2000cc injectors with PNP clips and a Full Blown 340LPH pump
Another addition to more power, is the increased chance of breaking the differential, so I decided to go with the Full Blown 8.8 Rear End Kit with the Driveshaft Shop 5.9 Axles and Aluminum Driveshaft. After I ordered the rear end kit, the gears started turning again, the next weak link was going to be the transmission. I was lucky enough to come across the V160 thread and decided that was the best option to go with, although it was as good chunk of change, but with spending a lot of time in North Dakota, I could save enough money to do this. so I had LJ make me the custom length 8.8 to v160 driveshaft, so it was at the point of no return. I had originally bought the Eaton Tru-trac differential for the Ford 8.8 but decided against it and ordered the Eaton Posi unit, along with Richmond 4.10 gears. The gears are cheap enough, if I desire something different, it wouldn't be too difficult to change.
Eaton Tru-Trac Limited Slip
Richmond Gear 4.10 Ring & Pinion
1/14/2012
The Full Blown Ford 8.8 Mounting Kit has arrived
2/27/2012
I also ordered the Ford Racing Aluminum Case with the upgraded rear cover, I didn't really have the time to sift through junkyards for a used housing, so I was able to buy it new for around $600. I should have just went with the OEM housing, because I had some issues with the rear end, which you can read about here https://www.s2ki.com/s2000/topic/932...#entry21459689
3/1/2012
Well I also decided with the added boost, the stock heat exchanger just wasn't going to cut it. so I purchase a larger heat exchanger(26X7X2) from Frozen Boost. Now that I look back at it, I should have opted for the thicker one. But we'll see how this one works out.
3/5/2012
In the process of waiting for parts to come in, I decided now would also be the best time to fix many issues that the S2000 has such as the Timing Chain Tensioner, so I went with the Inline Pro Race Tensioner
3/6/2012
The rest of the Full Blown Ford 8.8 rear end kit finally arrived!
Driveshaft Shop Stage 5.9 Axles, Aluminum Driveshaft, Chromoly hubs and ARP extended wheel studs.
I was also able to finally save up the cheddar for the V160, so I ordered a brand new one from Supra Store
3/29/2012
Doing some more looking around I found the cam timing thread put up by Phil (Sideways) and decided I might give these woodruff keys a try.
3/29/2012
I guess I didn't look hard enough, but I figured might as well change the rear diff mounts while everything was out. It was only until after I purchased the Hasport 75A diff mounts I found the Avid/Full Blown mounts.
Full Blown has done nothing but great things for me and I try to support them as much as possible, but apparently I skimmed by it.3/29/2012
While waiting for the V160 to arrive, I figured I could start piecing together all the additional parts I would need to complete the swap. So here are all brand new parts from Toyota for the shifter assembly and TRD Urethane transmission mount.
05-14-2012, 07:22 PM
#3
Thread Starter
Also bought some V160 transmission fluid, only needed 2, but figure I might as well stock up.

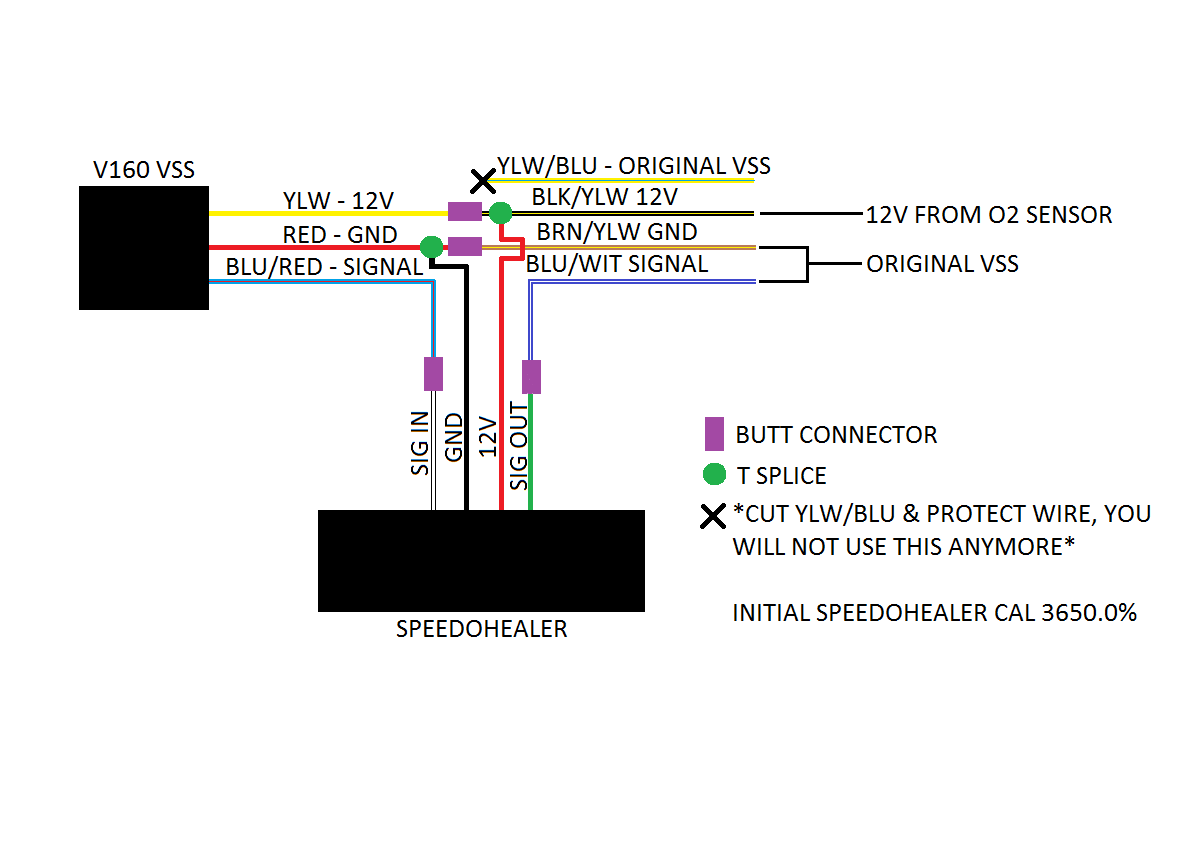
Bought a Speedohealer V4 to fix the Speed Sensor Issue

Full Blown V160 Conversion kit is here!

Clutchmasters Billet Twin Disk for V160

4/5/2012
Moddition Titanium Anvil countersunk shift knob to compliment the new shifter. But unfortunately the bore on the countersinking wasn't large enough to fit over the reverse lock out, so I will need to get that bore opened up.

4/5/2012
Last picture of the stock drive train

4/9/2012
Finally pulled out the Novi 1000 and put it side by side to the Novi 1200. 1200 is on top and novi 1000 below.

4/10/2012
Figured while I had the cams out to do the Woodruff keys, might not be a bad idea to change out the AP1 retainers and springs.
Ferrea Titanium retainers and beehive valve springs from Real Street Performance

4/12/2012
Finally started to pull the transmission, I hate this starter bolt. I found it easier to pull the alternator and tensioner out to get to the bolt. Although be careful loosening the started bolt, I ended up breaking the fragile knock sensor, so yet another thing I had to replace.

4/13/2012
While waiting for the FBM/Avid motor mountsto be released, I came across these on Evasives blog 1 day after they were released. Ordered them and had them 6 days after their release.
Hasport 70A Engine Mounts

4/15/2012
Got the transmission out and the FBM adaptor kit installed and put on the clutch just for illustration purposes.

4/16/2012
Ordered up an ATI Super Damper from Full Blown. I'm currently working on getting a machinist at work to do a custom pulley to mount on to the Super Damper. Since the face of it sticks out further than the OEM pulley, I'm going to try and go with a countersunk 6" pulley, so it will line up correctly and so I won't have to run such a small pulley on the blower when that time comes.

4/16/2012
Finally got around to pulling the knuckles off of the car to press in the new hubs on the rear, I also got extended wheel studs for the front.

Well since I figured pretty much the whole suspension was apart, I figured it would be another time to do some replacement and upgrades. Since you have to drop the front subframe to get the transmission out, I came across these Spoon Sports Rigid Collar kit, which keeps the subframe from shifting, because of the slop in the manufacturing process. Whether these will make a difference, I have no idea, but it seems somewhat sound.
Spoon Sports Rigid Subframe Kit

4/17/2012
Finally the day has arrived!
Brand new V160 from Toyota


Also the day that I got the transmission, I got my OEM hardtop back from paint.

The night of, I was able to get the transmission in. As suggested in the instructions, it is easier to put the clutch on the input shaft when you are bolting up the transmission. but you will not fully be able to slide the transmission to the adapter plate until you start installing the clutch to the flywheel. you can get a couple bolts started from the transmission to the plate, but I wasn't able to get all until I installed the clutch
V160 Installed


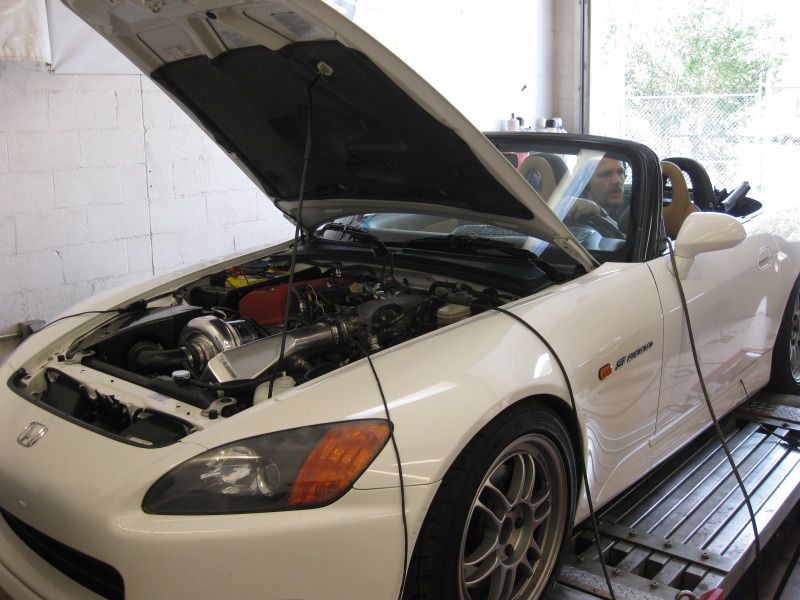
Chatted with p0staboy for a little bit and here is how I wired up the Speedohealer, haven't had a chance to test it on the road, but all signs point to it is working properly. He said that the speedometer didn't work until he was able to drive it. I'll report back with this as soon as I get a chance to drive it. I used the 12V from the O2 sensor, because I am not using it anymore, and 12V will do.
At this point I am still waiting for the rear end to be put together
4/20/2012
Had a little bit more money to blow, so I ordered a radiator from FBM with the Black Anodized stays

More parts that came in today were some Hardrace Rear Toe Links, Front Offset Ball Joints w/roll center plates, and rear roll center adjusters


Bought a Speedohealer V4 to fix the Speed Sensor Issue
Full Blown V160 Conversion kit is here!
Clutchmasters Billet Twin Disk for V160
4/5/2012
Moddition Titanium Anvil countersunk shift knob to compliment the new shifter. But unfortunately the bore on the countersinking wasn't large enough to fit over the reverse lock out, so I will need to get that bore opened up.
4/5/2012
Last picture of the stock drive train
4/9/2012
Finally pulled out the Novi 1000 and put it side by side to the Novi 1200. 1200 is on top and novi 1000 below.
4/10/2012
Figured while I had the cams out to do the Woodruff keys, might not be a bad idea to change out the AP1 retainers and springs.
Ferrea Titanium retainers and beehive valve springs from Real Street Performance
4/12/2012
Finally started to pull the transmission, I hate this starter bolt. I found it easier to pull the alternator and tensioner out to get to the bolt. Although be careful loosening the started bolt, I ended up breaking the fragile knock sensor, so yet another thing I had to replace.
4/13/2012
While waiting for the FBM/Avid motor mountsto be released, I came across these on Evasives blog 1 day after they were released. Ordered them and had them 6 days after their release.
Hasport 70A Engine Mounts
4/15/2012
Got the transmission out and the FBM adaptor kit installed and put on the clutch just for illustration purposes.
4/16/2012
Ordered up an ATI Super Damper from Full Blown. I'm currently working on getting a machinist at work to do a custom pulley to mount on to the Super Damper. Since the face of it sticks out further than the OEM pulley, I'm going to try and go with a countersunk 6" pulley, so it will line up correctly and so I won't have to run such a small pulley on the blower when that time comes.
4/16/2012
Finally got around to pulling the knuckles off of the car to press in the new hubs on the rear, I also got extended wheel studs for the front.
Well since I figured pretty much the whole suspension was apart, I figured it would be another time to do some replacement and upgrades. Since you have to drop the front subframe to get the transmission out, I came across these Spoon Sports Rigid Collar kit, which keeps the subframe from shifting, because of the slop in the manufacturing process. Whether these will make a difference, I have no idea, but it seems somewhat sound.
Spoon Sports Rigid Subframe Kit
4/17/2012
Finally the day has arrived!
Brand new V160 from Toyota
Also the day that I got the transmission, I got my OEM hardtop back from paint.
The night of, I was able to get the transmission in. As suggested in the instructions, it is easier to put the clutch on the input shaft when you are bolting up the transmission. but you will not fully be able to slide the transmission to the adapter plate until you start installing the clutch to the flywheel. you can get a couple bolts started from the transmission to the plate, but I wasn't able to get all until I installed the clutch
V160 Installed
Chatted with p0staboy for a little bit and here is how I wired up the Speedohealer, haven't had a chance to test it on the road, but all signs point to it is working properly. He said that the speedometer didn't work until he was able to drive it. I'll report back with this as soon as I get a chance to drive it. I used the 12V from the O2 sensor, because I am not using it anymore, and 12V will do.
At this point I am still waiting for the rear end to be put together
4/20/2012
Had a little bit more money to blow, so I ordered a radiator from FBM with the Black Anodized stays
More parts that came in today were some Hardrace Rear Toe Links, Front Offset Ball Joints w/roll center plates, and rear roll center adjusters
05-14-2012, 07:23 PM
#4
Thread Starter

4/23/2012
Since I was on mission to revamp the suspension as well, I decided to get the Spoon Sports Zero Bumpsteer Kit and Spoon Rigid Steering Collar kit, since the steering rack was disconnected from the knuckle and the linkage.

Installed

Back up to work for a while, and finally come back the 10th. Unfortunately the rear end is still not together.
 But progress is still being made.
5/10/2012
More fun stuff when I got back. Since I was on the suspension kick, I figured might as well, just replace every suspension bushing. It took me a little while to figure out the route I wanted to go. This will be a street car, but more gear towards track driving. So I just decided what the hell, I'm already in this project a boat load, might as well go all out and ended up ordering the full Hardrace pillowball bushing kit from Motorklasse, and new upper ball joints as well. So this car with only 44k miles will have all brand new suspension underneath it except for the, factory arms, coilovers and sway bars.


I got a Schley master bushing kit, and wow, what a difference that made in pressing out/in the new bushings. the only ones I really had trouble with were the rear lower front bushings as those are 2 piece bushings with a lip on each side, took me a little bit with the hammer and punches.
I also received an SOS 70mm throttle body and 3 bar map sensor.


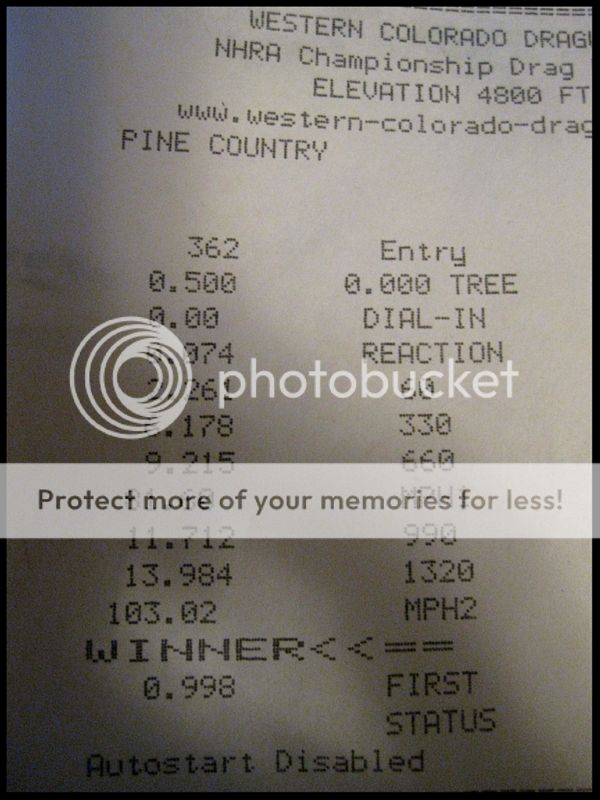
So that is it for now, just mostly waiting for more parts to filter in. I don't really have a deadline, so it's nice being able to build this up slowly and do it right the first time. I'm really hoping I might be able to break 400-450whp at this altitude. If I can't get it with this blower, I may look into going the Novi 1500 route with the high speed bearnings and seals. I know a lot of this might be pretty extreme for a supercharged S, but maybe when the time comes, I may just go the turbo route. I've pretty much got everything needed if I do decide to do that. I really enjoy the feel of the supercharger and hoping that I might be able to keep heat down to enjoy it on a track for a longer duration. I am also a drag racer at heart, so it will definitely see the drag strip. I've only been able to muster a 13.98 @ 103 when it was on 7PSI and a god awful 2.26 60'. lol
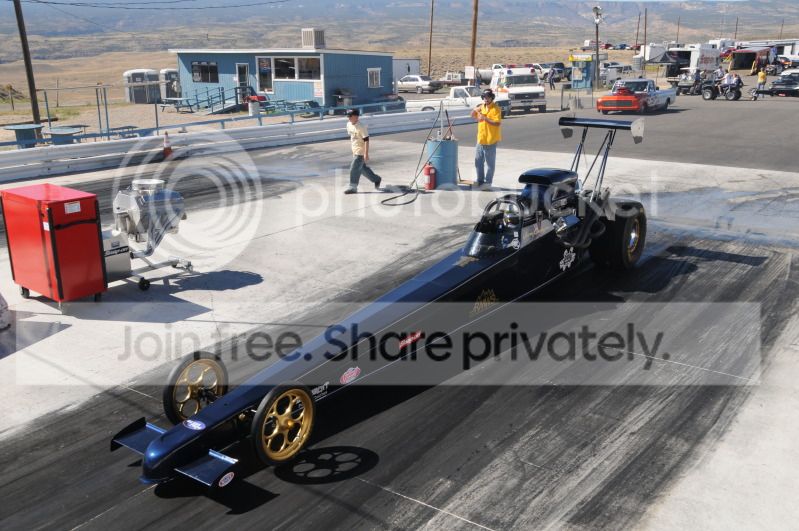
But here's my real drag strip car. lol
Thanks for looking, there's still a lot more to come.


