Coreys Tuck/Shave project
 10-21-2011, 07:42 PM
#1
Registered User
Thread Starter

Join Date: Apr 2010
Location: Gansevoort, NY
Posts: 3,401
Likes: 0
Received 0 Likes
on
0 Posts
Okay, the car has some very bad front tires so it is up for the season, so I figured time to get cracking! About 8 hours into the project have every accessory from the engine bay removed, both wiring harnesses ran through there respective sides from inside the car to the fender area, coolant, fuel, and vacuum lines all removed engine ready to be pulled, all spot welded brackets drilled out and removed, fuse box, ditribution block and inline fuse for the battery are all installed, EPS is in the wiper cowl, ordering a rywire mil-spec harness soon, ABS and cruise will be retained and located in the drivers fender, heater hoses are going in the wiper cowl as soon as the motor is out, this is going to be a VERY long process but figured people might be interested to see how it goes down!


How my fusebox, distro block, and inline fuse are mounted, notice I used the stock grommet with a new hole to run the harness out of! and the fusebox is positioned so that I can just remove the wheel well to change a fuse if I REALLY need to ( but how often does that happen!)also you can see the hole drilled for running the EPS wires into the cowl (still need to buy a grommet for this hole it WILL NOT be left bare!

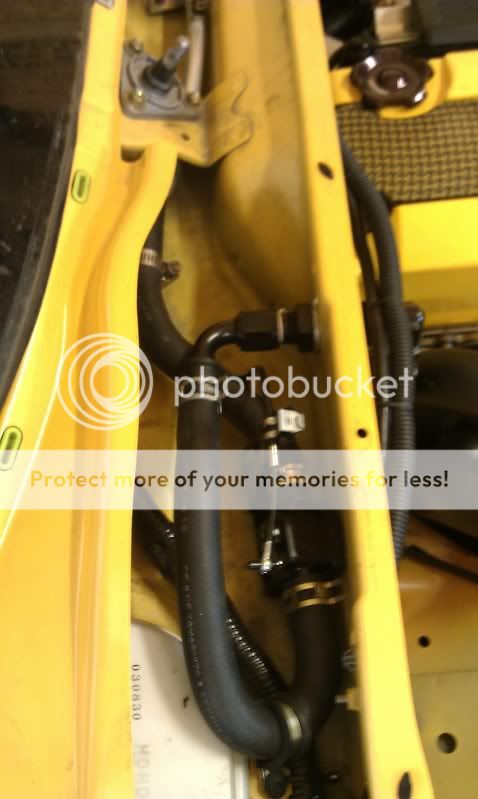
Driver side showing the relocated harness, and the use of the stock grommets again, the upper goes to the wiper motor and to the one wire that plugs into the bottom of the fuse block that holds the EPS fuse, and you can also see the cruise controls new home! That little black wire is the only wire on the driver side that needs to be extended to do this!

This is the entire harness for the secondary air pump (which of course has been deleted and this wiring is staying out)

This shows the one connector that needs to be depinned to remove this harness!

This is the connector that wire USED to go into, basically it supplies power to both the secondary air and EPS, so removing this connector and box wasnt going to happen, just de pin the one wire and you still have EPS power!

EPS in its new home, not bolted down yet cuz I want to see how well this is going to fit with the new heater hoses first (and yes, all those wires need to be extended, not a huge deal IMO

As she sits!
How my fusebox, distro block, and inline fuse are mounted, notice I used the stock grommet with a new hole to run the harness out of! and the fusebox is positioned so that I can just remove the wheel well to change a fuse if I REALLY need to ( but how often does that happen!)also you can see the hole drilled for running the EPS wires into the cowl (still need to buy a grommet for this hole it WILL NOT be left bare!
Driver side showing the relocated harness, and the use of the stock grommets again, the upper goes to the wiper motor and to the one wire that plugs into the bottom of the fuse block that holds the EPS fuse, and you can also see the cruise controls new home! That little black wire is the only wire on the driver side that needs to be extended to do this!
This is the entire harness for the secondary air pump (which of course has been deleted and this wiring is staying out)
This shows the one connector that needs to be depinned to remove this harness!
This is the connector that wire USED to go into, basically it supplies power to both the secondary air and EPS, so removing this connector and box wasnt going to happen, just de pin the one wire and you still have EPS power!
EPS in its new home, not bolted down yet cuz I want to see how well this is going to fit with the new heater hoses first (and yes, all those wires need to be extended, not a huge deal IMO
As she sits!


 10-21-2011, 07:52 PM
#4
Registered User
Thread Starter
Join Date: Apr 2010
Location: Gansevoort, NY
Posts: 3,401
Likes: 0
Received 0 Likes
on
0 Posts
If I had my welder the ABS and EPS fusebox would be mounted too and I could finish re looming/taping the driver harness!! But my buddy has it, AND I ran out electrical tape lol
10-22-2011, 10:28 AM
#5


Stealing my idea with the heater hose? J/K
Here's mine. How do you plan on doing yours? Looks like your EPS will be in the way unless you get crafty
Are you going to pull the dash out, pull the heater core then reroute the hard lines from the core?
Scott-
Here's mine. How do you plan on doing yours? Looks like your EPS will be in the way unless you get crafty
Are you going to pull the dash out, pull the heater core then reroute the hard lines from the core?
Scott-
10-23-2011, 04:45 AM
#6
Registered User
Thread Starter
Join Date: Apr 2010
Location: Gansevoort, NY
Posts: 3,401
Likes: 0
Received 0 Likes
on
0 Posts
Yes, I'm pulling the dash, i remember seeing yours awhile back and that was what sparked my idea, but mine will be a bit more involved only because I have all winter and the motor will be out, I will be using bulkheads to entert the wiper cowll just as you did.. And yea I know something crafty is gonna happen to keep the EPS there but that's why it's not bolted down, thanks for being one of the few who actually posts when they do something custom!

Trending Topics
 10-23-2011, 09:56 AM
#10
Registered User
Thread Starter
Join Date: Apr 2010
Location: Gansevoort, NY
Posts: 3,401
Likes: 0
Received 0 Likes
on
0 Posts
Im relocating EVERYTHING lol, no option of to the side 
WELL, awesome weekend, my sister and her fiance got married and I was the best man! Had a blast, but unfortunately had to neglect the S for a few days, but I came home this morning on about 5 hours of sleep extremely hung over and got to work! Motor is on the ground I just have to go grabe the engine crane to lift the front of the car high enough to slide it out! And also have mounted mocked a few other things!
Enough of my blabber, on to the pics!


ABS Mounted in its new home! Just gotta get some loom and tape to finish my harness and the driver side will be DONE minus brake lines and throttle cable for the cruise!

EPS box and heater control valve mocked in place, I am going to come up with some way to make it all look cleaner, but for now it will work!

Motor down, ready to be carted away!
WELL, awesome weekend, my sister and her fiance got married and I was the best man! Had a blast, but unfortunately had to neglect the S for a few days, but I came home this morning on about 5 hours of sleep extremely hung over and got to work! Motor is on the ground I just have to go grabe the engine crane to lift the front of the car high enough to slide it out! And also have mounted mocked a few other things!
Enough of my blabber, on to the pics!
ABS Mounted in its new home! Just gotta get some loom and tape to finish my harness and the driver side will be DONE minus brake lines and throttle cable for the cruise!
EPS box and heater control valve mocked in place, I am going to come up with some way to make it all look cleaner, but for now it will work!
Motor down, ready to be carted away!