When you click on links to various merchants on this site and make a purchase, this can result in this site earning a commission. Affiliate programs and affiliations include, but are not limited to, the eBay Partner Network.
Phew. This thread has been a long time in the making. If you wish to read this complete from start to finish, be sure you have a few minutes on hand. For those that are new to the forum and may have missed it, my first build was detailed here: Mase Turbo Build. Those already familiar may have noticed that my posts in this forum have slacked over the last 6-8 months. The truth is my car was down probably 9-10 months of 2010. I had a lot of stuff going on like going back to school to start working on my BS degree and buying my first one of these:
2900 sq ft 4br/3.5ba/2.5 car garage
First time homebuying is a painful experience. Add to the fact that it was a short sale, and you if can begin to understand why it took up so much of my time last year.
This rebuild actually started last summer. I was running the Mase kit and had had a lot problems with it and decided it was time to redo it. Let me explain. Here's the hotside of my old Mase kit:
Important details are: BB 6262sp, 2-bolt Tial 38mm (F38) which was recirculated, and the 2.5 inch downpipe. The last tune on that setup netted this:
Not bad, but there are some important details you don't see.
1 - 2 bolt Tial flanged was prone to warping
2 - 38mm does not flow enough to properly control the 6262, especially with it being recirculated. It will creep if your exhaust is free enough flowing.
In fact, the Tial flange warped on me twice. The first time it was resurfaced and put back together and ran fine for about 2 or 3 weeks (can't remember exactly how long). The second time it did it, I'd had enough and had some decisions to make. I no longer wanted to recirculate the dump, and I couldn't run the 6262 on a 38mm. The only options were to go back to a 5857 and replace the wastegate with the 38mm MVS, or redo everything. I figured by the time I finished paying to get the flange changed to a vband, closing the provision on the downpipe for the recirculation, and dealing with getting rid of the 6262, I'd have spent enough to get everything redone the way I really wanted. I want to clarify something for everyone running or considering a Mase kit...this is not to bash Mase or his kit. He makes a great product, but my iteration of it ultimately did not meet my goals.
So, there I was in my (at the time) 1 car garage with a car on jackstands and a turbo kit laying on the floor. When the setup was originally put back together after the first warp incident, my mechanic must've flown superman down to torque everything together because I could separate the wastegate from the manifold to save my life. As a matter of fact, I snapped one the bolts in half attempting to get that damn thing off, which meant that it had to be drilled out just to get the wastegate off. I made a few calls to some friends and decided the best way to go was to have everything custom made locally. Through a recommendation from my tuner, I decided to give the car to Roque Fab & Machine Shop here locally in Tampa (click the link to see some of his work). I'd seen a lot of his work and was impressed. Off she went:
That picture was taken in August of last year, when this all started. That should give you idea of how long this project has been in the works. Once there, me and Roque talked about how I wanted everything done. I brought the old Mase parts with me and together we brainstormed on how the new setup was going to be done. I wanted to keep all the upsides of the Mase setup and improve on all the downsides. Alex said he could do it all, which I was slightly skeptical of at first. That skepticism was later determined to be very unfounded as you will see continuing through this build.
As Roque was looking over the old Mase parts, we found something of important interest:
The manifold was developing a crack on runner one. Also, pay attention to the weld right above the rack, more on this in a bit. We determined it was a stress crack caused by the manifold being the sole supporter of the turbo hanging off to the side, and over time led to this.
Before I continue, let me clarify a few things from the past. Look at this manifold:
Looks like shit doesn't it? Why? Because it has the shittiest thermal coat job ever known to man on it. If you look it the wrong way shit chips off. All those scratches and dents were done during uninstallation. Some of you may remember that I reported that there was a crack in the manifold shortly after I initially installed the Mase kit, but I never confirmed it because it was the power coater that reported it and repaired it. Which leads me back to that weld I mentioned earlier...I can now say with certainty that it indeed did crack and was repaired by them, based on the half ass job done on that weld repair. Mase's welder can weld better than that with his eyes doused in acid.
Even though the thermal coat job was a POS, it was necessary because this and all sidewinder manifolds put off a MASSIVE amount of heat. After the coating, my underhood temps dropped considerably. I still recommend the coating if you can get it done, but make sure it is a quality job that doesn't turn to dust after a few heat cycles like what you see here.
BTW, this is what it looks like without that trash coating on it, post sandblasting:
I will post a for sale thread for these parts soon, with caveats pertaining to all its shortcomings. If you're interested, shoot me a PM.
Now for the actual fabrication. The new setup was spec'd as follows:
- Improve on the unequal length manifold
- Flange the manifold for a 44mm Tial MVR
- Open dump
- 3 inch downpipe vice the 2.5 of the Mase kit
- Brace the manifold
- Relocate NOTHING just like the Mase kit
Tall order, but Roque delivered. The pictures speak for themselves:
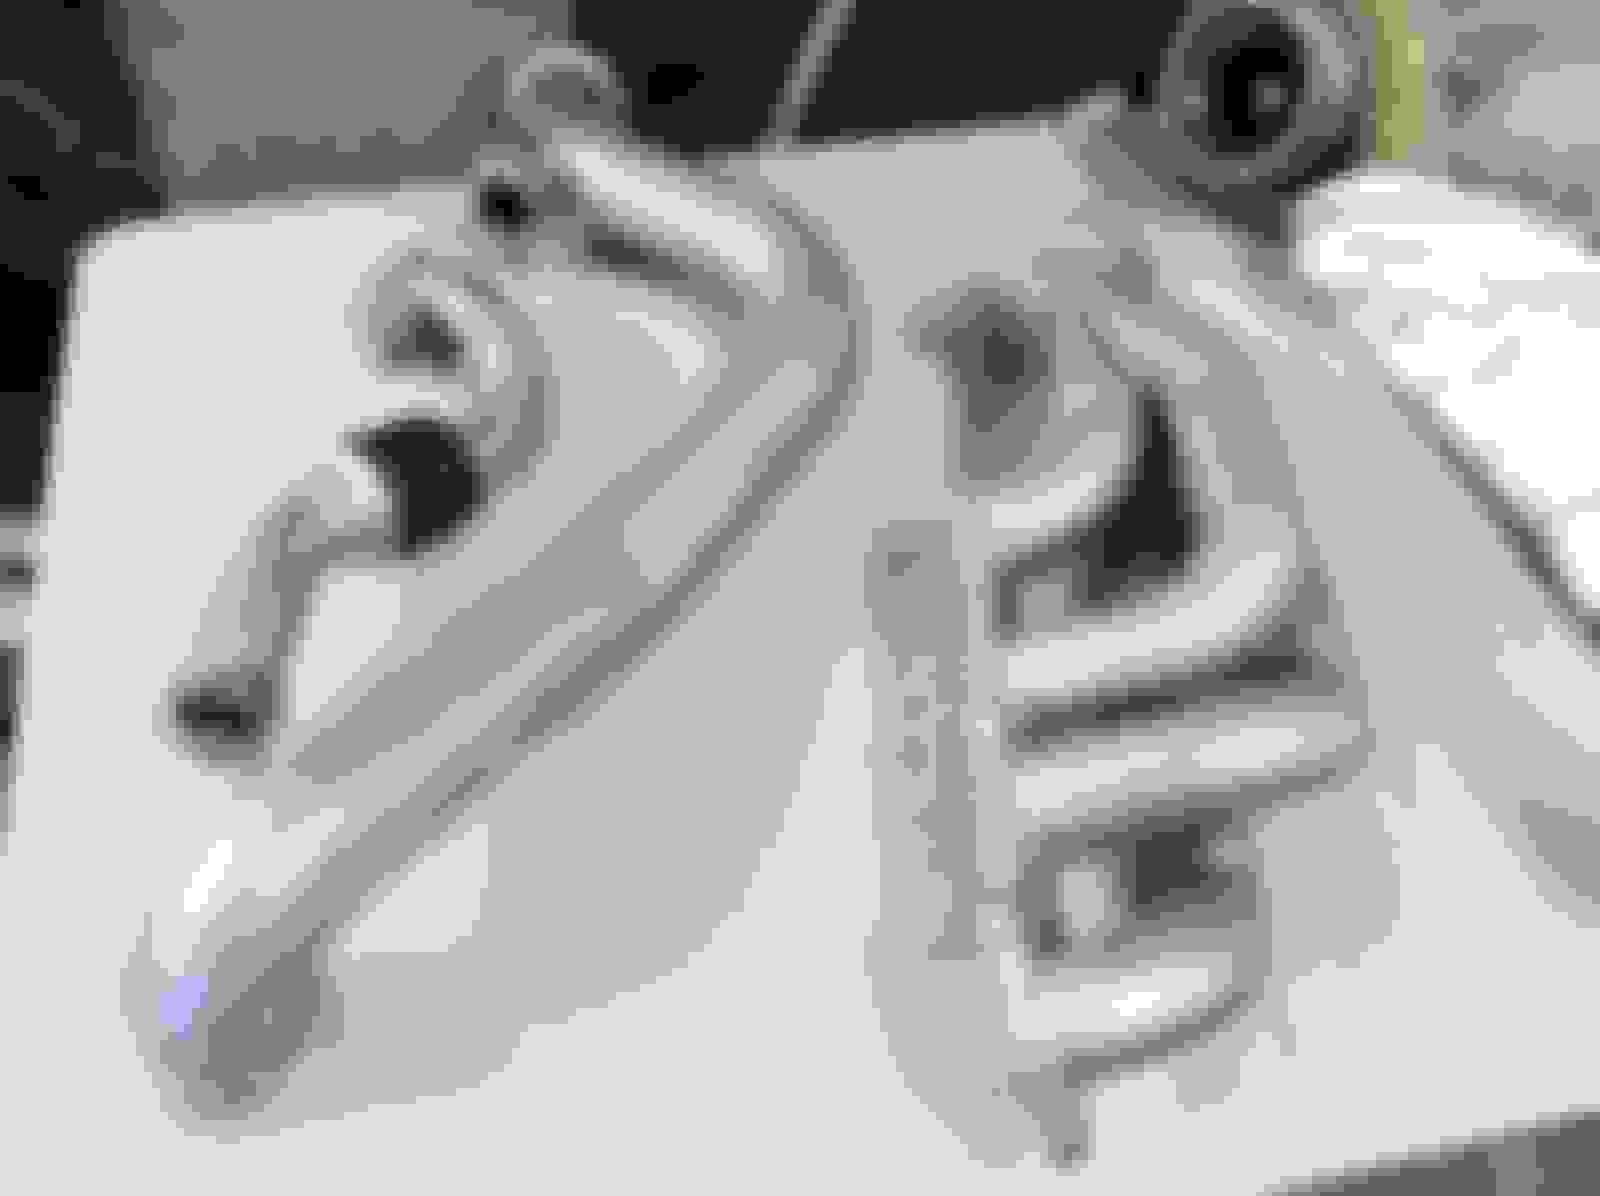
Let's break down some of the differences here. First the downpipe:
The old Mase downpipe started at 2.25 and flared to 2.5 immediately after the 90 degree turn all the way to the factory cat position. The new downpipe starts a 2.75 and flares to 3 inches where it mates with my 3 inch cat back exhaust. Comparison between the two:
Next is the wastegate. No longer a 2 bolt recirculated affair, it is now an open dump 44mm vband flowgasm:
Lastly, the manifold itself:
On the car during fabrication:
Of course, I needed to get all this thermal coated. Went to a different shop and ended up with a much better, ceramic coated thermal coat.
Before:
After (BLING!):
Pretty stuff no doubt, but still somethings needed to be addressed. We needed to brace this thing to stop it from cracking. Right around the time all this was being fabbed, 1SlowSi was getting his setup done which was very similar. I noticed he had braced his manifold and wanted to duplicate that as much as possible. Take a look at this:
On the bottom on runner 4 you can see a provision for a bolt. This was the spot where we chose to support the manifold (which is under the most stress caused by the weight of the turbo) on the motor mount with this one off hardware:
Its hard to get jist of how it works but basically the bolt at the end has some sort of heim opening attached to it which connects a rod upwards toward the manifold where it joins with the bolt hole from the previous picture. I will get a picture of this with it all installed on it soon and update this. We've had no problems with it so far.
Completed pics:
Everything fit perfectly, only a slight modification needed to be made to the existing charge piping off of hotside of the turbo. At this point you'd think everything was golden and I'd be home free. Unfortunately that wasn't the case.
On the test drive the night I got the car back, I could hear a distinct rattling coming from the motor on deceleration. We quickly discovered that the dumptube was vibrating against the subframe when the motor torqued forward. In my haste to drive a car I hadn't drove in 3-4 months, I drove it home anyway and planned to bring it back that next week to let Roque fix it. That was on Friday. I drove it on Sat and Sun, drove it to work on Monday and went straight to his shop afterwards. Roque rotated the dump away from the subframe and the vibration went away. On the way home from his shop, this happened:
Yea. Just those three days of driving it around was enough to weaken the weld and cause it. The car sat for about a week or two (this was around the Thanksgiving holiday) and when I had time I had the car towed back to Roque for the repair which he fixed at no charge. The car was down for an additional 2-3 weeks for the repair and also because we had to wait for powdercoater to redo the thermal coat. (Note: any manifold that has to be rewelded has to be sandblasted clean around the repair area to ensure a good weld). Everything was completed and the car put back together. I took the car back, again on a Friday. Drove it to Orlando and back for a dyno day/meet, then attempted to again that following Monday. That morning, I started her up and her what sounded like a loud metallic hiss followed by a change in exhaust tone. What could it be? I'll give you a hint, it was the goddamn wastegate elbow again:
This time, the failure occurred right at the base of the wastegate elbow where it meets the manifold. Again, I was bummed. Seemed like I couldn't win for losing. By now its Christmas, and I don't have time to screw around with this thing. I waited until after New Years, and discussed the problem with Roque. Luckily, 1SlowSi, having a very similar build had run into the exact same problem previously and remedied it by reinforcing that area with additional bracing between the manifold runner and and elbow. Confident that the repair worked for him, we decided to do the exact same thing here:
It hasn't, and shouldn't break again lol.
With that issue finally taken care of, it was time for a retune. Setup is still the same minus the new hotside.
- Stock motor, stock HG, etc
- ID 1000's
- Single Walbro
- KPro
My tuner is on the the board as "InductionPerformance" aka Alpha. Great tuner, highly recommend him if you're close to the Southeast region.
This was ~ 16psi. As good as Alpha is, for some reason he thought I had an AP2 and left the limiter @ 8600rpm lol. Dynomite dyno's do a rpm sync between the rollers and the car and we couldn't get it quite right so that torque figure is off by 10-15lb feet.
Now, me being me...I like to validate my numbers. So the following Saturday I drove down to Sarasota for a dyno day and put her on another dyno. Dynocom this time.
The first pull she hit boost cut so I turned it down to 14.5psi and we were able to make some clean pulls. This is with 9000rpm and the velocity stack vs the K&N filter.
With all this newfound power there was only one place left to go, the drag strip. This past Thursday I went down to our local 1/4 mile for test & tune night and got about 10-12 runs in. Alpha met me there and before the last 3 passes we setup the 2 step to give me about 5 psi off the line. My second to the last pass was the fastest of the night - 12.4 @ 118 with a 2.0 60ft. Street tires. On my last pass, something unfathomable happened. Go ahead and guess....
Let me caveat this. Like I said this was my 11th or 12th pass of the night, 2nd or 3rd coming off the 2 step. Up until that point I had either bogged and left, or spun and left and had no issues with the diff. In addition to the regular street cars that were running that night, there were also 3-4 full blown 7 & 8 second race cars making some passes. The track techs were keeping the track well prepped for them. So picture this: I'm in the staging lanes waiting on the prep work to be done. The techs dust down the lanes and respray VHT at the small end of the track. A turbo Mustang (easily 8 sec car), goes first in the left lane bogging off the line before getting out of the hole. The car immediately before me is a 3rd Gen Poopra that went 12 flat due to some issues with the AEM, supposed to be a high 10 sec car. He steps up to the line, same lane, lets out the clutch and snaps the driveshaft. So I'm next. This was to be my last or second to the last pass before calling it a night, so I wanted to get it on video. The other lane's display board was broken so I wanted to get my passes in the left lane so the times would show on video (you know, for the skeptics). Alpha and the team push the Poopra off the track, he walks up to me and says "the track is biting HARD so make sure you launch hard". Just thinking about this makes me laugh. I figured a good burnout and staying on the 2 step to make sure I came out on some boost would be enough...which in fact it was. Turns out, too much.
[media]http://www.youtube.com/watch?v=b8is6h1Fvwk [/media]&hd=1
If you listen closely, you can hear the wheel hop which brought her to her knees. I didn't let out of it when it started hopping, and it was just too much for the poor diff to handle. Drove it there, but left the track @ 2am like this:
I think my car has spent more time on flatbeds than it has in my garage.
So thats where we're at today. The damage? haha take a look at these:
I also broke one of the diff mounts.
Being that the car has 82k on it and I've never had a problem with the diff prior to my retarded user error, I'm going to stick with OEM diff. Lucky for me, PuddyMod is local to me and is already in possession of the diff. He is working on securing a set of 3.91 gears before putting it back together as we speak. She should be back on the road late next week hopefully.
I think that's it. I hope you've enjoyed the writeup. For those that have been wondering where I've been and what I've been up to, hopefully this thread answers your questions. Its been a labor of love to get it to this point and I've been looking at z06's more and more lately but I've managed to stick with it so far. You might think I'm disappointed to go all this just to break the diff within 2 weeks of it running again. I'm not at all. I enjoyed every minute of my time on the track and can't wait to go back. Probably won't do street tires again though lol. Project cars like these take a lot of time, money and patience to get right. I knew what I was getting into the moment I went boost and I'm not about to start crying about it now.
Future plans:
- Get a working diff
- Direct wire the walbro
- Tune on c16
- Get some slicks
- Run 11's.
Wow man you couldn't catch a break. I probably would have thrown in the towel long ago but it's nice to see you're a determined individual. Good luck with your build.
Love reading the build. I know I have experienced a bunch of drama and nonsense with my builds, its interesting to see it all layed out as you have hear.
Its all in good fun though and for me at least, worth it.
Dude holy crap that was painful to read. Wow. You've been through so many headaches getting this right... Looks like the motor is pulling strong now though. Keep us posted on your track times - it'd be great to see how you do.
 01-23-2011, 01:59 PM