My "build thread" for my new toy .... Honda S2000
 01-15-2011, 08:07 PM
#1
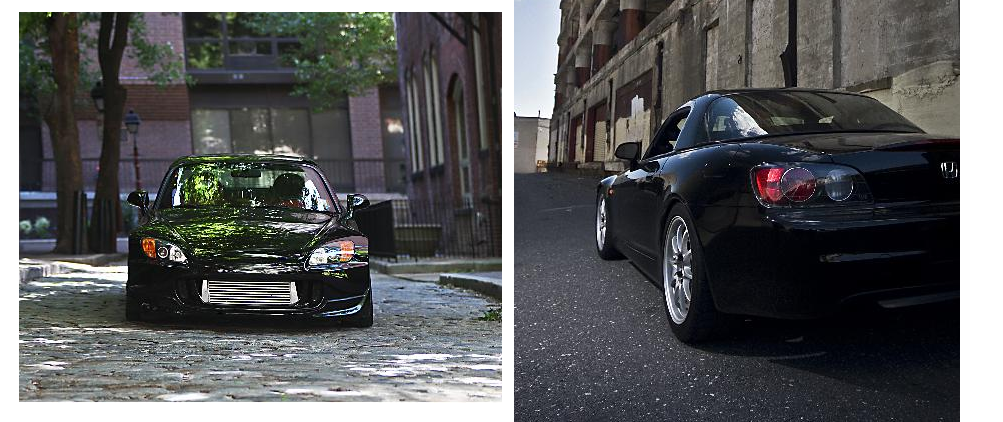
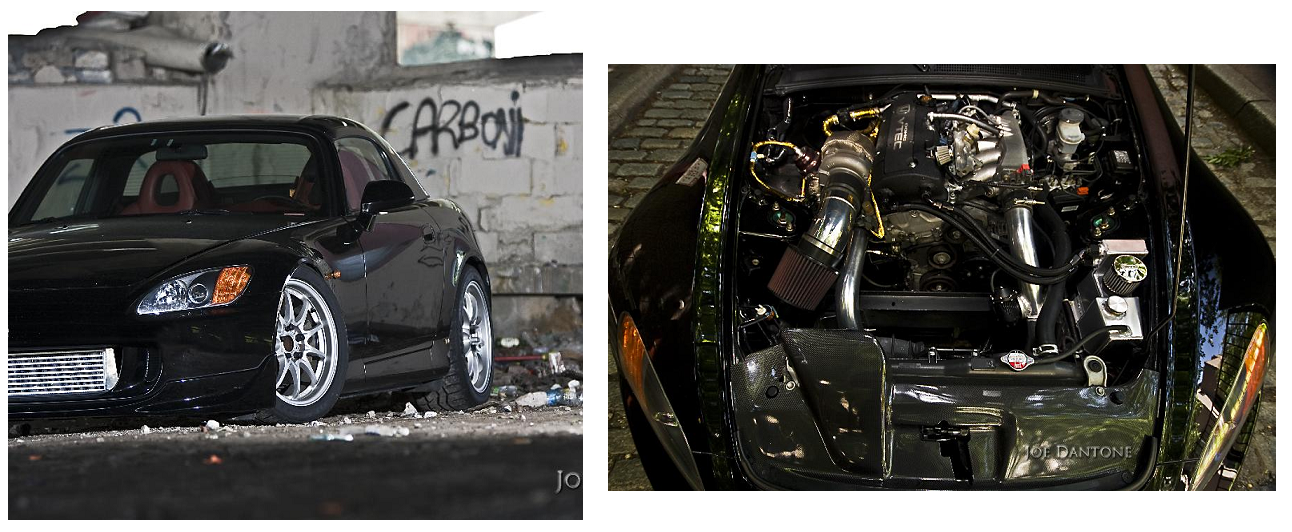
Wassup fellas , my name is Billy and I recently purchased this beautiful and well built S2000 from a fellow forum member ( madJDM ). I know it's frowned upon when a car is "bought and not built" but this car is done to almost exactly how I want it and in the end, I am saving money and most importantly, a lot of TIME and you guys with the intensive builds know what I am talking about. The most important thing that I have to keep in mind while modding this car is to keep it practical but also show worthy.
Below is the mod list when I purchased the car :
POWERTRAIN:
Original F20c1 61,XXX Miles, Under 2,000 on Turbo setup/Head gasket/Retainers
Jeff Evans Tuned, 490 rwhp/340tq on 93 Octane
Garrett GT3076r .82 W/ TiAL V-Band Housing, 90 Degree welded Elbow
TiAL 44 mm V-Band WG (7 PSI Spring)
PFAB Equal Length V-Band Manifold
PFAB 3" V-Band Downpipe
PFAB V-Band Dump tube
ACT Street Disc/Heavy Duty PP w/ OEM TOB and Fluids
PFAB Intercooler Piping
PFAB Stage 2 Intercooler
PFAB Intake Pipe
HKS SSQ BOV Matte
Walbro 255
Ti Heat wrap, Blanket & Gold Reflective Sheet
ARP Manifold Studs
Custom twin resonated single 3" turbo back exhaust
IP EGR block off
Bosch Injector Dynamics 1000cc W/ Clips
New OEM Head bolts
AP2 Retainers
New OEM Valve Seals
IP 3mm Head gasket
ATP Stainless Steel Oil/Coolant lines
Custom powder coated valve cover with (2) -10 AN bungs
BRM Stainless Catch Can/Water Over flow with Black AN Fittings
ELECTRONICS:
AEM EMS (U-series)
AEM Serial Gauge x2
AEM Boost Control Solenoid
Concealed Hi/Low Boost Toggle Switch (10/18psi)
SOS 3 Bar Map
SOS Pillar Pod
Battery Relocation Kit (Fused, In trunk Yellow Top Optima)
SUSPENSION/WHEELS:
TEIN Flex coilovers
Volk Racing ce28n Ti Silver
17 x 7.5 + 50, 17 x 9 + 63
Falken Azenis Rubber 225/255 (Less than 2000 miles)
UK Spec alignment performed by RT Tuning
BODY:
AP2 Front Bumper (Shaved emblem)
AP2 Front Lip
OEM Hardtop
MODIFICATIONS:
Deleted Soft top
Battery Relocation (Trunk)
Fuse box Relocation (Fender)
AC Removal
Air Pump removal
Supra PCV
.
.
.
.
.
.
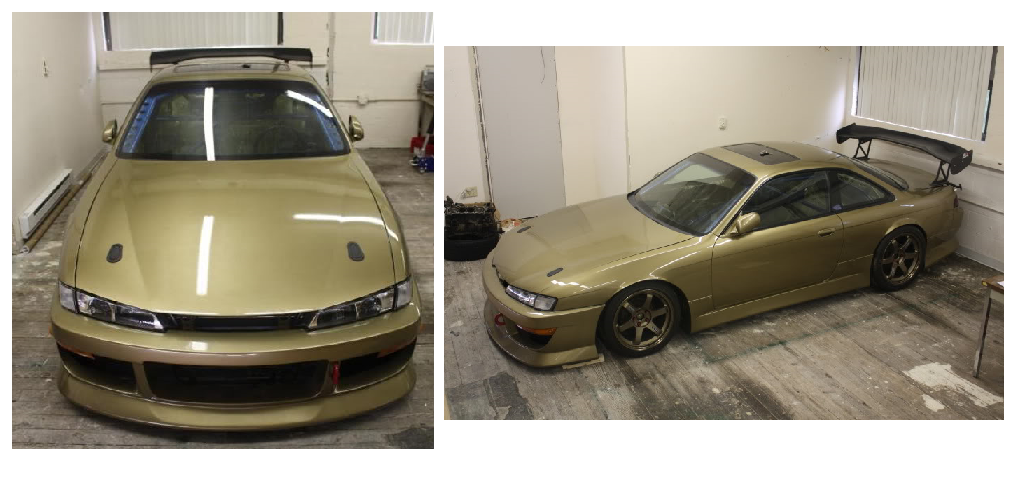
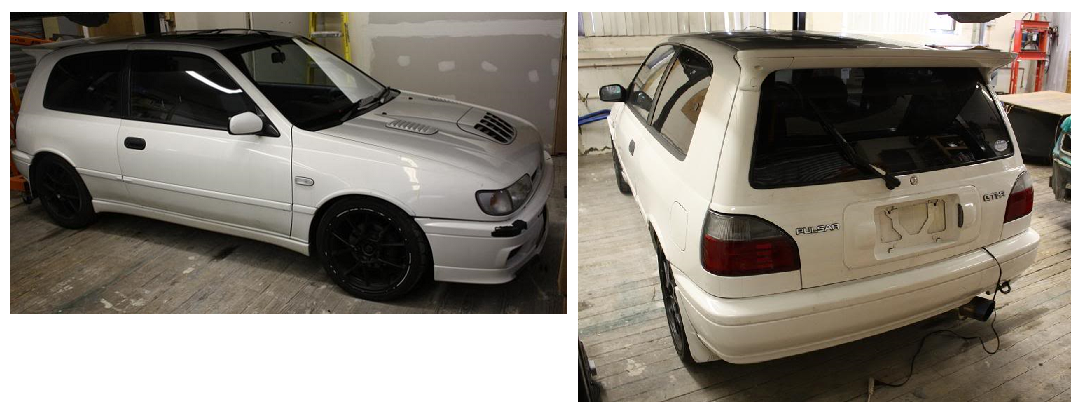
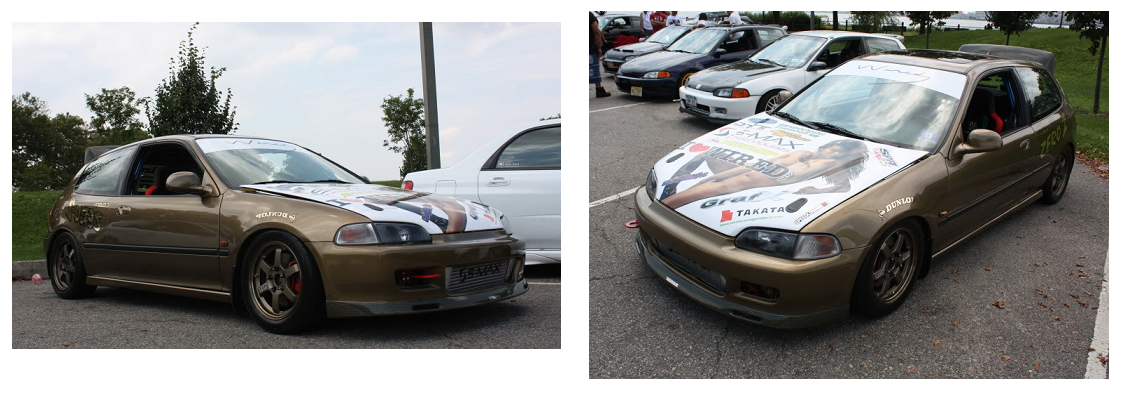
And below are pictures of cars that I previously had and were built from scratch ......

.
.
.
.
.
.
.
First order of business is the suspension work. I am a big fan of CUSCO and I've had their product on all my projects but I've been hearing good things about the Buddy Club Race Spec from the S2000 crowd and decided to give them a try. The biggest thing that I fear about with driving a lowered car is bottoming out or smashing something with my front bumper so I've been searching for a solution. A couple of years ago, I heard about a product that Top Secret Japan was using called the ROBERUTA cup kit. It allowed you to be able to raise your vehicle at the flick of a button without sacrificing your ride quality and performance of your coilovers. But the problem was that it was crazy expensive, long waiting time, specific vehicle application, specific coilover application , crazy shipping price and crazy expensive. Did I mention crazy expensive ???
Then recently I found a company called Umbrella Auto Design. It was the same concept as the Roberuta cup kit but I hear that their technology & quality is more advance and most importantly, they were located in the USA which meant customer support a phone call away. So I called Ravi from U.A.D. and put my order in for a set of cup kits front and rear to match up with my Buddy Club Race Spec coilovers. I should be getting them back into my hands within 1-2 weeks. Below is a video of their product in action .....
YouTube - Variable Ride Height (VRH) suspension lift system by Umbrella Auto Design

Below is the mod list when I purchased the car :
POWERTRAIN:
Original F20c1 61,XXX Miles, Under 2,000 on Turbo setup/Head gasket/Retainers
Jeff Evans Tuned, 490 rwhp/340tq on 93 Octane
Garrett GT3076r .82 W/ TiAL V-Band Housing, 90 Degree welded Elbow
TiAL 44 mm V-Band WG (7 PSI Spring)
PFAB Equal Length V-Band Manifold
PFAB 3" V-Band Downpipe
PFAB V-Band Dump tube
ACT Street Disc/Heavy Duty PP w/ OEM TOB and Fluids
PFAB Intercooler Piping
PFAB Stage 2 Intercooler
PFAB Intake Pipe
HKS SSQ BOV Matte
Walbro 255
Ti Heat wrap, Blanket & Gold Reflective Sheet
ARP Manifold Studs
Custom twin resonated single 3" turbo back exhaust
IP EGR block off
Bosch Injector Dynamics 1000cc W/ Clips
New OEM Head bolts
AP2 Retainers
New OEM Valve Seals
IP 3mm Head gasket
ATP Stainless Steel Oil/Coolant lines
Custom powder coated valve cover with (2) -10 AN bungs
BRM Stainless Catch Can/Water Over flow with Black AN Fittings
ELECTRONICS:
AEM EMS (U-series)
AEM Serial Gauge x2
AEM Boost Control Solenoid
Concealed Hi/Low Boost Toggle Switch (10/18psi)
SOS 3 Bar Map
SOS Pillar Pod
Battery Relocation Kit (Fused, In trunk Yellow Top Optima)
SUSPENSION/WHEELS:
TEIN Flex coilovers
Volk Racing ce28n Ti Silver
17 x 7.5 + 50, 17 x 9 + 63
Falken Azenis Rubber 225/255 (Less than 2000 miles)
UK Spec alignment performed by RT Tuning
BODY:
AP2 Front Bumper (Shaved emblem)
AP2 Front Lip
OEM Hardtop
MODIFICATIONS:
Deleted Soft top
Battery Relocation (Trunk)
Fuse box Relocation (Fender)
AC Removal
Air Pump removal
Supra PCV
.
.
.
.
.
.
And below are pictures of cars that I previously had and were built from scratch ......
.
.
.
.
.
.
.
First order of business is the suspension work. I am a big fan of CUSCO and I've had their product on all my projects but I've been hearing good things about the Buddy Club Race Spec from the S2000 crowd and decided to give them a try. The biggest thing that I fear about with driving a lowered car is bottoming out or smashing something with my front bumper so I've been searching for a solution. A couple of years ago, I heard about a product that Top Secret Japan was using called the ROBERUTA cup kit. It allowed you to be able to raise your vehicle at the flick of a button without sacrificing your ride quality and performance of your coilovers. But the problem was that it was crazy expensive, long waiting time, specific vehicle application, specific coilover application , crazy shipping price and crazy expensive. Did I mention crazy expensive ???
Then recently I found a company called Umbrella Auto Design. It was the same concept as the Roberuta cup kit but I hear that their technology & quality is more advance and most importantly, they were located in the USA which meant customer support a phone call away. So I called Ravi from U.A.D. and put my order in for a set of cup kits front and rear to match up with my Buddy Club Race Spec coilovers. I should be getting them back into my hands within 1-2 weeks. Below is a video of their product in action .....
YouTube - Variable Ride Height (VRH) suspension lift system by Umbrella Auto Design
 01-15-2011, 08:08 PM
#2
January 21, 2011
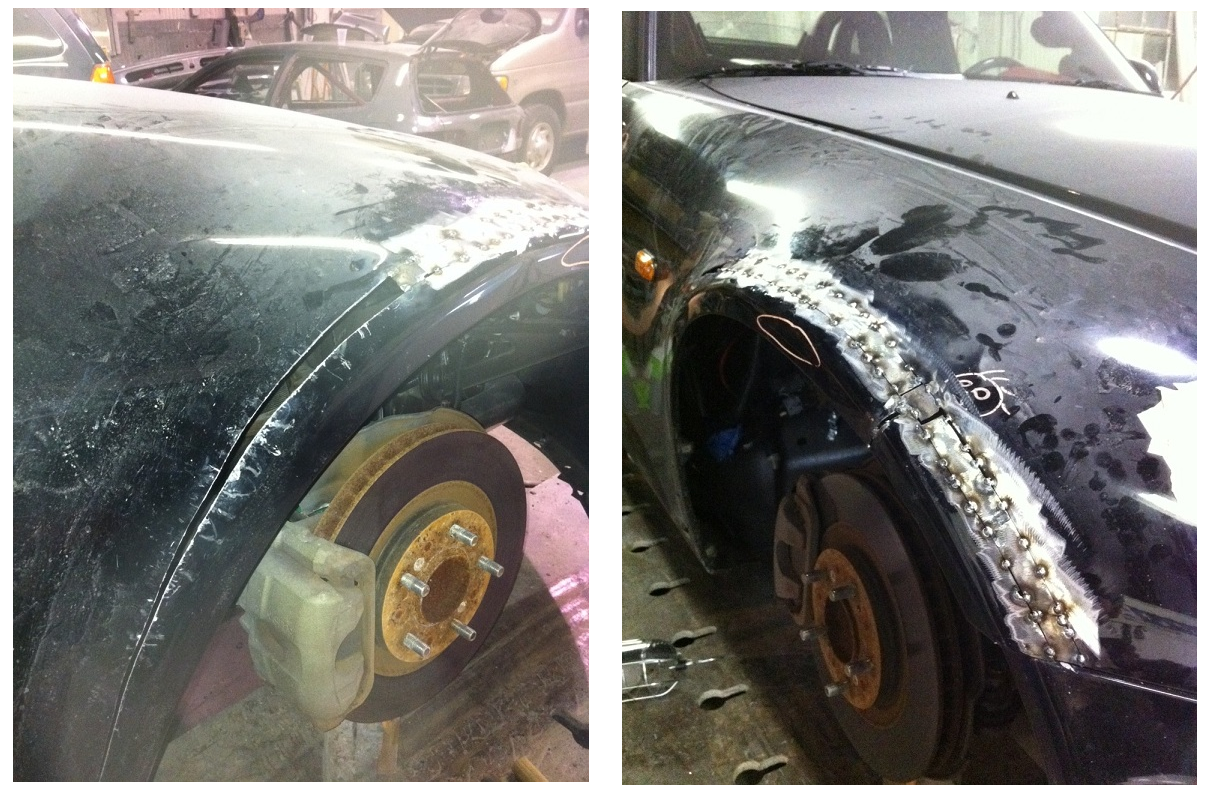
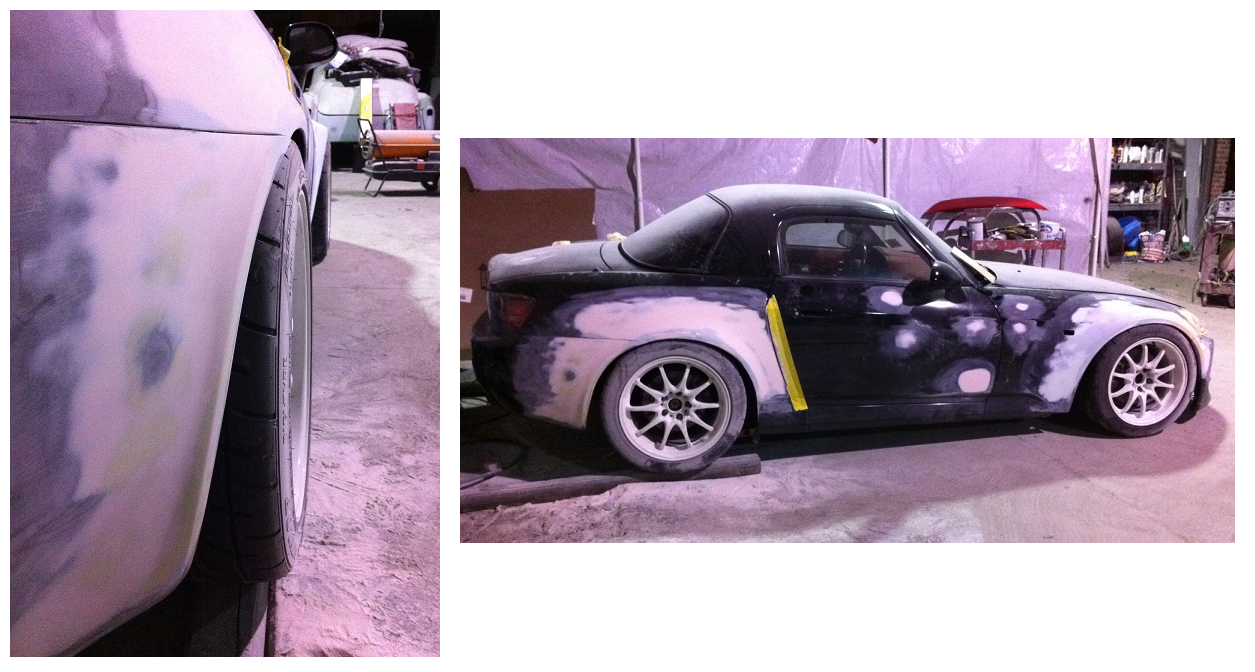
Some updates on the S2000. My body guy called me up and told me that he has some time to squeeze me in to get some work done. At first, I just wanted to get the small little dings on the car repaired. But I also would like to run wider wheels/tires in the near future and my two options was to either do a roll/pull/flare to the stock fenders and quarter panel OR purchase FPR or CF rear over fenders and wider front fenders but both of those options could end up ugly with cracked parts which was very likely. Then I thought since I was doing that, I might as well do a whole color change ( Lambo Telesto Gray ) but I had to stop and remind myself, "KEEP THE CAR PRACTICAL !" So after about a couple hours of pondering, I decided to keep the OEM look but still be able to accommodate a wider wheel/tire setup. And below are pictures of what we ended up doing .......
( I wanted to get a picture when the sheet metal was tacked on because you were able to see the added piece and where the cut was made. I will try to get a picture when he does the other side of the car )
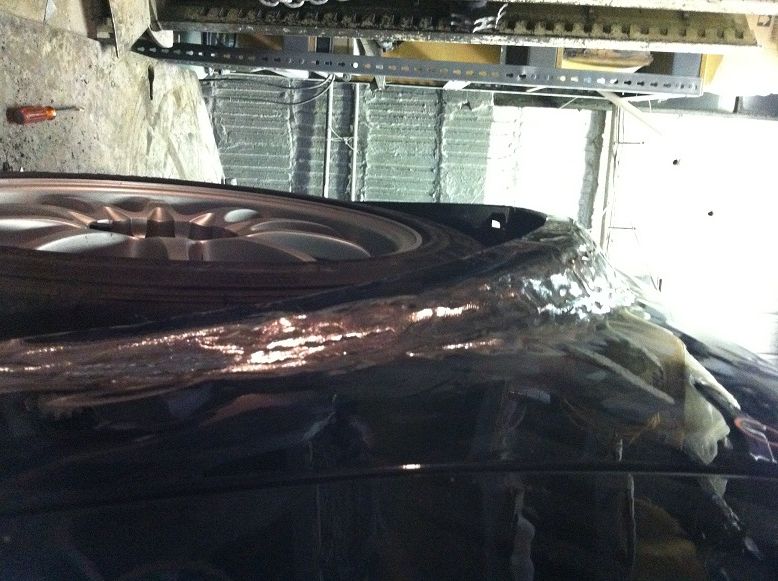
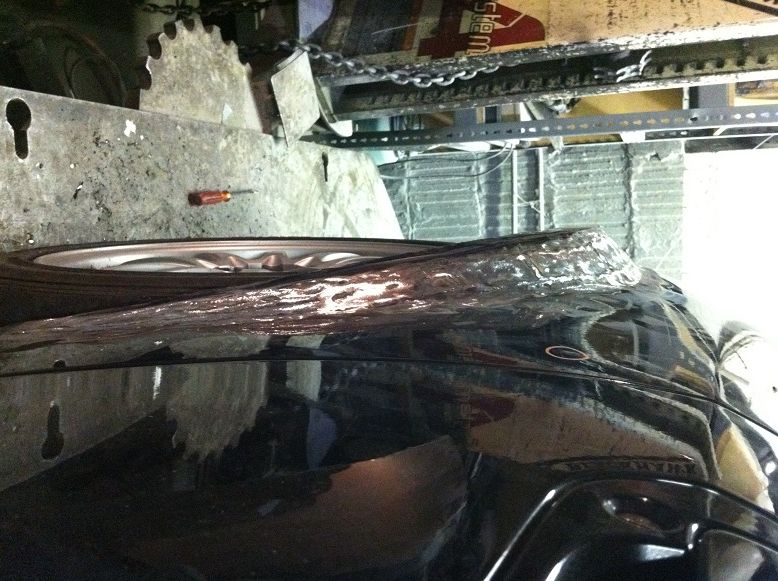
The game plan :
1) fold up/roll the inner edge of front fenders and quarter panels
2) add 1" sheet metal to the front fenders ( sheet metal shaped like a long slender moon to maintain the OEM look )
3) add 1.5" sheet metal to the rear quarter panels
4) widened stock bumpers to mate up with wider fenders and quarter panels
4) add sheet metal to the underside of the newly added sheet metal
5) apply sealent where needed
6) rhino line wheel wells & paint black
7) body work and paint
As far as wheel and tire setup, I went with 17 x 9.5 +28 Volk CE28N / Dunlop Direzza Sport Z1 Star Spec 255/40-17. I will get pictures of them as soon as they arrive.
I was able to convince the two guys that are working on the car to take a picture with the S.
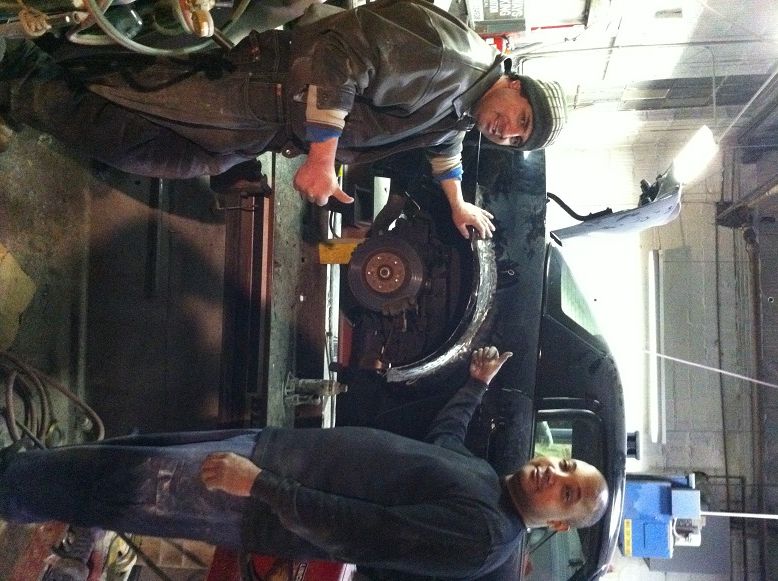
And here's a picture of them game planning the front fenders.
Some updates on the S2000. My body guy called me up and told me that he has some time to squeeze me in to get some work done. At first, I just wanted to get the small little dings on the car repaired. But I also would like to run wider wheels/tires in the near future and my two options was to either do a roll/pull/flare to the stock fenders and quarter panel OR purchase FPR or CF rear over fenders and wider front fenders but both of those options could end up ugly with cracked parts which was very likely. Then I thought since I was doing that, I might as well do a whole color change ( Lambo Telesto Gray ) but I had to stop and remind myself, "KEEP THE CAR PRACTICAL !" So after about a couple hours of pondering, I decided to keep the OEM look but still be able to accommodate a wider wheel/tire setup. And below are pictures of what we ended up doing .......
( I wanted to get a picture when the sheet metal was tacked on because you were able to see the added piece and where the cut was made. I will try to get a picture when he does the other side of the car )
The game plan :
1) fold up/roll the inner edge of front fenders and quarter panels
2) add 1" sheet metal to the front fenders ( sheet metal shaped like a long slender moon to maintain the OEM look )
3) add 1.5" sheet metal to the rear quarter panels
4) widened stock bumpers to mate up with wider fenders and quarter panels
4) add sheet metal to the underside of the newly added sheet metal
5) apply sealent where needed
6) rhino line wheel wells & paint black
7) body work and paint
As far as wheel and tire setup, I went with 17 x 9.5 +28 Volk CE28N / Dunlop Direzza Sport Z1 Star Spec 255/40-17. I will get pictures of them as soon as they arrive.
I was able to convince the two guys that are working on the car to take a picture with the S.
And here's a picture of them game planning the front fenders.
01-15-2011, 08:08 PM
#3
January 22, 2011
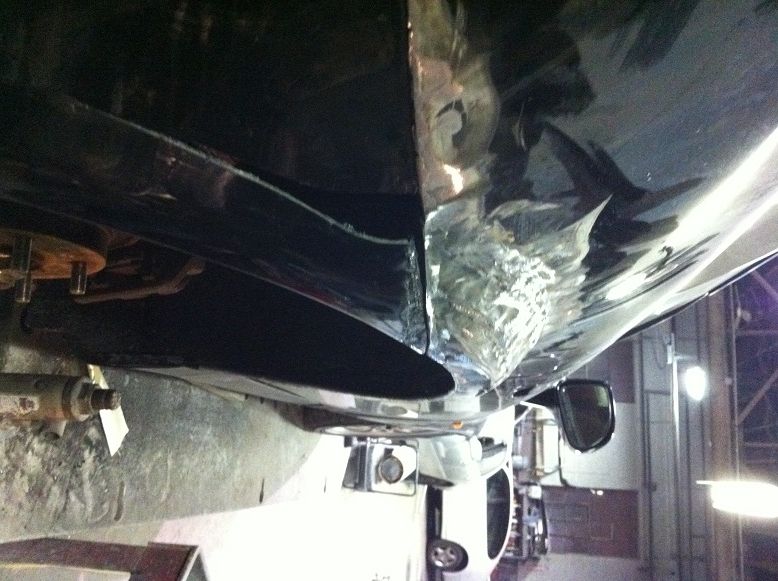
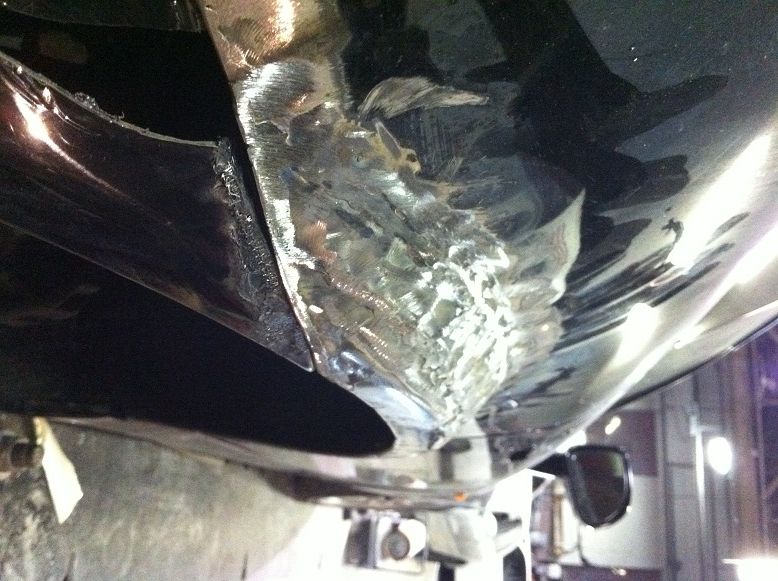
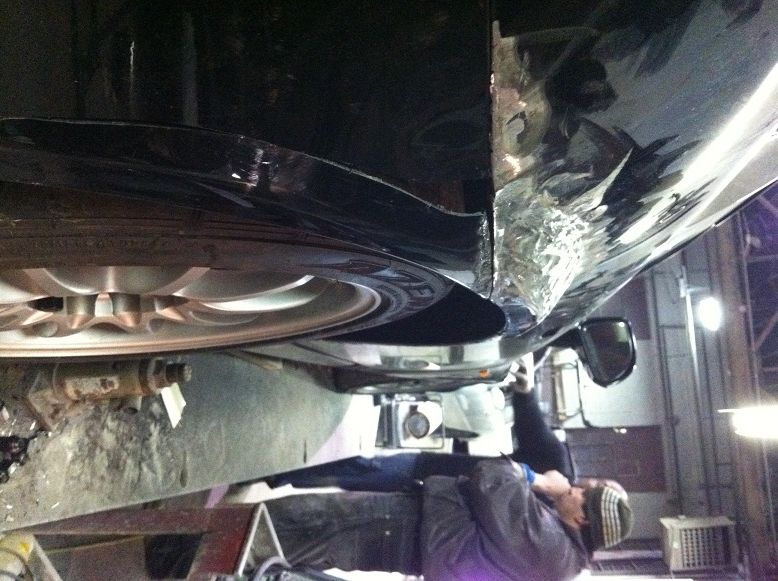
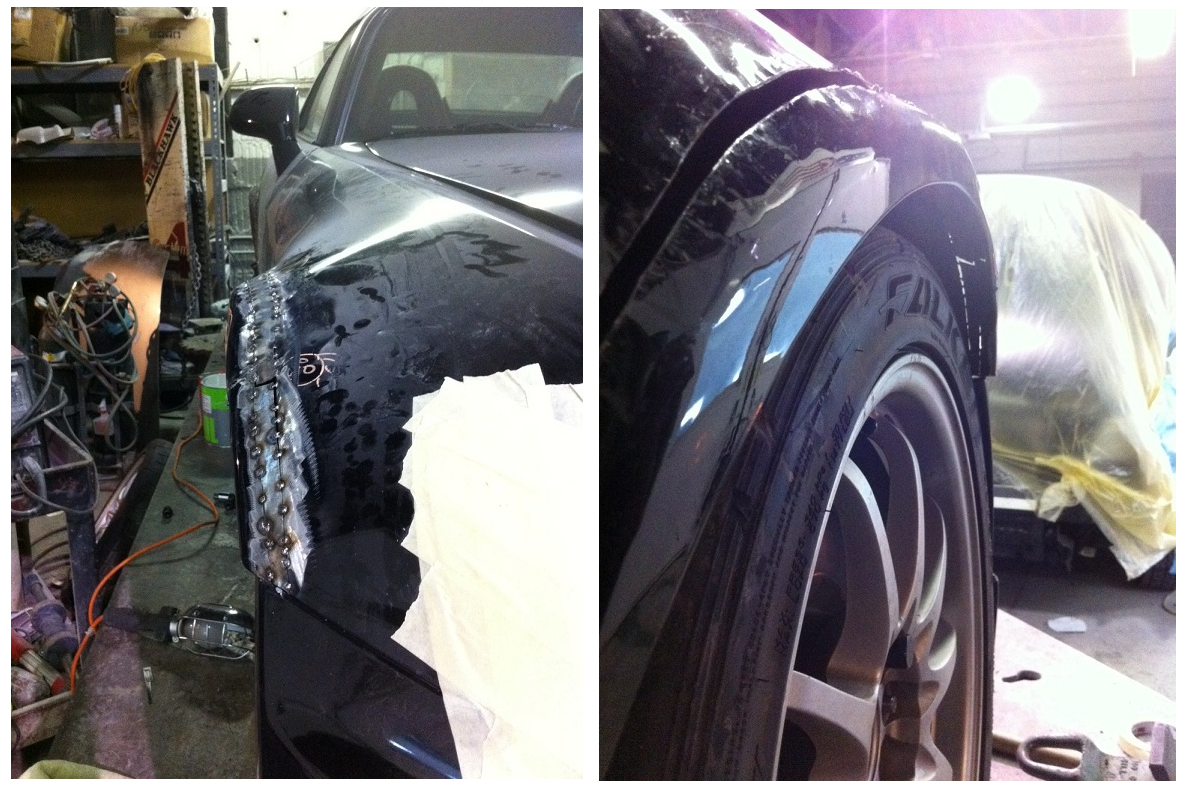
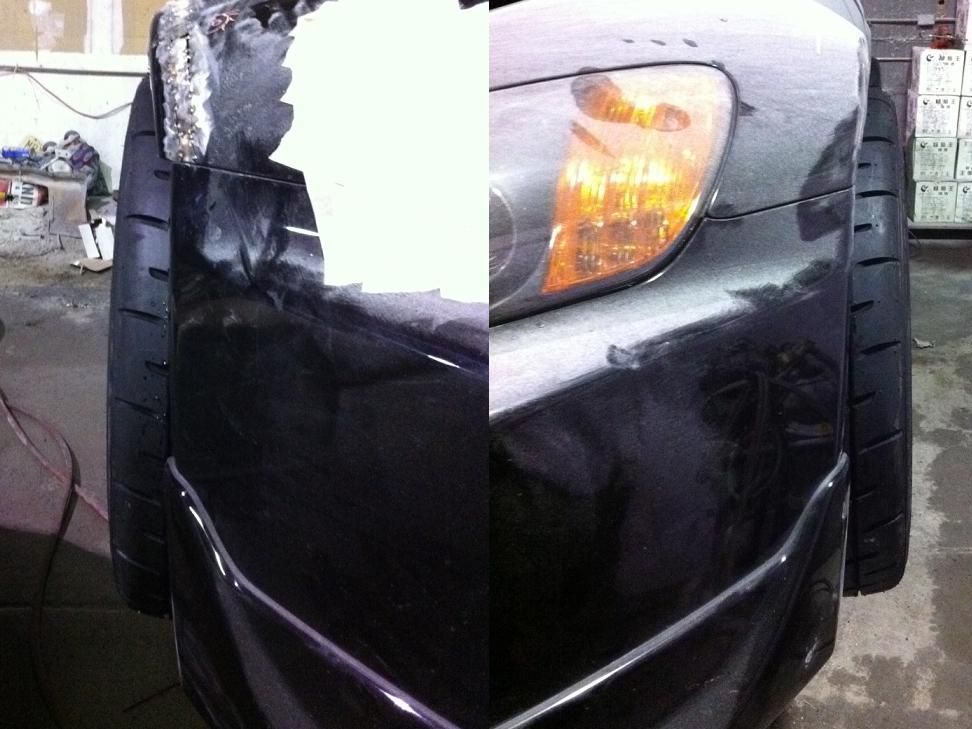
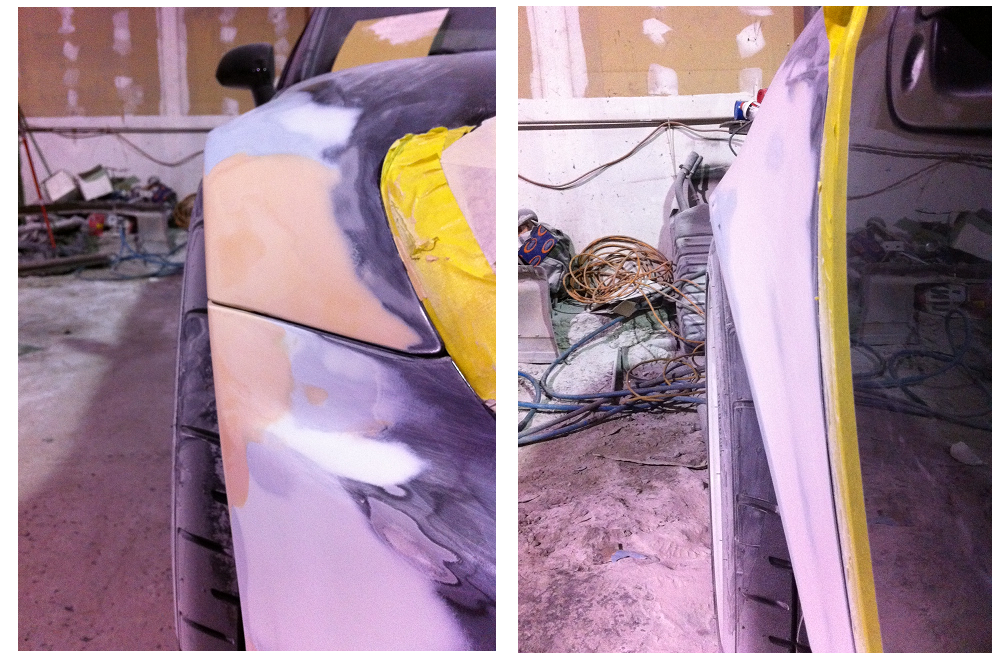
Passenger side rear quarter panel is finished with fabrication and next for it is some bodywork. ( they finished off the fabrication with plastic welding the added section in the rear bumper to match with the widen rear quarter panel ) It's hard to see since the car is black but the OEM bend and lines are still there.

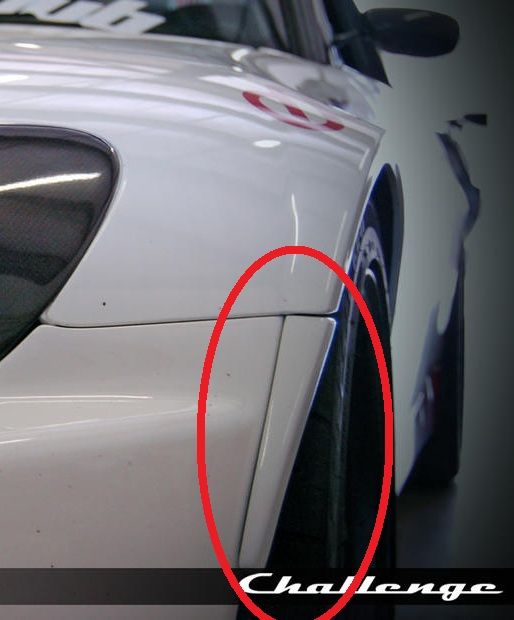
And then they started on the front passenger fender . Also for the front bumper, they decided not to cut the bumper and expand it since it gets the most contact which will cause stress cracks.
So to accommodate the widen fender, they will do some bodywork to the front bumper to match up the body lines.
Something like this piece below but it will be molded instead of an add-on piece.
.
.
.
.
.
.
.
.
.
JANUARY 26TH, 2011
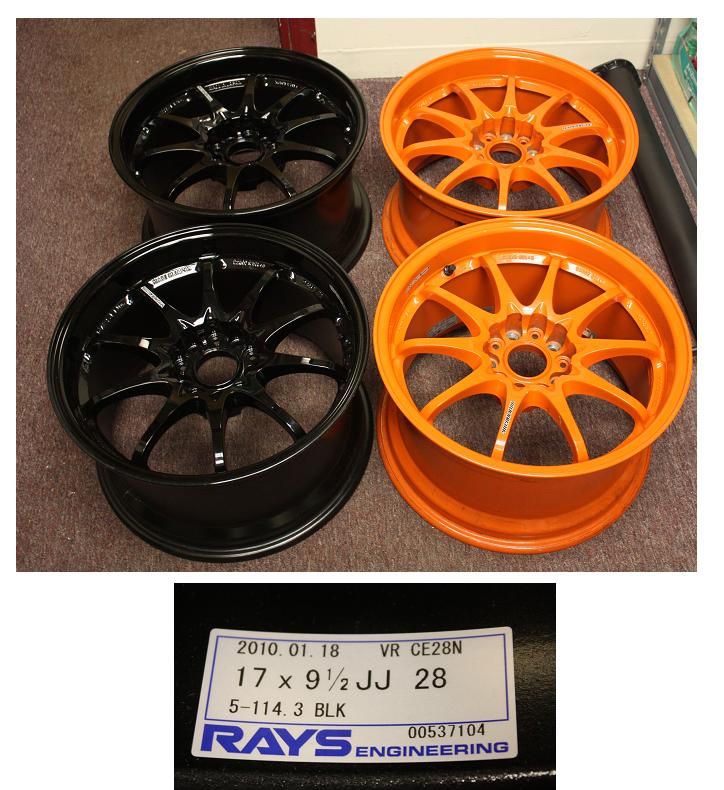
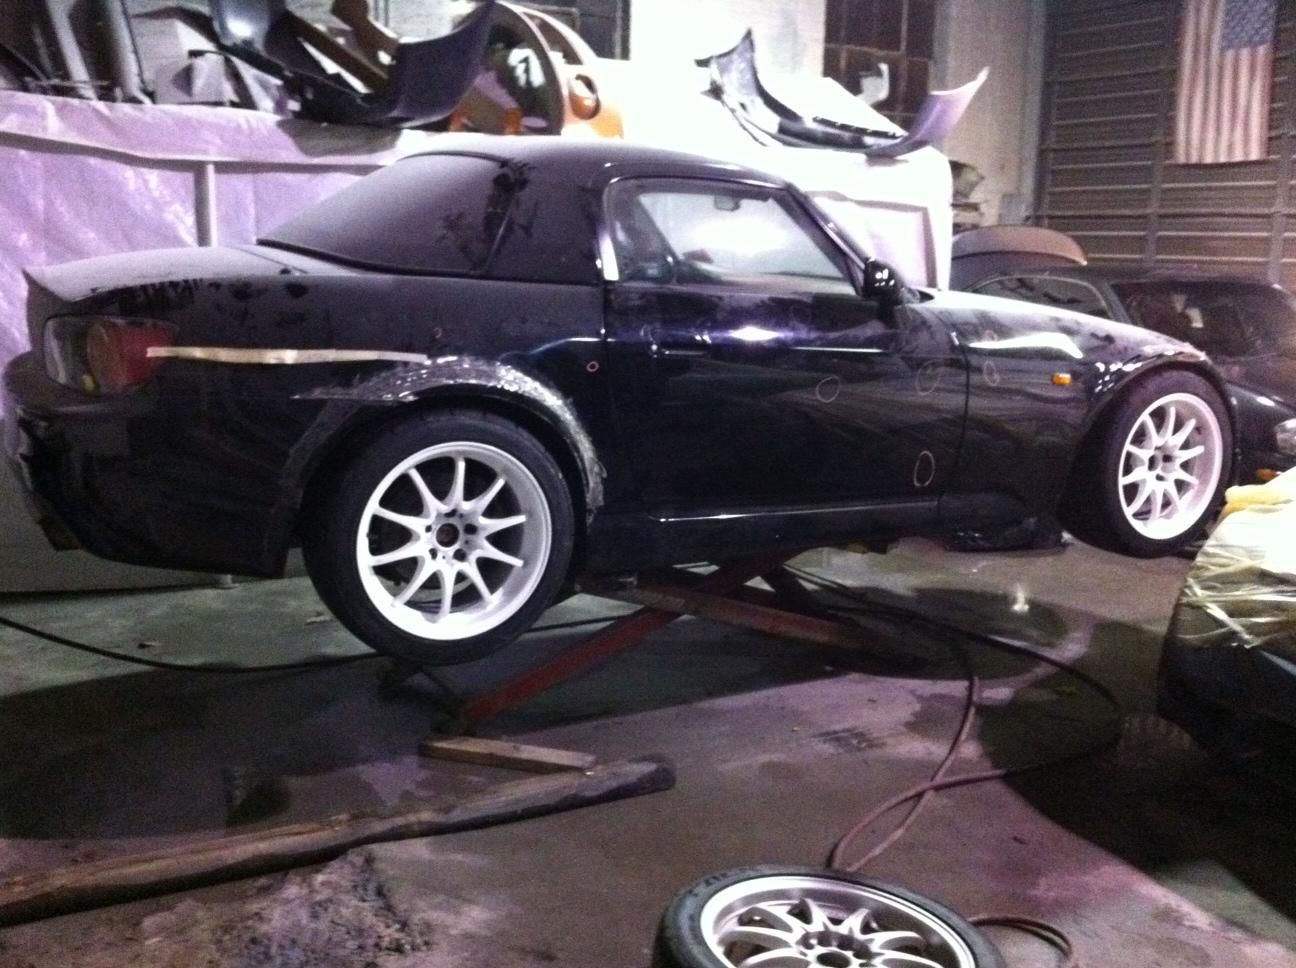
FEDEX just dropped off my wheels that I purchased off of a member on Evolutionm.net. As you can see, two of them are orange and two are black but that will change very soon. Planning to get them powder coated gloss white with silver flakes. I also plan to coat the intercooler piping, valve cover and maybe the compressor housing the same color. As far as tires, I'm going to run Dunlop Direzza Sport Z1 Star Spec 255/40/17. I've read great reviews on them and also heard that they're the best bang for the buck.
.
.
.
.
.
.
.
.
.
.
.
.
January 27, 2011
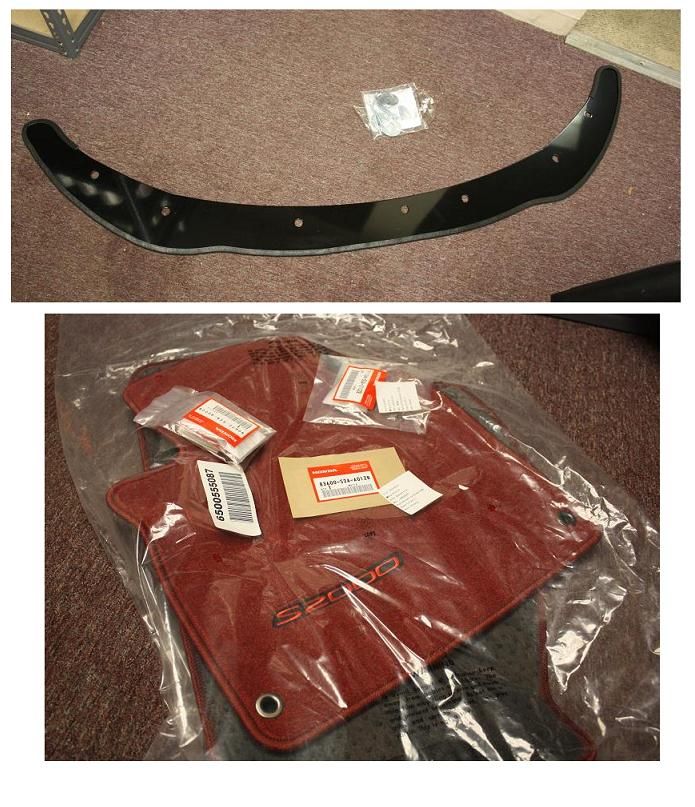
Got some more goodies in the mail. A couple parts that I ordered from Honda which consists of OEM red floor mats, license plate plugs and front tow hook cover. Also got my Coastal Metal splitter to protect the AP2 front lip. After inspecting the splitter, I would give it two thumbs way up. It's a high quality piece made of thick gauge that will insure you that it will last you a very long time and will be able to take a beating.
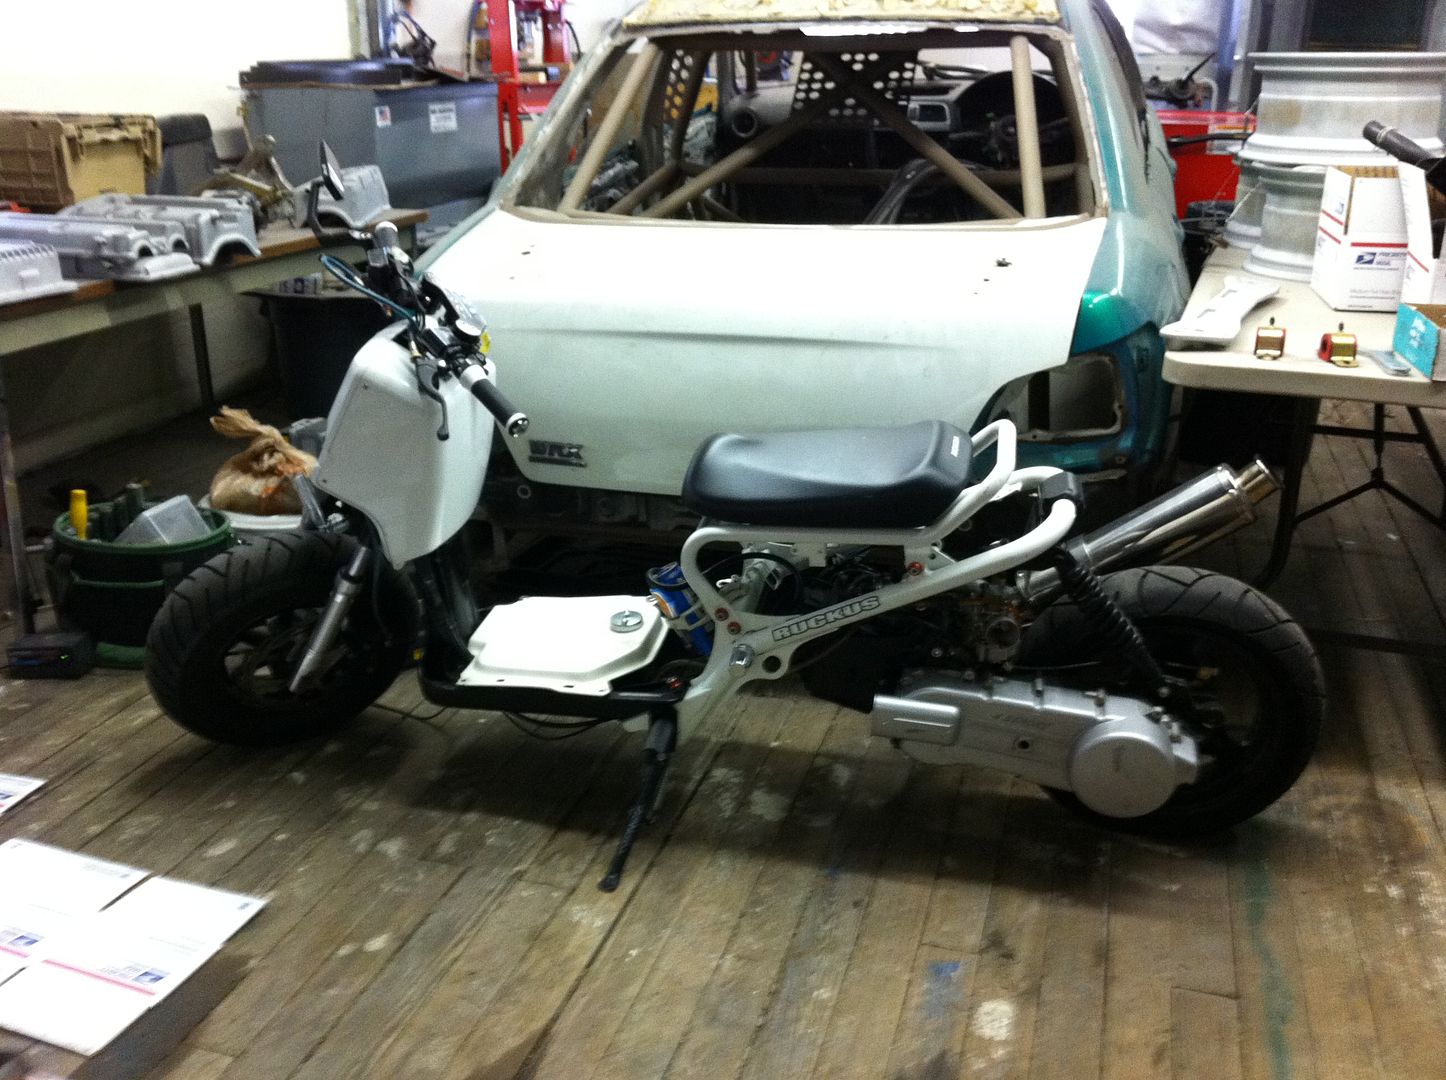
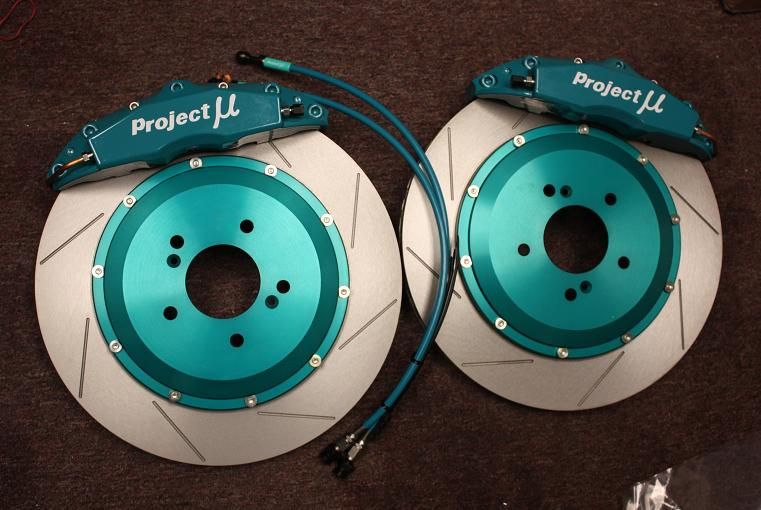
I also ended up selling my Honda Ruckus GY6 and used the money to instantly purchase a brand new set of Project Mu 355mm big brake kit. I's going to be a tight squeeze with the 17" Volk CE28n but let's hope that it will work. Bye bye my Ruckus ! And hello to Project Mu goodness ! Thanks SENSON !!!!!!!
Passenger side rear quarter panel is finished with fabrication and next for it is some bodywork. ( they finished off the fabrication with plastic welding the added section in the rear bumper to match with the widen rear quarter panel ) It's hard to see since the car is black but the OEM bend and lines are still there.
And then they started on the front passenger fender . Also for the front bumper, they decided not to cut the bumper and expand it since it gets the most contact which will cause stress cracks.
So to accommodate the widen fender, they will do some bodywork to the front bumper to match up the body lines.
Something like this piece below but it will be molded instead of an add-on piece.
.
.
.
.
.
.
.
.
.
JANUARY 26TH, 2011
FEDEX just dropped off my wheels that I purchased off of a member on Evolutionm.net. As you can see, two of them are orange and two are black but that will change very soon. Planning to get them powder coated gloss white with silver flakes. I also plan to coat the intercooler piping, valve cover and maybe the compressor housing the same color. As far as tires, I'm going to run Dunlop Direzza Sport Z1 Star Spec 255/40/17. I've read great reviews on them and also heard that they're the best bang for the buck.
.
.
.
.
.
.
.
.
.
.
.
.
January 27, 2011
Got some more goodies in the mail. A couple parts that I ordered from Honda which consists of OEM red floor mats, license plate plugs and front tow hook cover. Also got my Coastal Metal splitter to protect the AP2 front lip. After inspecting the splitter, I would give it two thumbs way up. It's a high quality piece made of thick gauge that will insure you that it will last you a very long time and will be able to take a beating.
I also ended up selling my Honda Ruckus GY6 and used the money to instantly purchase a brand new set of Project Mu 355mm big brake kit. I's going to be a tight squeeze with the 17" Volk CE28n but let's hope that it will work. Bye bye my Ruckus ! And hello to Project Mu goodness ! Thanks SENSON !!!!!!!
01-15-2011, 08:08 PM
#4
JANUARY 29th, 2011
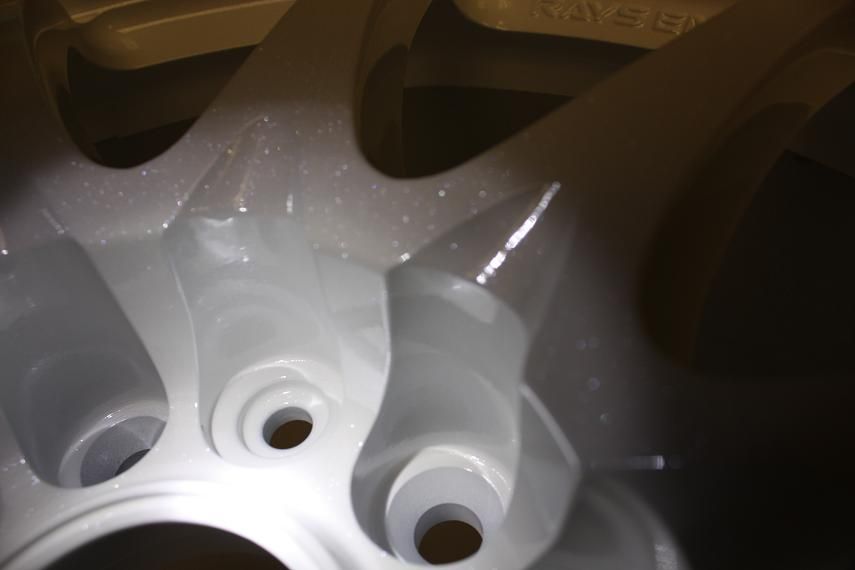
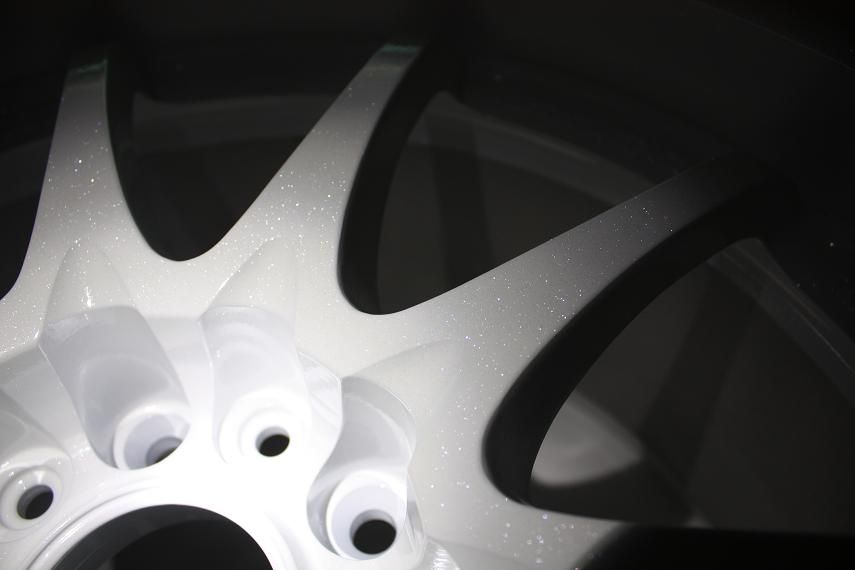
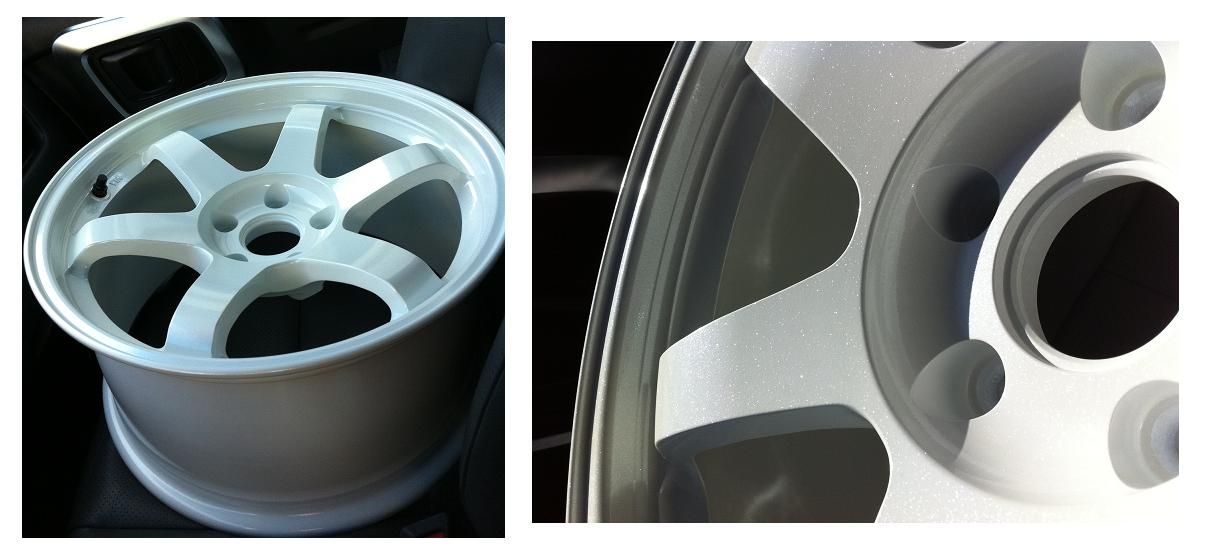
Wheels are fresh baked out the oven. I went with "Sky white" and added a "silver flake" clear coat. Under normal conditions, you can barely see the flakes but when light hits it, it's more noticeable. I plan to get the Dunlop Star Specs mounted on them tomorrow and then shoot over to the body shop and mount them on the car to see how they fit with the widened front fender and widened rear quarters.

.
.
.
.
.
.
.
.
FEBRUARY 02, 2011
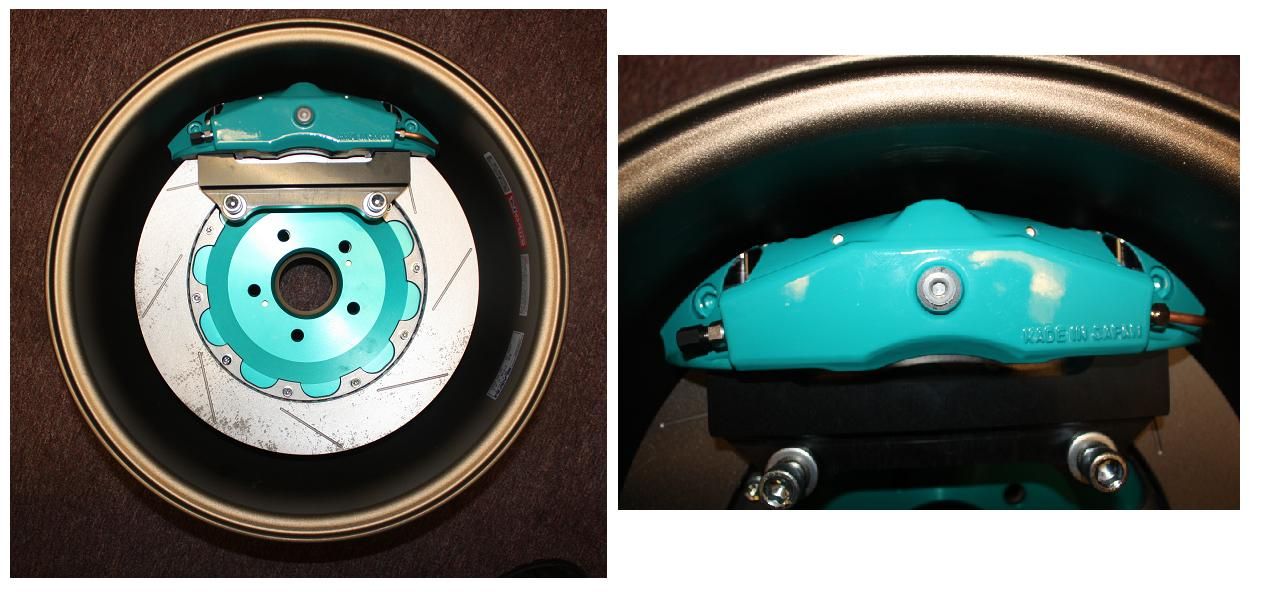
After alot of head pounding, internet searching, many phone calls and fitment testing; the 17" CE28N will not fit the 355mm Project Mu big brake kit. When I first laid the rotor inside the wheel, I was so excited since the rotor filled up the whole barrel but I instantly remembered about the caliper. I grabbed the caliper and slid them onto the rotor and laid the caliper/rotor onto the rim and guess what, the top of the caliper touches the inner barrel. MUDDAFUKCAH !!!! I was ready to start grinding the caliper but came to my senses and had to figure out a solution.
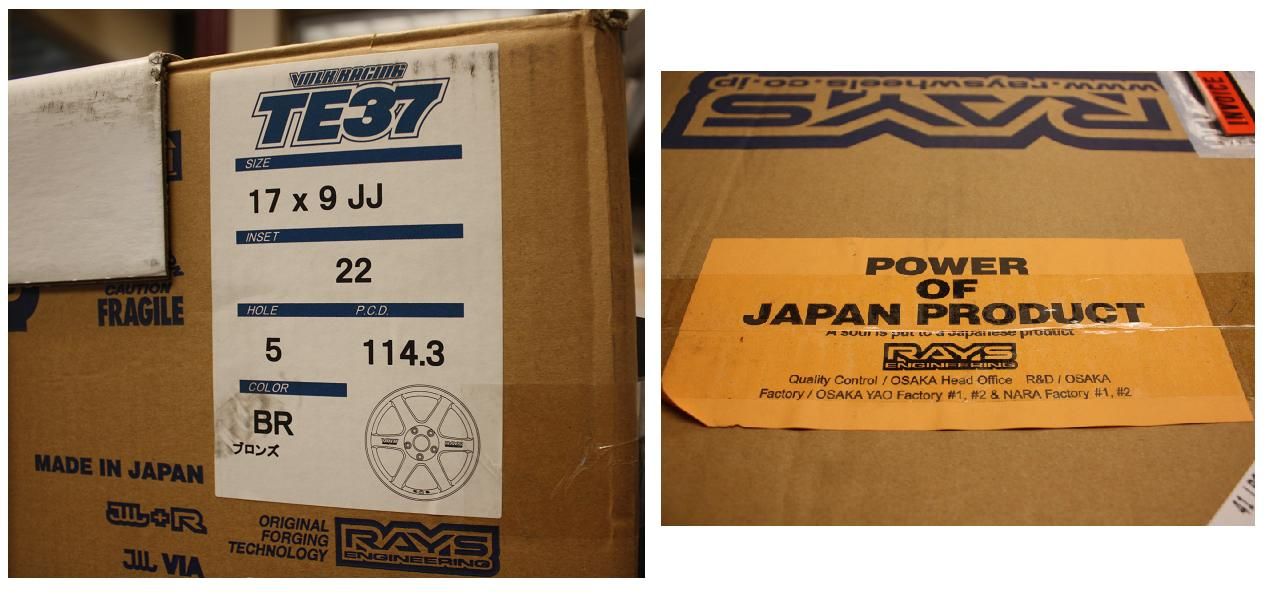
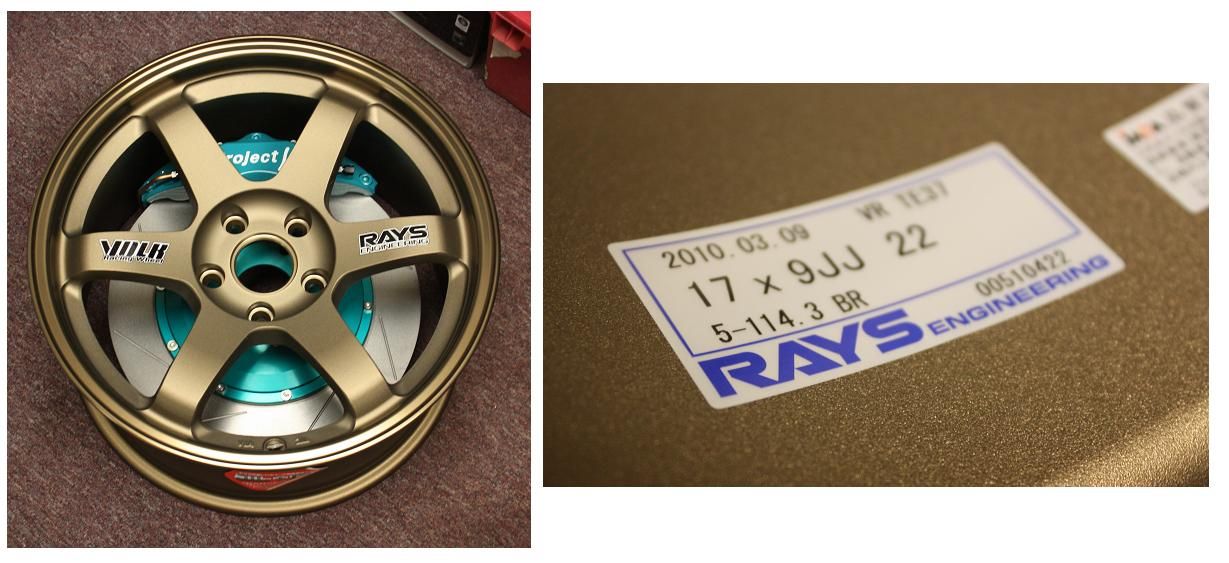
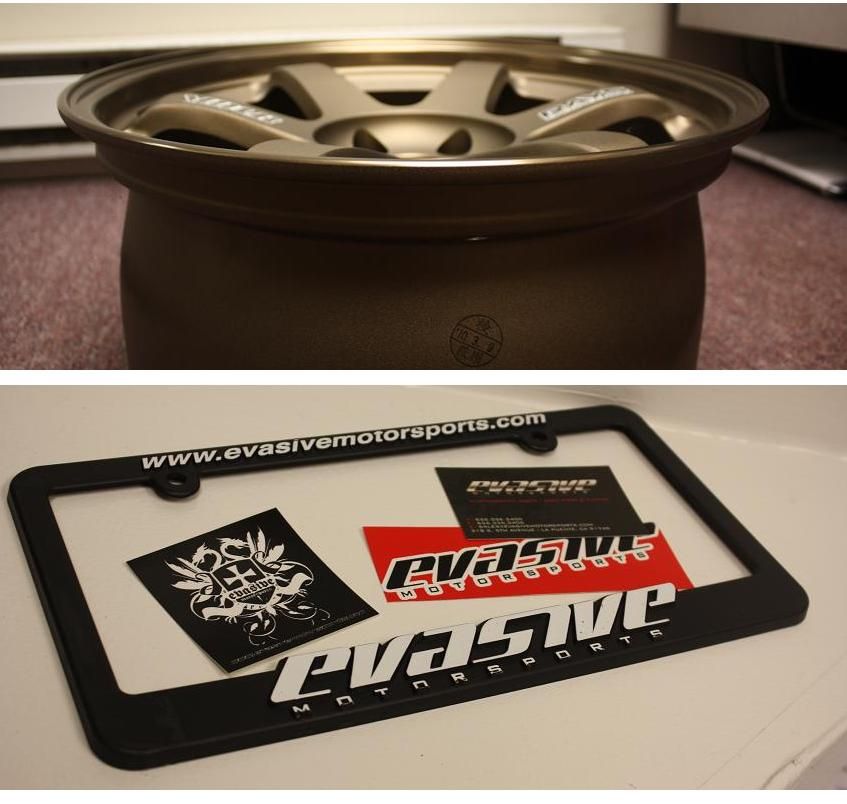
After speaking to MACKIN INDUSTRIES and EVASIVE MOTORSPORTS, I found out that 17" Volk TE37 has a larger diameter barrel which will clear the BBK and I was very surprised because I thought that the TE and CE had an identical barrel design. So I called up EVASIVE MOTORSPORTS and ordered up a set of 17x9 +22 and I should be getting them by next week. So my 17x9.5 +28 Volk CE28N are up for sale in case if anyone is interested. https://www.s2ki.com/forums/index.ph...pic=843715&hl=
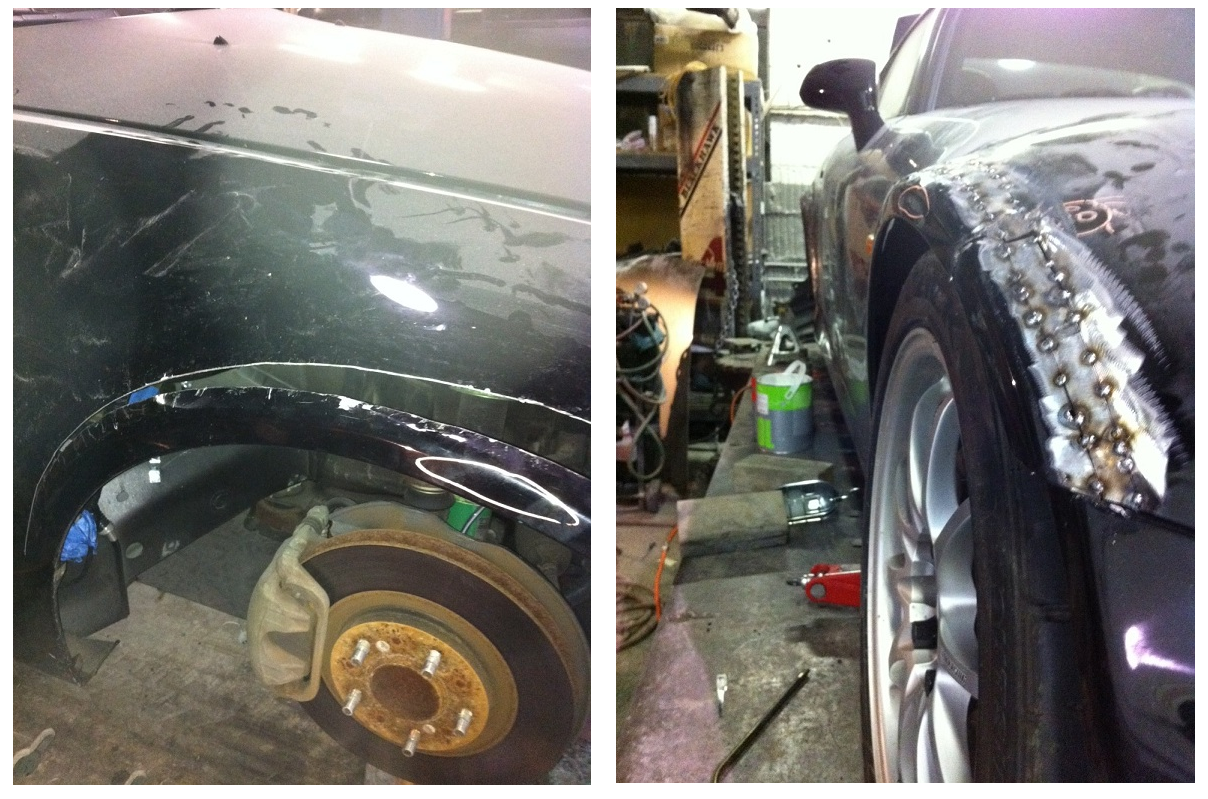
As far as the body shop, the car is on hold since the fabricator won't be in until Monday but I did get a chance to mount on the 17x9.5 +28 CE28N to see how they would fit with the extended quarters and fender. I think that the setup will work out pretty good. Keep in mind that the car is lifted in the air so it's probably positive camber but I do plan on rolling the fenders just a little bit to get the fender line flushed with the wheel.

.
.
.
.
.
.
.
.
.
FEBRUARY 8th, 2011
Today is an exciting day to find out the truth with my own eyes. My Volk TE-37 was scheduled to be delivered today. I normally get my UPS deliveries around 5pm but on my way to work, I saw Larry ( my neighborhood UPS truck driver ). I pulled over and asked him if I got any packages and he tells me that I do. So I was able to get my wheels a little earlier than scheduled. I rush over to my shop and opened up the first box to pull out one of the TE-37s to see if the Project Mu BBK will clear and yes it does !!! I'm so relieved and excited that I can move forward with my project.
The TE-37s looks so fresh and I feel bad doing it but it's getting powder coated ASAP. I was thinking about doing another color but I'll stick with the SKY WHITE w/ SILVER FLAKES.
Before going to the pictures, I just want to thank Mike @ Evasive Motorsports and forum member Senson for the Project Mu BBK !!!
 01-15-2011, 08:09 PM
#5
FEBRUARY 16, 2011
Not a major update but it's something. Everything is currently dragging because of non-car related issues that keeps popping up but I did get to order some more parts.
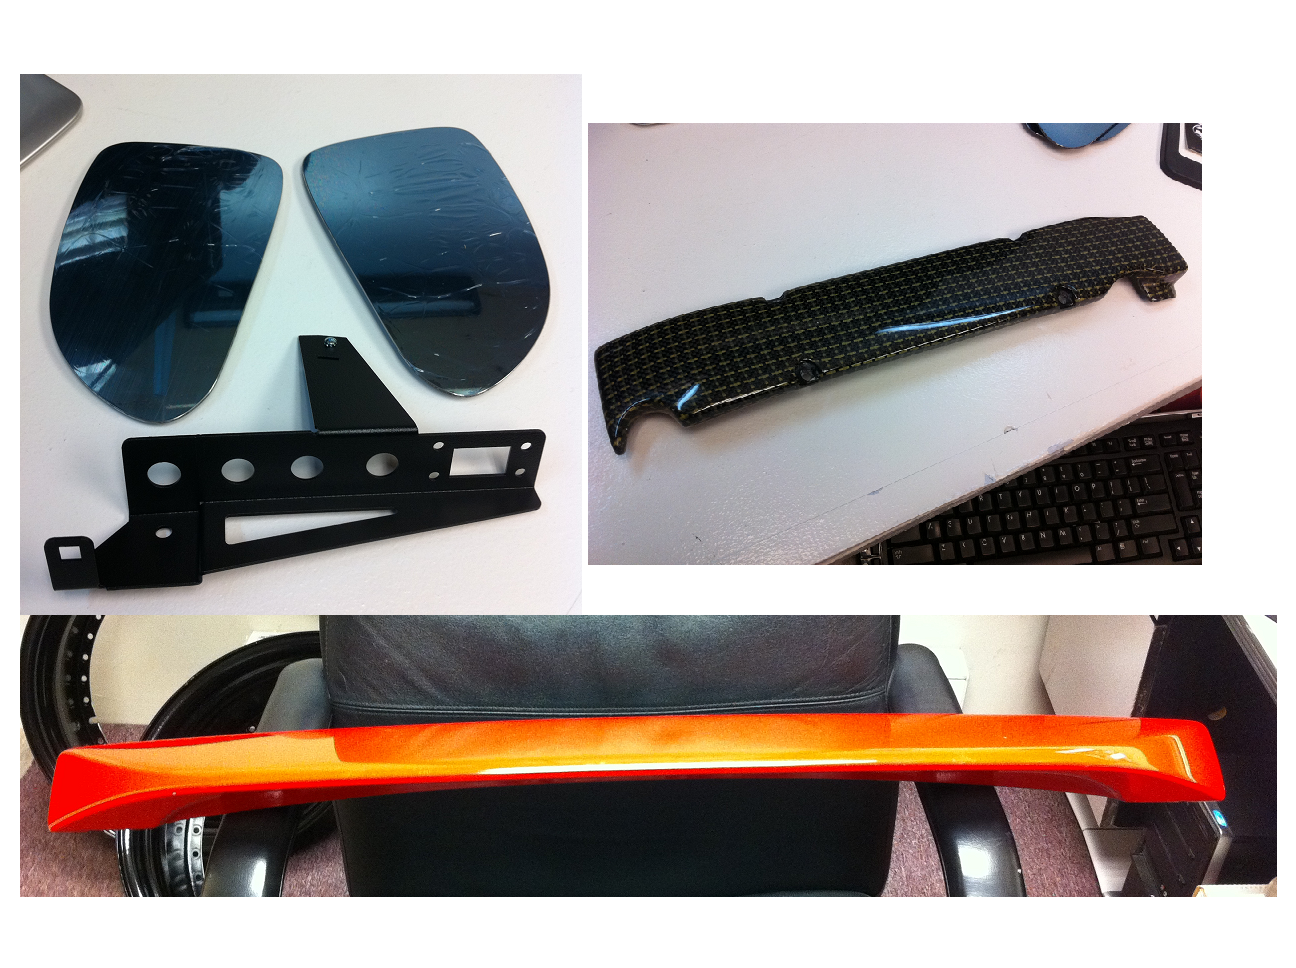
1. JAIMA Blue convex mirrors ( super fast shipping !!! )
2. Alloy Craft heater valve relocation bracket ( super fast shipping !!! )
3. Carbon Kevlar spark plug cover ( not too crazy about because the fabric pattern is not straight )
4. OEM wing ( chose this one so I can retain OEM brake light , I was thinking about the TAMON wing but some days I liked it and on some days I thought it looked weird. )
I almost pulled the trigger on an impulse buy for some Brando Built air jacks but could not justify spending $1900 on a mod that I would barely use and the downside of it is that I would be adding more weight onto the car.
Another part that I am highly considering is the VOLTEX Carbon rear diffuser but I gotta make sure before dumping $1325. If I do get this rear diffuser, I would also like to get the VOLTEX front bumper and side skirts when they hit the states. But it's very likely that I will be calling EVASIVE and putting my order in very soon if things go accordingly.
Onto the pictures of the little tidbits that still put a big smile on my face when I find them in my mail box .................
.
.
.
.
.
.
.
.
.
.
.
FEBRUARY 19, 2011
Wassup guys. I went over to body shop today to inspect the car and make sure everything looks okay before the car gets painted. I think everything seems to fit well so I gave my painter the okay to go ahead and paint it.
With my tire setup, I think I might go 245/40-17 on the front but I am not sure yet. They are currently 255/40-17 all around but for some reason, the front tires looks bigger than the rears. What do you guys think?
I had the same situation before with my Honda Civic and it just bothered me but I'll see after I get the car back and everything get's aligned.
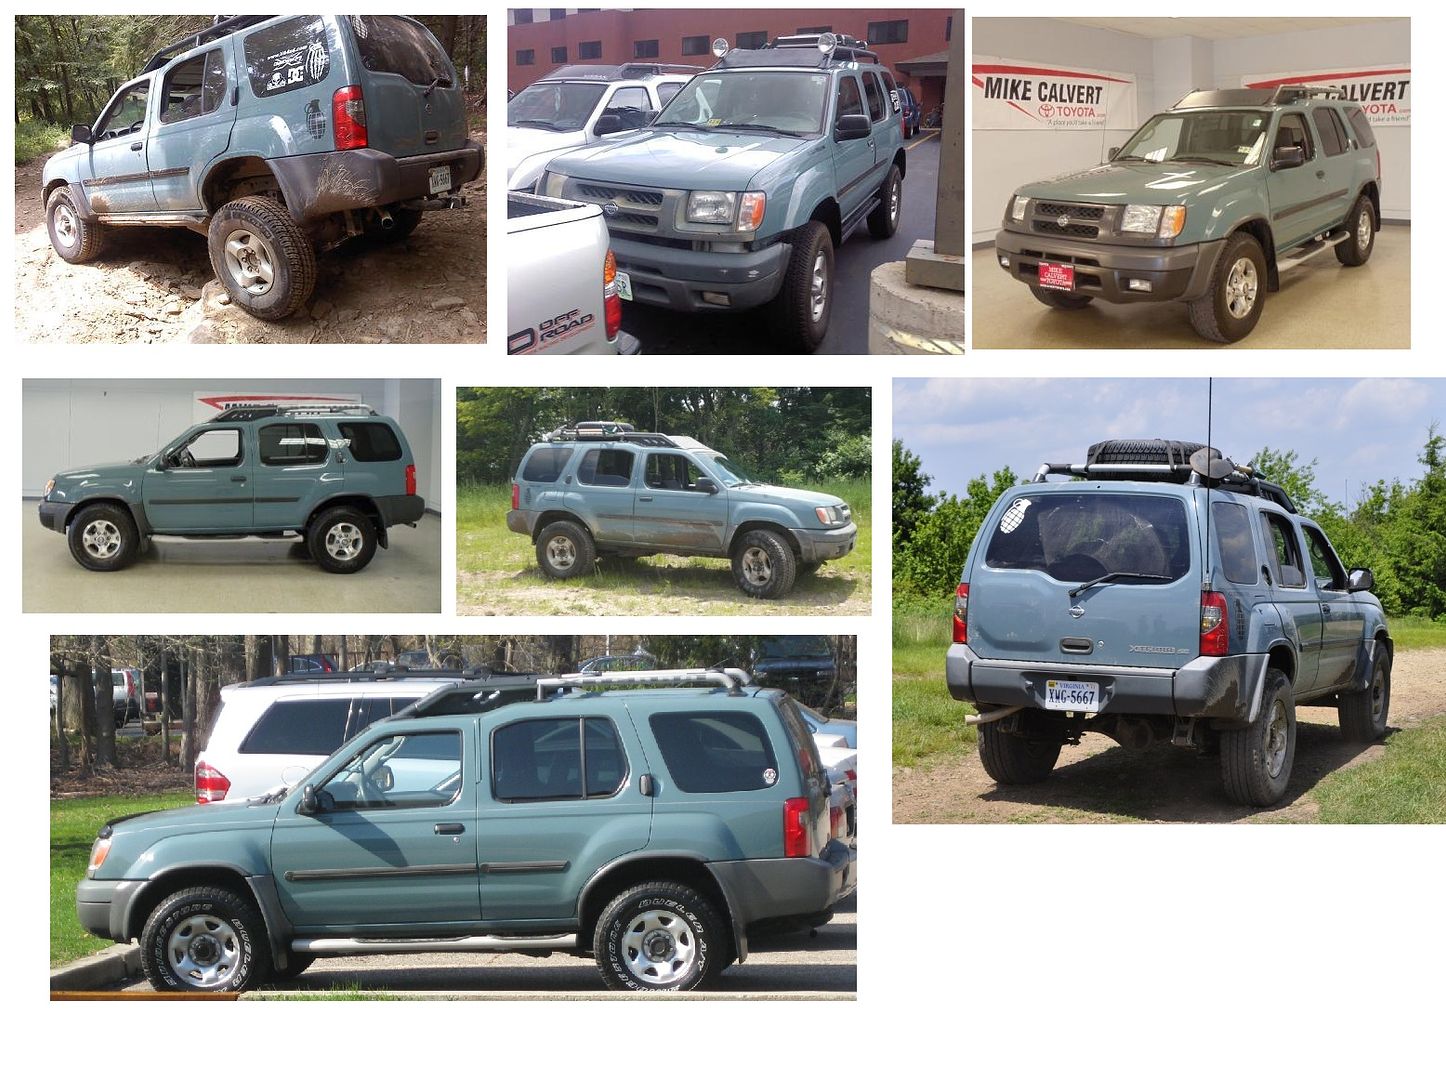
As far as the color of the car, I tried to convince myself over and over to play it safe and keep the car black but the show-side of me is pushing me change it to a color called MINERAL BLUE that came available on the Nissan Xterra. I originally wanted to paint the car gray or teal but I think the Mineral Blue looks grayish teal so I get both of the colors I wanted. We'll find out in the next couple days if it's going to stay black or change to blue. Below is a picture of the Nissan color and couple pictures of my car's current state at the body shop.
.
.
.
.
.
.
.
.
.
.
.
.
.
FEBRUARY 23, 2011
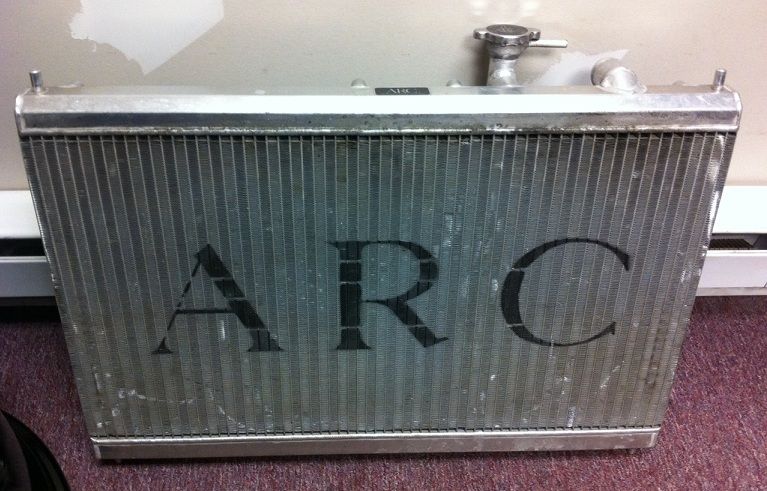
A couple more parts came in that I am really excited about. First up is the ARC radiator that I picked up from a forum member ( thanks Law ! ). I believe the water temp currently stays right around 220 with the stock radiator but I will make sure once I am back in the car. With the upgraded radiator, I hope to see a decrease in water temp which will give me some ease. ( I was traumatize with car overheating in my younger years. )
)
Next up is my true 3" Berk Technology catless exhaust. I am really anxious to get this part on my car then onto the dyno to get a comparison with my current exhaust. I strongly believe that there will be some gains but I need to see it with my own eyes. I will post pictures of the dyno plots and get some videos of the dyno pulls to compare the exhaust tones.
Onto the pictures ..............

.
.
.
.
.
.
.
.
.
.
.
.
MARCH 02, 2011
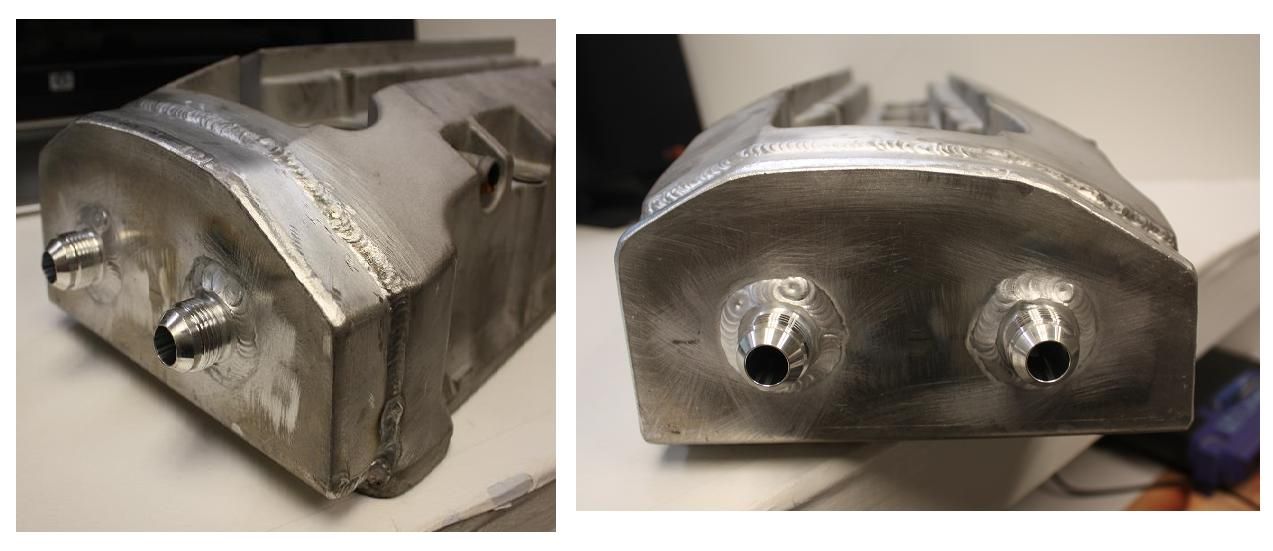
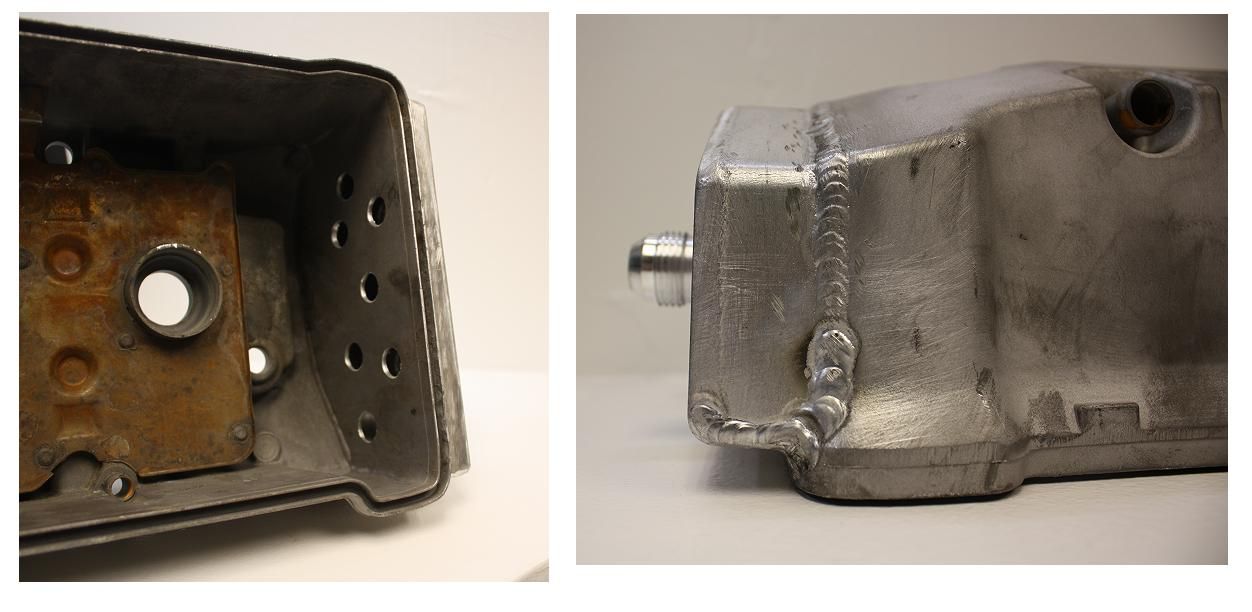
Okay finally some update. When I first got the car, Greg ( previous owner ) told me that the position of the -10 bungs on the valve cover for the breather setup was right in front of the cam gears which causes the oil catch can to fill up pretty quick. I told him I didn't mind and that I will keep an eye on oil level and empty out the can when need to. So recently, I picked up a spare valve cover to get powder coated but would need to get the dual -10 bungs welded on so I can run my breather tank. When I brought the valve cover to my welder, I asked him if he can weld a small plate in front of the hole so not as much oil will get pushed through. He told me that he was not sure if it would work since he did not know the clearance from valve cover wall to the cam gears. So it was time for some quick thinking. I remember seeing the SPOON elongated valve cover and thought I could do something similar. So I told my welder the idea and he made it happen and below is a picture of what I got back today. And there is also a picture of my 17x9 +22 Volk TE-37 that just got powder coated.
Not a major update but it's something. Everything is currently dragging because of non-car related issues that keeps popping up but I did get to order some more parts.
1. JAIMA Blue convex mirrors ( super fast shipping !!! )
2. Alloy Craft heater valve relocation bracket ( super fast shipping !!! )
3. Carbon Kevlar spark plug cover ( not too crazy about because the fabric pattern is not straight )
4. OEM wing ( chose this one so I can retain OEM brake light , I was thinking about the TAMON wing but some days I liked it and on some days I thought it looked weird. )
I almost pulled the trigger on an impulse buy for some Brando Built air jacks but could not justify spending $1900 on a mod that I would barely use and the downside of it is that I would be adding more weight onto the car.
Another part that I am highly considering is the VOLTEX Carbon rear diffuser but I gotta make sure before dumping $1325. If I do get this rear diffuser, I would also like to get the VOLTEX front bumper and side skirts when they hit the states. But it's very likely that I will be calling EVASIVE and putting my order in very soon if things go accordingly.
Onto the pictures of the little tidbits that still put a big smile on my face when I find them in my mail box .................
.
.
.
.
.
.
.
.
.
.
.
FEBRUARY 19, 2011
Wassup guys. I went over to body shop today to inspect the car and make sure everything looks okay before the car gets painted. I think everything seems to fit well so I gave my painter the okay to go ahead and paint it.
With my tire setup, I think I might go 245/40-17 on the front but I am not sure yet. They are currently 255/40-17 all around but for some reason, the front tires looks bigger than the rears. What do you guys think?
I had the same situation before with my Honda Civic and it just bothered me but I'll see after I get the car back and everything get's aligned.
As far as the color of the car, I tried to convince myself over and over to play it safe and keep the car black but the show-side of me is pushing me change it to a color called MINERAL BLUE that came available on the Nissan Xterra. I originally wanted to paint the car gray or teal but I think the Mineral Blue looks grayish teal so I get both of the colors I wanted. We'll find out in the next couple days if it's going to stay black or change to blue. Below is a picture of the Nissan color and couple pictures of my car's current state at the body shop.
.
.
.
.
.
.
.
.
.
.
.
.
.
FEBRUARY 23, 2011
A couple more parts came in that I am really excited about. First up is the ARC radiator that I picked up from a forum member ( thanks Law ! ). I believe the water temp currently stays right around 220 with the stock radiator but I will make sure once I am back in the car. With the upgraded radiator, I hope to see a decrease in water temp which will give me some ease. ( I was traumatize with car overheating in my younger years.
) Next up is my true 3" Berk Technology catless exhaust. I am really anxious to get this part on my car then onto the dyno to get a comparison with my current exhaust. I strongly believe that there will be some gains but I need to see it with my own eyes. I will post pictures of the dyno plots and get some videos of the dyno pulls to compare the exhaust tones.
Onto the pictures ..............
.
.
.
.
.
.
.
.
.
.
.
.
MARCH 02, 2011
Okay finally some update. When I first got the car, Greg ( previous owner ) told me that the position of the -10 bungs on the valve cover for the breather setup was right in front of the cam gears which causes the oil catch can to fill up pretty quick. I told him I didn't mind and that I will keep an eye on oil level and empty out the can when need to. So recently, I picked up a spare valve cover to get powder coated but would need to get the dual -10 bungs welded on so I can run my breather tank. When I brought the valve cover to my welder, I asked him if he can weld a small plate in front of the hole so not as much oil will get pushed through. He told me that he was not sure if it would work since he did not know the clearance from valve cover wall to the cam gears. So it was time for some quick thinking. I remember seeing the SPOON elongated valve cover and thought I could do something similar. So I told my welder the idea and he made it happen and below is a picture of what I got back today. And there is also a picture of my 17x9 +22 Volk TE-37 that just got powder coated.
01-15-2011, 08:09 PM
#6
April 1st, 2011
Finally I have some time to post some updates. I got the car out of the body shop about two weeks ago and since then, I've installed the suspension, radiator and big brake kit. I didn't want to post up pictures until the car got a complete detail and an alignment but I couldn't resist. I will also get a video of the suspension in action as soon as I get some time. The priority at the moment is to get all the air out of the cooling/heating system. I've spent 4 days on it so far and will keep going until it get's right.

Finally I have some time to post some updates. I got the car out of the body shop about two weeks ago and since then, I've installed the suspension, radiator and big brake kit. I didn't want to post up pictures until the car got a complete detail and an alignment but I couldn't resist. I will also get a video of the suspension in action as soon as I get some time. The priority at the moment is to get all the air out of the cooling/heating system. I've spent 4 days on it so far and will keep going until it get's right.
Trending Topics
 01-15-2011, 10:48 PM
#9

Join Date: Jan 2007
Location: Atlanta, GA
Posts: 4,852
Likes: 0
Received 0 Likes
on
0 Posts
Originally Posted by BILLYhoang,Jan 15 2011, 11:08 PM
First order of business is the suspension work. I am a big fan of CUSCO and I've had their product on all my projects but I've been hearing good things about the Buddy Club Race Spec from the S2000 crowd and decided to give them a try. The biggest thing that I fear about with driving a lowered car is bottoming out or smashing something with my front bumper so I've been searching for a solution. A couple of years ago, I heard about a product that Top Secret Japan was using called the ROBERUTA cup kit. It allowed you to be able to raise your vehicle at the flick of a button without sacrificing your ride quality and performance of your coilovers. But the problem was that it was crazy expensive, long waiting time, specific vehicle application, specific coilover application , crazy shipping price and crazy expensive. Did I mention crazy expensive ???
Then recently I found a company called Umbrella Auto Design. It was the same concept as the Roberuta cup kit but I hear that their technology & quality is more advance and most importantly, they were located in the USA which meant customer support a phone call away. So I called Ravi from U.A.D. and put my order in for a set of cup kits front and rear to match up with my Buddy Club Race Spec coilovers. I should be getting them back into my hands within 1-2 weeks. Below is a video of their product in action .....
YouTube - Variable Ride Height (VRH) suspension lift system by Umbrella Auto Design
Holy shit.