DIY - Mugen Hardtop FRP - S2000 AP1/2
 08-21-2009, 11:05 AM
#1
Registered User
Thread Starter

Join Date: Dec 2006
Location: Teh Yay
Posts: 479
Likes: 0
Received 0 Likes
on
0 Posts
http://www.gotuning.com/product_info...roducts_id=212
First a small disclaimer, I'm writing this DIY as a first hand installer but I do not own an S2K. After hours of searching, doing, experimenting and attempting to understand the fail Japanese instructions that came with said Mugen Hardtop, I was appalled that no one had bothered to put up a step by step.
Also -- it was a six hour install and I'm still reeling from the consequences of the epic lack of sleep I will have at the track tomorrow in not my S2K. I want to say that you should definitely **BUDGET** time for this install, and should not be doing it mid-week on a night unless you are absolutely proficient in your install skills and armed with the following DIY instructions not in Japanese
Finally -- a sad note I do not have any pictures of the install because when it began, I was just the helper, I didn't really think it would turn out to be the epic adventure that it was. Perhaps after this weekend or during I may be able to snap some pictures and put it along with this guide.
**PAINT IT FIRST** Trust me on this one.
TOOLS:
10 mm socket + ratchet
14 mm socket + ratchet
1 large philips screwdriver
1 medium flat head
1 drill + drill bits
a friend (this is actually pretty mission critical!)
+=+=+=+=+=+=+=+=+=+=+=+=+=+=+=+=+=+=+=+=+=+
HOW TO INSTALL A MUGEN HARDTOP (FIBERGLASS OR CF) S2000
STEP 1: Remove all the hard top accessories that came with the hard top and lay them on the floor. Unless you are fond of scratching your hard top (freshly painted I assume) then you should be doing this inside on a living room carpet or have a large soft area you can work in because you will be moving the hard top around for various part placements.
PARTS:
1 hard top
2 bolt down rear door brackets
2 bolt down rear door mechanisms
4 triangular metal reinforcement plates (goes with bolt down rear door mechanisms)
2 windshield release brackets
6 elongated / rounded reinforcement plates (goes with windshield release brackets)
2 windshield clips (for release brackets to hold on to -- these are NOT the same as your OEM soft top ones!)
2 new OEM panels (these are reversed, so you will have to drill out your fuel cap release hole or never get fuel ... ever)
2 rear trunk stoppers (honestly, you don't need these, plus they're ugly but they go on the hard top NOT in the truck as the instructions say)
1 rear window (with rubber trim / side moldings)
2 metal window brackets (screws into hard top)
2 rubber trim window bracket covers
1 long rubber trim to go around the bottom rear of the hard top
1 thick piece of rope (yes, you need this, I know, wth?)
2 rubber cap pieces for your soft top (I did not see a need for this)
2 fiberglass corner looking pieces (also did not see where in the WORLD this could go)
misc bolts that come in a pre-sealed package
STEP 2: The window rubber trim should already be on the window and has rubber grooves on the upper side and underside. Find the UNDERSIDE rubber grooves (if you dig in with your fingers, you will find a much wider track than it looks) and insert the rope into the groove from the BOTTOM to the TOP. The rope should be the correct length that you will end up with two equal sized excess ends on the top of the window where the window should meet the grooves of the hard top on the very top.

Then carefully place the window (TOP SIDE FIRST) into the pre-cut window hole in the hard top. Make sure that the top side is already in the top groove (the rope should be directly against the top portion of the pre-cut window hole).
Take the excess ends of the rope and carefully pull the window into the hard top from the under side of the hard top. As you pull the rope the groove should snap into place along the inside of the window hole for the hard top.
If you mess up on this process, supposedly, the window might not seal well. However, if you **really** don't want to restart, just pry with your fingers and pray it will take less than 2 hours
STEP 3: Once you have the window in place, it is now time to put the trim on. WARNING -- you need a drill for this. There are 6 tapping screws that hold the metal window trim bracket in place and 16 tabs along the longest rubber window trim that you have that go on the bottom. EVERY single hole except for where the metal trim bracket will have to be drilled out to accommodate the size of the plastic tabs as they don't fit otherwise.
Use the short, black philips tapping screws (some may be silver, not black but they should be the same size) to screw on the window trim bracket on each side with the cut metal flanges on each side facing inwards (this is how you know you got the correct side!). Then carefully place the rubber trim into the metal bracket making sure that the grooves in the metal bracket are snugly against the grooves in the rubber trim. The large flat side of the rubber trim goes on the front of the hard top (where it meets the windshield) and you will also need one additional tapping philips screw to screw it in.
STEP 4: Take the long rubber trim after you have drilled out all of the holes for the plastic tabs and remove the adhesive cover. The ends of this long piece of rubber trim goes underneath the previous window rubber trim on the side where there is already an existing long plastic screw that goes through both into the hard top. Make sure that each plastic tab SNAPS into its respective hole on the hard top. The rubber trim may not fit exactly right, some parts may bulge up a little (such as rounding the corner) but this is just extra material to ensure a snug fit when the hard top is in place. Do a firm press through the rubber piece to ensure that the adhesive (double sided) is securely stuck to the hard top.
STEP 5: Now we are going to move onto the brackets. First take the rear locking bracket (that goes on behind the door / behind the window) and line two triangular reinforcement plates between the hard top and the bracket (the bracket should be facing inward with the locking lever towards the REAR of the car -- both brackets should be marked for L or R). The hard top should already be pre-fitted with threads in the shape of the triangular reinforcement plate holes. You will need the 10 mm socket + ratchet for this. Tighten this down firmly to a hand tight but don't over tighten it as you might crack the hard top.
STEP 6: Install the windshield release brackets on the top of the hard top with a washer and a normal screw (both philips). You will need 3 of the 6 reinforcement plates (rounded ones with two screw holes) for each side. The hard top is also already pre-fitted with threads for these screws. This should be pretty self explanatory. Just make sure that the release button is facing INWARDS (again, right / left is very important, they're NOT interchangeable!)
After you have installed all of the rubber trim on the hard top and both sets of locking mechanisms, you can leave the hard top for now and go back to the car.
STEP 7: You will need to do this step for BOTH sides (driver and passenger).
First, remove the s2000 logo door trim piece on the bottom of the door. There are three snap in plastic tabs, so you just need to pull gently. Then move your seat forward and remove the back panel by opening up the screw covers on the two hooks behind the seat and making good use of your philips screwdriver. Once the two hooks are out, the back panel (containing your speaker unit) pulls out with a gentle tug (there are two clips on the bottom corner and three clips on top that hold it in place). DO NOT pull this hard, your speakers **are** still connected to the car.
Put these pieces aside, by now you should start accumulating a safe place for all the screws / bolts you will be taking out later.
Take off the rear panel next to the seat (there is one screw holding onto it at the bottom near the seat rails, the rest are tabs that snap in). This panel should come off easily. You should have gotten two replacement panels which are cut out for the additional mounting bracket you will be bolting to the side of the car so you **cannot** use your original panels.
Sometimes you will also need a dremel to cut out the fuel cap release for your driver side as this hole allocation is on the passenger side at this point. There should be groves in your new panel to show you where to make this cut.
Next, there are four bolts you revealed after removing the panel. Two of these should be 10 mm (one of them body colored, the other brass colored) and two should be 14 mm also brass colored. NOTE: unless you plan on modifying the bracket or your car, you will only be able to properly fit in THREE out of the four bolts just mentioned. It is recommended that you leave out the body panel colored bolt as it happens to be the most problematic for aligning the bracket to the car.
Take the bracket (it should fit in with the grooves of the car at that location) and loosely screw in the three brass colored bolts (10 mm and two 14 mm) until you get a good alignment for the bracket and tighten down all three bolts.
You're done at this point so you can put the panels back (original and new). Again, make sure you use the panels that come with the hard top.
STEP 8: This part may be a little tricky, now you are going to take off the trim surrounding your windshield to get to the NEW triangular locks onto the windshield (where the windshield release mechanisms would clasp onto). These are ALSO different from the OEM soft top locks so you cannot use your original one.
First unscrew the sun visor from the windshield trim. The A pillar interior trim on each side should snap off with some prying (there are again 3 plastic tabs, be careful with these). This should reveal the entire upper windshield trim containing the front interior light module. Use the flathead screwdriver to pop open the cover for the lighting module. You will find two screws on each side of the light bulb. Remove these screws and use the flathead again to pop out the bracket containing the lighting module. There are two tabs on each side but pry from the bottom as it will come out easier.
Unplug the lighting module bracket from the car and place this aside, you don't want to work with a dangling lighting module in the way. Once you have removed the bracket, the top trim piece should come out easily, there is one tab on each side of the trim in between the end of the windshield and the lighting module.
This should reveal the two large screws holding onto the lock at the windshield on each side. These screws can sometimes be a PITA to take out because they are EXTREMELY tightly screwed into the windshield frame so be careful and do not strip these!
Once you have removed the current locking pieces, put in the new ones that came with the hard top using the same screws.
You can put all the trim pieces back once you have securely tightened the new locking pieces on the windshield.
WE'RE ALMOST THERE!
STEP 9: The instructions DON'T tell you to place two triangular dipped brackets with a rubber stopper onto the hard top itself, but actually that's where it's supposed to go. There are two pre-fitted thread holes on each side in the rear of the hard top to do this. You can install them this way but they look hideous since they sit outside of the hard top. The purpose is pretty necessary, however, as currently the trunk will open ALL the way up in such a way that the edges of the trunk will scratch / dent the hard top. This is originally fitted to prevent such damage.
However, you **can** also fabricate a system to elongate the current trunk stops underneath the trunk (at the bottom of the two levers holding the trunk up). I will have to take pictures to this to show exactly how its done but if you want to install the bracket properly and don't care about the looks, then you can just bolt on the rubber stopper brackets to the hard top with the rubber piece facing UPWARDS once the hard top is oriented on the car.
STEP 10: Ensure that all the necessarily bolts / screws / panels etc. are securely in place. Get the friend (remember, mission critical piece!) and have the friend help you carry the hard top and place it onto the car. Needless to say, make sure your soft top is down. (SIDE NOTE: there are two rubber covering pieces provided with the hard top to be put onto the soft top ... there doesn't seem to be a reason for this and they tend to fall off easily so I would just skip that step).
Place the rear locking mechanism in first but do not lock it down. Then align and lock down the windshield release in the front. Once this is done, use the lever to lock down the rear portion of the hard top.
Roll up your windows and get a small stream of pressurized water (i.e. garden hose, but not full blast!) and test to see if you have fitted the rubber trim piece correctly. If you did, your interior should not be wet. Otherwise, get a towel!
This is as comprehensive as my sleep deprived self can think up. I will make a valid attempt at pictures this weekend and update the guide with actual pictures pointing to what I am talking about
enjoy!
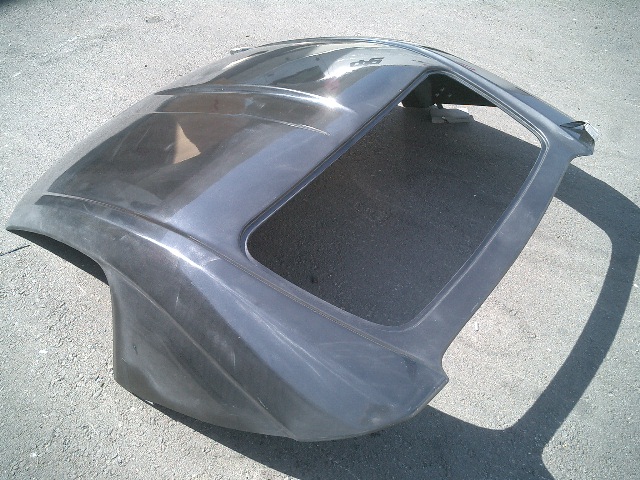
DESCRIPTION: The highest quality aftermarket hardtop available to the S2000. Wind-tunnel tested to ensure aerodynamic efficiency. OEM quality fitment. Rear tinted window is made of polycarbonate. Includes all OEM mounting hardware and trim necessary for installation. Constructed in FRP (fiberglass reinforced plastic). Come unpainted pre-prepped for paint. Weighs 44 lbs.
Also -- it was a six hour install and I'm still reeling from the consequences of the epic lack of sleep I will have at the track tomorrow in not my S2K. I want to say that you should definitely **BUDGET** time for this install, and should not be doing it mid-week on a night unless you are absolutely proficient in your install skills and armed with the following DIY instructions not in Japanese
Finally -- a sad note I do not have any pictures of the install because when it began, I was just the helper, I didn't really think it would turn out to be the epic adventure that it was. Perhaps after this weekend or during I may be able to snap some pictures and put it along with this guide.
**PAINT IT FIRST** Trust me on this one.
TOOLS:
10 mm socket + ratchet
14 mm socket + ratchet
1 large philips screwdriver
1 medium flat head
1 drill + drill bits
a friend (this is actually pretty mission critical!)
+=+=+=+=+=+=+=+=+=+=+=+=+=+=+=+=+=+=+=+=+=+
HOW TO INSTALL A MUGEN HARDTOP (FIBERGLASS OR CF) S2000
STEP 1: Remove all the hard top accessories that came with the hard top and lay them on the floor. Unless you are fond of scratching your hard top (freshly painted I assume) then you should be doing this inside on a living room carpet or have a large soft area you can work in because you will be moving the hard top around for various part placements.
PARTS:
1 hard top
2 bolt down rear door brackets
2 bolt down rear door mechanisms
4 triangular metal reinforcement plates (goes with bolt down rear door mechanisms)
2 windshield release brackets
6 elongated / rounded reinforcement plates (goes with windshield release brackets)
2 windshield clips (for release brackets to hold on to -- these are NOT the same as your OEM soft top ones!)
2 new OEM panels (these are reversed, so you will have to drill out your fuel cap release hole or never get fuel ... ever)
2 rear trunk stoppers (honestly, you don't need these, plus they're ugly but they go on the hard top NOT in the truck as the instructions say)
1 rear window (with rubber trim / side moldings)
2 metal window brackets (screws into hard top)
2 rubber trim window bracket covers
1 long rubber trim to go around the bottom rear of the hard top
1 thick piece of rope (yes, you need this, I know, wth?)
2 rubber cap pieces for your soft top (I did not see a need for this)
2 fiberglass corner looking pieces (also did not see where in the WORLD this could go)
misc bolts that come in a pre-sealed package
STEP 2: The window rubber trim should already be on the window and has rubber grooves on the upper side and underside. Find the UNDERSIDE rubber grooves (if you dig in with your fingers, you will find a much wider track than it looks) and insert the rope into the groove from the BOTTOM to the TOP. The rope should be the correct length that you will end up with two equal sized excess ends on the top of the window where the window should meet the grooves of the hard top on the very top.
Then carefully place the window (TOP SIDE FIRST) into the pre-cut window hole in the hard top. Make sure that the top side is already in the top groove (the rope should be directly against the top portion of the pre-cut window hole).
Take the excess ends of the rope and carefully pull the window into the hard top from the under side of the hard top. As you pull the rope the groove should snap into place along the inside of the window hole for the hard top.
If you mess up on this process, supposedly, the window might not seal well. However, if you **really** don't want to restart, just pry with your fingers and pray it will take less than 2 hours
STEP 3: Once you have the window in place, it is now time to put the trim on. WARNING -- you need a drill for this. There are 6 tapping screws that hold the metal window trim bracket in place and 16 tabs along the longest rubber window trim that you have that go on the bottom. EVERY single hole except for where the metal trim bracket will have to be drilled out to accommodate the size of the plastic tabs as they don't fit otherwise.
Use the short, black philips tapping screws (some may be silver, not black but they should be the same size) to screw on the window trim bracket on each side with the cut metal flanges on each side facing inwards (this is how you know you got the correct side!). Then carefully place the rubber trim into the metal bracket making sure that the grooves in the metal bracket are snugly against the grooves in the rubber trim. The large flat side of the rubber trim goes on the front of the hard top (where it meets the windshield) and you will also need one additional tapping philips screw to screw it in.
STEP 4: Take the long rubber trim after you have drilled out all of the holes for the plastic tabs and remove the adhesive cover. The ends of this long piece of rubber trim goes underneath the previous window rubber trim on the side where there is already an existing long plastic screw that goes through both into the hard top. Make sure that each plastic tab SNAPS into its respective hole on the hard top. The rubber trim may not fit exactly right, some parts may bulge up a little (such as rounding the corner) but this is just extra material to ensure a snug fit when the hard top is in place. Do a firm press through the rubber piece to ensure that the adhesive (double sided) is securely stuck to the hard top.
STEP 5: Now we are going to move onto the brackets. First take the rear locking bracket (that goes on behind the door / behind the window) and line two triangular reinforcement plates between the hard top and the bracket (the bracket should be facing inward with the locking lever towards the REAR of the car -- both brackets should be marked for L or R). The hard top should already be pre-fitted with threads in the shape of the triangular reinforcement plate holes. You will need the 10 mm socket + ratchet for this. Tighten this down firmly to a hand tight but don't over tighten it as you might crack the hard top.
STEP 6: Install the windshield release brackets on the top of the hard top with a washer and a normal screw (both philips). You will need 3 of the 6 reinforcement plates (rounded ones with two screw holes) for each side. The hard top is also already pre-fitted with threads for these screws. This should be pretty self explanatory. Just make sure that the release button is facing INWARDS (again, right / left is very important, they're NOT interchangeable!)
After you have installed all of the rubber trim on the hard top and both sets of locking mechanisms, you can leave the hard top for now and go back to the car.
STEP 7: You will need to do this step for BOTH sides (driver and passenger).
First, remove the s2000 logo door trim piece on the bottom of the door. There are three snap in plastic tabs, so you just need to pull gently. Then move your seat forward and remove the back panel by opening up the screw covers on the two hooks behind the seat and making good use of your philips screwdriver. Once the two hooks are out, the back panel (containing your speaker unit) pulls out with a gentle tug (there are two clips on the bottom corner and three clips on top that hold it in place). DO NOT pull this hard, your speakers **are** still connected to the car.
Put these pieces aside, by now you should start accumulating a safe place for all the screws / bolts you will be taking out later.
Take off the rear panel next to the seat (there is one screw holding onto it at the bottom near the seat rails, the rest are tabs that snap in). This panel should come off easily. You should have gotten two replacement panels which are cut out for the additional mounting bracket you will be bolting to the side of the car so you **cannot** use your original panels.
Sometimes you will also need a dremel to cut out the fuel cap release for your driver side as this hole allocation is on the passenger side at this point. There should be groves in your new panel to show you where to make this cut.
Next, there are four bolts you revealed after removing the panel. Two of these should be 10 mm (one of them body colored, the other brass colored) and two should be 14 mm also brass colored. NOTE: unless you plan on modifying the bracket or your car, you will only be able to properly fit in THREE out of the four bolts just mentioned. It is recommended that you leave out the body panel colored bolt as it happens to be the most problematic for aligning the bracket to the car.
Take the bracket (it should fit in with the grooves of the car at that location) and loosely screw in the three brass colored bolts (10 mm and two 14 mm) until you get a good alignment for the bracket and tighten down all three bolts.
You're done at this point so you can put the panels back (original and new). Again, make sure you use the panels that come with the hard top.
STEP 8: This part may be a little tricky, now you are going to take off the trim surrounding your windshield to get to the NEW triangular locks onto the windshield (where the windshield release mechanisms would clasp onto). These are ALSO different from the OEM soft top locks so you cannot use your original one.
First unscrew the sun visor from the windshield trim. The A pillar interior trim on each side should snap off with some prying (there are again 3 plastic tabs, be careful with these). This should reveal the entire upper windshield trim containing the front interior light module. Use the flathead screwdriver to pop open the cover for the lighting module. You will find two screws on each side of the light bulb. Remove these screws and use the flathead again to pop out the bracket containing the lighting module. There are two tabs on each side but pry from the bottom as it will come out easier.
Unplug the lighting module bracket from the car and place this aside, you don't want to work with a dangling lighting module in the way. Once you have removed the bracket, the top trim piece should come out easily, there is one tab on each side of the trim in between the end of the windshield and the lighting module.
This should reveal the two large screws holding onto the lock at the windshield on each side. These screws can sometimes be a PITA to take out because they are EXTREMELY tightly screwed into the windshield frame so be careful and do not strip these!
Once you have removed the current locking pieces, put in the new ones that came with the hard top using the same screws.
You can put all the trim pieces back once you have securely tightened the new locking pieces on the windshield.
WE'RE ALMOST THERE!
STEP 9: The instructions DON'T tell you to place two triangular dipped brackets with a rubber stopper onto the hard top itself, but actually that's where it's supposed to go. There are two pre-fitted thread holes on each side in the rear of the hard top to do this. You can install them this way but they look hideous since they sit outside of the hard top. The purpose is pretty necessary, however, as currently the trunk will open ALL the way up in such a way that the edges of the trunk will scratch / dent the hard top. This is originally fitted to prevent such damage.
However, you **can** also fabricate a system to elongate the current trunk stops underneath the trunk (at the bottom of the two levers holding the trunk up). I will have to take pictures to this to show exactly how its done but if you want to install the bracket properly and don't care about the looks, then you can just bolt on the rubber stopper brackets to the hard top with the rubber piece facing UPWARDS once the hard top is oriented on the car.
STEP 10: Ensure that all the necessarily bolts / screws / panels etc. are securely in place. Get the friend (remember, mission critical piece!) and have the friend help you carry the hard top and place it onto the car. Needless to say, make sure your soft top is down. (SIDE NOTE: there are two rubber covering pieces provided with the hard top to be put onto the soft top ... there doesn't seem to be a reason for this and they tend to fall off easily so I would just skip that step).
Place the rear locking mechanism in first but do not lock it down. Then align and lock down the windshield release in the front. Once this is done, use the lever to lock down the rear portion of the hard top.
Roll up your windows and get a small stream of pressurized water (i.e. garden hose, but not full blast!) and test to see if you have fitted the rubber trim piece correctly. If you did, your interior should not be wet. Otherwise, get a towel!
This is as comprehensive as my sleep deprived self can think up. I will make a valid attempt at pictures this weekend and update the guide with actual pictures pointing to what I am talking about
enjoy!
 08-21-2009, 11:13 AM
#2

Someone sticky this, we just finished last night at 2am, only the strip the last screw for the front catchers. The Mugen manual says these should have been torqued to 16N-m. They were insanely tight from the factory. Thank God it's Friday.


