DIY Rotors and Brake Lines
 03-21-2012, 05:19 PM
#1

Thread Starter
This DIY will cover the installation of front and rear rotors as well as brake lines.
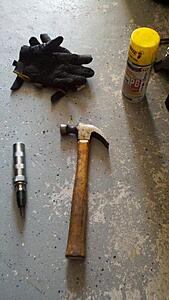
Special tools used:
Impact screwdriver - $10 from your local auto parts store
10mm Flared nut wrench - $5 from your local auto parts store
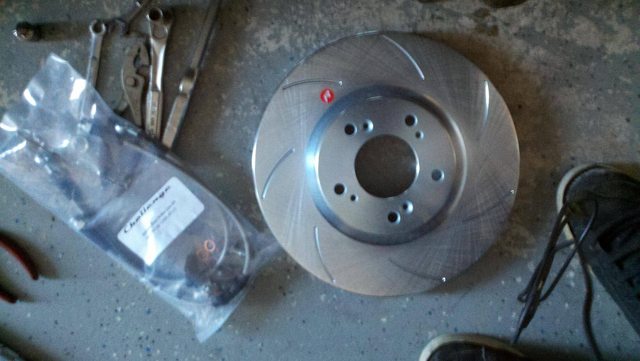
New parts:
Generic zinc plated and slotted rotors - $150 from various vendors
Challenge Stainless steel brake lines - $110 from various vendors
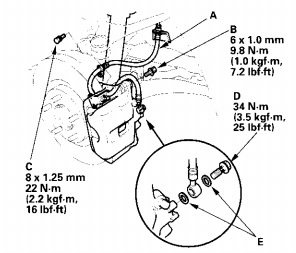
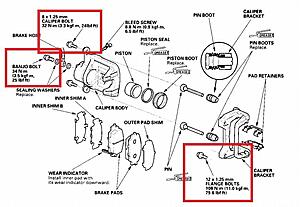
Torque numbers from the manual:
Step 1:
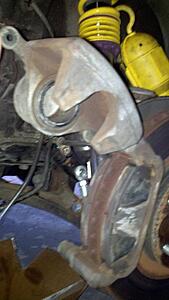
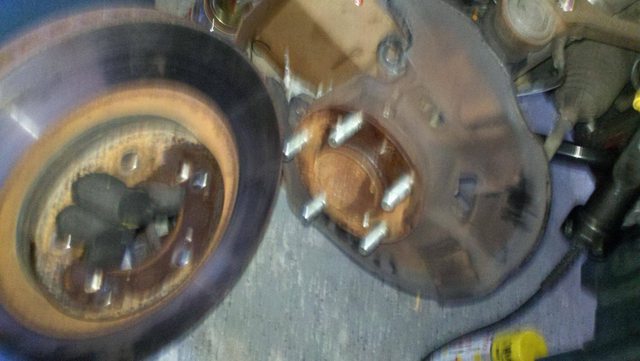
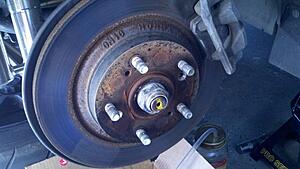
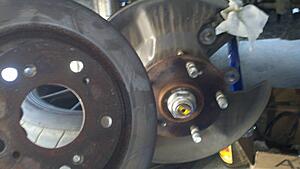
Loosen your lug nuts and put the car on jack stands then remove your wheels. You should see this:
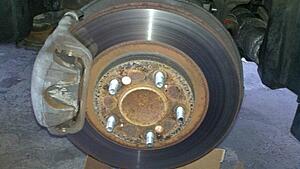
Step 2:
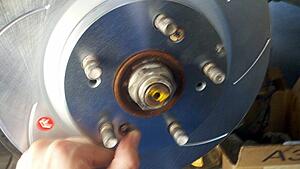
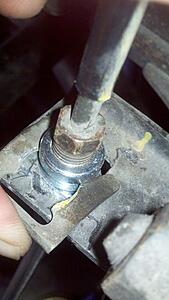
Press the impact screwdriver firmly in the Philips head screw. Ensure the bit is lined up perfectly then smite the driver like Oden smites a Frost Giant. Repeat for the other screw. If the screws are not budging give them a blast with some penetrating oil.
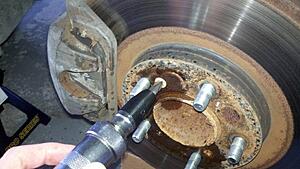
Now that the rotor screws are out you should see this.
Step 3:
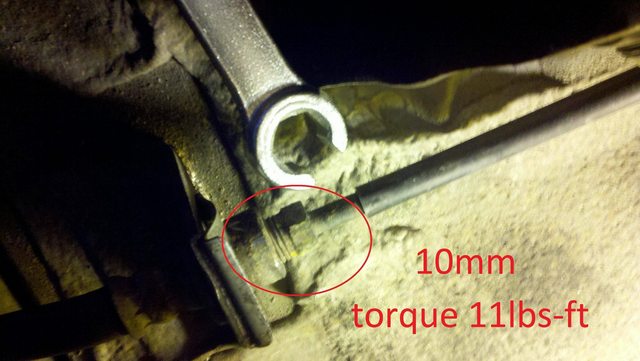
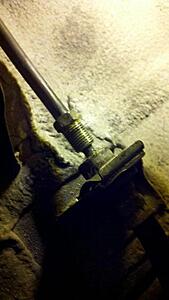
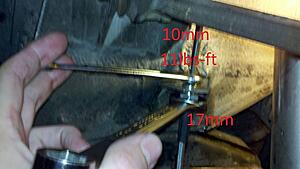
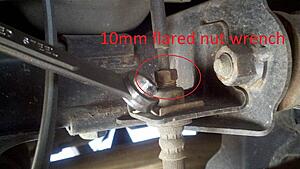
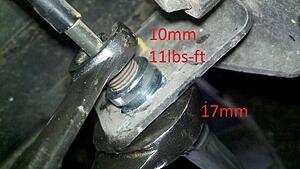
Next loosen the flared nut from the brake hard line to the brake line. Use a 10mm flared nut wrench. When re-installing this is torqued to 11lbs-ft
Don't remove the hard line yet.
Step 4:
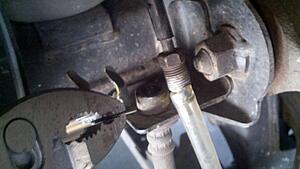
Remove the brake line clip that holds the soft line in place. Just grab the edge with your pliers and yank from side to side until it comes off.
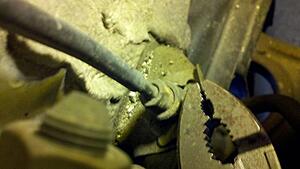
Step 5:
Now that the clip is removed you can pull the hard and soft lines apart. I put the end of the hard line into a nylon tube so that and remaining fluids drain into a container.
Step 6:
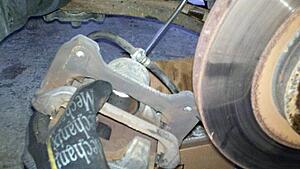
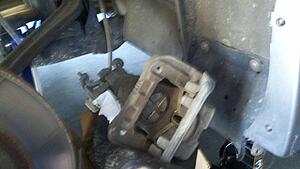
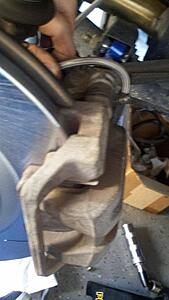
Now its time to remove the brake pads so loosen the bottom caliper pin so that you can rotate up the caliper and remove the pads.
The caliper pin is 12mm
Rotate the caliper up and remove the pads. They should pull right out, wiggle them if they are getting stuck.
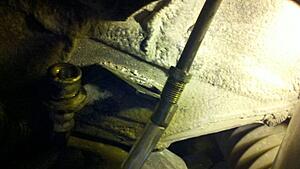
Step 7:
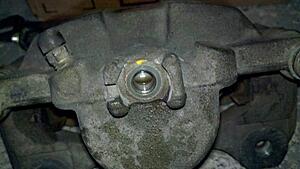
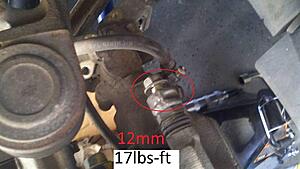
Next, remove the brake line mounting bolt. The bolt is 12mm
Step 8:
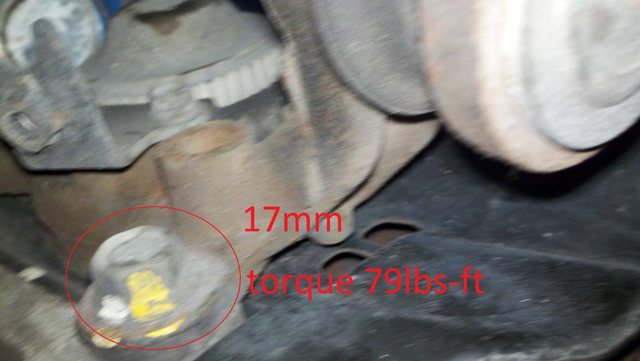
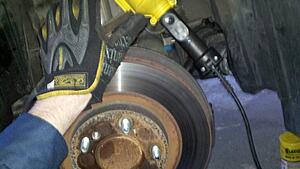
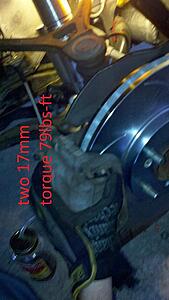
Now comes the muscle part. The caliper bracket mounting bolts are torqued at 79lbs-ft. I'd recommend a 6 point socket or box end wrench. Use a breaker bar or hit it with a hammer. The bolts are 17mm and are on tight.
Step 9:
The caliper can now be removed from the hub and clear the rotor. So remove it and put it on the ground.
Step 10:
Remove the brake line from the caliper. The bolt is 12mm. Have a rag ready in case any fluid leaks out
Wipe the area clean and dry once the line is removed.
Step 11:
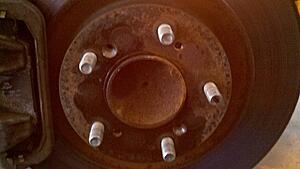
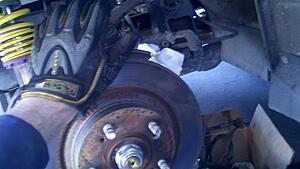
Give the rotor a Bruce Lee palm strike to knock it loose.
Wiggle the rotor until it comes off.
Step 12:
Connect your new brake line to the hard line. I recommend pushing the new brake line up and threading the hard line with your finger to make sure you are threading it correctly.
Now use your flared wrench and a 17mm wrench to tighten the brake lines to what you think 11lbs-ft is
Step 13:
Re-install the brake line clip
I tapped it with a flat head screwdriver and hammer to seat it fully

Special tools used:
Impact screwdriver - $10 from your local auto parts store
10mm Flared nut wrench - $5 from your local auto parts store

New parts:
Generic zinc plated and slotted rotors - $150 from various vendors
Challenge Stainless steel brake lines - $110 from various vendors
Torque numbers from the manual:

Step 1:
Loosen your lug nuts and put the car on jack stands then remove your wheels. You should see this:

Step 2:
Press the impact screwdriver firmly in the Philips head screw. Ensure the bit is lined up perfectly then smite the driver like Oden smites a Frost Giant. Repeat for the other screw. If the screws are not budging give them a blast with some penetrating oil.

Now that the rotor screws are out you should see this.

Step 3:
Next loosen the flared nut from the brake hard line to the brake line. Use a 10mm flared nut wrench. When re-installing this is torqued to 11lbs-ft
Don't remove the hard line yet.

Step 4:
Remove the brake line clip that holds the soft line in place. Just grab the edge with your pliers and yank from side to side until it comes off.

Step 5:
Now that the clip is removed you can pull the hard and soft lines apart. I put the end of the hard line into a nylon tube so that and remaining fluids drain into a container.

Step 6:
Now its time to remove the brake pads so loosen the bottom caliper pin so that you can rotate up the caliper and remove the pads.
The caliper pin is 12mm
Rotate the caliper up and remove the pads. They should pull right out, wiggle them if they are getting stuck.

Step 7:
Next, remove the brake line mounting bolt. The bolt is 12mm
Step 8:
Now comes the muscle part. The caliper bracket mounting bolts are torqued at 79lbs-ft. I'd recommend a 6 point socket or box end wrench. Use a breaker bar or hit it with a hammer. The bolts are 17mm and are on tight.
Step 9:
The caliper can now be removed from the hub and clear the rotor. So remove it and put it on the ground.

Step 10:
Remove the brake line from the caliper. The bolt is 12mm. Have a rag ready in case any fluid leaks out
Wipe the area clean and dry once the line is removed.

Step 11:
Give the rotor a Bruce Lee palm strike to knock it loose.

Wiggle the rotor until it comes off.
Step 12:
Connect your new brake line to the hard line. I recommend pushing the new brake line up and threading the hard line with your finger to make sure you are threading it correctly.

Now use your flared wrench and a 17mm wrench to tighten the brake lines to what you think 11lbs-ft is

Step 13:
Re-install the brake line clip

I tapped it with a flat head screwdriver and hammer to seat it fully

 03-21-2012, 05:19 PM
#2
Thread Starter
Step 14:
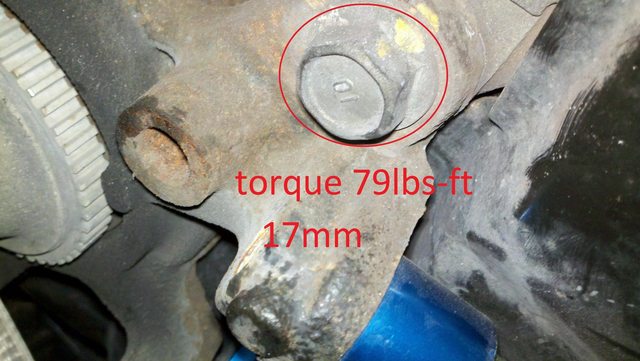
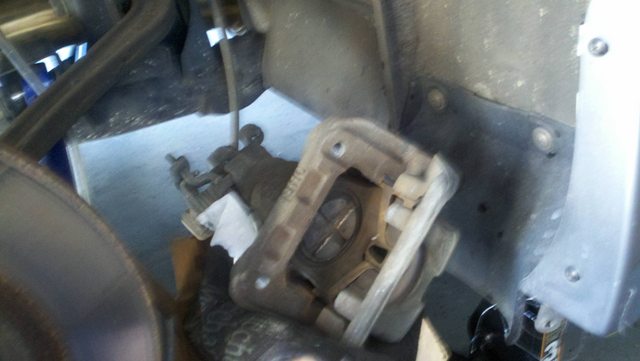
Hold the caliper against the hub and start threading the two 17mm bolts. Evenly torque the two nuts down to 79lbs-ft
Step 15:
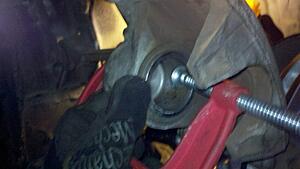
Use a clamp to push back the piston in the caliper allowing it to clear the new rotors and put your pads back in.
Step 16:
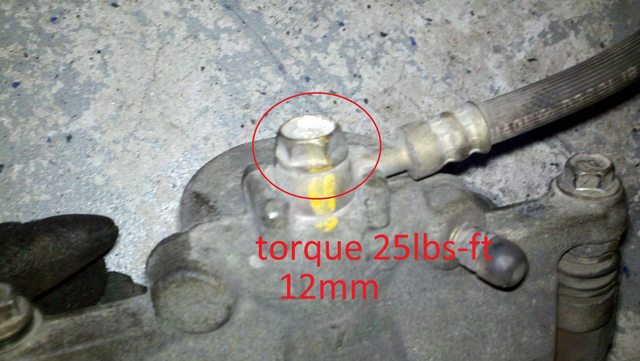
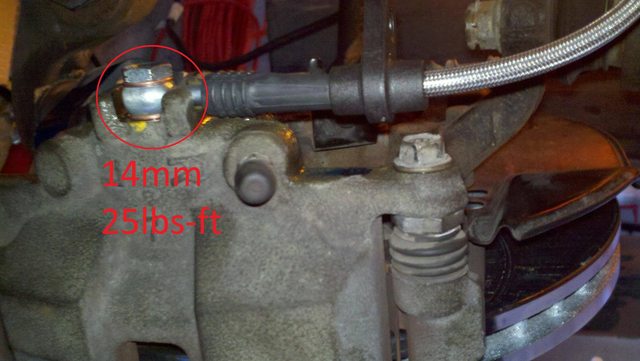
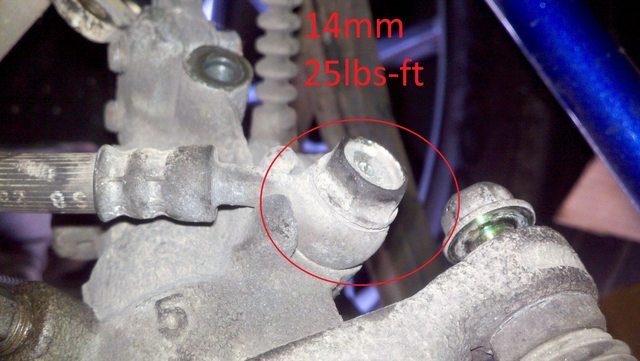
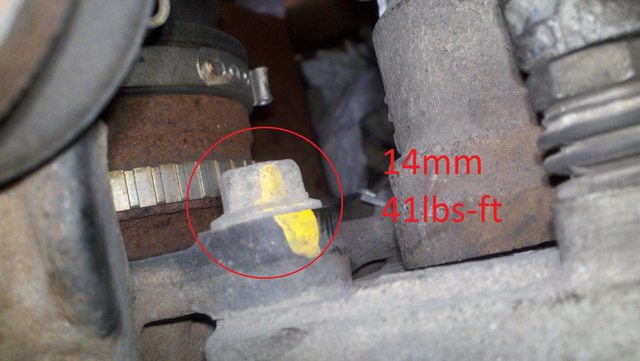
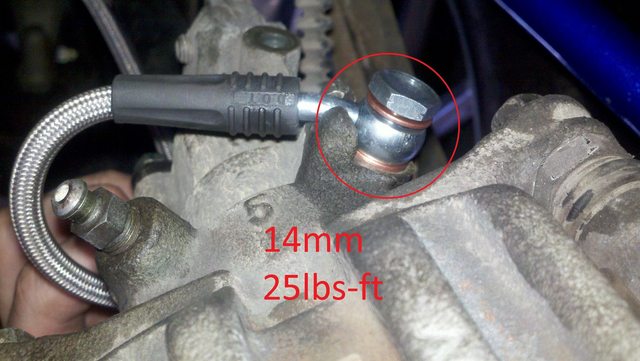
Insert the new bolt and washer on the new brake line then thread the bolt into the caliper. The new bolt was 14mm and torqued to 25lbs-ft
Step 17:
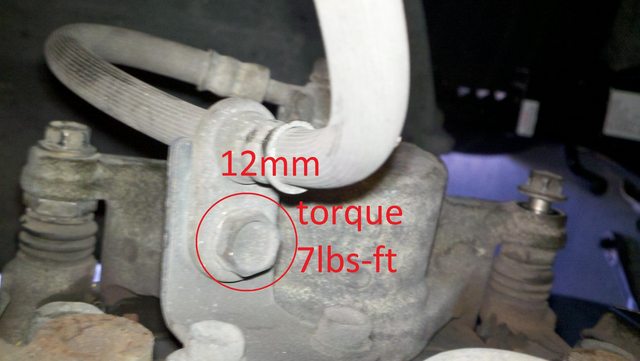
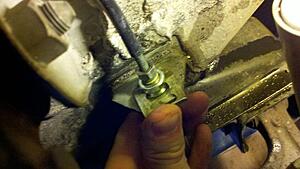
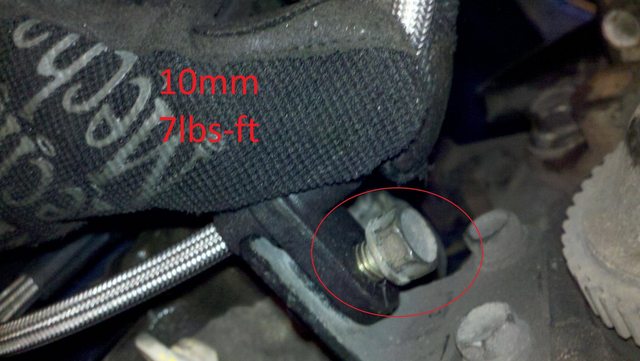
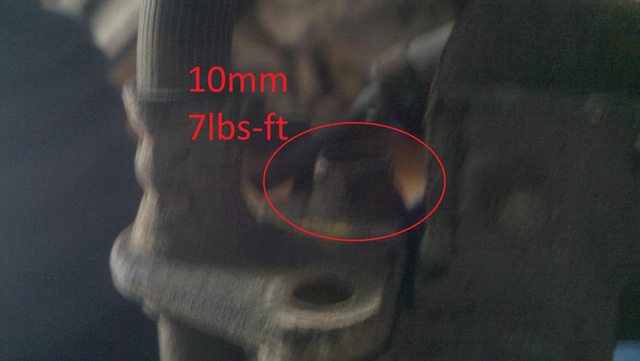
Re-install the 10mm bolt from the brake line mounting tab. The torque is 7lbs-ft
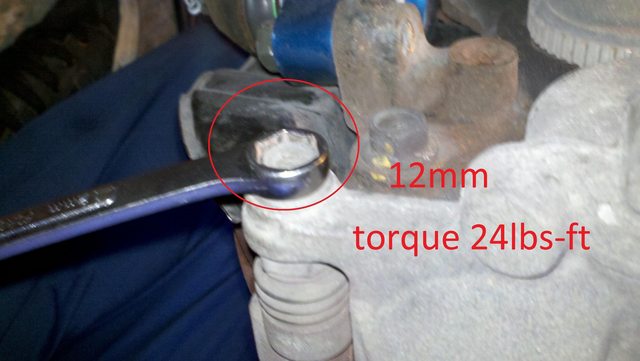
Step 18:
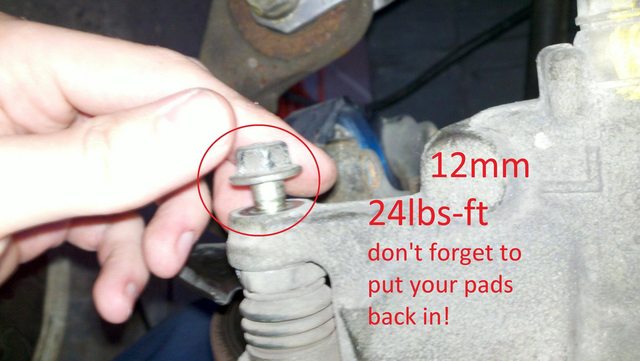
Re-install the 12mm caliper bolt. Make sure you stuck your pads in already. Torque is 24lbs-ft
Hold the caliper against the hub and start threading the two 17mm bolts. Evenly torque the two nuts down to 79lbs-ft

Step 15:
Use a clamp to push back the piston in the caliper allowing it to clear the new rotors and put your pads back in.

Step 16:
Insert the new bolt and washer on the new brake line then thread the bolt into the caliper. The new bolt was 14mm and torqued to 25lbs-ft
Step 17:
Re-install the 10mm bolt from the brake line mounting tab. The torque is 7lbs-ft
Step 18:
Re-install the 12mm caliper bolt. Make sure you stuck your pads in already. Torque is 24lbs-ft
03-21-2012, 05:20 PM
#3
Thread Starter
On to the rears:

Step 1
Wheels off parking brake off and on jack stands again line up the impact driver and whack the rotor screws free.
Step 2
Break loose the nut on the hard brake line
Step 3
Remove the clip holding the soft line to the body. Put the end of the hard line into a nylon tubing so it doesn't drip on you.
Step 4
Remove the top caliper bolt pull down the caliper and remove the pads. Close the caliper and insert the bolt back in
Step 5
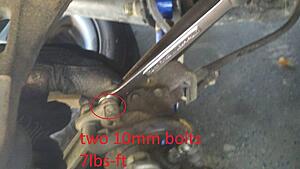
Remove the parking brake cover, two 10 mm bolts, then remove the two 10mm brake line mounting bolts
Step 6
Remove the brake line from the caliper, 14mm bolt. Have a rag ready to catch any fluid and put the brake line on the ground.
Step 7
Remove the two 14mm caliper bracket bolts.
Step 8
Place the caliper on the lower control arm. Do not let it dangle by the parking brake line.
Step 9
Knock the old rotor loose and remove it
Step 10
Install your new rotor and install the rotor screws
Step 11
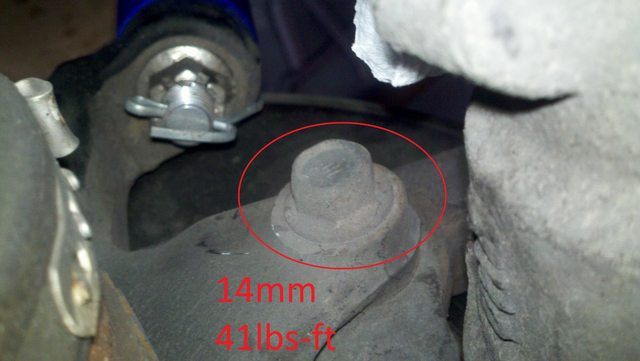
Re-install your caliper with the two 14mm nuts, torque each nut to 41lbf-ft
Step 12
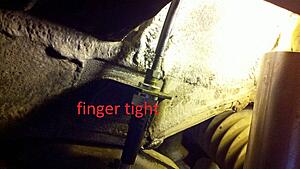
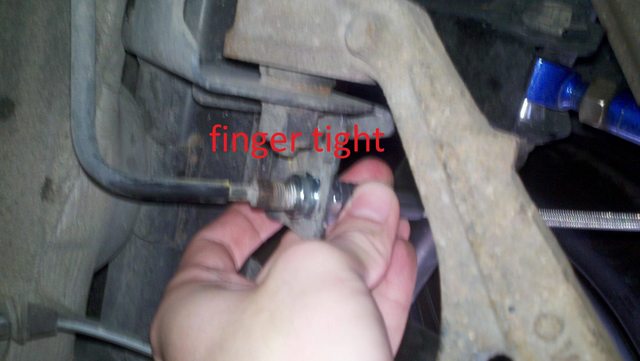
Connect your new brake line to the hard line and thread it finger tight
Step 13
Torque the brake hard line nut to what you think is 11lbf-ft using your 10mm flared nut wrench
Step 14
Insert the brake line clip
Step 15
Position the new brake line on the caliper and tighten the 14mm bolt to 25lbf-ft
Step 16
Mount the brake line mounting tab to the caliper. Two 10mm bolts, 7lbf-ft. Re-install the parking brake cover

Step 1
Wheels off parking brake off and on jack stands again line up the impact driver and whack the rotor screws free.

Step 2
Break loose the nut on the hard brake line

Step 3
Remove the clip holding the soft line to the body. Put the end of the hard line into a nylon tubing so it doesn't drip on you.

Step 4
Remove the top caliper bolt pull down the caliper and remove the pads. Close the caliper and insert the bolt back in

Step 5
Remove the parking brake cover, two 10 mm bolts, then remove the two 10mm brake line mounting bolts

Step 6
Remove the brake line from the caliper, 14mm bolt. Have a rag ready to catch any fluid and put the brake line on the ground.
Step 7
Remove the two 14mm caliper bracket bolts.
Step 8
Place the caliper on the lower control arm. Do not let it dangle by the parking brake line.
Step 9
Knock the old rotor loose and remove it


Step 10
Install your new rotor and install the rotor screws

Step 11
Re-install your caliper with the two 14mm nuts, torque each nut to 41lbf-ft
Step 12
Connect your new brake line to the hard line and thread it finger tight
Step 13
Torque the brake hard line nut to what you think is 11lbf-ft using your 10mm flared nut wrench

Step 14
Insert the brake line clip

Step 15
Position the new brake line on the caliper and tighten the 14mm bolt to 25lbf-ft

Step 16
Mount the brake line mounting tab to the caliper. Two 10mm bolts, 7lbf-ft. Re-install the parking brake cover

 08-08-2012, 04:55 AM
#7
Perfect write up. I just did my front rotors this weekend and can confirm the steps.
I do have a couple of tips:
1) I would recommend putting those pesky rotor retainer screws back in with the new rotors. I had initially not intended on putting them back in after getting them out but then I noticed that even with everything tightened down the rotor did slightly move when the brakes were applied. Because the lug nut bolts holes in the rotor are slightly oversized, the rotor is allowed to rotate on the hub every so slightly (yes, even with the wheel installed). I personally didn't like that, so I put some anti sieze compound on the screw and put them back in, and it completely eliminated any rotor movement.
2) Ideally, you want to put new brake pads in with new rotors, but it isn't absolutely necessary. Just don't forget to take it easy the first few hundred miles with your old pads / new rotors. The old pads are broken into the old rotors, so you'll need to give the old pads some time to seat themselves onto the new rotors. Until they fully seat, your braking performance will be slightly degraded.
3) Once you put everything back together, your brakes might feel spongy / light. Just pump the brake pedal a few times to get the pads to seat back up against the rotors and get the fluid to stabilize in the lines. Check your brake fluid level after this and add fluid as necessary.
4) Because I'm OCD, I sprayed my new calipers with rustoleum. I hate rust, hate it. I sprayed the inside of the hub area and the outside of the hub area, and the outer diameter of the rotors. I didn't worry about overspray as it will wear off in time, and it provides me a sort of "wear marker" to tell me when the rotors / pads are seated.
Trending Topics
08-08-2012, 07:01 AM
#8


Also, for step 15, pushing the front caliper piston back into the caliper... Tip: use the old brake pads against the piston. This will prevent any marring of the piston that could happen with the c-clamp.
Finally, for the rear calipers, there's no mention of how to push the piston back in. The best way is to have the brake piston tool, but if you don't have it... a 3/8 ratchet will work. Just leave the socket off, stick the end into the grooves in the piston, and twist it back in.
Great write-up and pictures. Surprised someone hasn't done this before (or has, but it's hiding). Hopefully the photos can be hosted somewhere that won't disappear after 8 months

