Installed Ebay Leather Seat Covers
 04-25-2017, 10:56 AM
#1

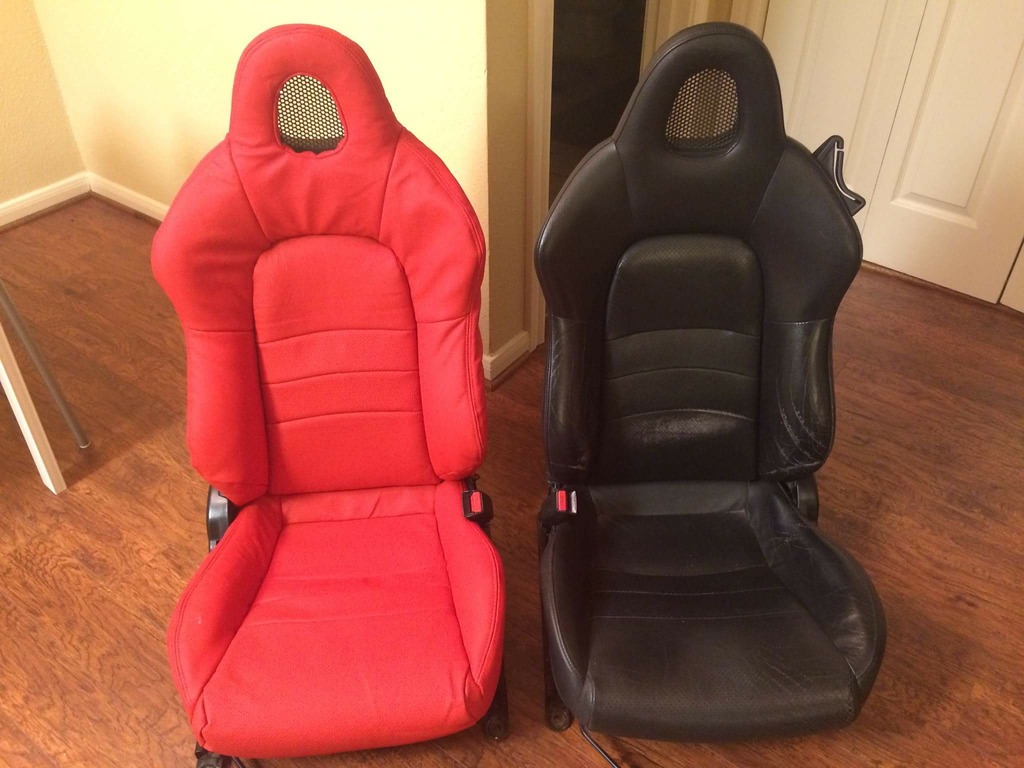
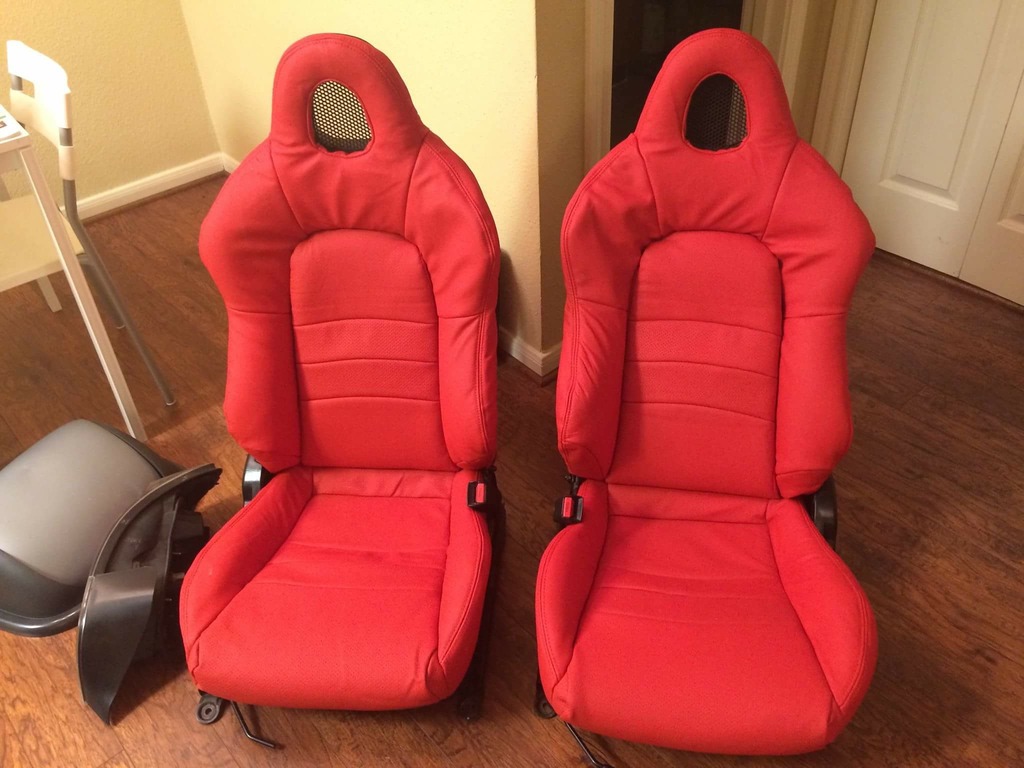
My 00 has the all black interior that I have wanted to change to red/black for sometime. I was able to use leather dye for the door panels but i knew that would not work for the seat covers. After looking at used seats and seat covers from established internet vendors I decided to take a chance on the custom leather covers from ebay. The reason was price as these covers were about half the cost of other established vendors. Also, these are replacement covers, meaning you must remove the factory leather cover first. My experience
The vendor was responsive, however it clearly stated the covers would take a few weeks. I think it was about 20 days from the time I ordered to the time I received them.
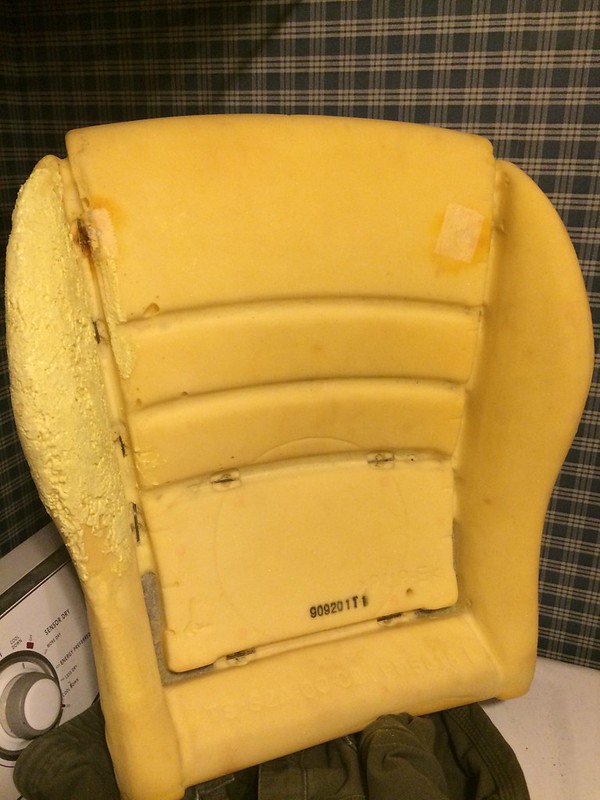
Once received, I inspected the covers. The leather quality was automotive grade, feeling heavier than the factory leather. The foam backing was thicker than the oem covers. The stitching was good using a double/double in some places where the factory used a double/single. There was a few hanger threads that needed to be trimmed. The center section was perforated and they included map pockets just like the oem covers. The attachment material (part that goes under the seat) was more paper like than felt like, so it seemed cheaper than the oem covers. Overall the materials seemed at least oem good and there was quite a bit of work done in stitching these.
Install: The vendor recommends professional installation and there is a reason why. Because at least half of how well the end product turns out is dependent on the skills of the installer. I myself have done some upholstery work and some leather repair work. However this is my first set of full leather replacement covers. If you have any doubts about your skills, pay a pro. I will give a basic overview, but this is not an easy job and experience greatly helps.
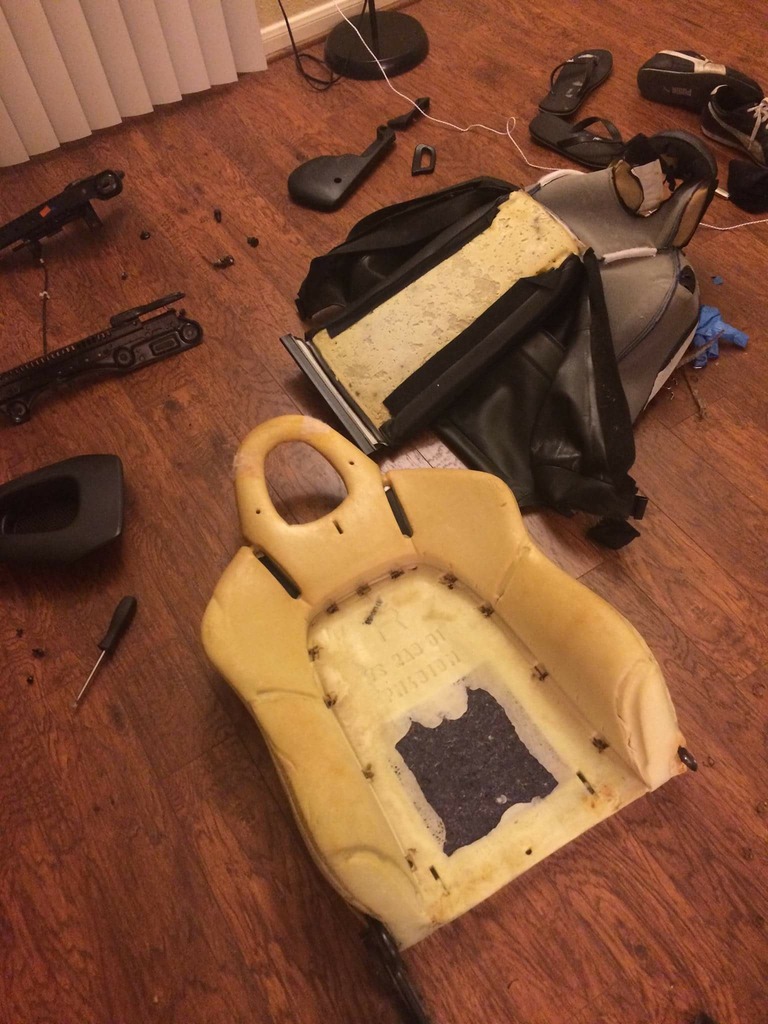
The OEM covers use hog rings and listing rods for attachments. I have used zip ties in the past, but for a new installation hog rings are easier. Plus they allow the cover to "float" which can aid in getting out wrinkles. The listing rods are both metal and plastic on the OEM covers. The new cover comes with none of them. I transferred the metal rods from old to new but the plastic ones are molded to the OEM cover. I created new rods by using coat hanger sections. Also the leather section in the center of the back rest ended with no loop for a listing rod. This means I had to take the material, fold it over and stitch my own loop for a listing rod. I used the oem cover as a model and it turned out OK.
Stretching the new cover over the foam I accidentally tore the attachment material (more paper) in two places. Like a heavy construction paper, if you pull straight its strong, bit if you pull it laterally it will tear easily. Lesson learned, I stitched a repair that no one will see. FYI the oem material is stronger and more flexible. Other than that, it helps if the covers are warm, and you install them inside out and roll it down as you go. You attached the listing rods using hog rings.
When all done the covers looked OK, with apparent wrinkles on the head rest, side bolsters and the rear of the bottom cushion. Using a steamer and heat gun and pulling and massaging the leather, I was able to minimize if not eliminate most of the wrinkles. It takes work and time. Also it seems that longer the seat sat, the better the covers looked. I can only assume the new covers were conforming to the seat foam and frame.
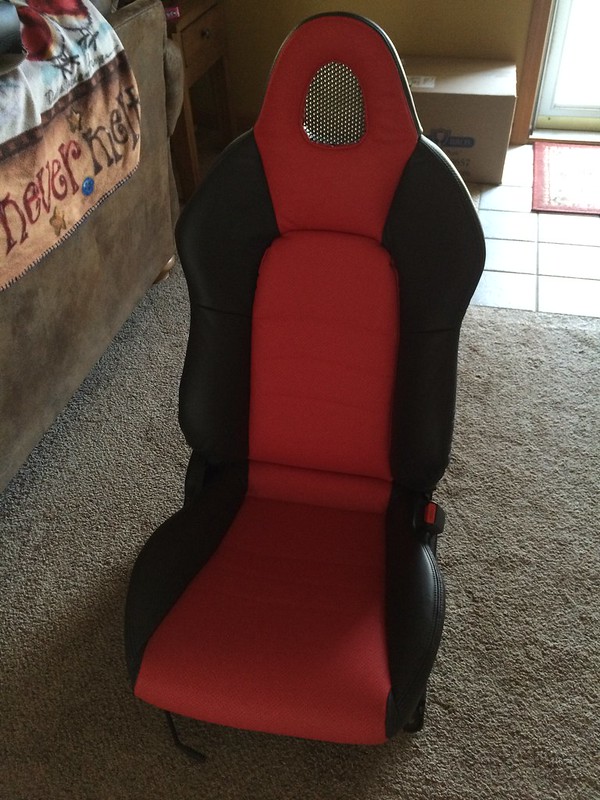
So the bottom line... The covers look great, especially to a layman. However an upholsterer would know they were not oem. They fit pretty damn good, but nothing fits like OEM. From internet pics I have seen of S2ks with replacement seat covers, the fitment of these looks no better or worse from what I can tell. The issue is any complaints could be the install not the cover. Unfortunately this may be an issue you would face even with a pro. The cover vendor could blame the installer and vice versa. From my end there are still a few wrinkles but not enough for me to re-do them. I will work them a bit more and as they wear in, they should look better
I know I should have more photos, but this is what I have right now. I will try to take some close ups of the areas that are not perfect, but they are hard to see.
Bottom line, these covers look really good and I doubt they look any worse than "name brand" leather covers. Why spend twice the money?
The vendor was responsive, however it clearly stated the covers would take a few weeks. I think it was about 20 days from the time I ordered to the time I received them.
Once received, I inspected the covers. The leather quality was automotive grade, feeling heavier than the factory leather. The foam backing was thicker than the oem covers. The stitching was good using a double/double in some places where the factory used a double/single. There was a few hanger threads that needed to be trimmed. The center section was perforated and they included map pockets just like the oem covers. The attachment material (part that goes under the seat) was more paper like than felt like, so it seemed cheaper than the oem covers. Overall the materials seemed at least oem good and there was quite a bit of work done in stitching these.
Install: The vendor recommends professional installation and there is a reason why. Because at least half of how well the end product turns out is dependent on the skills of the installer. I myself have done some upholstery work and some leather repair work. However this is my first set of full leather replacement covers. If you have any doubts about your skills, pay a pro. I will give a basic overview, but this is not an easy job and experience greatly helps.
The OEM covers use hog rings and listing rods for attachments. I have used zip ties in the past, but for a new installation hog rings are easier. Plus they allow the cover to "float" which can aid in getting out wrinkles. The listing rods are both metal and plastic on the OEM covers. The new cover comes with none of them. I transferred the metal rods from old to new but the plastic ones are molded to the OEM cover. I created new rods by using coat hanger sections. Also the leather section in the center of the back rest ended with no loop for a listing rod. This means I had to take the material, fold it over and stitch my own loop for a listing rod. I used the oem cover as a model and it turned out OK.
Stretching the new cover over the foam I accidentally tore the attachment material (more paper) in two places. Like a heavy construction paper, if you pull straight its strong, bit if you pull it laterally it will tear easily. Lesson learned, I stitched a repair that no one will see. FYI the oem material is stronger and more flexible. Other than that, it helps if the covers are warm, and you install them inside out and roll it down as you go. You attached the listing rods using hog rings.
When all done the covers looked OK, with apparent wrinkles on the head rest, side bolsters and the rear of the bottom cushion. Using a steamer and heat gun and pulling and massaging the leather, I was able to minimize if not eliminate most of the wrinkles. It takes work and time. Also it seems that longer the seat sat, the better the covers looked. I can only assume the new covers were conforming to the seat foam and frame.
So the bottom line... The covers look great, especially to a layman. However an upholsterer would know they were not oem. They fit pretty damn good, but nothing fits like OEM. From internet pics I have seen of S2ks with replacement seat covers, the fitment of these looks no better or worse from what I can tell. The issue is any complaints could be the install not the cover. Unfortunately this may be an issue you would face even with a pro. The cover vendor could blame the installer and vice versa. From my end there are still a few wrinkles but not enough for me to re-do them. I will work them a bit more and as they wear in, they should look better
I know I should have more photos, but this is what I have right now. I will try to take some close ups of the areas that are not perfect, but they are hard to see.
Bottom line, these covers look really good and I doubt they look any worse than "name brand" leather covers. Why spend twice the money?

 04-25-2017, 11:18 AM
#3

Wow, great review and the covers look fantastic. Was there any wear on your stock foam? If so, did you do any work to the foam or replace any? I've seen videos of people using steam to expand the foam to its original shape. Just curious.
04-25-2017, 11:53 AM
#4
The original seat covers were mint. 26k miles on them. Thats why I did not want to cut out the listing rods, the OEM covers are still very good.
The seat foam bottom, LH side bolster was pretty trashed. It was hollowed out by the metal frame. So I used great stuff foam to re-build it. I used the window and door version because it is squishy, but its still harder than the oem seat foam. I love it because it provides firm lateral support for track days.
The seat foam bottom, LH side bolster was pretty trashed. It was hollowed out by the metal frame. So I used great stuff foam to re-build it. I used the window and door version because it is squishy, but its still harder than the oem seat foam. I love it because it provides firm lateral support for track days.
04-25-2017, 11:56 AM
#5
04-25-2017, 05:20 PM
#6
Community Organizer


They look great! Do you have any pics of your dyed door inserts?

Trending Topics
05-05-2017, 12:07 PM
#8

I'm pretty sure I got the same leathers from same seller. It was postmarked and had the seller located in Houston TX? I received mine about a year ago now and im sure its through the same person because the leather looks same quality and price was low as well. I actually got mine for $225 shipped because it was an auction. I ended up going all red leather.
My review on it:
1. I think the leather is pretty cheap quality. I daily drive mine and after about a year now, there are already some wear spots on the leather. Despite how durable the oem leather is.
2. Seller communication was horrible. Since I am located in Houston, I asked if there was anyway I could do local pickup to save on shipping. 2 weeks later, I finally got a response and they told me no. 2 more weeks later, it finallly arrived in mail. Thinking it was probably made overseas then shipped here.
3. The leather is softer/more plush than oem. Where the oem leather is kinda firm and your body slides around alot, these are way more plush and comfortable to sit in. And leather isnt slick, so at track, I dont slide around as much like oem leathers.
For the price, its not too bad if you tackle the replacement yourself. I was quoted by an upholstery shop $400 in labor to do both seats. And since I only got the leathers for $225, I couldnt justify spending that much on labor, so I did it myself. Took me about 8 hours to do both, and $20 for hog ring pliers, bag of 200 hog rings and bag of zip ties. After installing (pics shown) the leather was kinda wrinkled up looking, but what I did was leave top down for few days in TX sun, and it looks better now.


