$100 DIY Smart Strings
 04-02-2013, 04:08 PM
#1

Why did I build this?
1. I’m cheap and over $400 for Smart Strings seemed a lot of money.
2. I like a project.
3. Because stringing a car is inherently inaccurate if you do not know for certain known distances between fixed points on the car if your strings are not a known distance apart. Marking up a garage floor with plumb bob references is time consuming, although it is fool proof provided you choose symmetrical reference points. There doesn’t seem to be a definite answer on the internet land about the distance between the wheel mounting surfaces. Rob’s alignment guide (which is excellent and which I found indispensable) lists AP1 specs but not AP2. You cannot use the rim face for a reference point (even with non-staggered wheels) unless you know the distances between the wheels’ mounting surface, and even then, you are setting your measurement tool up from the very point you are trying to adjust. And yes, I realize you can measure front and rear of the rim face and use the mean for a reference, but that seems like too much math to do every time.
4. I wanted a quicker way to set up an alignment.
5. My older brother said it works, and I tend to listen to him. (Thanks, Duncan!)
What you will need:
1. ¾” square aluminum tubing, two six foot lengths. I bought it from Lowe’s and it came in 6 foot lengths. You can substitute ½” EMT (metal conduit) if you’re on a budget. It won’t be as easy to work with, but it’s a fraction of the price. $23 each.
2. 1” EMT, one ten foot length. About $6.
3. 1” EMT clamp, eight. About 68 cents apiece.
4. Four thumbscrews. I used 10-32 x ¾”. About $2.
5. Four eye-bolts. I used 5/32 by 1 1/2'’. About $2.
6. Fishing line. I used 20 lb test. About $8.
7. Two weights- I had some bolts left over from the harness install, and they worked well. Large sockets also work well.
8. Four small tie-down straps. I bought mine from Autozone for $20 or so.
9. Four bungee cords. I bought a selection for around $15 from Autozone.
That’s around $100 total, but you could save money on the square tubing, and I imagine a lot of us have tie down straps, fishing line, or bungee cords laying around.
What you are building:
Here's what it looks like:


How to:
First, cut the 1” conduit in half to make two five foot lengths. About one inch from each end, drill and tap a hole for the thumb screws. This is not a critical dimension, and the ¾” square tube fits so well inside the conduit, that these probably aren’t really necessary.
Second, install the conduit clamps on the conduit. I spaced them 20 and 24 inches apart and centered, and it works really well. Two will face up, the other two down.
Third, drill a hole about a half inch in from either end of the aluminum square tubing and bolt on the eye bolts. The distance from the end is not important. It is absolutely critical, however, that the distance between the eye bolts is the same on each tube.

A socket works equally well as a weight. As does, I imagine, a fishing weight.

You are able to freely adjust laterally by loosening the thumb screws.

The inside clamp is intentionally angled a bit. Leave them a little loose the first time to get it set up.
That’s it! Now for setup:
To hang the straps, I used the radiator brackets and the holes in the trunk above the trunk lid springs. Attach the bungee cords to gain a good amount of tension. I used 24” bungees front and rear. They are attached to the back of the mufflers and one of the holes in the factory plastic diffuser/engine splash guard.
Tie the fishing line to one eye hook, run it through the other, and then tie a weight on.

I found this style of tie-down adjuster to be very easy to work with when bumping the bars up and down.

The holes are hiding above the trunk lid springs.
There are three things we have to ensure at this point for accurate measurements:
1. The fishing line runs through the hub centers.
2. The distance from the right side axle to the fishing line is the same as the distance on the left side, and the right side hub to the fishing line is the same distance as the left side.
***edit***
3. The distance between the alignment bars is equal (front right corner to rear right corner and front left corner to rear left corner).

This should be the same on either side.

As should this.
Note the *very* professional drawings. To ensure we are constructing a true rectangle (ie that opposite sides are equidistant and all sides are at right angles) we need the following to be true:
1. X1 = X2 and Y1 = Y2. –AND:-
2. Either YA = YB or XA = XB. Either implies the other.

That's supposed to represent a car. That's what a year of high-school drafting 15 years ago gets you- professionalism.

The alignment bar as viewed from the front or rear of the car. Also, these drawings are upside down on my phone and right way up on my computer, and I don't know why that is.
Notice also on the *just incredibly* well-rendered drawings the effect of even a 10 degree angle on the alignment bar- it’s effective length is reduced from 72” to 70.91”. That’s fairly significant when trying to set toe. To counter that effect, ***edit*** simply measure YA and YB and adjust until they are equal. If your bumper was significantly asymmetrical you might need to shim the bars against the body. I will consider adding adjustable rubber stand-offs to the design, as well.
This setup takes about 15 minutes after the first time, and it should be as accurate as the Longacre Smart String system, and I expect it will work on most cars as long as they’re not wider than six feet. All for under $100.
Please(!) post your suggestions to improve the design. My rules for building were: no machine work should be necessary, no welding should be necessary, and price was a big issue. Also, if I’ve made some fundamental error in alignment theory, please tell me so I can edit the post and avoid looking like an idiot for an extended period of time.
1. I’m cheap and over $400 for Smart Strings seemed a lot of money.
2. I like a project.
3. Because stringing a car is inherently inaccurate if you do not know for certain known distances between fixed points on the car if your strings are not a known distance apart. Marking up a garage floor with plumb bob references is time consuming, although it is fool proof provided you choose symmetrical reference points. There doesn’t seem to be a definite answer on the internet land about the distance between the wheel mounting surfaces. Rob’s alignment guide (which is excellent and which I found indispensable) lists AP1 specs but not AP2. You cannot use the rim face for a reference point (even with non-staggered wheels) unless you know the distances between the wheels’ mounting surface, and even then, you are setting your measurement tool up from the very point you are trying to adjust. And yes, I realize you can measure front and rear of the rim face and use the mean for a reference, but that seems like too much math to do every time.
4. I wanted a quicker way to set up an alignment.
5. My older brother said it works, and I tend to listen to him. (Thanks, Duncan!)
What you will need:
1. ¾” square aluminum tubing, two six foot lengths. I bought it from Lowe’s and it came in 6 foot lengths. You can substitute ½” EMT (metal conduit) if you’re on a budget. It won’t be as easy to work with, but it’s a fraction of the price. $23 each.
2. 1” EMT, one ten foot length. About $6.
3. 1” EMT clamp, eight. About 68 cents apiece.
4. Four thumbscrews. I used 10-32 x ¾”. About $2.
5. Four eye-bolts. I used 5/32 by 1 1/2'’. About $2.
6. Fishing line. I used 20 lb test. About $8.
7. Two weights- I had some bolts left over from the harness install, and they worked well. Large sockets also work well.
8. Four small tie-down straps. I bought mine from Autozone for $20 or so.
9. Four bungee cords. I bought a selection for around $15 from Autozone.
That’s around $100 total, but you could save money on the square tubing, and I imagine a lot of us have tie down straps, fishing line, or bungee cords laying around.
What you are building:
Here's what it looks like:
How to:
First, cut the 1” conduit in half to make two five foot lengths. About one inch from each end, drill and tap a hole for the thumb screws. This is not a critical dimension, and the ¾” square tube fits so well inside the conduit, that these probably aren’t really necessary.
Second, install the conduit clamps on the conduit. I spaced them 20 and 24 inches apart and centered, and it works really well. Two will face up, the other two down.
Third, drill a hole about a half inch in from either end of the aluminum square tubing and bolt on the eye bolts. The distance from the end is not important. It is absolutely critical, however, that the distance between the eye bolts is the same on each tube.
A socket works equally well as a weight. As does, I imagine, a fishing weight.
You are able to freely adjust laterally by loosening the thumb screws.
The inside clamp is intentionally angled a bit. Leave them a little loose the first time to get it set up.
That’s it! Now for setup:
To hang the straps, I used the radiator brackets and the holes in the trunk above the trunk lid springs. Attach the bungee cords to gain a good amount of tension. I used 24” bungees front and rear. They are attached to the back of the mufflers and one of the holes in the factory plastic diffuser/engine splash guard.
Tie the fishing line to one eye hook, run it through the other, and then tie a weight on.
I found this style of tie-down adjuster to be very easy to work with when bumping the bars up and down.
The holes are hiding above the trunk lid springs.
There are three things we have to ensure at this point for accurate measurements:
1. The fishing line runs through the hub centers.
2. The distance from the right side axle to the fishing line is the same as the distance on the left side, and the right side hub to the fishing line is the same distance as the left side.
***edit***
3. The distance between the alignment bars is equal (front right corner to rear right corner and front left corner to rear left corner).
This should be the same on either side.
As should this.
Note the *very* professional drawings. To ensure we are constructing a true rectangle (ie that opposite sides are equidistant and all sides are at right angles) we need the following to be true:
1. X1 = X2 and Y1 = Y2. –AND:-
2. Either YA = YB or XA = XB. Either implies the other.
That's supposed to represent a car. That's what a year of high-school drafting 15 years ago gets you- professionalism.
The alignment bar as viewed from the front or rear of the car. Also, these drawings are upside down on my phone and right way up on my computer, and I don't know why that is.
Notice also on the *just incredibly* well-rendered drawings the effect of even a 10 degree angle on the alignment bar- it’s effective length is reduced from 72” to 70.91”. That’s fairly significant when trying to set toe. To counter that effect, ***edit*** simply measure YA and YB and adjust until they are equal. If your bumper was significantly asymmetrical you might need to shim the bars against the body. I will consider adding adjustable rubber stand-offs to the design, as well.
This setup takes about 15 minutes after the first time, and it should be as accurate as the Longacre Smart String system, and I expect it will work on most cars as long as they’re not wider than six feet. All for under $100.
Please(!) post your suggestions to improve the design. My rules for building were: no machine work should be necessary, no welding should be necessary, and price was a big issue. Also, if I’ve made some fundamental error in alignment theory, please tell me so I can edit the post and avoid looking like an idiot for an extended period of time.

 04-02-2013, 06:01 PM
#3
It allows you to align the rear wheels to the front. With toe plates it's possible to point the rear wheels in a non-straight direction and still have correct toe as far as the rear wheels are concerned (relative to each other). On a lot of solid axle rear ends toe adjustment is not possible in the rear so it's not an issue.


 04-03-2013, 04:15 AM
#7
Former Moderator


Nice work. I'd be nice to be able to clamp the bars to the exhaust pipes in the rear and the grill insert in the front. Anyone know where the SmartStrings are anchored on the S2000?
This string calculator was linked to by someone else here on the forum but it definitely helps with the math:
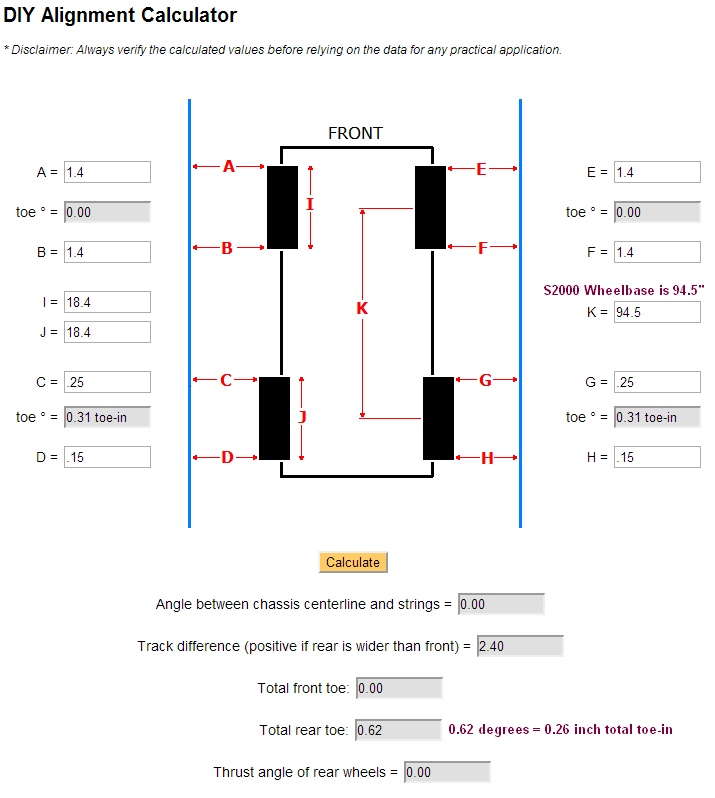
This string calculator was linked to by someone else here on the forum but it definitely helps with the math:
Trending Topics
04-03-2013, 07:17 AM
#8
Thanks for the write up!
Check out the home-alignment ideas in this video: http://www.youtube.c...h?v=sZoL1gaWedA
He explains how to create a level surface in your garage or driveway. I marked mine with tape so it was very repeatable after the first setup. This will allow you to accurately check camber using a bubble level-type gauge.
And the use of linoleum tiles and salt create dirt cheap alignment turn plates to make toe changes easier.

Thread
Thread Starter
Forum
Replies
Last Post
zeroptzero
S2000 Brakes and Suspension
2
06-05-2010 05:32 PM