Kirkey Aluminum seat install
 12-18-2013, 05:44 PM
#1


So I've seen a lot of threads asking about these but very few actually provide answers so since I just went through this heres all the details.
I'm a big guy. I drive a small car, and would like to do so safely on the track. I also would like to be able to pass a broomstick test should I ever want to run with an organization that requires this. To compound this, I still would like shorter people to be able to drive the car to get setup feedback from friends or if I want my fiancée to co-drive at AutoX.
All of these space constraints meant that an aluminum seat was the best option that was thin but strong, and had good side containment as well. It also helped that I have been using a different model Kirkey in my lemons car and have been very comfortable driving for 3-4 hour stints in that so I knew if done right they are very accommodating.
Below are some final install pics and some explanations on what had to happen to get it to this state. Moti at Blackbird Fabworx is responsible for most of the aluminum massaging and fabrication.
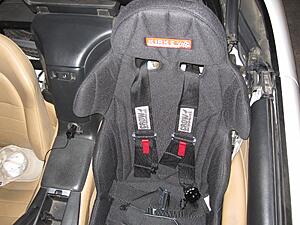
With the door closed, everything clears, just barely. The shoulder wings has to be bent in to achieve this. They now wrap around my shoulders perfectly.
Door open (trim was removed for the rollbar install, not seat. Trim will clear the seat. Worth noting its very tight. The seat cover actually slightly ribs the trans tunnel carpet where it wraps around the outside.
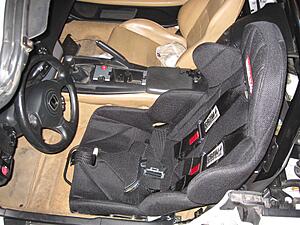
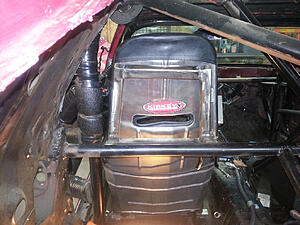
Showing clearance of glove box.

Shot from behind the seat showing clearance to back. This seat is a 15 degree layback that we then adjusted further by bending it between the lateral support and shoulder wings a few degrees. This let it curve more naturally to my back and let it slide back another 3-4 inches. You could do with a 10 degree layback and actually get a little farther back in the car for leg room if you have over a 34 inseam but you will sit slightly more upright. I like a little more layback. Sharp eyes will note that i have not yet installed the seat brace here. When installing an aluminum seat you should run a back brace from the harness bar to the seat just below the harness holes. Composite seats with an FIA cert dont need this until the cert expires, then many organizations will require a brace on an expired seat.
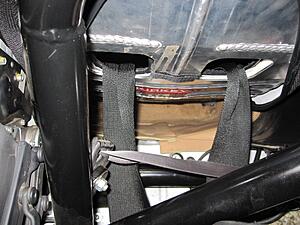
One more showing clearance to roll bar when slid all the way back.
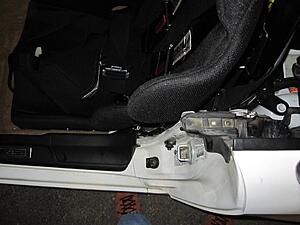
The seat sits on a subframe with the 6 point anti-sub mounted directly under the driver to the subframe since it is much stronger than the floor pan. This also allows the belt to move with the seat so you don't need to re-adjust that belt for shorter drivers. next time i pull the seat to remove the OEM belt reel Ill take some photos of the mounting.
Some things still left to do are trim some foam inserts for under the cover and tailor the fit of the seat. The ability to do this is a nice upside of an aluminum seat. I also need to install my back brace now that all of the adjustments are done.
Big thanks to Moti at Blackbird for working his magic on this.
Hope someone out there finds this useful.
-Ryan
I'm a big guy. I drive a small car, and would like to do so safely on the track. I also would like to be able to pass a broomstick test should I ever want to run with an organization that requires this. To compound this, I still would like shorter people to be able to drive the car to get setup feedback from friends or if I want my fiancée to co-drive at AutoX.
All of these space constraints meant that an aluminum seat was the best option that was thin but strong, and had good side containment as well. It also helped that I have been using a different model Kirkey in my lemons car and have been very comfortable driving for 3-4 hour stints in that so I knew if done right they are very accommodating.
Below are some final install pics and some explanations on what had to happen to get it to this state. Moti at Blackbird Fabworx is responsible for most of the aluminum massaging and fabrication.
With the door closed, everything clears, just barely. The shoulder wings has to be bent in to achieve this. They now wrap around my shoulders perfectly.

Door open (trim was removed for the rollbar install, not seat. Trim will clear the seat. Worth noting its very tight. The seat cover actually slightly ribs the trans tunnel carpet where it wraps around the outside.

Showing clearance of glove box.

Shot from behind the seat showing clearance to back. This seat is a 15 degree layback that we then adjusted further by bending it between the lateral support and shoulder wings a few degrees. This let it curve more naturally to my back and let it slide back another 3-4 inches. You could do with a 10 degree layback and actually get a little farther back in the car for leg room if you have over a 34 inseam but you will sit slightly more upright. I like a little more layback. Sharp eyes will note that i have not yet installed the seat brace here. When installing an aluminum seat you should run a back brace from the harness bar to the seat just below the harness holes. Composite seats with an FIA cert dont need this until the cert expires, then many organizations will require a brace on an expired seat.

One more showing clearance to roll bar when slid all the way back.

The seat sits on a subframe with the 6 point anti-sub mounted directly under the driver to the subframe since it is much stronger than the floor pan. This also allows the belt to move with the seat so you don't need to re-adjust that belt for shorter drivers. next time i pull the seat to remove the OEM belt reel Ill take some photos of the mounting.
Some things still left to do are trim some foam inserts for under the cover and tailor the fit of the seat. The ability to do this is a nice upside of an aluminum seat. I also need to install my back brace now that all of the adjustments are done.
Big thanks to Moti at Blackbird for working his magic on this.
Hope someone out there finds this useful.
-Ryan

 12-19-2013, 11:24 AM
#5
Previously I had a stock seat on BYS rails and that lowered me about 1". This setup is probably another 1.5-2" lower than that.
12-19-2013, 01:29 PM
#6
Registered User

Join Date: May 2008
Posts: 37
Likes: 0
Received 0 Likes
on
0 Posts
Trending Topics
12-19-2013, 03:39 PM
#8
Registered User
Join Date: May 2008
Posts: 37
Likes: 0
Received 0 Likes
on
0 Posts
Ah gotcha, am i correct in assuming that these seats could be mounted in the s2k using the generic sliders only and a little bit of fab work. I think i might try out the drag seat they offer as I dont want the shoulder pads
12-23-2013, 01:03 PM
#9
Be aware that the drag seats are pretty flimsy and wont contain you that well in a wreck. Also the seats with no shoulder wings and one harness passthrough hole we have seen fail at the head support and let the drivers head flop back.
IF you're going to run one of those a catch bar should be behind the driver to prevent this.
Heres an image of the catch bar on the seat in our lemons car for reference. This way if the seat fails in a rear impact the drivers head doesn't flop back over the harness bar. In the seats with shoulder wings and 2 harness holes the additional seat material prevents these kinds of failures.
 09-28-2022, 01:41 PM
#10
Registered User
I know this is a really old thread, but I am also a big guy who wants to take my S2000 to the track. I am 6'3" 200lbs. I am 15" wide at the hips and 21" at the shoulders. I am planning to get a 16" wide Kirkey 65 series since I loved the one in my former Lemons car.
@anorexicpoodle how tall are you? I am curious if we are similar in dimensions and if you were low enough with this setup to pass a broomstick test? I am trying to figure out my options and if I will ever get low enough.
@anorexicpoodle how tall are you? I am curious if we are similar in dimensions and if you were low enough with this setup to pass a broomstick test? I am trying to figure out my options and if I will ever get low enough.