Any DIY's for Spoon Rigid Collars?


 03-17-2015, 07:39 PM
#22
^ I just installed these last weekend and updated my build thread with some pictures that might help. You need to disconnect the one bolt on the steering column to allow for play while lowering the subframe. The wheel doesn't need to be locked while doing this. When using the copper grease, put it on the collars themselves. Be sure to double check the subframe bolt threads to ensure they're still in good shape to put back in, if not then replace them. Also remember the torque spec for subframe bolts is different from what Honda says in the service manual, torque to new proper spec. Hope this helps out.
03-20-2015, 02:23 PM
#23
Sounds like there's a lot of confusion and misinformation. According to this video with Spoon themselves, the grease goes on the threads. So Chewerks did it correctly.
https://m.youtube.com/watch?v=cGj3oC-wPF0
"But for question #1, is there any reason not to (disconnect the steering wheel coupler?)"
Disconnecting coupler = more play, with accidental risk of damaging cable reel and tearing expensive clock spring airbag cable
Not Disconnecting coupler = less play, I'm not sure what risk in damage. Risk damaging steering joint maybe?
Some advice above and something doesn't sound right here. I think I would rather install it with less play and not disconnecting the steering coupler. Accidentally damaging the fragile cable reel and clock spring airbag cable sounds a lot more risky and easily done, than damaging a heavy duty metal steering joint/bolt.
03-20-2015, 04:05 PM
#24

Sounds like there's a lot of confusion and misinformation. According to this video with Spoon themselves, the grease goes on the threads. So Chewerks did it correctly.
https://m.youtube.co...h?v=cGj3oC-wPF0
"But for question #1, is there any reason not to (disconnect the steering wheel coupler?)"
Disconnecting coupler = more play, with accidental risk of damaging cable reel and tearing expensive clock spring airbag cable
Not Disconnecting coupler = less play, I'm not sure what risk in damage. Risk damaging steering joint maybe?
Some advice above and something doesn't sound right here. I think I would rather install it with less play and not disconnecting the steering coupler. Accidentally damaging the fragile cable reel and clock spring airbag cable sounds a lot more risky and easily done, than damaging a heavy duty metal steering joint/bolt.
Honda explicitly calls for disconnecting that joint when doing a clutch job, which in regard to
edit - damn swype - good -> this
03-20-2015, 04:52 PM
#25
Honda explicitly calls for disconnecting that joint when doing a clutch job, which in regard to good install is the same procedure. It's really not difficult to not turn the steering wheel, which is the only way you'd damage the reel. Just tie it in place if need be.
03-20-2015, 09:55 PM
#26
Yeah the coupler will only be loosened about an inch, I have a picture in my thread showing this. There is no was to damage the steering set up as you shouldn't be messing with the steering wheel. I have anti seize that I put on the bolts separately. The spoon directions are in Japanese so if it specifies how to apply the copper grease, I can't read it. I've had no issues since the install and haven't had anyone tell me different so I'm assuming this was correct.
03-22-2015, 03:07 AM
#27
Registered User

Join Date: Dec 2014
Posts: 39
Likes: 0
Received 0 Likes
on
0 Posts
Someone should really do a DIY on this. The youtube video is great but I think everyone would like a better visual on unbolting the steering coupler so as to prevent steering-related damage. If its so important, why didn't they do it on the youtube install? Did they skip a vital step?
04-03-2015, 05:37 AM
#28
Registered User


Join Date: Dec 2012
Posts: 182
Likes: 0
Received 0 Likes
on
0 Posts
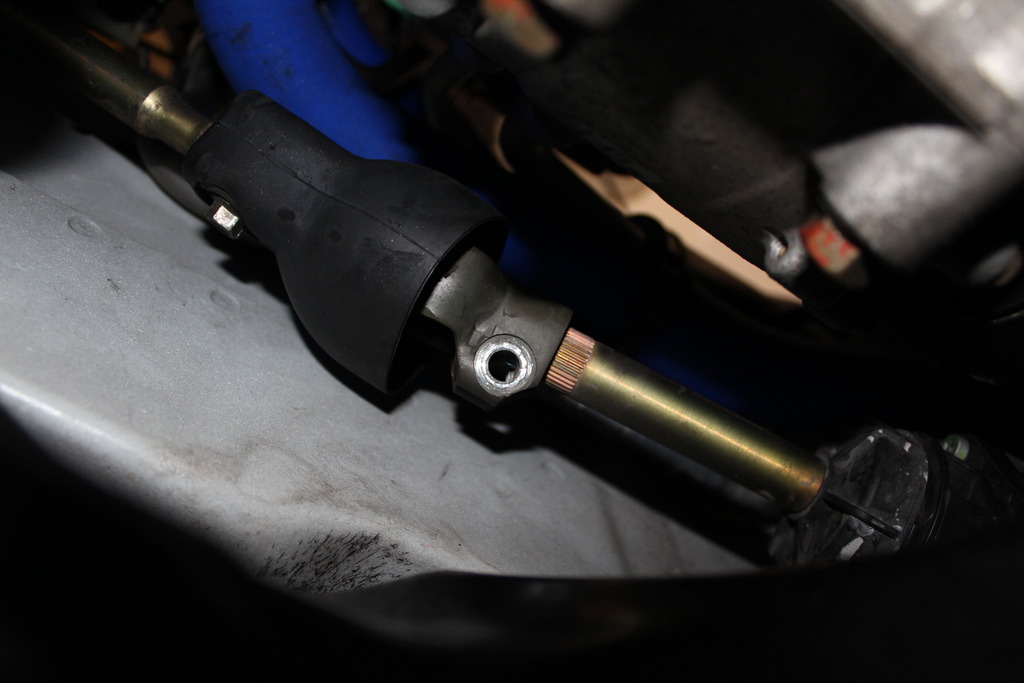
I hope tama05 doesn't mind but here's the pic of the coupler he referenced on his thread:
Tama05, you mentioned that the torque spec is different from factory (85ft/lbs for 19mm bolts and 43ft/lbs for 17mm bolts) specs. What are the new ones?
Tama05, you mentioned that the torque spec is different from factory (85ft/lbs for 19mm bolts and 43ft/lbs for 17mm bolts) specs. What are the new ones?
04-16-2015, 05:14 PM
#29
^ No problem, I hope this helps clarify for people wondering what bolt to undo. I torqued to the factory specs plus 10% after reading several threads on loose subframe bolts. Some people used loctite, but my bolts were all good, I just did it for piece of mind.
05-09-2015, 06:07 AM
#30

When I did mine I had a family friend that speaks Japanese explain the instructions that came in the kit to me. She is an older woman that knows nothing about cars. There is some terminology she does not know English word. So it was a bit of figuring things out.
At least according to the instructions, the grease goes on the collars, in thick beads around the top and bottom bases. There is way too much in the tube if it were just for the bolt threads. For the collars it is just right amount.
The instructions say to disconnect the steering joint. Can you skip this step? Some say yes. I disconnected it. Note that I first tried to go without disconnecting, but found I could not lower the front subframe evenly. I found I was not able to do this job without disconnecting steering joint.
Be sure to mark the alignment of joint to shaft, so you can maintain steering wheel alignment when you are done.
The basic process:
Lube the collars. Since its difficult to tell top from bottom of collar once lubed, be careful to stage the collars right side up after you lube them, and be careful not to lose track of orientation as you work
Car secured on stands, remove all 4 wheels
Loosen the 4 subframe corner bolts, lowering them about 30 mm
Now remove the 2 center bolts, loosening each one a little at a time, evenly lowering the subframe.
Place the collars in the 2 center locations, being very careful to note which way is up. Insert bolts, screw in to same 30 mm drop as the others
Now do one corner at a time. Remove bolt, add collar, replace bolt, screw back to 30 mm
Now tighten each corner, a little at a time, to evenly raise subframe, until its seated
Now tighten the 2 center bolts
Now torque them all to spec
Now repeat for the other subframe
Note the bolts in all 6 locations are not the same size, and not same size front to back. Make sure correct bolt goes in correct location. Honda says to replace these bolts. So if you want to go by the book, buy the bolts.
The collars themselves are different sizes, and marked with a letter A, B, etc. There is a diagram in the instructions that is explicitly clear which letter goes in which hole, even though its Japanese.
For the front, instructions say to disconnect the steering column u joint. Be very careful not to let steering wheel spin freely while this joint is disconnected, or you will be buying a very expensive replacement 'clockspring' airbag cable. For the rear I had to disconnect the cover for the evap whatever thing that resides in front of drivers axle.
As you raise subframe (by progressively tightening each corner), make sure the collar slides into hole in underbody, make sure that collar lip does not hang up on the edge (bolt will become hard to turn prematurely). Just rock the subframe a little as you tighten bolts if this happens.
Its not a difficult DIY, but there are some things to pay attention to. In particular, the up down orientation of the collars. Don't screw this part up. Once they are lubed up its much more difficult to tell which way is up.
The following 3 users liked this post by Car Analogy: