DIY S2000 Tensioner and Serpentine Belt
 02-26-2010, 06:18 AM
#1
Registered User
Thread Starter

Join Date: Jan 2010
Location: Clayton, NC
Posts: 391
Likes: 0
Received 0 Likes
on
0 Posts
Remove S2000 (F22C) Serpentine Belt & Tensioner
Tools required:
14mm socket/wrench/extension
Needle nose pliers
10mm socket/wrench/extension
Flat head screwdriver
Torque Specs
2 x Tensioner bolts (8 x 1.25mm) = 16 lb ft
Pully Bolt = 31 lb ft
Note
You do not need to change the tensioner, or remove the airbox to change the belt. I had to replace my tensioner that is why it is in this instruction. Removing the airbox makes removing the belt, and reinstalling easier.
1. The first thing I recommend is to draw out (or take a picture) of the belt and pulleys so you know how to install the new belt.
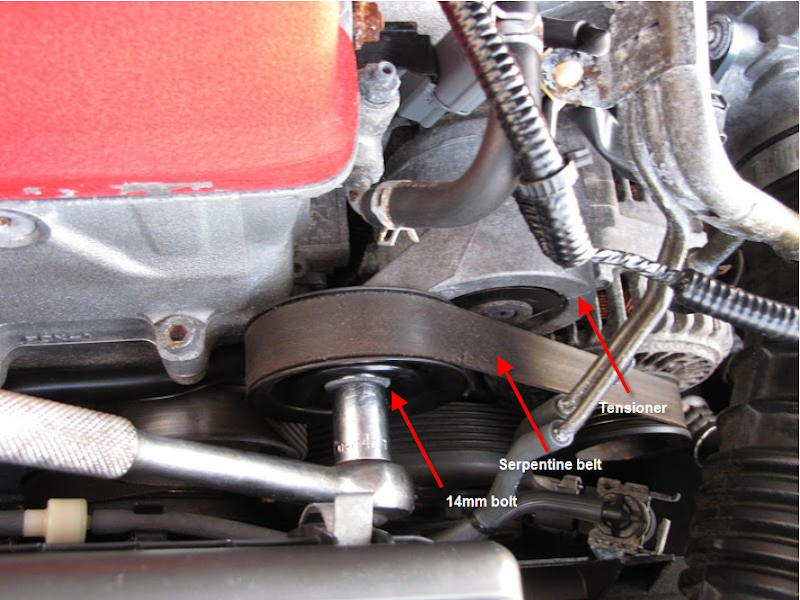
2. Remove the tension off of the serpentine belt (drive belt). This is easier than a beginner would think. To do this put a 14mm socket on the 14mm bolt and turn counter clockwise. You will notice that the tension will release. Slip the belt onto the 14mm socket.
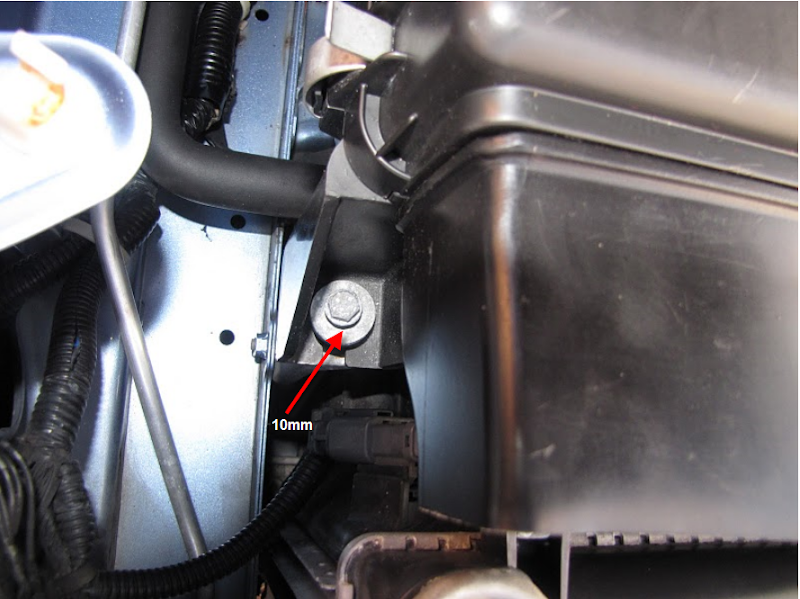
3. Remove the 4 10mm bolts from the air box. There should be a 10mm bolt in each corner of the air box. If you have a CAI your lucky!
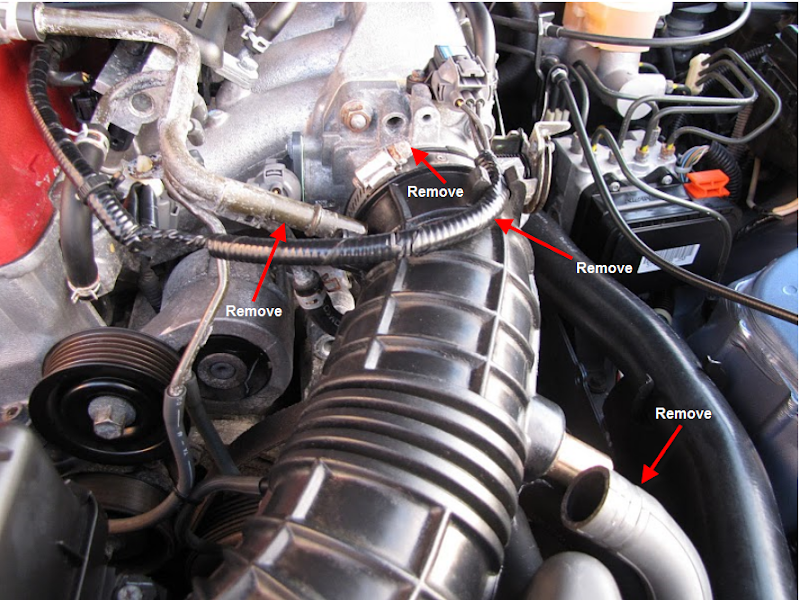
4. There will be wires attached to the air box closest to the engine just detach them.
5. Remove the clamp hitched up to the throttle body.
6. Remove the hoses/wires attached to the intake.
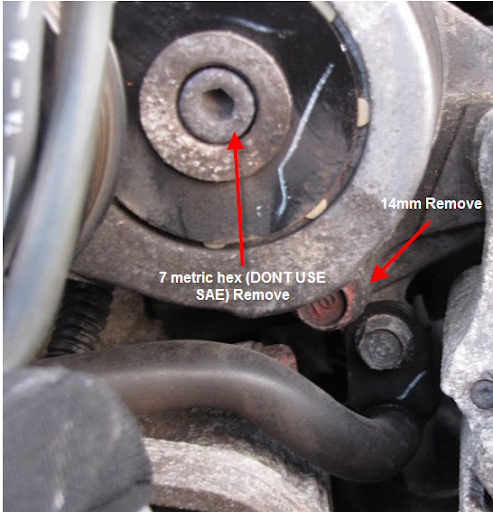
7. Remove the tensioner
a. #7 metric hex for center bolt
b. 14mm bolt for bottom of tensioner
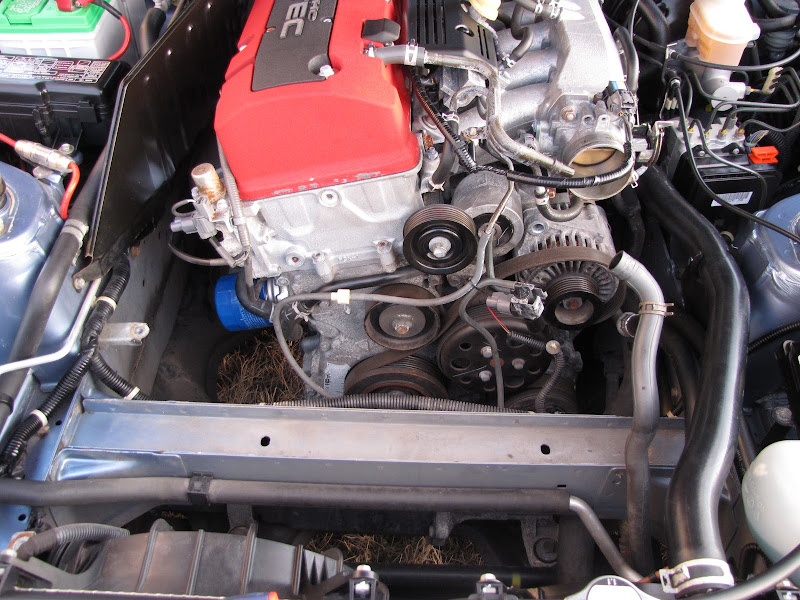
Recommendation - While you have the tensioner and air box off you could clean up the engine following Engine Cleaning Tips by krshultz.
https://www.s2ki.com/home/2010/02/26/s2000-...detailing-tips/
8. Install new tensioner the same way you removed the old one.
9. Install the new belt; follow your picture, or written instructions you took in step 1.
10. Check your belt make sure it’s on each pulley correct (aligned in the grooves).
11. Install the air box the way you removed it, check to make sure all cables/hoses are attached.
12. Check all your work; make sure everything is in the correct place.
13. Check your work again.
14. Start your engine, drive around the block.
I am not sure on the torque specs for the bolts so if anyone has them please post.
Also technically it makes more sense to take out the airbox first, snap a picture of the belt, and then remove the belt and the tensioner but no matter you will come to the same result.
If anyone wants extra security in their car you could pop the hood, slip off the serpentine belt which would take 10 seconds, and I guarantee no one will take your car with ease
Thank you

Tools required:
14mm socket/wrench/extension
Needle nose pliers
10mm socket/wrench/extension
Flat head screwdriver
Torque Specs
2 x Tensioner bolts (8 x 1.25mm) = 16 lb ft
Pully Bolt = 31 lb ft
Note
You do not need to change the tensioner, or remove the airbox to change the belt. I had to replace my tensioner that is why it is in this instruction. Removing the airbox makes removing the belt, and reinstalling easier.
1. The first thing I recommend is to draw out (or take a picture) of the belt and pulleys so you know how to install the new belt.
2. Remove the tension off of the serpentine belt (drive belt). This is easier than a beginner would think. To do this put a 14mm socket on the 14mm bolt and turn counter clockwise. You will notice that the tension will release. Slip the belt onto the 14mm socket.
3. Remove the 4 10mm bolts from the air box. There should be a 10mm bolt in each corner of the air box. If you have a CAI your lucky!
4. There will be wires attached to the air box closest to the engine just detach them.
5. Remove the clamp hitched up to the throttle body.
6. Remove the hoses/wires attached to the intake.
7. Remove the tensioner
a. #7 metric hex for center bolt
b. 14mm bolt for bottom of tensioner
Recommendation - While you have the tensioner and air box off you could clean up the engine following Engine Cleaning Tips by krshultz.
https://www.s2ki.com/home/2010/02/26/s2000-...detailing-tips/
8. Install new tensioner the same way you removed the old one.
9. Install the new belt; follow your picture, or written instructions you took in step 1.
10. Check your belt make sure it’s on each pulley correct (aligned in the grooves).
11. Install the air box the way you removed it, check to make sure all cables/hoses are attached.
12. Check all your work; make sure everything is in the correct place.
13. Check your work again.
14. Start your engine, drive around the block.
I am not sure on the torque specs for the bolts so if anyone has them please post.
Also technically it makes more sense to take out the airbox first, snap a picture of the belt, and then remove the belt and the tensioner but no matter you will come to the same result.
If anyone wants extra security in their car you could pop the hood, slip off the serpentine belt which would take 10 seconds, and I guarantee no one will take your car with ease
Thank you


 02-26-2010, 08:13 AM
#4
Registered User
Thread Starter
Join Date: Jan 2010
Location: Clayton, NC
Posts: 391
Likes: 0
Received 0 Likes
on
0 Posts
Originally Posted by spets,Feb 26 2010, 08:32 AM
Does the airbox have to be removed if you are simply replacing the belt, or is there enough room to route it with everything installed?
The belt takes 5 minutes its the easiest job I have done in a long time, Honda FTW!
The airbox is pretty easy to take off if you want a better visual of how to put the belt back on + more room to work with.
4 Bolts, and a few hoses and its off!
 02-26-2010, 08:18 AM
#6
Registered User
Thread Starter
Join Date: Jan 2010
Location: Clayton, NC
Posts: 391
Likes: 0
Received 0 Likes
on
0 Posts
Originally Posted by rail157,Feb 26 2010, 09:13 AM
Do I need to perform this in a field, or will my driveway do? 
The belt takes 5 minutes its pretty easy. It can be done in a field, in the woods, in a pond (w/oxygen tank), or in a garage (spoiled).

Trending Topics
02-26-2010, 04:03 PM
#8
hmmmm, I just did this job recently. I didn't remove the air box and I didn't remove the tensioner. It took a couple tries getting the belt in the right way but I got it done without much fuss. thanks for the write up. I put in a Goodyear Gatorback belt, less cost than the Honda belt and I think it's a better design as well (runs quieter and cooler)
02-26-2010, 05:17 PM
#9
Registered User
Thread Starter
Join Date: Jan 2010
Location: Clayton, NC
Posts: 391
Likes: 0
Received 0 Likes
on
0 Posts
Originally Posted by JFUSION,Feb 26 2010, 05:03 PM
hmmmm, I just did this job recently. I didn't remove the air box and I didn't remove the tensioner. It took a couple tries getting the belt in the right way but I got it done without much fuss. thanks for the write up. I put in a Goodyear Gatorback belt, less cost than the Honda belt and I think it's a better design as well (runs quieter and cooler)
Just me everyone is different.
Thanks
02-26-2010, 05:39 PM
#10
ah that makes sense if you change the tensioner. Yeah removing the air box will make the job easier improving access to the front of the engine. How do you know if you have a bad tensioner, does it have weak tension ?