Source for dbw APPS sensor?
 06-30-2019, 03:02 PM
#21


It works! I tried the suggested idle relearn, but didn't help. Then I thought I'd give alignment a try. I'd previously discounted that as stock sensor didn't seem to care how it was aligned.
The sensor has oval mounting slots, to allow adjustment.
After some experimenting with stock part and replacement part, and discovering that even stock part can throw the code if installed at the extreme end of range of adjustment, I found a procedure that works.
DIY for installing replacement APP sensor in DBW S2000 (will likely cure intermittent dbw hesitation issue)
Tools needed:
10mm socket and extension
12mm open end wrench
Flat blade screwdriver
T20 Torx bit socket
Cutoff wheel or dremel
OBD scanner
Replacement sensor. I got mine from Amazon seller NewYall, $25.
Remove black throttle assembly cover. Under hood, driver side (left hand drive) fender, just aft of shock tower. The cover the throttle cable goes to.
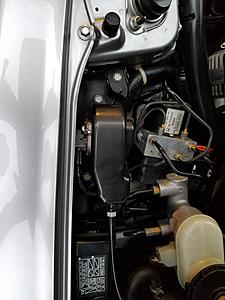
Unplug electrical connector from sensor.
Remove throttle cable. Loosen throttle cable lock nut, enough to remve cable from bracket. Manually advance throttle so you can remove cable end from throttle rotating assembly.
Remove throttle assembly from car, by removing 2 10mm bolts.
Now the fun part. Removing old APP sensor. Its secured by two screws, but there is no head. They just look like rivets.
Use cutoff wheel or dremel to carefully cut a groove in each head, so you can use screwdriver to loosen screws. The head from grinding will help break them loose, so loosen each one as soon as done grinding groove. Make a decently deep groove. It'll just make it more difficult if you go too low then strip the groove if it can't handle torque needed.
Once the screws are out, old part just comes off. There is a copper gasket, reuse it.
Now install new sensor. You'll see there is a slot in rotating throttle assembly, and a corresponding tab on sensor. Sensor tab needs to fit in that groove. Make sure it does.
Now secure the new sensor using the provided torx screws. Tighten just enough so you can still rotate sensor in its slotted mounting holes, but tight enough so it stays where you set it.
Sensor alignment:
Plug the electrical connector back into sensor. Note, if you turn the key on with sensor unplugged, it will throw a code. Two codes actually, codes are for both APP sensor circuits low. If you accidentally turn on ignition with sensor unplugged, just clear the codes and continue.
With sensor loosly tightened and plugged in, rotate sensor as far clockwise as ot will go. Throttle assembly is not bolted in place yet. Only sensor is loosely bolted in place and plugged in.

Turn on ignition, but DO NOT START ENGINE. Press pedal ALL the way to the floor. Make sure no code is thrown.
Now we're going to find the spot where sensor alignment just throws a code, then back off a hair.
Rotate sensor counter clockwise by as small an increment as you can. Press throttle to floor again. Make sure no code. Repeat this process until it throws a code (code will be P2123, APP circuit D too high).
Now back the sensor down clockwise by as small an increment as you can. Tighten into place, being careful it doesn't rotate at all.
Clear code. Then try throttle to floor again, make sure it does not throw code.
Reassemble everything, go for a drive. Make sure to floor it during drive in something higher than first gear, to make sure no code is thrown (it often wouldn't throw the code in first when misaligned). Keep floored well up into vtec. Make sure its FULLY floored.
Drink a beer, you just saved about $200 (how much more it would cost to buy a whole new assembly with sensor already installed and aligned).
 06-30-2019, 03:49 PM
#22
Community Organizer


Nice work! 
This sensor adjustment was what I wanted to avoid by purchasing a "calibrated" assembly and not having to explain how it has to be done, you will certainly get a few questions in the future. The YouTube videos for Accords show plug and play and that is the best way for most non technical owners.
This sensor adjustment was what I wanted to avoid by purchasing a "calibrated" assembly and not having to explain how it has to be done, you will certainly get a few questions in the future. The YouTube videos for Accords show plug and play and that is the best way for most non technical owners.
06-30-2019, 10:08 PM
#23
Good job and thanks for confirming the idle relearn didn't have anything to with it.
Maybe you could also check the resistance on the sensor with no pedal and pedal to the floor.
When you got acceptable numbers to aim for it might be faster and easier to have it setup correctly.
Maybe you could also check the resistance on the sensor with no pedal and pedal to the floor.
When you got acceptable numbers to aim for it might be faster and easier to have it setup correctly.
 07-01-2019, 03:24 AM
#24
I took resistance readings. What I learned is both oem and replacement sensors have similar numbers, though there were differences, and more importantly the full range of motion of sensor does not occur once installed. No matter where you install sensor along its range, it can't ever reach the highest resistance reading nor lowest.
The installed range of motion is that much restricted from the sensors full range of motion.
The installed range of motion is that much restricted from the sensors full range of motion.

Thread
Thread Starter
Forum
Replies
Last Post
Wannabes2k2k11
S2000 Under The Hood
5
02-12-2014 07:11 PM
CoolGuy094
S2000 Forced Induction
5
05-09-2013 01:08 PM