When you click on links to various merchants on this site and make a purchase, this can result in this site earning a commission. Affiliate programs and affiliations include, but are not limited to, the eBay Partner Network.
I did not take many pictures because I originally had not planned on doing a write up but I had a request to do one so I will explain the best I can. Valve stem seals can go bad over time causing oil to seep into the cylinder. This can cause highly increased oil burning and smoking when the car idles.
Tools Needed:
-10mm and 12mm Socket.
-5/8 spark plug socket
-Clean shop towel- I like to have this to set all the part in order on. Makes putting everything back together easier!
-HPT valve compressor
-Little magnet tool
-torque wrench
-needle nose pliers
-flat head screwdriver
-paper towels
-Valve adjustment feeler gauges if you loosen the valve adjustment bolts
-Either air compressor tool and adapter for spark plug or 5 feet of nylon rope.
-Spark plug pliers
-8 intake valve stem seals. I bought super tech brand
-8 exhaust valve stem seals.
Before starting I would take the spring compressor tool and run the bolt that pushes the valve spring down through its threads multiple times. I found a brand new one when threading caused some metal shavings to come off the base and you don't want those lying in the head of your engine.
Step One:
Remove spark plugs and valve cover. You can follow @suzuka-blue-s2k 's instructions below
- Remove bolts from spark plug cover and take it off.
- Take out the bolts that are holding the coil packs in (1 on each coil)
- Pull up on the coilpack and remove electrical clips from them, then remove coil packs.
- Disconnect sensor on the back of the valve cover
- Remove bigger hose coming from intake to the valve cover
- Loosen all of the bolts to the actual valve cover (Should be 4 main ones)
- Once those are off, use a flat head screwdriver to pull up on the edges since it might be on there pretty good. Once you got it up a little bit you should be able to wiggle it around, and pull it strait up. You will kind of have to remove it at an angle since the back of it will hit (you will see what i'm talking about when you do it) just work with it and it will come off fairly easy.
Step two: Remove Cam Caps and Cams.
Some people say to loosen the valve lash adjuster nuts/bolts but I prefer not to mainly because it saves you from having to do another valve lash adjustment.If not experienced with doing this just loosen the nut and back off the valve adjuster as you can damage part when putting it back together if not careful It will make putting the games back in a little bit more of a pain so if valve lash adjustments don't annoy you then loosen the little bolts/nuts. Regardless when putting back together I still check all my valve lashes(adjustments). A lot easier to tweak ones that are off than replace a valve seat.
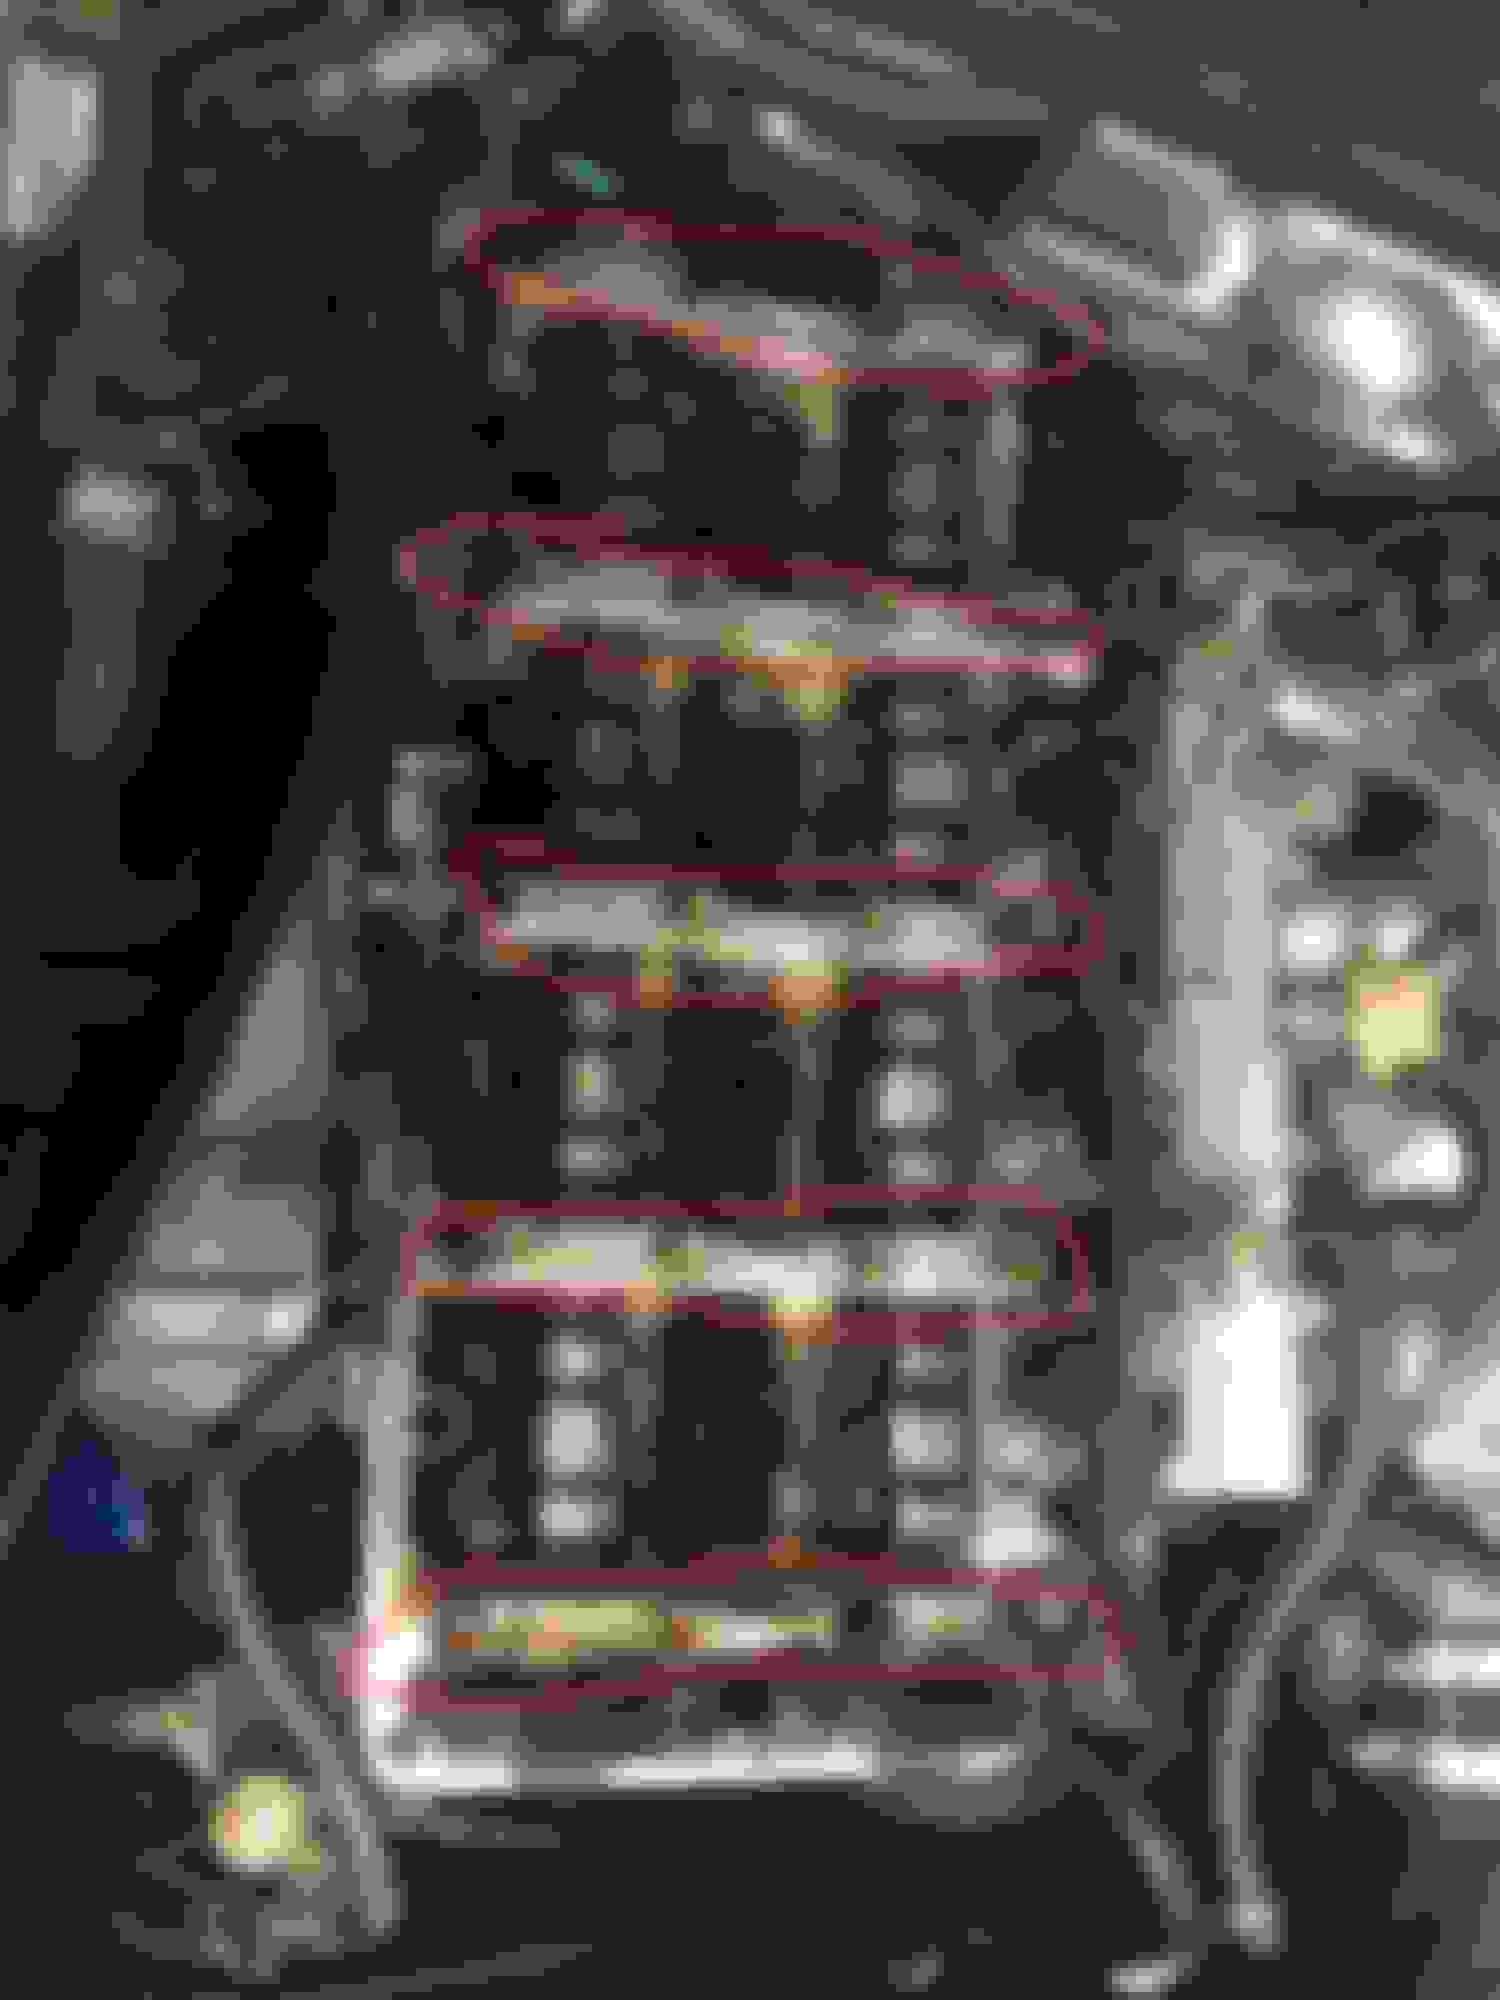
-Remove the 20 12mm cam cap bolts circled in the picture below. Note the location of the 5 bolts that have different heads on them. Also remember the length. I believe the two toward the back of the engine are shorter than the front three.
-Remove cams. Might be a little tight just pull up and work them out.
-Remove lower cam towers/holders (not sure the technical name) They are what the cams are resting on before you pull them out. These can be a little tricky to get out. I recommend putting two of the cam cap bolts back in and threading them a couple threads on each end to hold the the rocker assembly together together and just work them up.
-You now have a couple choices to hold the valves from falling into your engine. You can use the air compressor trick where you pressure your cylinder to hold up the valve which I did when changing my retainers but did not trust it enough while doing my valve seals. The trick I used was stuffing nylon rope into my cylinder through the spark plug hole and turning the crank until the rope was pushed up against the valves holding them up. If you use the air compressor trick also be sure you are at TDC for that cylinder just in case it does fail you can still save the valve.
-Stuff paper towels in oil return holes on the head to prevent keepers from falling into the engine.
-Screw the HPT valve compressor tool into the head as the picture shows below. This tool is around $80 but worth every penny. It makes this job so much easier. I used a different tool to do my retainers and it was much more frustrating than this tool. Compress the valve spring releasing the keepers. If keepers do not release after a little compression pull the compressor tool off and stick a 14 mm socket on the top of the retainer and hit it a couple of times with a hammer(not too hard) to break the keepers free. Then put the compressor tool back on and try again. Do this for both of the intake and exhaust valves. When the keepers pop out the top use the magnet tool to get ahold of them and pull them out. Remember orientation of retainer and springs so you don't put the spring back in upside down. Not my picture but heres how it works
-Now you have the springs out and have the valve stem seals exposed(circled in the picture below. These are the new ones i installed).
-Use the spark plug pliers to pull the old seals off. Some are stubborn and I found that making sure you were pulling out at the angle the valves were they came out easier. Don't just pull up. Here is an old bad seal removed being held by the spark plug pliers
-Now to install the new ones. Dip the new seal in some oil before sliding it on the stem. Slide them on the stem and then use a 10mm or 12mm socket(can't remember which) and hit them lightly with a hammer to get them seated all the way down. You will hear the difference in sound when they are fully seated on the valve stem.
-After this everything is basically opposite of what you've done.
-Replace springs, retainers, and keepers. When replacing the keepers some of them won't want to fall right into place because of the angle being slightly off(you will see what i mean when doing it) to solve this simply just take a small flathead and push the keeper down into place. I found it just took a slight push and it fell right in. If having any trouble with this reference Energetic's thread for replacing the valve retainers. It shows in more detail.
-reinstall cams making sure timing is correct by setting crank pulley where the arrow lines up with the mark on the pulley and the cams look like this:
-There is multiple threads on timing. reference them also as making sure you get your timing perfect is essential. If on stock ECU your car won't start if timing is off.
-Then reinstall cam caps following the bolt pattern below and going through it a 3 or so times before torquing to 16ft-lbs
-Reinstall valve cover, spark plugs(22ft-lbs), and coils. Plug back in sensors and the PCV valve along with the intake breather line.
You're good to go! This was my first write up hope you all enjoy!
Last edited by Mullallyman; 03-10-2017 at 03:07 PM.
Not sure yet. I have only put 150 miles on the car so I don't have a good gauge. My car has stopped puffing clouds though so I would say that is a definite improvement. I will update when I hit the 500 mile mark on the improvement.
Two suggestions. Put some lube on new seals before installing them. I use new motor oil. Also it's better to loosen valve adjust lock nut and back off the adjuster before removing rocker assembly. Saving the time it takes to adjust valves is not worth it. Not loosening them makes it harder to install rocker assembly and easier to damage something. Valve lash will/can change removing and reinstalling rocker assembly. Ask me how I know this.
Should note to be absolutely certain cams and crank alignment marks are correct before trying to turn motor. Even to crank it with a wrench. Valves can hit pistons and destroy motor if you don't have cams aligned properly.
This is the one step you can get in real trouble real easy. Male certain you get it right.
Not really worn but falling apart. That little sliver hanging off in the pic of me holding it in the plier is a piece of the rubber that broke off the seal.
Last edited by Mullallyman; 03-10-2017 at 10:03 AM.
 03-09-2017, 08:15 AM