When you click on links to various merchants on this site and make a purchase, this can result in this site earning a commission. Affiliate programs and affiliations include, but are not limited to, the eBay Partner Network.
UK & Ireland S2000 CommunityDiscussions related to the S2000, its ownership and enthusiasm for it in the UK and Ireland. Including FAQs, and technical questions.
Between the clip and the panel, not between the clip and the car - the only bit i found rattled was where the clips didn't quite seat nicely against the card itself.
Pretty good progress this weekend! Started off my (finally) installing the K&N FIPK that I bought a couple of months ago off another member. Very straightforward install, started off following the K&N instructions but these were clearly for a pre-facelift so I soon ignored those. The unit was also missing a few hoses, I bought some to replace them and actually worked out well because I could route them as I wanted. Decided to bypass the throttle body coolant passage at the same time which was easy to do! Very pleased with the result, the noise is pretty subtle before VTEC apart from WOT, and then in VTEC it sounds awesome! Especially in tunnels with the roof down....
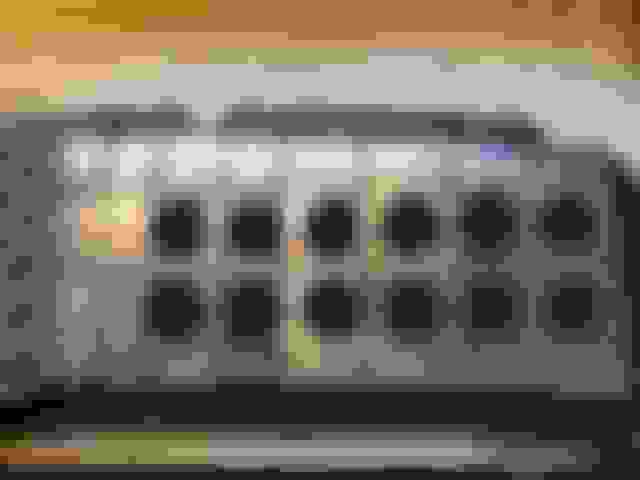
Next up was sorting out the parcel shelf situation (as per previous replies). It was actually easier than expected - drilled 12 fairly large (~65mm) holes in the shelf (drilled straight through the Dynamat rather than faff around removing it):
Then covered in speaker grille cloth:
And finally installed in the car - pretty pleased with how it came out, it's pretty much invisible when looking through the rear window which is good from a security point of view, but should let plenty of bass through. Here it is installed in the car, the glue lines aren't really visible it's just the camera:
When getting the audio tuned at Studio In Car the other week it became clear that the door cards were vibrating quite a lot and causing a few resonances - time to add some Dynamat to the door cards too! Pretty straightforward:
Added some foam for a bit more isolation:
Haven't had a good listen yet but hopefully this does the trick! Next up was sorting out the subwoofer install which I wasn't very happy with. As mentioned previously I bought a sub box off eBay from the US, it's pretty well built but the fit isn't great and the carpet was black which isn't ideal. So, decided to make a top plate out of 6mm MDF which fits the carpet much better. After a little measuring this was screwed on and then carpeted in grey carpet - I had ordered a few samples off eBay and this was the one that matched best, so ordered a roll.
I drilled a few holes in the bottom of the carpet and put some silica gel packs to soak up any moisture, just in case!
Then installed in the car, looks much better! The carpet match is a bit better in person, but of course not perfect.
Final audio job remaining is to do something about the spare wheel cover - need to allow the bass through without it looking rubbish. Have a few ideas on this, either drilling holes similar to the shelf and re-covering in the same grey carpet, or cutting the wheel shaped section out completely and replacing with wire mesh before carpeting (would also increase boot space which is no bad thing!). Thats a job for a few weekends time!
Finally, a few Amazon bargains turned up which I ordered to make up for loosing the storage in the boot well. The storage pouch matches quite well velcro's in place, as does the netting. Only a few quid each!
So thats it for this this weekend - next jobs are sorting out the spare wheel cover and installing the Eibach ProLine springs I bought off here, and doing something with the exhaust - either the 'UK mod' or a full system.
thanks for the good info re audio install ... i have a system to install from my last car (dc5) into the S, and took great interest in the info about the doors and the door cards. i will be chatting with my installer on with your ideas and progress to date
regarding your decision on purchasing a dc5 and S. I think you made the right choice. i had mine for nearly 2 years and sold it for the S. thats the decision i made. and my s is an 07 in the same colour as well
dont get me wrong the dc5 is a great driving car and provides practicality on whole different level to the S. However IMHO the S is more rewarding to drive than the dc5, better community of owners and just feels a better car.
they are totally different cars in their own right and its not really a fair comparison. but thats my take on the subject
will watch your thread with interest. thanks for passing on the info re the audio install
Glad to help, good luck with your install! Let me know if you need any links for anything I’ve used.
I installed my Focal 6.5" door speakers around 3 years ago, just like the OP. Both are now dead from water damage where rain water runs on the inside of the door. May be worth installing some foam baffles, as yours Look more expensive than the ones I bought.
I installed my Focal 6.5" door speakers around 3 years ago, just like the OP. Both are now dead from water damage where rain water runs on the inside of the door. May be worth installing some foam baffles, as yours Look more expensive than the ones I bought.
Thanks, I’ll definitely keep an eye on them and install something if needed.
Cheers
Haven't had much time the last few weeks but pretty much finished off the audio install today - the remaining job was tidying up the spare wheel cover. I wanted to make something that removed the 'bump' to give more space and also was breathable to allow the sub bass to get through to the cabin. Took me a while to decide what to do, but ended up buying a second hand wheel cover and cutting most of it away, leaving just a frame. Then got some steel mesh from work and shaped it to close off the panel, removing the 'bump'. Then punched lots of little holes all the way around the panel and stitched the mesh in with some cord:
I then covered this in the same carpet as I used for the sub box, the match isn't bad, looks better in person that in the pictures. Job done!
Next job is to get the Eibach Pro springs that I bought a few weeks ago fitted - likely I will leave this till MOT time at TGM rather than trying to do it myself, but will see how it goes!
A few jobs completed today - first up was removing the front plate holder which I had been meaning to do for ages but couldn't work out what to replace it with. Initially tried removing the bumper to remove the holder, but a few bolts weren't playing ball so decided to just cut the plate holder off instead and leave the two little metal squares in place. This was much less extreme than it sounds, simply pulled back a little on the holder and used a hacksaw blade to trim around one of the metal squares so I could remove. Once this was done the obvious thing to do was a 3/4 size but full width plate, so that's what I went for!
Next up was detailing session, which I hadn't got round to doing on this car yet - quite a lot of swirl marks that needed sorting out! First up wash and then clay treatment, followed by a second wash. Then polished a few problem areas followed by treatment with Poor Boys Black Hole glaze - awesome stuff for dark coloured cars. Finally some Autoglym HD wax followed by windows, wheels etc. Certainly looks a lot better!
Shame the ride height is a bit high - need to get those springs on come MOT time next month!
Cheers for looking.
Finally time for another update! I was waiting until MOT time to get the springs fitted as the car would be at TGM for that anyway. And, while it was there, decided to get some braided brake lines fitted as well, after the issues with the HEL lines at the last attempt. So, some thoughts on the new stuff:
Eibach ProLine Springs
Initial feel was pretty good, no obvious impact on ride quality, just a bit stiffer so a bit less roll during corners, and a bit lower! Of course got a full geometry setup once fitted. Unfortunately after a few miles it was clear that there was some vibration coming from thereat end - turned out to be the common issue of driveshaft rollers now being in a different position at the different height, and so running over a worn area causing vibration. So, back to TGM who swapped the cups over side to side pretty quickly. All good now, in fact it feels smoother on power than ever so was probably worth doing even without springs! And with the vibration gone the springs feel great. Recommended! And quite happy with the height:
Goodridge Braided Lines
Also fitted while at TGM, after trying to fit HEL ones back in the spring but not being able to. Great pedal feel now (combined with the quite new discs and pads plus decent fluid), a good improvement at high pressures. Very pleased with them!
Shifter Service
Once back home I decided to do another job I had bought parts for a while ago - replacing the shifter cup and ball. There's a great guide on the forum, a nice easy job for a weekend afternoon, only took an hour or so. I wasn't sure if I would really notice much difference, but the parts were only £20 and I was ordering other stuff from Hendy anyway so just went for it. How wrong I was - shifter feel greatly improved! Would recommend everyone to give this a go next time you're ordering some bits and bobs.
Next plans are probably an engine torque damper, as I can feel the engine moving around quite a bit and want to try something cheap and easy before committing to full engine mount replacement. Likely I'll be doing a new clutch in the spring so will do the mounts then if the damper doesn't sort it. And still on the look out for a decent second hand exhaust......
Small update before a big update in a few days - booked in at TGM for a clutch change plus a few other jobs:
New OEM clutch, remove delay valve
VibraTechnics engine mounts and Hardrace gearbox mounts
Tegiwa differential mount collars
Spoon subframe and steering rack rigid collars
Bit of an alignment tweak, a little more camber both ends
Looking forward to seeing how the new mounts and collars turn out - I have quite a lot of drivetrain 'slop' at the moment so hopefully this tightens things up a bit! Will report back with feedback which may help someone one day!
Cheers
 04-29-2018, 08:07 AM