My UK Kraftwerks Supercharged S2000 Build
 09-19-2015, 02:38 PM
#1
Registered User

Thread Starter

Hi guys,
This is my long overdue build thread for my newly supercharged Honda S2000. Firstly a little history.
My current S2000 is my third S2000 and my favourite. When I got my first S2000 back in 2008 I was really disappointed with the car initially (was used to driving a torquey modified and mapped BMW 330D manual at the time) but soon the S2000 and VTEC got under my skin and I became a fan. The S2000 was never for me the fastest car but it was FUN! After a few slight mods and a K’N Induction Kit I was really happy with the car; a trip to the Nurburgring and general driving around Europe adding to my enjoyment.
I did eventually feel I wanted a faster car and at the time the cost of a supercharger was way out of the question so in late 2009 I decided that I would be better getting an ultimately faster car and also enjoy some 4 wheel drive “grip & go”. After much persuasion from my Evo loving car mates I bought an Evo 8 MR which was in a different league performance wise to my S2000.
Eventually due to the fact that I didn’t really have dry space to keep my S2000 over the winter months I regretfully sold the car and concentrated on my Evo. I got the Evo to stage 1 (400bhp/400ftlbs) and thoroughly enjoyed the car; however I did still fancy an S2000 especially in summer – nothing beats the top down experience.
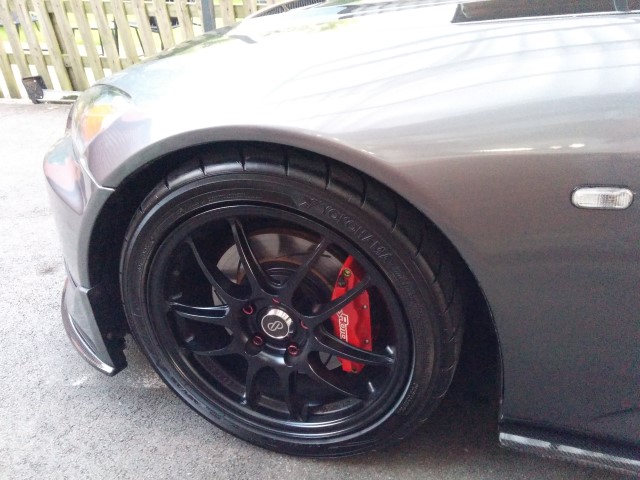
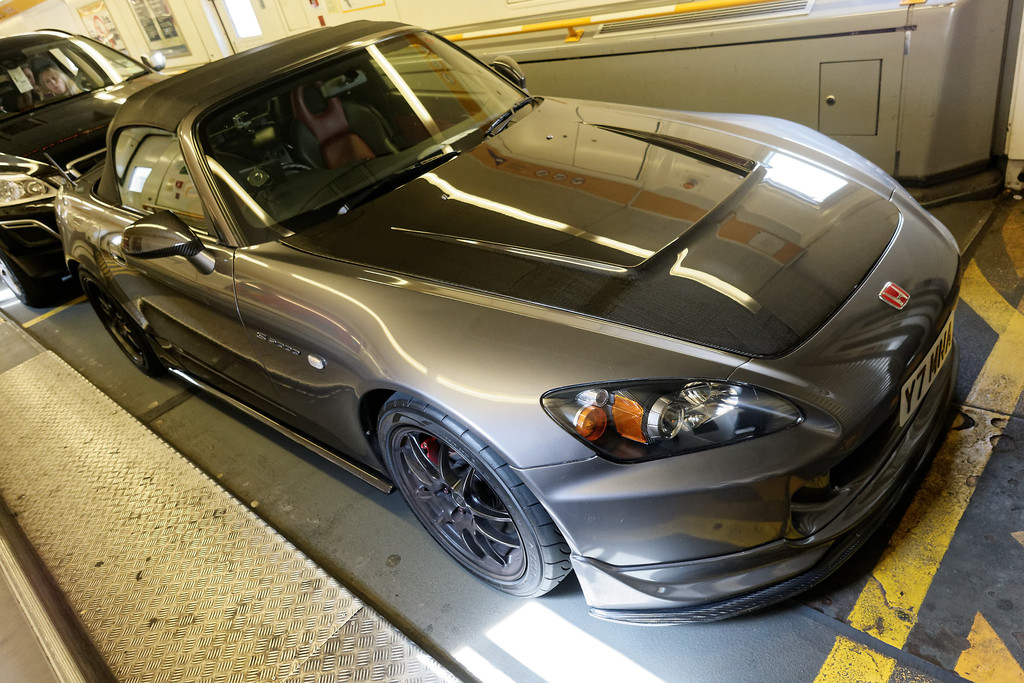
After almost buying the TTS Development S2000 (which was sadly not to be and it left such a sour taste in my mouth that I would never buy anything from TTS) I bought my current S2000. I did a few basic mods such as the smoothed front end, and installed an AEM V2 Induction Kit, some staggered Enkei PF01 17” wheels in Matt Black and a lovely Steering Wheel retrim from RobinA3 on here.
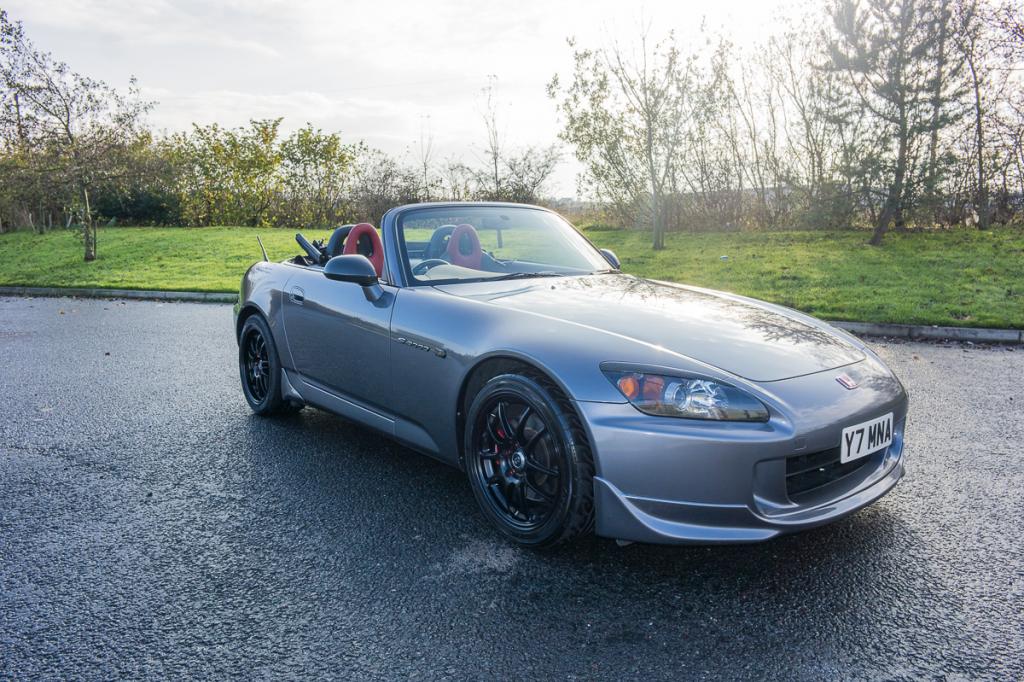
I used the car for the summer months and because I had the Evo I was just enjoying the S2000 in relatively standard form and not worried about power. After another trip to the Nurburgring, this time in my Evo I got bitten by the power bug! I got carried away eventually the car went in to TRL Developments in Halifax to have full blueprinted engine rebuild (2.2L Long Rod with and FP Red Turbo) and various other bits and pieces pushing out 590.8bhp and 525ftlbs torque.
The plan was that to help pay for the build on the Evo I would sell my S2000 but I just couldn’t do it knowing I would regret selling it. Fast forward to this year and I still had the urge to supercharge my S2000. I had driven the TTS development car previously and it was one of the nicest cars I had ever driven with the 9k rpm and the gear ratios working really well; and Evo is much shorter geared and a much more frenetic driving experience.
After toying with selling the S2000 I decided to finally go for it and supercharge it since I've been wanting to do it for years! After reading about Blue Monsters build on here I was going to go for the SOS Stage 2 Kit. The HKS Supercharger kit also interested me but It only makes around 350 -380bhp so I didn’t see the point for my needs when it was a similar price to the SOS kit which produced much more power. After some further research on the US forum I discovered that Kraftwerks had just released a new S2000 supercharger kit that was based on the same Rotrex superchargers that TTS use. The new kit uses a larger supercharger and intercooler then the old Kraftwerks kit. The initial dyno results were that the kit produced more low down torque then the SOS Stage 2 kit but the SOS Stage 2 had the potential for more peak power. After reading for many months I finally pulled the trigger and purchased the Kraftwerks Kit with AEM ECU V2 and larger Rotrex C38-91 Supercharger from Moddiction in the US. Ryan did me a great deal and through using a US shipping company I got the whole kit delivered to the UK for a very good price
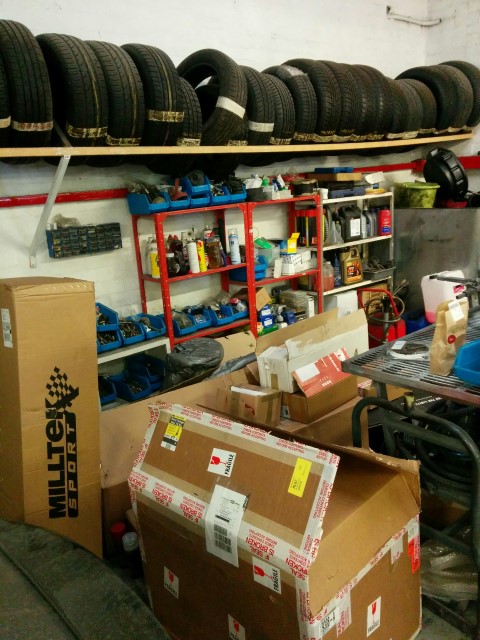
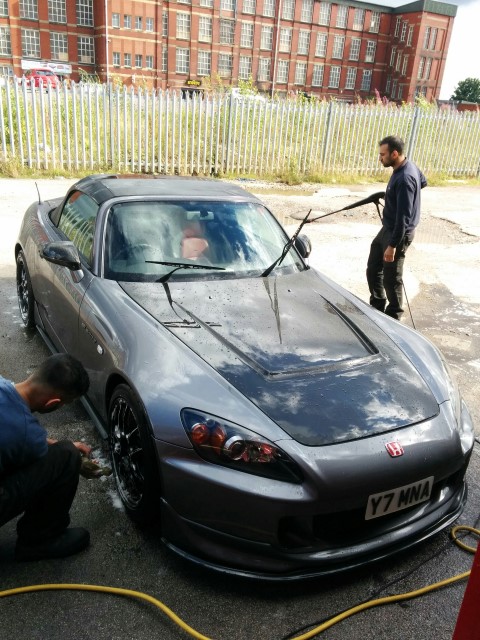
So I decided to get my car ready for the supercharger conversion. All my family cars for the last 12 years or so have been looked after by my friend Nadir at Auto-Serve in Oldham so we made a plan. Auto-Serve have good experience of working with both Civics, S2000's, Subarus and Evos.
Like I did with my Evo build, increasing power would need significant improvements to cooling, handing and braking. This was supposed to be a “cheaper” build but it never works out that way!!
Basic Checks and Improvements
Nadir at Auto-Serve started by doing a basic compression test on my car and then we adjusted valves and also replaced the TCT with a Ballade uprated TCT for peace of mind. He also installed a Competition Stage 2 Clutch with a Lightweight flywheel and braided Clutch cable.
We also flushed the engine Oil and I used Millers Nanodrive 5w-40 (which I know from my Evo is fantastic oil!) and also replaced the fluid in the rear diff and gearbox with genuine Honda MT3 Fluid.
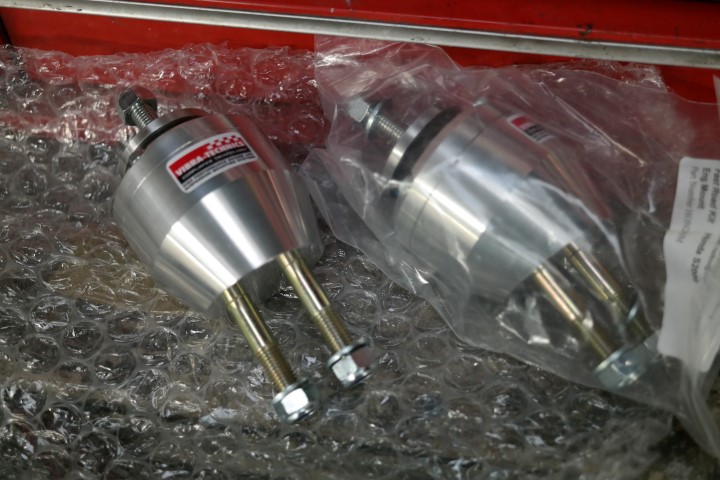
I decided also to fit stronger engine mounts so bought the Vebra Tech Mounts which are supposed to be very good with hardly any increase in NVH. Generally you can’t even tell they are fitted apart from a slight vibration at 3000 rpm sometimes – very pleased with these and the quality is superb!
I then drove the car for around 500 miles to run the clutch in – I was amazed at how light the pedal felt on the new clutch – literally as light as standard if not even lighter.
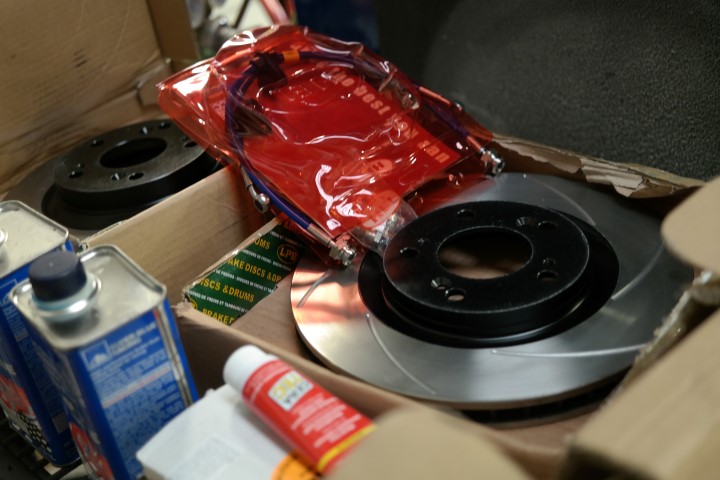
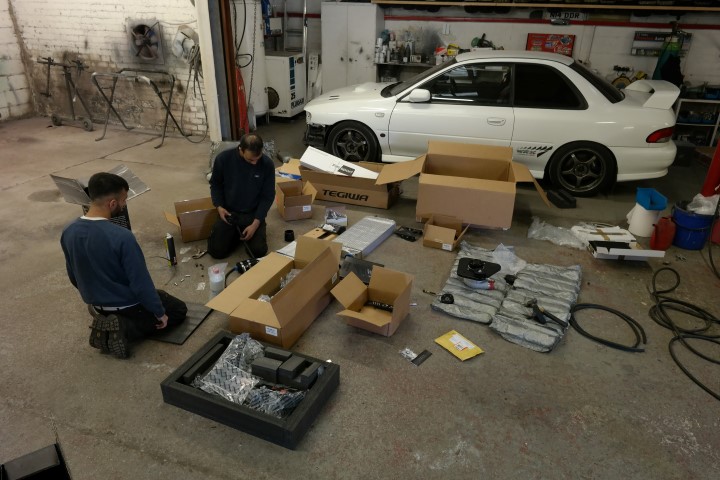
"My corner" of the garage full of parts ready to be fitted!
Valve Adjustment

Ballade TCT
Vibra-Technics Engine Mounts
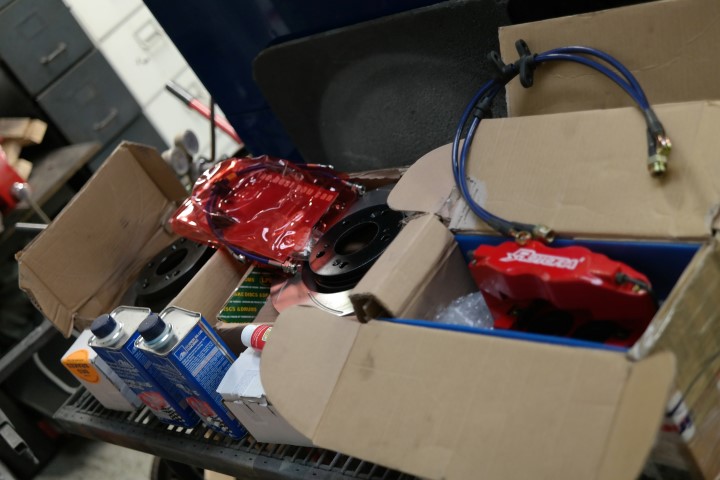
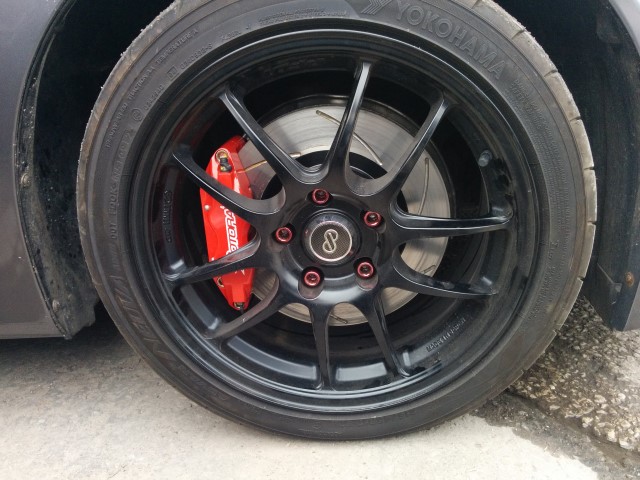
Brakes
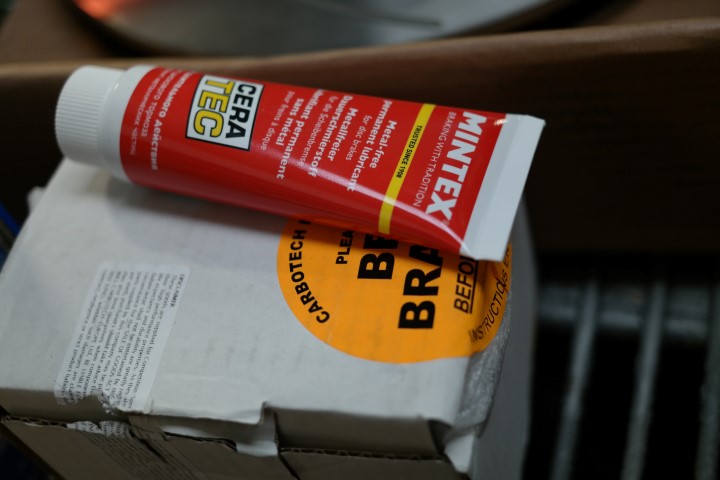
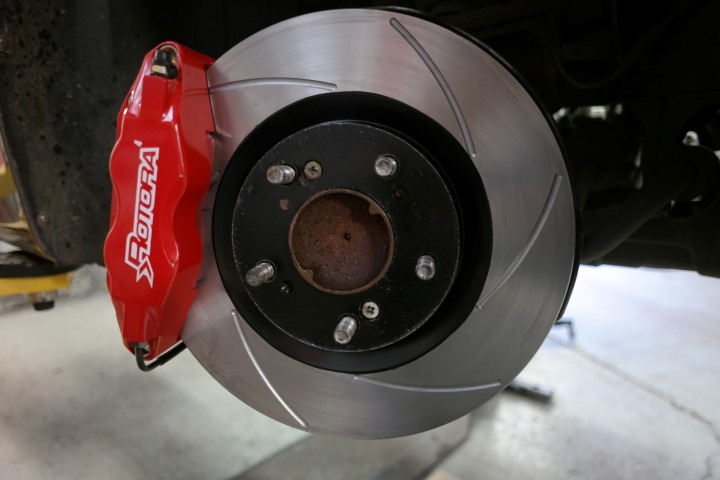
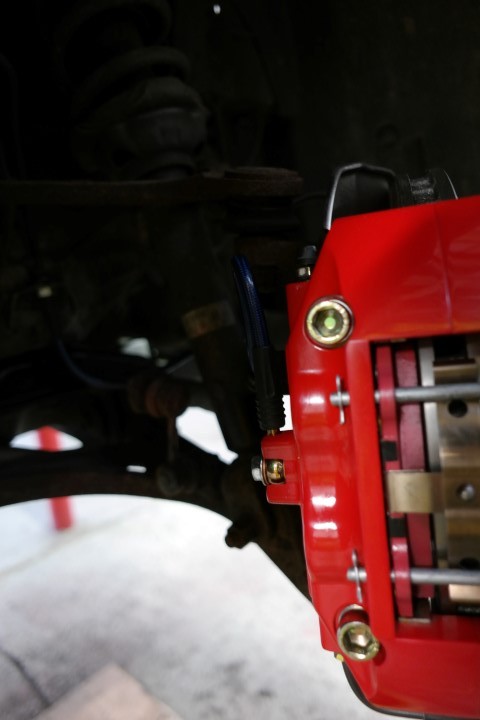
Next step was to make sure the car could stop before adding the power, so I purchased Red Rotora 4 pot front brake calipers. Rotora are basically copies of the Spoon 4 pot calipers and are the same dimensions so I knew my Enkei wheels would clear the calipers. I contracted Ian at Carbotech (who again I had used for my Evo) and sent him the brake pads that came with the calipers. He measured and replaced the compound with his brilliant XP10 pads (which I have on my Evo).
The complete braking upgrade consisted of:
The brakes were much improved and confidence inspiring after these changes and the pressing the brakes felt literally like hitting the anchors!
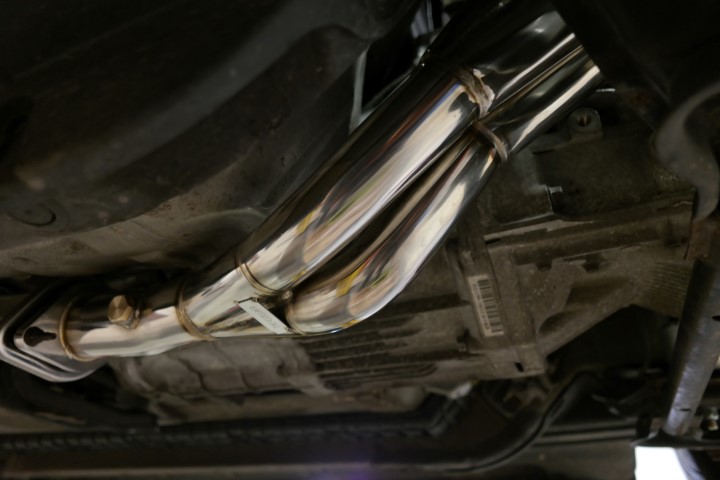
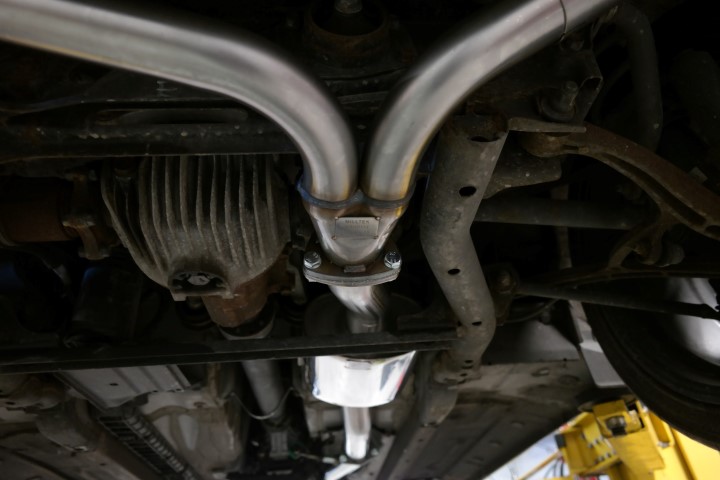
Exhaust System
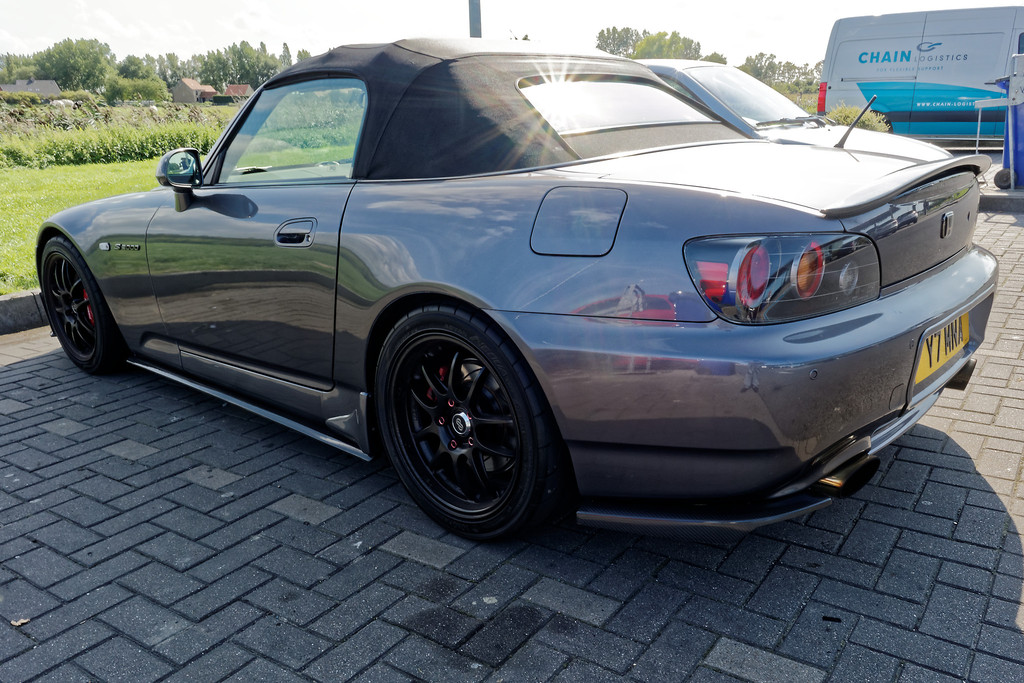
We upgraded the Exhaust system since I wanted the car to sound as special as 4 pot could, so we installed a Milltek Dual Exit Cat back system along with Invida 70mm decat and a Tegiwa J’s copy exhaust manifold. This combination gave the car a really deep growl – no rasp at all – just deep and mean which is exactly what I wanted! One of the Milltek back-boxes that came were damaged in transit but Si@Hendly Performance soon arranged a swap. I love the oval tail pipes of the Milltek system!
Off goes the old Exhaust
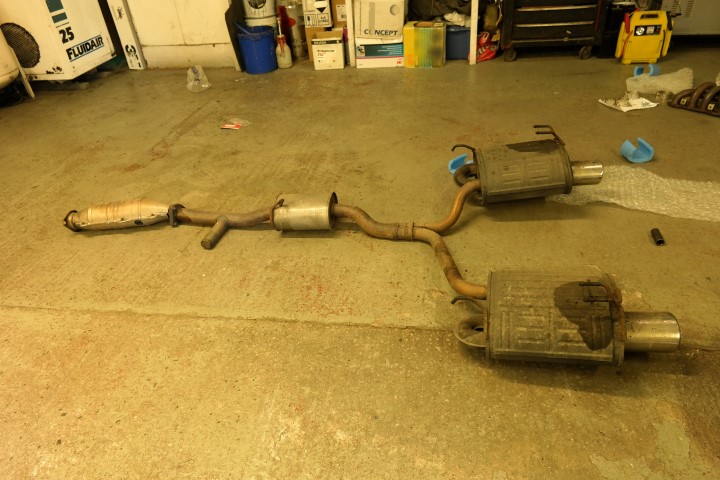
New system being fitted
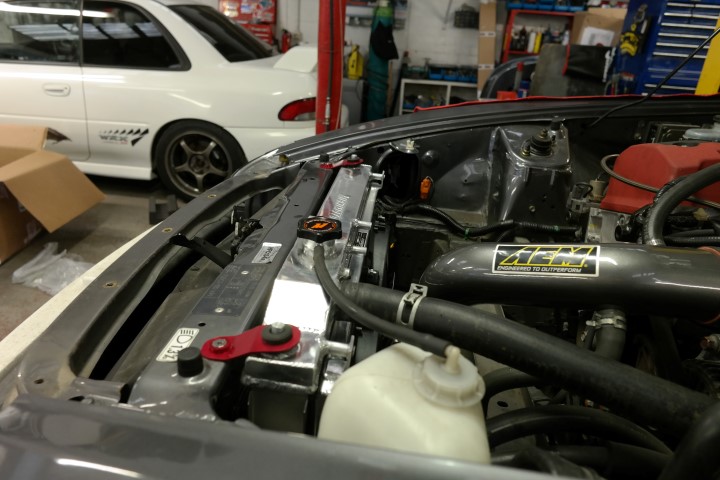
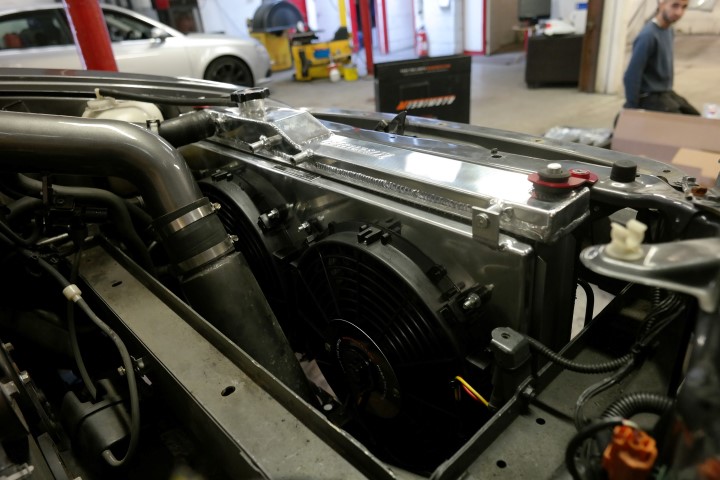
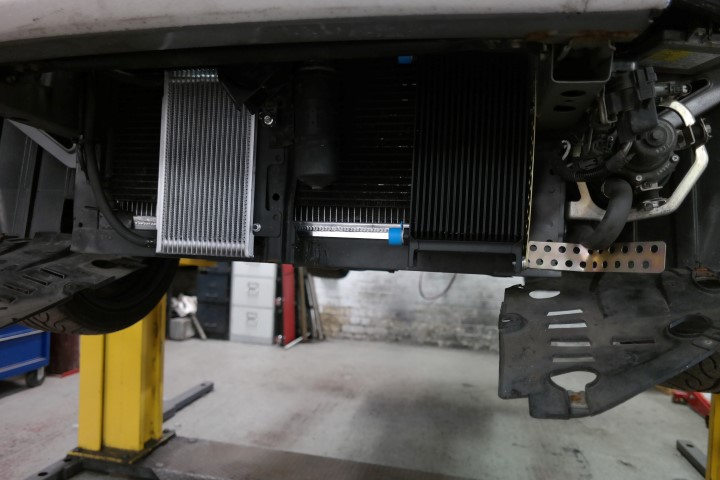
Cooling
Again from more reading on here, it seemed cooling might be an issue with cars driven hard on track so I decided to try to reduce this risk as much as possible by installing a Mishimoto triple core radiator and the slim fans.
We also installed a 19 row oil cooler with a thermostatic switch.
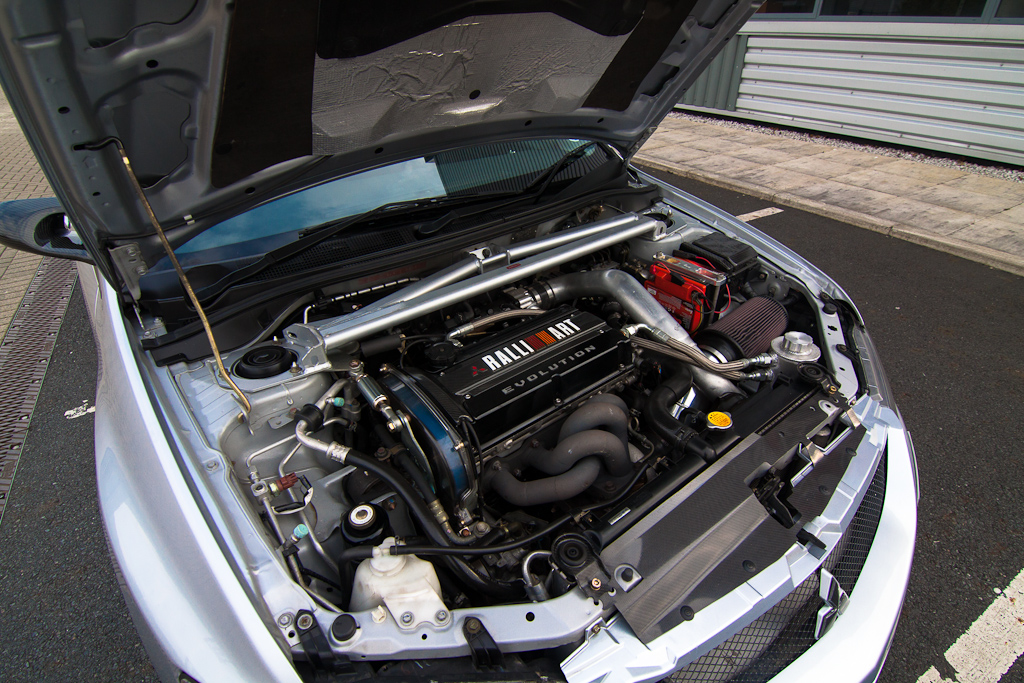
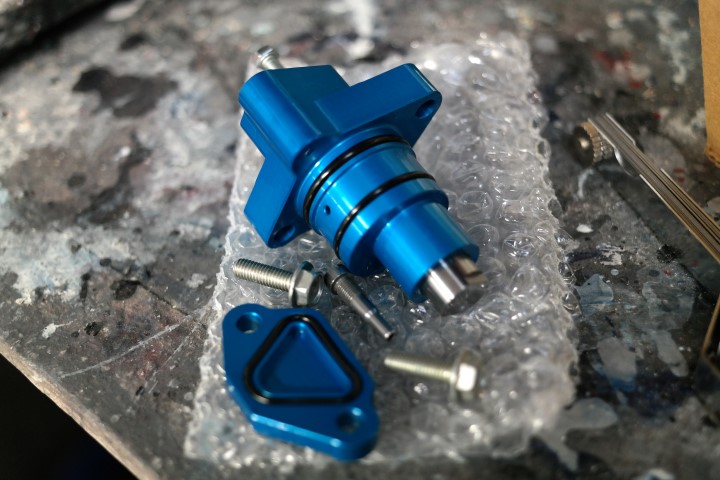
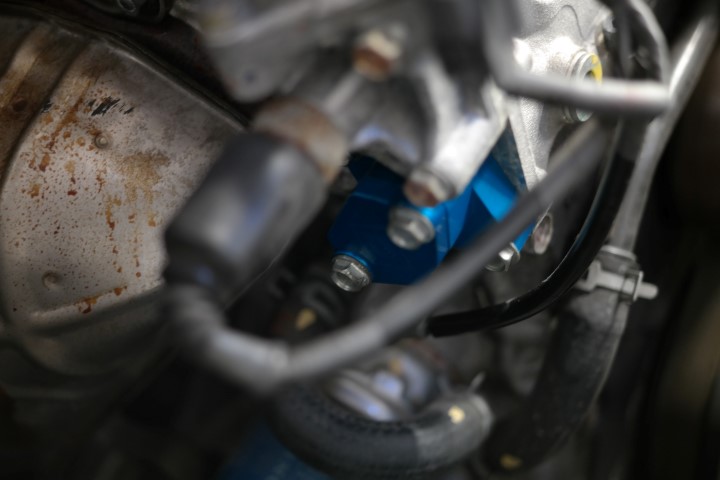
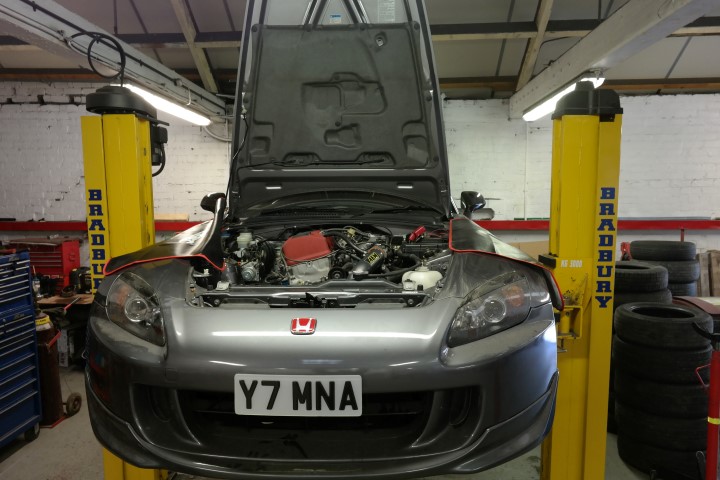
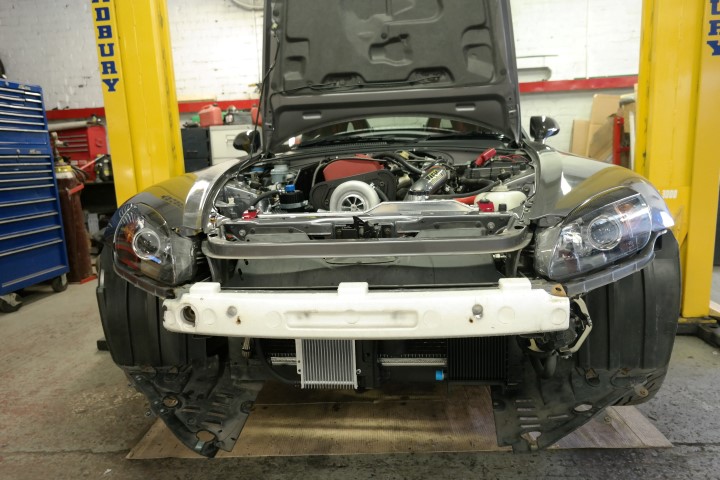
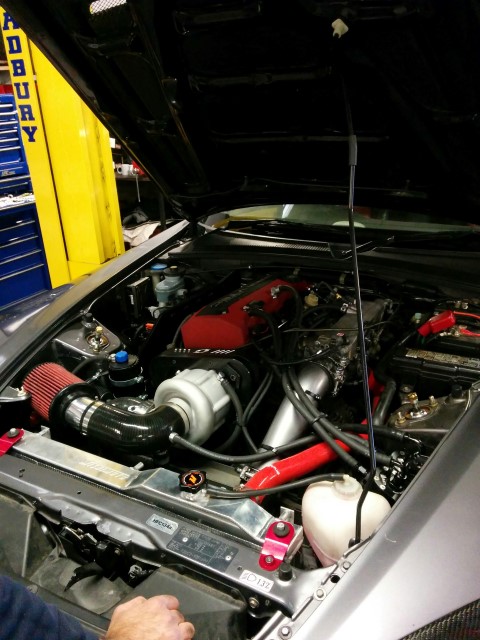
Supercharger kit fitting
Once we were happy the car was running well with the new additions it was time to fit the supercharger.
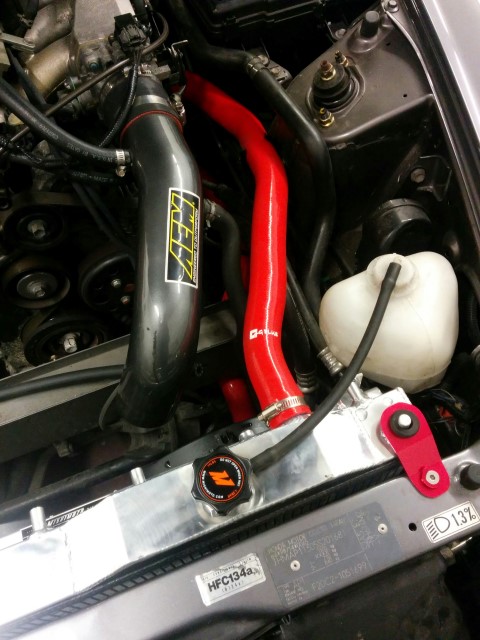
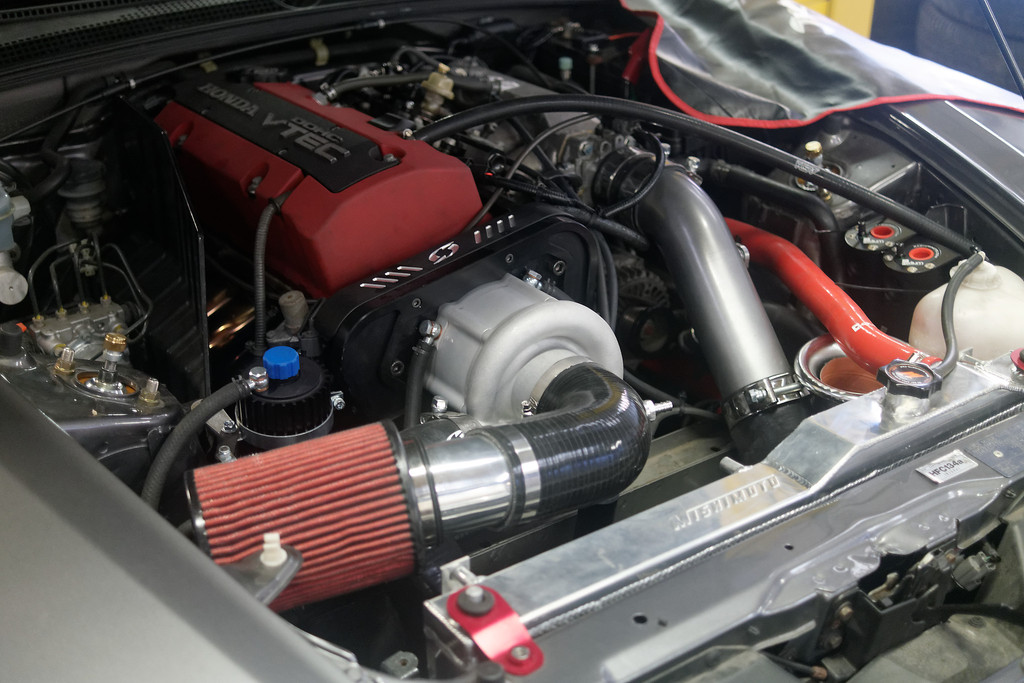
The kit comes complete with everything required to fit including 1000cc Grams (Bosch) injectors, 320L Gram fuel pump and the AEM ECM V2.
As has been said many times on the US forums the Kraftwerks instructions are not the best and these did cause some frustrations for Nadir but through a combination of common sense, experience and lots of good info on the US forums we got the kit installed.
Here are a few pictures of the installation at various stages.

This is my long overdue build thread for my newly supercharged Honda S2000. Firstly a little history.
My current S2000 is my third S2000 and my favourite. When I got my first S2000 back in 2008 I was really disappointed with the car initially (was used to driving a torquey modified and mapped BMW 330D manual at the time) but soon the S2000 and VTEC got under my skin and I became a fan. The S2000 was never for me the fastest car but it was FUN! After a few slight mods and a K’N Induction Kit I was really happy with the car; a trip to the Nurburgring and general driving around Europe adding to my enjoyment.
I did eventually feel I wanted a faster car and at the time the cost of a supercharger was way out of the question so in late 2009 I decided that I would be better getting an ultimately faster car and also enjoy some 4 wheel drive “grip & go”. After much persuasion from my Evo loving car mates I bought an Evo 8 MR which was in a different league performance wise to my S2000.
Eventually due to the fact that I didn’t really have dry space to keep my S2000 over the winter months I regretfully sold the car and concentrated on my Evo. I got the Evo to stage 1 (400bhp/400ftlbs) and thoroughly enjoyed the car; however I did still fancy an S2000 especially in summer – nothing beats the top down experience.
After almost buying the TTS Development S2000 (which was sadly not to be and it left such a sour taste in my mouth that I would never buy anything from TTS) I bought my current S2000. I did a few basic mods such as the smoothed front end, and installed an AEM V2 Induction Kit, some staggered Enkei PF01 17” wheels in Matt Black and a lovely Steering Wheel retrim from RobinA3 on here.

I used the car for the summer months and because I had the Evo I was just enjoying the S2000 in relatively standard form and not worried about power. After another trip to the Nurburgring, this time in my Evo I got bitten by the power bug! I got carried away eventually the car went in to TRL Developments in Halifax to have full blueprinted engine rebuild (2.2L Long Rod with and FP Red Turbo) and various other bits and pieces pushing out 590.8bhp and 525ftlbs torque.


The plan was that to help pay for the build on the Evo I would sell my S2000 but I just couldn’t do it knowing I would regret selling it. Fast forward to this year and I still had the urge to supercharge my S2000. I had driven the TTS development car previously and it was one of the nicest cars I had ever driven with the 9k rpm and the gear ratios working really well; and Evo is much shorter geared and a much more frenetic driving experience.
After toying with selling the S2000 I decided to finally go for it and supercharge it since I've been wanting to do it for years! After reading about Blue Monsters build on here I was going to go for the SOS Stage 2 Kit. The HKS Supercharger kit also interested me but It only makes around 350 -380bhp so I didn’t see the point for my needs when it was a similar price to the SOS kit which produced much more power. After some further research on the US forum I discovered that Kraftwerks had just released a new S2000 supercharger kit that was based on the same Rotrex superchargers that TTS use. The new kit uses a larger supercharger and intercooler then the old Kraftwerks kit. The initial dyno results were that the kit produced more low down torque then the SOS Stage 2 kit but the SOS Stage 2 had the potential for more peak power. After reading for many months I finally pulled the trigger and purchased the Kraftwerks Kit with AEM ECU V2 and larger Rotrex C38-91 Supercharger from Moddiction in the US. Ryan did me a great deal and through using a US shipping company I got the whole kit delivered to the UK for a very good price
So I decided to get my car ready for the supercharger conversion. All my family cars for the last 12 years or so have been looked after by my friend Nadir at Auto-Serve in Oldham so we made a plan. Auto-Serve have good experience of working with both Civics, S2000's, Subarus and Evos.
Like I did with my Evo build, increasing power would need significant improvements to cooling, handing and braking. This was supposed to be a “cheaper” build but it never works out that way!!
Basic Checks and Improvements
Nadir at Auto-Serve started by doing a basic compression test on my car and then we adjusted valves and also replaced the TCT with a Ballade uprated TCT for peace of mind. He also installed a Competition Stage 2 Clutch with a Lightweight flywheel and braided Clutch cable.
We also flushed the engine Oil and I used Millers Nanodrive 5w-40 (which I know from my Evo is fantastic oil!) and also replaced the fluid in the rear diff and gearbox with genuine Honda MT3 Fluid.
I decided also to fit stronger engine mounts so bought the Vebra Tech Mounts which are supposed to be very good with hardly any increase in NVH. Generally you can’t even tell they are fitted apart from a slight vibration at 3000 rpm sometimes – very pleased with these and the quality is superb!
I then drove the car for around 500 miles to run the clutch in – I was amazed at how light the pedal felt on the new clutch – literally as light as standard if not even lighter.
"My corner" of the garage full of parts ready to be fitted!

Valve Adjustment

Ballade TCT


Vibra-Technics Engine Mounts

Brakes
Next step was to make sure the car could stop before adding the power, so I purchased Red Rotora 4 pot front brake calipers. Rotora are basically copies of the Spoon 4 pot calipers and are the same dimensions so I knew my Enkei wheels would clear the calipers. I contracted Ian at Carbotech (who again I had used for my Evo) and sent him the brake pads that came with the calipers. He measured and replaced the compound with his brilliant XP10 pads (which I have on my Evo).
The complete braking upgrade consisted of:
- Rotora 4 pot brake calipers Front
- Brand New replacement OEM Rear Calipers
- Carbotech XP10 Front Pads
- Carbotech XP8 Rear Pads
- Braided Hoses Front and Rear
- Godspeed Front and Rear grooved Brake Disks
- Super Blue Racing Dot 4 Brake Fluid.
- Complete Brake System Bleed
The brakes were much improved and confidence inspiring after these changes and the pressing the brakes felt literally like hitting the anchors!


Exhaust System
We upgraded the Exhaust system since I wanted the car to sound as special as 4 pot could, so we installed a Milltek Dual Exit Cat back system along with Invida 70mm decat and a Tegiwa J’s copy exhaust manifold. This combination gave the car a really deep growl – no rasp at all – just deep and mean which is exactly what I wanted! One of the Milltek back-boxes that came were damaged in transit but Si@Hendly Performance soon arranged a swap. I love the oval tail pipes of the Milltek system!
Off goes the old Exhaust

New system being fitted


Cooling
Again from more reading on here, it seemed cooling might be an issue with cars driven hard on track so I decided to try to reduce this risk as much as possible by installing a Mishimoto triple core radiator and the slim fans.
We also installed a 19 row oil cooler with a thermostatic switch.
Supercharger kit fitting
Once we were happy the car was running well with the new additions it was time to fit the supercharger.
The kit comes complete with everything required to fit including 1000cc Grams (Bosch) injectors, 320L Gram fuel pump and the AEM ECM V2.
As has been said many times on the US forums the Kraftwerks instructions are not the best and these did cause some frustrations for Nadir but through a combination of common sense, experience and lots of good info on the US forums we got the kit installed.
Here are a few pictures of the installation at various stages.


 09-19-2015, 02:38 PM
#2
Registered User
Thread Starter


I bought a Forge Large dump valve based on advice on the US forum and Alloy Craft sell a nice bracket to securely hold the ECU in place. We also wired in an AEM UEGO Wideband for extra safety and I decided to hardwire the fuel pump in using the kit produced by SOS.
The kit even comes with a base map to get the car started. The car ran rough with this but at least it started and was driveable but obviously it was not driven hard by any means!
Mapping and Dyno Time
I decided to take the car to Matt from TRL Developments in Halifax. He did all the work on my Evo and is an excellent mapper working all over the world. He also has a lot of experience with VTEC system and Hondas so it was a natural choice for me.
We gently drove the car down to him and left the car with him for couple of days. Matt took his time with the map. I know with the aftermarket ecu on my Evo (Syvec S6), making peak power is the easy part – it’s the drivability, hot start, cold start, behaviour in traffic etc that is most important which is why Matt wanted to keep the car for a few days.
Here is a little dyno run while he was tuning it (What a sound in VTEC!!):
[media]http://www.youtube.com/watch?v=M6y4Ra3Xvis[/media]
Now I was hoping for over 400bhp, since I went with the standard 100mm supercharger belt that Kraftwerks supply because I insisted on keeping the 9k rpm red line - the red line is to me the whole point of the car and I wouldn’t want to lower it significantly! US figures are to be taken with a pinch of salt since they don’t always correlate to our UK horse power. After much discussion Matt experimented with lowering VTEC to 3500rpm. 4000rpm, 4500rpm and 5000rpm. The most midrange was gained at 4500rpm so we set it there and after him working his magic the kit produced 440.8bhp and 292.1ftlbs of torque. I was more than happy with these figures since I knew I had potential for more power if required by fitting a smaller belt (95mm – meaning 8900rpm redline) and a larger intercooler and pipework like TTS do in their race kit. But the standard 100mm belt produced 14.5psi.
Matt called me when the car was ready so we set off on the 30 minute journey to collect. The drive back to Nadir’s garage was not quite as expected however!

Initially the car was great, but around half way through the drive home there was a clattering noise and then blowing noise from the exhaust!! Nadir said it sounded like something was loose or blowing from the exhaust. We look the car straight to Nadir’s garage on the ramp. It turned out that one of the exhaust blanks in the Tegiwa header was missing! It must not have been fully tight and worked its way loose. Luckily Nadir had a spare so we put in the new blank. When we started the car back up the car was hunting on Idle and didn’t seem right. I rang Matt and after trying a few things on the phone he said to bring the car back and offered to stay late. So we drove back to TRL and after Matt had plugged his laptop back in, said that the AF ratio of the car was not what he had set the car too when he mapped it. We think that the exhaust bung must not have been fully tight when he mapped the car, then when we replaced it with a fully tight bung it has changed the A/F ratio. Bit strange, but Matt tweaked the map again and the car idled perfect after that and drove how it did when we first picked it up. A Big thanks to Matt for great customer service since it was almost 9pm by the time we left!!
To tie in with the S2000 being supercharged we had planned a trip to the Nurburgring which was booked for the weekend after!!
So the next step of project S2000 was suspension which I was waiting to do until after the supercharger was fitted and working well. I was thinking that with only a week to go until the Nurburgring trip maybe I should wait and do the suspension until after the ring trip….but then I thought NAH!!! GET IT DONE! Lol
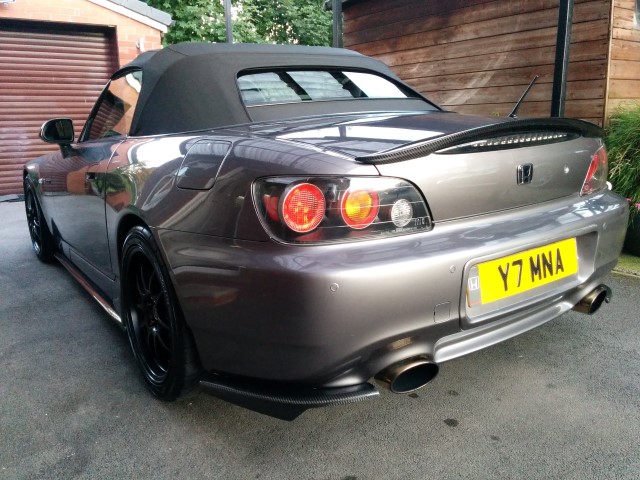
Suspension
I am a strong believer in not compromising on suspension so I ordered what I thought was the best setup available for my needs.
We fitted:
- Ohlins Road and Track DFV Coilovers
- Whiteline Front Underchassis Brace
- Rear Beatrush 4 point Rear Underchassis Brace
- Buddy Club Front and Rear Roll Centre and Anti bump steer Kit
- Front steering rack spacers (unfortunately due to them moving the rack too close to the supercharger pulley system these could not be fitted so were returned).
- Driveshaft spacers
- Hardrace Adjustable Rear Toe Arms
- Yokohama AD08 Tyres (already had)
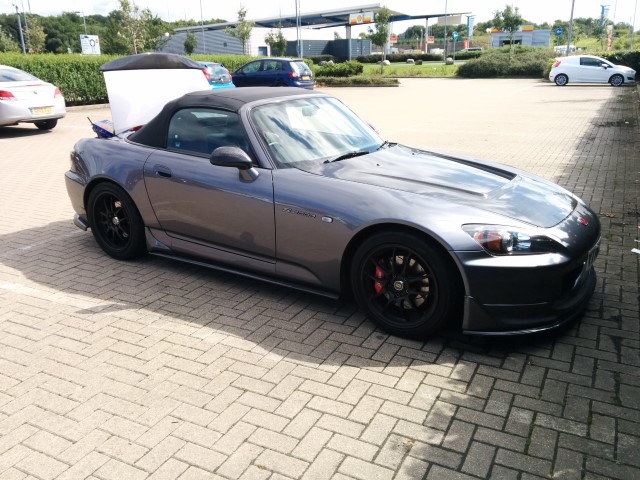
After fitting and literally two days before we were due to go to the Ring I drove the car to Ninemeister (Porsche specialists with their own race team) in Warrington (around 45 mins away) for a Fast Road Geometry. The car was absolutely terrifying to drive down to them with everything all over the place geometry wise – it was scary to even go over 30mph but I made it there in the end! There were no seized adjustors on my car apart from the front tie-rods that had to be heated up to adjust – they managed to get them to adjust but the next time I get a geo adjustment I’ll need to get some front tie-rods which is not a big deal Ninemeister set the car up to a fast road setup and were pretty experienced with S2000s and also do a lot of work for the teams in the Tegiwa Honda Civic Cup. They gave the car a good safe fast road setup but with more camber then the Honda standard setup.


The car drove brilliantly with the suspension work and I picked it up the next day with just one day to go before the Ring trip.
We only lowered the car slightly over the stock car because the car is low even as standard - I did want to go lower but had to be realistic!
Adjusting ride heights before the geometry
 09-19-2015, 02:39 PM
#3
Registered User
Thread Starter
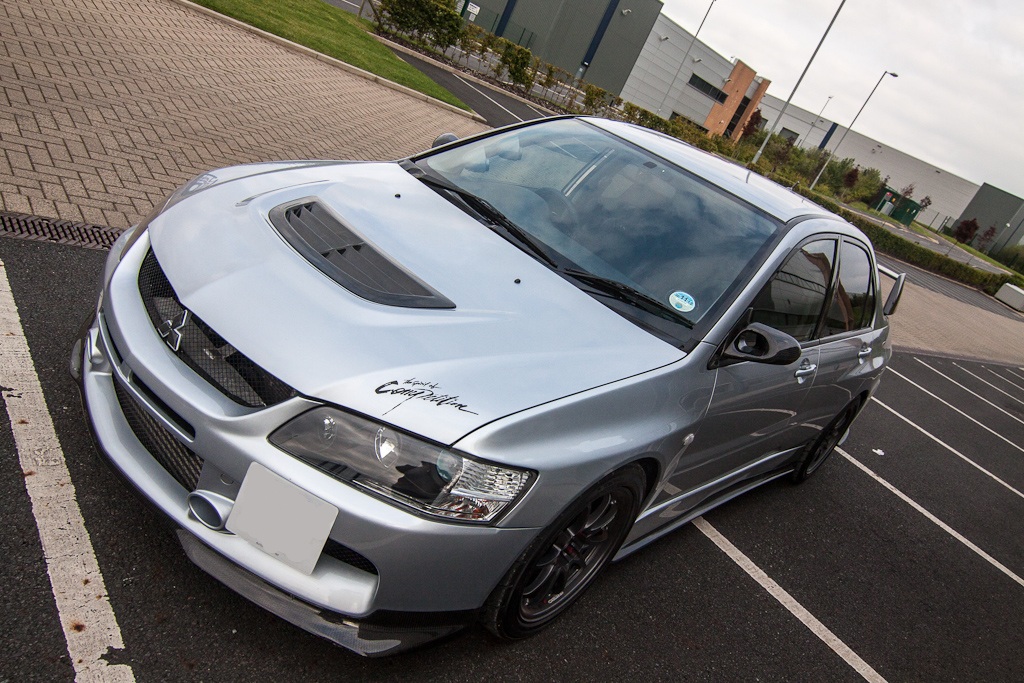
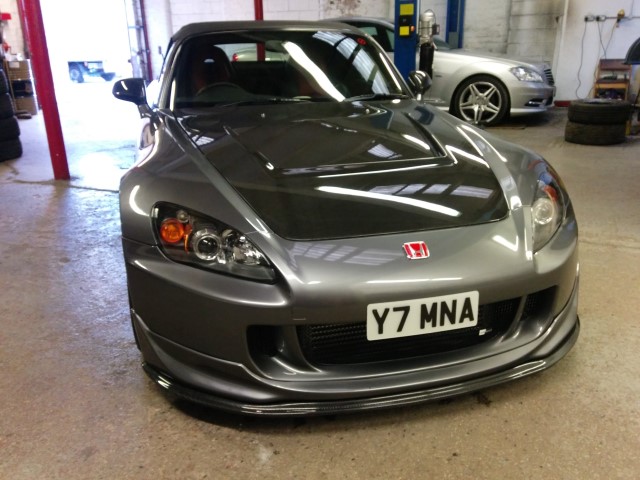
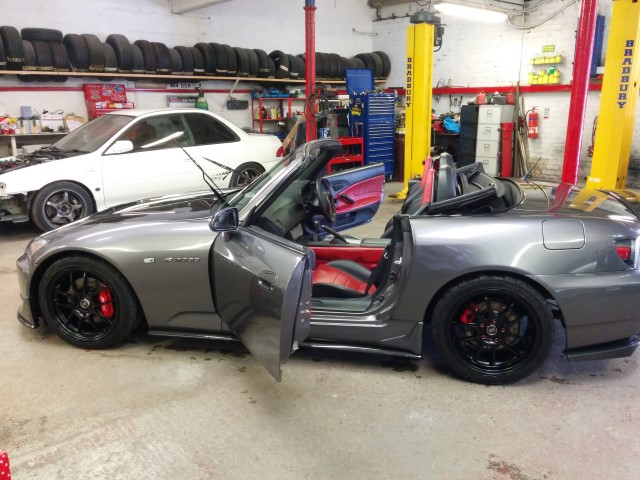
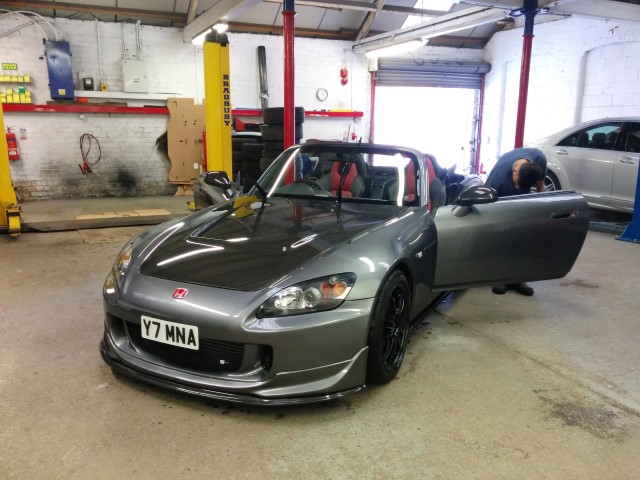
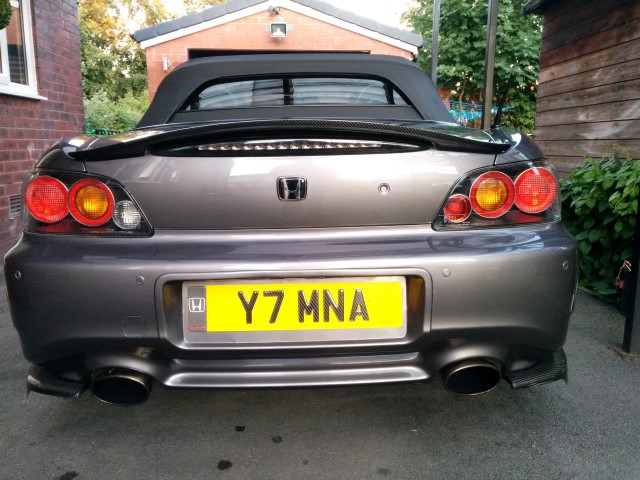
Looks and Carbon Fibre!
Those that know me, know that I love carbon fibre on a car so back to Nadir@Auto-Serve and he had lots of carbon bits to fit so we added:
Along with my Enkei wheels and my existing carbon spoiler and carbon wing mirror covers and Zunsport Grills the car looked really race ready! After a quick clean and polish and adding a few finishing touches such as my Skunk2 gearknob, Modifry Camera Mount and glovebox organiser.
We also fitted my Radium twin Catch Can setup and we changed the position of the supercharger air feed to the opposite side to where Kraftwerks have it (which is right behind the radiator!)
Looking much better!
Time for clean!
Those that know me, know that I love carbon fibre on a car so back to Nadir@Auto-Serve and he had lots of carbon bits to fit so we added:
- Buddy club Vented Carbon Bonnet (Proper carbon) and helps with under bonnet temps and actually fits properly and does weigh a little less then standard.
- Downforce front carbon lip
- Downforce Side carbon extensions
- Downforce Rear bumper extensions
Along with my Enkei wheels and my existing carbon spoiler and carbon wing mirror covers and Zunsport Grills the car looked really race ready! After a quick clean and polish and adding a few finishing touches such as my Skunk2 gearknob, Modifry Camera Mount and glovebox organiser.
We also fitted my Radium twin Catch Can setup and we changed the position of the supercharger air feed to the opposite side to where Kraftwerks have it (which is right behind the radiator!)
Looking much better!


Time for clean!


 09-19-2015, 02:39 PM
#4
Registered User
Thread Starter
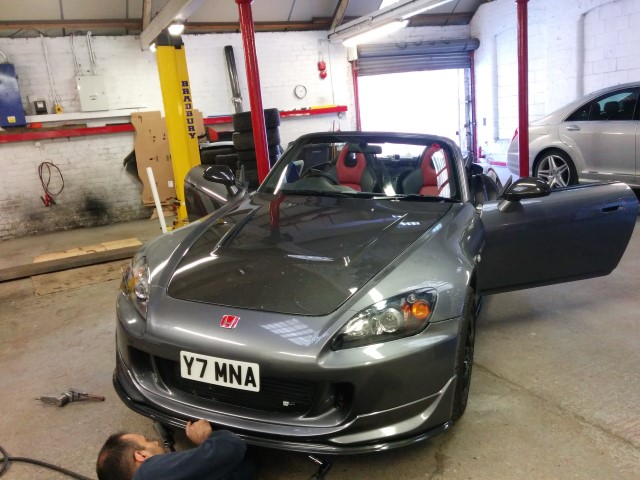
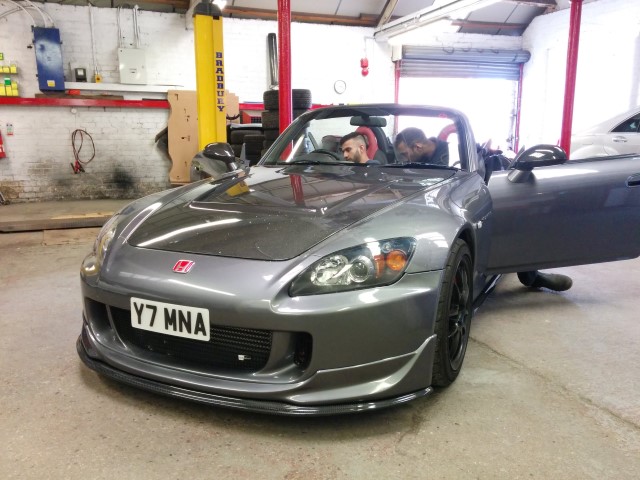
Finally I took the car home and prepared for the the trip to the Nurburgring the next day - leaving at 5am!
Home at last!
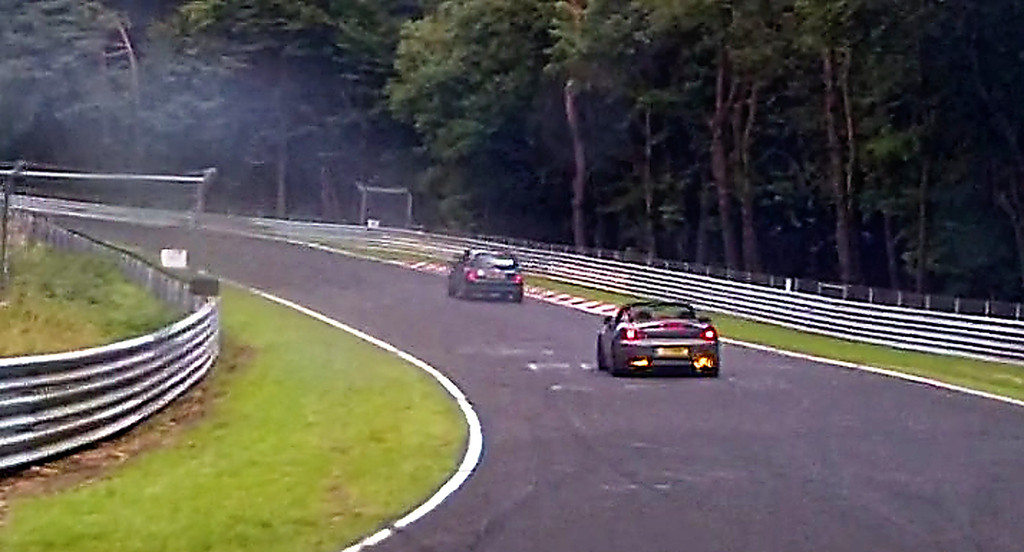
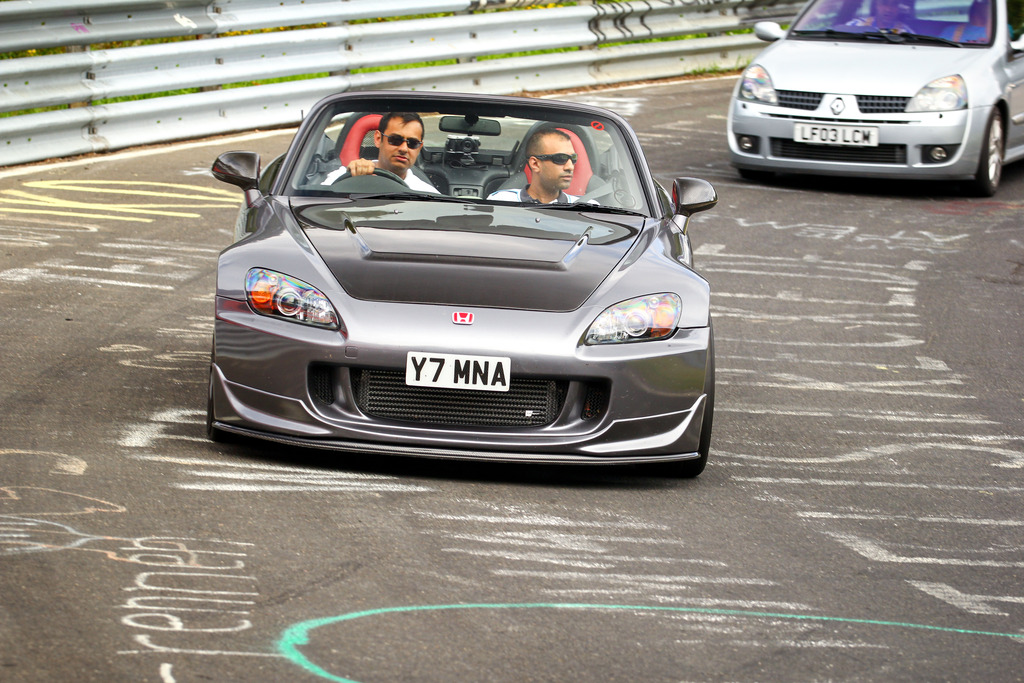
The car was ready so the next day we set off with a group of friends that took at modified Clio 172 pushing almost 200bhp to the Ring.
We had a fantastic trip to the ring and the car was brilliant to drive and awesome fun!
The car felt like it was in the sweet spot for power, handling, looks and braking. The Carbotech XP10 Pads with the Rotora Calipers really provided so much confidence on the brakes and the Ohlins suspension - simply brilliant. The supercharger transformed the car into something really special and the noise it makes when hitting VTEC is just insane – been described as either a motorbike or if you hear it coming but don’t know what it is it sounds like an old V10 F1 Engine Wailing!
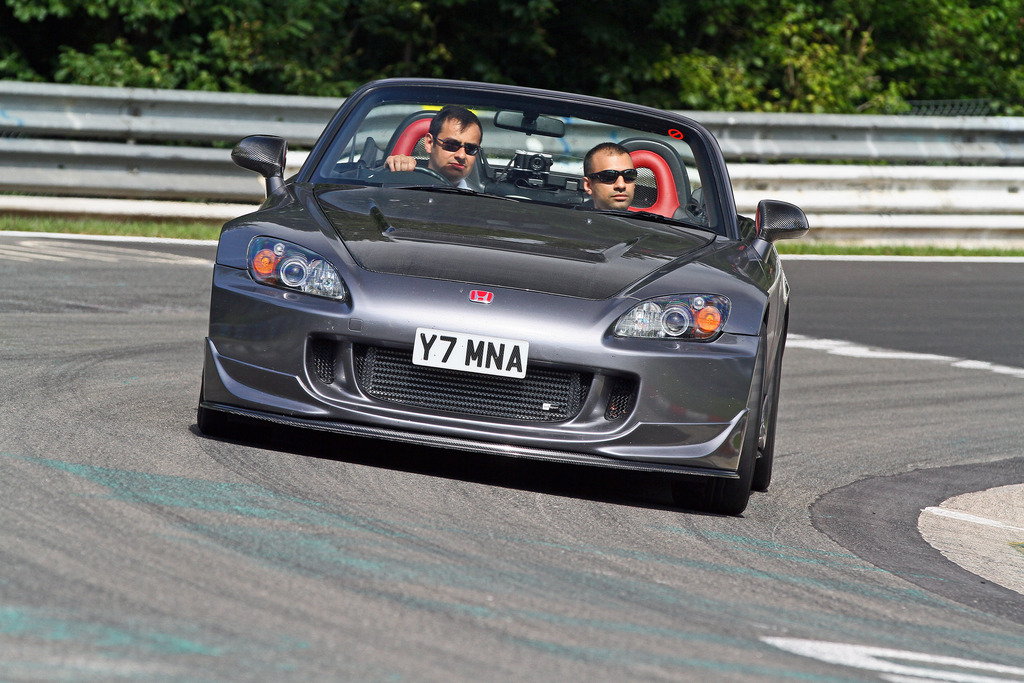
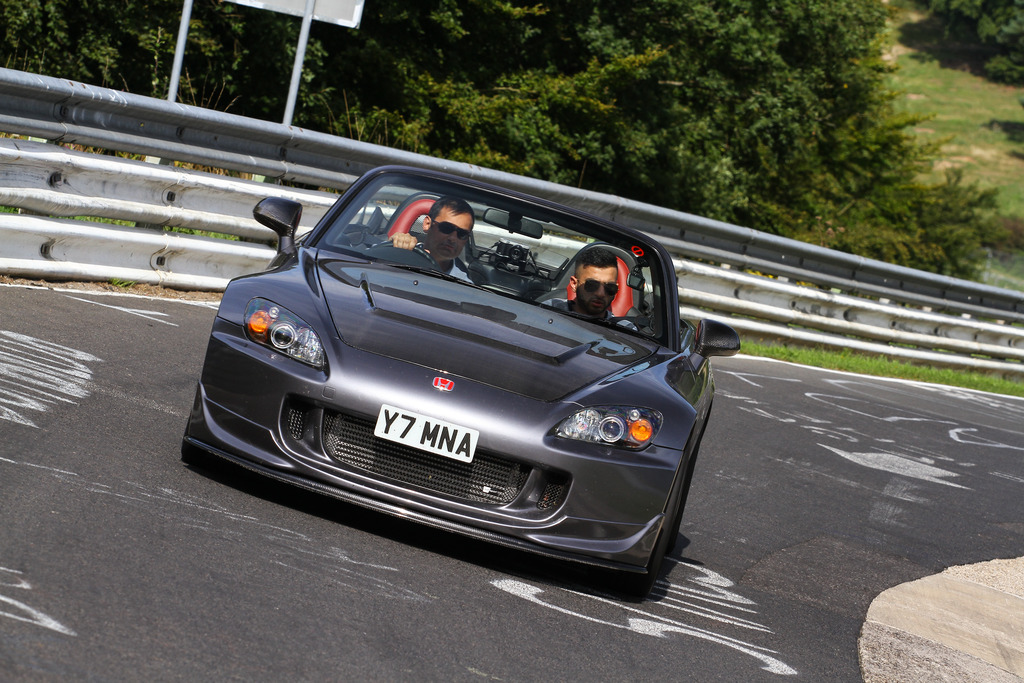
Here is a quick video of the car in Europe and around the Ring – please turn up the volume to enjoy the sound (TUNNEL ACTION ).
).
Check out the flames on track too!!
[media]http://www.youtube.com/watch?v=u90YDWun18w[/media]
A few pic of the car around the Ring:

It is not all plain sailing with car modifying however. We did have a miss-hap at the Ring. It was red hot both days we visited the Ring, 32C on Saturday and 34C on Sunday – the car started to overheat!
  This caused a panic but we discovered that the radiator cap provided by Mishimoto was terrible and not holding the pressure and we were losing coolant from it!!
We ended up not doing as many laps of the Ring as we wanted because of this – we also had to let the car cool down completely and bleed the radiator system again – luckily Nadir was able to do this in the Ring car park!! We kept an eye on the temperature the next day and after another lap the next day at the Ring the temperature would climb over half-way but letting off for a few corners it would drop below half again. We decided to not risk any more laps on the Ring and set off the next night for home as scheduled. On the road the temperature was rock solid, even after a 10 hour drive back to the UK and then back to the North West. Once we got back and had recovered, I ordered a Spoon 1.35bar cap which is much much better than the standard Mishimoto cap and added some Water Wetter and we bled the system again – there was still a fair bit of air in the system!
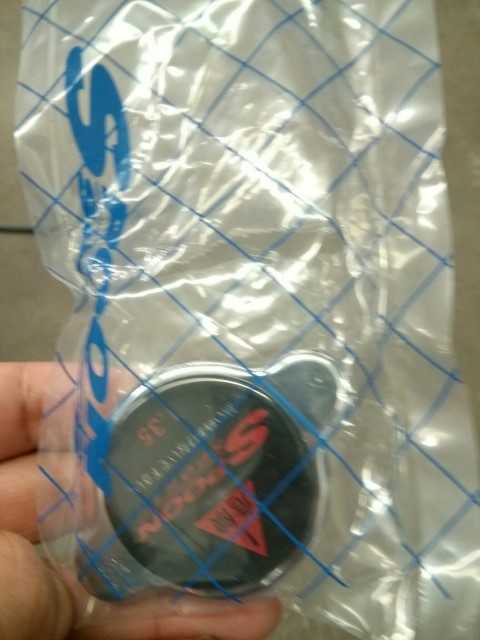
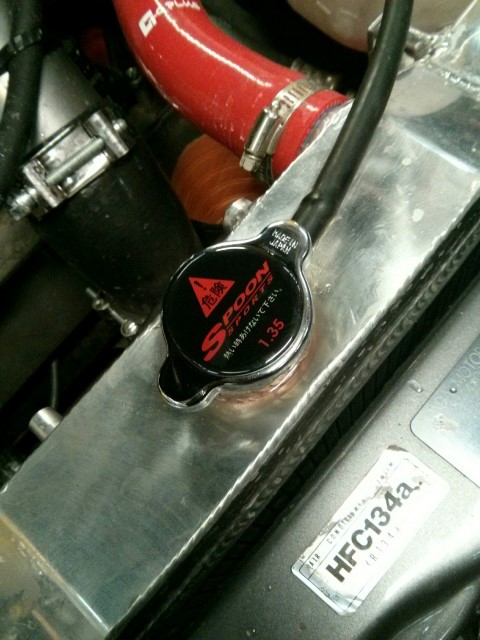
I have since read online that the Mishimoto radiator caps are regarded as CRAP!!! It’s frustrating to think that we had all this trouble because of a radiator cap!
In conclusion, as a road car it’s the S2000 I wanted it to be and it is so much fun!
I don’t think I have spoiled the drivability of the car in any way at all – yes you have to be even more careful in the wet but then you need to do that anyway. With the supercharger the adjustability and ability to steer on the throttle is magic and as a driver it doesn’t really feel scary at all and the car just keeps pulling and pulling. As a passenger it’s a different story however and is rather frightening! The car just GOES and has such a wide power band and is so easy to drive. It a totally different driving experience to my Evo (which has a much more aggressive power delivery) but I love them both!
Home at last!


The car was ready so the next day we set off with a group of friends that took at modified Clio 172 pushing almost 200bhp to the Ring.
We had a fantastic trip to the ring and the car was brilliant to drive and awesome fun!
The car felt like it was in the sweet spot for power, handling, looks and braking. The Carbotech XP10 Pads with the Rotora Calipers really provided so much confidence on the brakes and the Ohlins suspension - simply brilliant. The supercharger transformed the car into something really special and the noise it makes when hitting VTEC is just insane – been described as either a motorbike or if you hear it coming but don’t know what it is it sounds like an old V10 F1 Engine Wailing!
Here is a quick video of the car in Europe and around the Ring – please turn up the volume to enjoy the sound (TUNNEL ACTION
). Check out the flames on track too!!

[media]http://www.youtube.com/watch?v=u90YDWun18w[/media]
A few pic of the car around the Ring:
It is not all plain sailing with car modifying however.
We did have a miss-hap at the Ring. It was red hot both days we visited the Ring, 32C on Saturday and 34C on Sunday – the car started to overheat! This caused a panic but we discovered that the radiator cap provided by Mishimoto was terrible and not holding the pressure and we were losing coolant from it!! We ended up not doing as many laps of the Ring as we wanted because of this – we also had to let the car cool down completely and bleed the radiator system again – luckily Nadir was able to do this in the Ring car park!! We kept an eye on the temperature the next day and after another lap the next day at the Ring the temperature would climb over half-way but letting off for a few corners it would drop below half again. We decided to not risk any more laps on the Ring and set off the next night for home as scheduled. On the road the temperature was rock solid, even after a 10 hour drive back to the UK and then back to the North West. Once we got back and had recovered, I ordered a Spoon 1.35bar cap which is much much better than the standard Mishimoto cap and added some Water Wetter and we bled the system again – there was still a fair bit of air in the system!


I have since read online that the Mishimoto radiator caps are regarded as CRAP!!! It’s frustrating to think that we had all this trouble because of a radiator cap!
In conclusion, as a road car it’s the S2000 I wanted it to be and it is so much fun!
I don’t think I have spoiled the drivability of the car in any way at all – yes you have to be even more careful in the wet but then you need to do that anyway. With the supercharger the adjustability and ability to steer on the throttle is magic and as a driver it doesn’t really feel scary at all and the car just keeps pulling and pulling. As a passenger it’s a different story however and is rather frightening! The car just GOES and has such a wide power band and is so easy to drive. It a totally different driving experience to my Evo (which has a much more aggressive power delivery) but I love them both!
09-19-2015, 02:39 PM
#5
Registered User
Thread Starter
Few more general pictures from journey:
Just to add also, fuel economy wise the car did pretty much the same fuel consumption as my mates Clip 172 when crusing - obviously VTEC action brings this down significantly! When Matt@TRL was mapping the car I did tell him about the trip to the Ring so he has spent some time on the map trying to lean off fuel when the car is on a cruise and not on throttle to give decent economy. I ran the car on V Power 99 in the UK, V Power 98 (France ) and then V Power Racing 100 Ron in Germany and I tried some of the Aral 102 Ron near the ring!
The dilemma that I now have is that to truly enjoy the car I am going to have to start taking it on track where it will end up getting battered and I think my car is too nice to be just a track car but is it so much fun!
The car, driving around in Europe and the Ring was brilliant with the grip it had on their beautiful tarmac and roads – in the UK with the poorer roads we have (being politically correct their!) it’s a different proposition; you have to modulate the throttle much more to avoid wheel spin and back end action. lol
To use it more on track I also need to address a few more things:
Cooling - I think I need to look at better fans to keep the car cool and possibly put the radiator fans on a switch so they can be on all the time when on track.
Fuelling - When the fuel gets low the car no longer wants to Rev – this is a common issue on cars with aftermarket high flow fuel pumps. The solution to this is to fit a swirl pot/surge tank which I will look at doing over the winter.
Overall, I am very pleased with the results of the project. I have spent WAY WAY more then I wanted to but then that’s always the way. Special thanks to Nadir@Auto-Serve for his hard work and dedication, Matt@TRL for the mapping and care taken to tweak the drivability of the car and to the traders on here especially Moddiction, Sumo Power and Si@Hendly Performance for the supply of the parts and general advice.
I will now keep this thread updated as I refine the car. I use the word refine rather then finish because cars like these are never finished!


Just to add also, fuel economy wise the car did pretty much the same fuel consumption as my mates Clip 172 when crusing - obviously VTEC action brings this down significantly! When Matt@TRL was mapping the car I did tell him about the trip to the Ring so he has spent some time on the map trying to lean off fuel when the car is on a cruise and not on throttle to give decent economy. I ran the car on V Power 99 in the UK, V Power 98 (France
) and then V Power Racing 100 Ron in Germany and I tried some of the Aral 102 Ron near the ring!The dilemma that I now have is that to truly enjoy the car I am going to have to start taking it on track where it will end up getting battered and I think my car is too nice to be just a track car but is it so much fun!
The car, driving around in Europe and the Ring was brilliant with the grip it had on their beautiful tarmac and roads – in the UK with the poorer roads we have (being politically correct their!) it’s a different proposition; you have to modulate the throttle much more to avoid wheel spin and back end action. lol
To use it more on track I also need to address a few more things:
Cooling - I think I need to look at better fans to keep the car cool and possibly put the radiator fans on a switch so they can be on all the time when on track.
Fuelling - When the fuel gets low the car no longer wants to Rev – this is a common issue on cars with aftermarket high flow fuel pumps. The solution to this is to fit a swirl pot/surge tank which I will look at doing over the winter.
Overall, I am very pleased with the results of the project. I have spent WAY WAY more then I wanted to but then that’s always the way.
Special thanks to Nadir@Auto-Serve for his hard work and dedication, Matt@TRL for the mapping and care taken to tweak the drivability of the car and to the traders on here especially Moddiction, Sumo Power and Si@Hendly Performance for the supply of the parts and general advice.I will now keep this thread updated as I refine the car. I use the word refine rather then finish because cars like these are never finished!
The following users liked this post:
typefern (12-28-2019)


Trending Topics
09-19-2015, 10:00 PM
#8

Nice read 
like the oval oem look tailpipes fits like they should do
like the oval oem look tailpipes fits like they should do
09-19-2015, 11:53 PM
#9


Very nice build.
Do you still have the Evo at all?
One thing I'll say is if you haven't replaced the OEM anti roll bars, get some Eibachs on there. I've got Ohlins coilovers and I had Eibach sway bars put on yesterday and it's made it a complete weapon now.
Do you still have the Evo at all?
One thing I'll say is if you haven't replaced the OEM anti roll bars, get some Eibachs on there. I've got Ohlins coilovers and I had Eibach sway bars put on yesterday and it's made it a complete weapon now.
09-20-2015, 01:01 AM
#10
Registered User
Thread Starter
Thanks for the comment guys. The car has really felt like a project between friends and we have learnt so much and it's great sense of accomplishment when you know you've done something like this like this.
Yes, lucky enough to still have the Evo but my attention recently has been on the s2000. I'm active on MLR and there is a build thread on the car in the TRL developments section. The Evo (and probably the s2000) are the kind of cars I'm prepared to keep as long as possible since I know no one will pay anywhere near what they cost to build so I may as well just enjoy them and not worry about it.
I was toying with anti roll bars but was reading that they can change the balance and characteristics of the handling and I wasn't too confident that I'd be able to understand and feel the changes with out more time driving the car. I will look into them later however - how have you found the ride with the Eibach anti roll bars and Ohlins combo? Did you replace both?
I've set my dampening to the recommended Ohlins settings for now and they seem to work well. I'm also looking for a easy way to adjust the dampening on the rear without having to cut holes out of the trim. Have you had chance to experiment with dampening settings?
Thanks