When you click on links to various merchants on this site and make a purchase, this can result in this site earning a commission. Affiliate programs and affiliations include, but are not limited to, the eBay Partner Network.
UK & Ireland S2000 CommunityDiscussions related to the S2000, its ownership and enthusiasm for it in the UK and Ireland. Including FAQs, and technical questions.
Here's the UK forum's tech faq. It is a joint effort by many of the UK owners and covers a lot of the questions which are asked on a regular basis, plus a number of very important technical issues which you will probably be unaware of (especially since most of the UK Honda dealers are also unaware of them )
If you are considering buying an S2000 (or you have just become a new owner) I recommend that you read through these FAQs, as you are bound to learn something new and important - I know I did, when I compiled them.
Each chapter is now linked, just click on the heading below to take you to the relevant post.
Day to Day Running Oil
Fuel
Tyres
Punctures, Breakdowns & Towing
Vehicle Security
Automatic Boot Release Part Numbers by Model Year
Maintenance Honda Recommended Owner Maintenance
Trickle Charging
Wipers
Battery
Servicing at Your Local Honda Dealer
Suspension Geometry Settings
Cleaning Your S2000
Changing Belts - part numbers
Common Problems Idle / Hesitation / Kangerooing / Misfire Problems
Spring Spacers
Seizing Suspension Geometry Adjustment Bolts
MAP Sensor
Auto Window Function Fails
Premature Wearing of Hood
Heavy Clutch
Clonking Suspension
Squeaking Dashboard
Puddle in Passenger Footwell
Rattling Roof Catches
054/055 Clutch
Alloy Wheels
Locking Wheel Nuts
Gearbox
Headlamp Washers inc...
Disabling the Headlamp Washers
Buying Model Year Differences
UK PDI Check Sheet
Recalls
Warranties
Imports
Modifications and Upgrades In Car Entertainment ("ICE") Upgrades
Hardwiring
Upgrading the Headlights
Removing the Honda and S2000 Badges
Cold Air Intakes & Air Box/Filter Modifications
Aftermarket Wheel Fitment Guide
Miscellaneous Changing/Replacing Roof - Guide with pics
Garage Hardtop Hoist
Hardtop Fitting Kit Details
Hardtop Fitting Instructions
Hardtop Stand Instructions
Removing Dash Trim
Changing the Brake Pads
Turning off the Automatic A/C Demister
Driving on the Track
Miscellaneous Comments
ECU Fault Codes
Oilmansi's Guide to Oil
Technical Service Bulletins
Other S2ki Resources
Ensure regular, REGULAR, checks are made to the oil levels. Each X on the dipstick is approx 100ml so top up accordingly. When checking the dipstick, check both sides, choose the lowest of the two sides and treat this as your current oil level. Always ensure oil levels are checked once oil has drained into the pan. Always ensure car is not on an angle when checking. Keep it horizontal.
Low oil can result in (above the obvious evil engine wear and subsequent seizures) a lack of VTEC engagement. I don`t know this personally, I just know people have complained about vtec issues and low oil has been their problem.
5.5l of oil is needed for a full oil change.
Diff Oil
Diff should be 75W90 GL-5
Gearbox Oil
Transmission 75W/80 GL-4
Oilmansi's comprehensive guide to oil can be found in the Miscellaneous section below.
Fuel
This varies by model year. MY99 - MY03 prefer 97/98 RON Super Unleaded but can ruin on 95 if required.
MY04 onwards are less fussy.
Tyres
MY99 - MY03
Standard fit tyres on the S2000 were Bridgestone ES02JZ. Bridgestone developed these tyres specifically for the S2000 and Honda recommended that only these tyres be used on the car.
However, Bridgestone have discontinued the ES02JZ
Tyre Sizes are as follows:
Front 205/55/ R16 89W
Rear 225/50/ R16 92W
See here for more information and opinions on tyres Tyre Thread
Winter Tyres
If you encounter serious snow on a more than occasional basis, there is the option of proper winter tyres which work extremely well in the main. Here is a useful thread: Link
Tyre Pressures
Tyre pressures are crucial to the handling of the car, and it is recommended that they are checked regularly.
Standard pressures are 32psi.
Other tyres can be run up to 34psi or higher, to compensate for the softer tyre wall
MY04 -
The MY04 runs on Bridestone RE050s which are supposed to give improved wet weather performance.
On the front E050MZ 215/45/R17 87W
On the Rear E050MZ 245/40/R17 91W
Your Bridgestone RE050s will also have a number similar to the following... TO250, KO301 Ignore these numbers, they are internal build codes that do not make any difference to the tyre.
Punctures, Breakdowns and Towing
It is not recommended to use the space-saver wheel to replace a rear wheel. Apart from the obvious handling difficulties this could produce - especially in the wet - it can also cause damage to the LSD.
The space saver should be inflated to 60psi
Procedure for a rear puncture is:
1. remove front wheel
2. put on space saver
3. remove rear (flat) wheel
4. put front wheel on back axle
5. remove tool tray from boot and place in space left by the spare wheel
6. put damaged wheel in boot
If you are considering towing your S2000 - Don't. This can cause damage to the LSD.
If you have broken down and are at the mercy of the AA/RAC etc insist the car is transported on a flat-bed, which will handle the low ride height of the S2000.
Jacking Points
Here's a thread which shows where to find the cars Jacking Points
OEM Alloys
OEM MY00-03 wheel sizes and offsets are as follows:
Front: 16" x 6.5", +55 offset
Rear: 16" x 7.5", +65 offset
OEM MY04+ wheels are as follows:
Front: 17" x 7.0", +55 offset
Rear: 17" x 8.5", +65 offset
Vehicle Security
All New EU & UK S2000s are delivered with a Cat2 Immobiliser. Honda UK then fit their own Cat1 alarm system when the PDI is done. Parallel import cars do not have alarm systems fitted as standard and you will need to fit your own system.
Some of the early MY99 UK cars did not have alarms fitted.
If you have the Honda UK alarm, you can open the boot remotely. When you unlock the car using the key fob, the indicators will flash once. Within 3 seconds of the indicators going out press the indented unlock button again. The boot should then open automatically.
Part Numbers by Model Year
Below are links to the parts diagrams for each model year of UK spec cars.
When you click on one of the parts diagrams, the part numbers are shown in the "PFKL" format -dealers are generally happy to work with these but if you wish to see the actual part number, you need to remove the "_pfk" from the address shown in your browser's address bar
For example:
"http://www.lingshondaparts.com/honda_car_parts_selection_pfk.php?block_01=17S2A801&block_02=B__0100&block_03=1 9269&block_05=hcr"
becomes:
"http://www.lingshondaparts.com/honda_car_parts_selection.php?block_01=17S2A801&bl ock_02=B__0100&block_03=19269&block_05=hcr"
Check engine oil level – Make sure the engine is warm and the car is on a level surface. Wait a few minutes after you have turned off the engine. Each X is 100ml
Check engine coolant level – The coolant is in a bottle at the front of the engine bay on the right hand side. Check the coolant is between the MAX and MIN lines
Weekly
Air conditioning – check that the air-con works every week.
Monthly
Check brake and clutch fluid – The brake fluid is at the top of the engine bay on the right hand side. The clutch fluid is on the right of the brake fluid.
Check tyre pressure – Check the tyre pressure when they are cold or have been left for 3 hours. The tyres can still be considered cold if you have driven less than 1 mile.
Check battery condition and terminals for corrosion
Check windscreen defroster and air conditioning. Also check the defroster vents.
Check all lights
3 – 6 Monthly
Grease the roof seals - Rub a thin film of Shin-Etsu Silicone grease (Shin Etsu Part Number G-30M) onto the seals wherever they touch the convertible top or each other.
Trickle Chargers
If you're car is garaged and unused for more than a couple of weeks at a time, the chances are that you will flatten your battery and the alarm will sound until the battery is completely dead. This can be solved by using a trickle chargers. The CTEK range is used by a number of people on this board.
Wipers
***WARNING*** Do not open your bonnet with your windscreen wipers in the raised position - you will scrach your car!
Here are the sizes
Passenger Side: Bosch 20"
Driver Side: Bosch 16s - s is for the spoiler
Battery
If your dealer doesn't have a battery in stock and you're desperate for a battery. Halfords stock them. However, the model number on their computer has the terminals the wrong way round and will not fit the car. The actual battery you need is
Halfords own brand HB053
Servicing at your local Honda dealer
We are in the process of putting together a good dealer guide Dealer Satisfaction Survey If your dealer is not included you could do worse than ask the service guys about a few of the subjects that have been covered in this faq.
One thing that has come up more than once, is cosmetic damage to cars, in particular the exterior and red engine cover. On arrival to the dealership get the service manager to do a vehicle state inspection. Any marks, scratches or dents are marked on a diagram of the car. When this process is complete, the manager signs it and gives you a copy. Then when you return, all you have to do is check the car against the "agreed" diagram.
Also beware dealers that have freshly washed the car when you pick it up (and it's still wet) - notoriously difficult to spot bodywork scratches/marks!
Your S2000 should be serviced every 9000 miles or every twelve months if you haven't covered that many miles.
Honda offer fixed price servicing for cars over 3 years old (all S2000s), see here for details http://www.honda.co....irs/servicing/. Please make sure your service book is stamped by the dealer who carries out the service.
Definitive Service schedule, to clear up any confusion about 54k and spark plug changes.....
Get your dealer to check Service Bulletin HUK00000000000671 dated 28.10.05 it says
With reference to a message posted on the Dealer Technical home page concerning an error on the 9,000 mile service check sheet, to clarify and assist you further, the correct service sheet has been attached to this bulletin.
Please click on the attachment file to print and view the correct service sheet.
In the meantime we apologise for any inconvenience caused and if you require further assistance, please do not hesitate to contact me.
Suspension Geometry settings
Not all garages can do the alignment - due to the height of the car.
If you have the car aligned, check the printout for the results. Also be aware that it's normal for the alignment to drift a little so it's worth having it checked every so often.
MY99 - MY03
After customer complaints of excessive "tracking" (susceptibility(sp) to follow the wear patterns in the road) by UK customers, Honda UK carried out dynamic testing and arrived at an optimum specification to counter this effect of "tracking".
This is not an optimum performance setting, but only an optimum setting for poor UK roads and drivers who let their cars drive them and not point the car where they want to go.
When the S2000 had a facelift in 2004 the suspension pick up points in the chassis were modified to alter this characteristic and no longer required any modification to alter the effects of "tracking".
1999-2003 S2000 set to standard settings for best performance or optimum settings if the car is tracking.
MY04 - MY05
2004 onwards S2000 set to standard, settings below
QUOTE
Wheel alignment from 2004 workshop manual
Item Measurement Qualification Standard or New Service Limit
Wheel alignment Camber
Front at inspection −0°30'±30'
Front at adjustment −0°30'±10'
Rear at inspection −1°30'±30'
Rear at adjustment −1°30'±10'
Caster
Front at inspection 6°00'±45'
Front at adjustment 6°00'±15'
Total toe-in
Front 0°00'±16';( 0±2 mm) (0±0.08 in.)
Rear 0°24'±16' (3±2) (0.12±0.08 in.)
If the springs or shock absorbers are modified or car lowered factory settings do not apply as the angle from suspension pickup to wheel centre will alter and no amount of adjustment can return the original fine balance achieved by the factory.
Please Note: It is not unknown for the adjustment bolts to corrode which means new suspension arms. Please check the Common Problems post
Cleaning your S2000
Cleaning the Pre MY02 plastic rear windscreen
The plastic rear window can get cloudy over time. The best product to clean this is the BMW Z1 and Z3 window cleaner. The part number is 81 22 9 407 665 and you can order it from any BMW dealer for around £7.50. There are a couple of other products which have been recommended by regular users on the board - Renovo and Hindsight.
Cleaning the Soft Top
The soft top is made of vinyl. The general consensus is that it is best to wash the roof with warm mildly soapy water and use a sealant such as Auto Glym vinyl protectant, or 303 sealant http://www.wwc.co.uk/acatalog/index.html?h...tml&CatalogBody
Using 303 Protectant
303 aerospace protectant is good stuff, but just because it comes in a spray bottle do not be tempted for a moment to apply to the roof using this somewhat indiscriminate device - if you get it on the paintwork it is a pain to get off!
Unscrew the bottle and pour a little into a shallow dish, then use a small sponge to carefully apply to the roof, avoiding contact with windows/paintwork. I find it best to lower the windows and release the roof from the latches and open it just a tad - this way you can do the roof edges more easily. Do not use too much - apply it sparingly otherwise the next time it rains it will run off and look horrid on your paintwork!
Leave it to dry for 30 mins or so, and then gently rub the roof over with a damp microfibre towel (reserve a towel just for this purpose) and you will be left with a nice matt black roof.
Changing Belts - Part numbers
When it comes to auxiliary belts (rubber belts that go round the alternator, crank and air con pulleys etc) there are two common types, the V-belt commonly known as the fan belt and the Micro-V belt commonly known as a serpentine belt.
You can purchase these from a decent motor factor if you know how to measure them and work out the generic part number. Unfortunately it’s not quite as easy as walking into the shop and asking for a micro-v over the counter because rarer cars like the S2000 never seem to be list or if they are they are often incorrect. Using the method below will ensure you get the correct one first time.
V-Belts
Firstly measure the width in mm, then using a piece of string work out the complete length.
I.e. 11mm wide & 1200mm long would give you the part number 11x1200 simple!
(some motor factors use the letters 'AV' as apposed to 'x' in the part number, i.e. 11AV1200)
You won’t always get an exact match, the width is important to remain the same but the length has got a degree of tolerance dependant on the amount of adjustment on the auto or manual tensioned. For example, you require the 11AV1200 above, in most cases an 11AV1195 or 11AV1209 would suffice.
Micro-V Belts
With a Micro-V you don’t measure the width you simply count the ribs (not the grooves) and then same technique as above with a piece of string calculate the length in mm.
i.e. 6 ribs and 2300mm long would generate the part number 6PK2300 or 6FPK2300 (some motor factors use the letters 'PK' and some use 'FPK')
Again with these belts there is a degree of tolerance so if you required 6PK2300 going either way by a small amount of mm would suffice.
Note: The tolerance is pretty much guess work and down to the amount of movement on the belt tensioned / manual adjuster. Most modern cars i.e. The S2000 use a sprung loaded tensioned so your tolerance is minimal, possibly as low as 5mm either way (6FPK2295 - 6FPK2305 using the hypothetic number above)
For the record:
The part numbers for the S2000 are as follows (Standard 99 to 2007 inc. JDM / UK models)
With Air Con = 6FPK1470
With out Air Con = 6FPK1138
Although I have given the only two part numbers for the S2000 the above guide is useful if for instance you add another auxiliary device, supercharger etc or for any piece of machinery, lawn mower, car etc.
I see a lot of posts on this, and get a lot of PM's about these type of problems so I thought maybe making this a sticky thread would filter some of the problems out.
As idle / hesitation / kangerooing / misfire problems and misfires seem to be a common problem on the S2000, and indeed on most cars, I thought I would construct a thread to aid people in diagnosing their problems.
Aside from an actual problems listed below, these type of problems can just be a passing phase. Your ECU has to cope with changing ambient temps and pressures, and can simply be adjusting. If your problem persists or gets worse then read on....
All this info is based on MY00-05 cars - the 06 has some differences in its setup which im not clued up on (drive by wire throttle etc)
Idle and hesitation / kangeroo problems can be caused by the following:
Loose throttle cable
Failed or failing MAP sensor
Failed or failing O2 / lambda sensor
Air leaks (on the vacuum side)
Blocked throttle lines
Dirty throttle butterfly
Blocked air filter
ISCV / AIC (idle speed control valve) misbehaving
One person (simon prelude) also had a seized aircon pulley which cause a bad idle on his
Hesitation / Kangeroo!
This is a common complaint. You have been driving the car a while, you stop at a junction waiting to pull out, you see your chance, boot the throttle and not a lot happens Frustrating at best, dangerous at worst if you roll out in front of someone!
It has been said that the car will kangeroo becuase of the light flywheel - I dont subscribe to that view. No car ive ever owned does it this bad, and the ECU should easily be able to cope with the flywheel weight. The kangerooing I believe is to be ether IAT (intake air temp) or MAP (manifold absolute pressure) heatsoak. I have some logs from my PLX when the car was kangerooing and there was basically no fuel going in, and some very screwy readings from both sensors.
In my case I bought a new MAP sensor and it was fine again, while others have cured it with intake snorkels and cooling mods. An intake snorkle is a good idea anyway as it ensures the airbox only takes air from outside the engine bay.
Some people decide to live with it by revving the car before pulling away, which effectively allows the engine to gulp a lot of warm air and clear the problem.
Misfires are slightly different but can have some similar causes (more often than not its the MAP sensor if above 6000 rpm):
Failed or failing MAP sensor
Blocked injectors
Damaged coil packs
Worn or damaged spark plugs
Valve clearances
Damaged Crank Position Sensor
Corroded ECU wires - this has been found on a number of cars and isnt easy to detect or fix!
Failed or failing O2 or lambda sensor
Air leaks (on the vacuum side)
One thing to note regarding misfire codes is that they can be diagnosed quite nicely by doing the following. If you have an error code on cylinder 1 and 3, then you can find out if its a coil pack by swapping them around (noting where you put them!) and see if the fault follows it. Valve clearance issues and blocked injectors seem to be the main culprit of misfire codes....
There are many others faults which can crop up, but these tend to be the main ones. This guide should either identify one of these problems as a cause, but if not then at least you have narrowed it down and post up what issues you have!
Ok now how to check what is causing the problem, to be checked in this order.... If your car is hesitating, idling badly or misfiring, then the following should be checked, and if you still get stuck then post up - but it would be helpful to check these first!
Have you got a CEL - check engine light?
This is the amber light on your dash that you can see when you turn the ignition on. The CEL is a bloody great invention and can be your best clue at diagnosing a problem. Too many people just reset it and dont get the code...
Should the ECU decide something is wrong, it will light up to tell you there is a problem. These codes can be decoded by a dealer, normally for a charge, or you can get ECU code readers to plug into the diagnostic OBDII port under the passenger side trim. PM if you need a code reader. Quite often you can have a fault with the and no CEL will appear but getting these codes is vital in diagnosing the problem. If the CEL is flashing - DO NOT DRIVE ANYWHERE! If it's just lit then I would say you can drive with caution and get the error code as soon as you can. Some codes will go away once the ECU is happy again, often within about 50 miles. Occasionally with all the things the ECU has to deal with, you may get the odd false CEL which will go away All codes are stored in the ECU even when the light has gone out.
The ECU reset!
This leads nicely onto the ECU reset... Dont reset the ECU until you have extracted any codes from it. If the car is misbehaving, an ECU reset can often put things right. The ECU does not learn your driving style, but it does store fuelling trends / trims and idle info etc. By resetting the ECU, it wipes its fuelling trim memory and idle control.
My spin on this is to get the car warm then park up. Switch the car off and pull the ECU fuse shown below for about 10 mins (this removes power to the ECU) Replace it, start the car up then go and find a long stretch of road and give it redline through the gears. The ECU will quickly learn where to set its fuelling and ignition timing. The next step is to get the idle sorted. You will notice the car really struggles to idle and tries to cut out (it shouldn't normally cut out, but comes close). To relearn, park up and let the car go through 3 cycles of the cooling fan coming on and off. its then set. It will eventaully learn anyway, but its quicker using the cooling fan method.
Fuse can be found behind the fuse cover inside the footwell:
If you reset and your problem persists then onto the following...
Ok, question time! These are things to check and I have tried to put them into the easiest things first.
1) Have you just had a service or added a modification to the car?
Its quite common that something may have been nocked or not re-connected which will casue you a few problems! Have a double check that all is well uner the bonnet. If a sensor is disconnected it will generally give a CEL. Have any of the vac hoses been pulled off? there are bloody loads of them on the S2000! Quite easy for one to come loose.
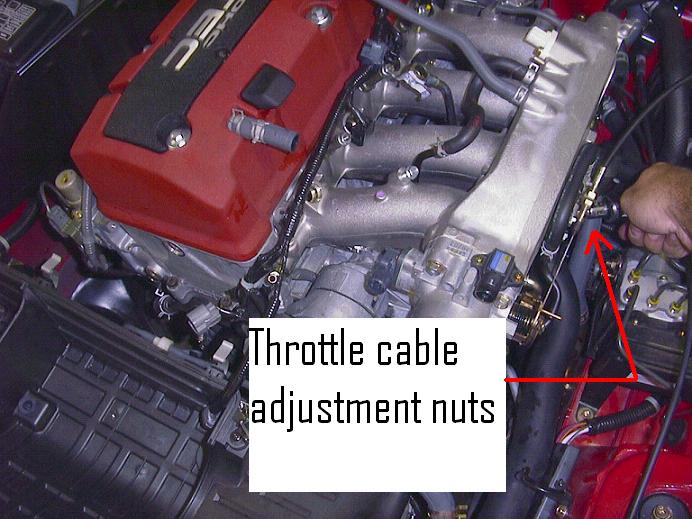
2) Is the throttle cable taught?
Notice I didnt use the word tight! The cable seems to slacken off on these cars, which means when you touch the throttle, its not actually opening the butterfly, so the engine doesnt try and pick up. The cable can be adjusted using the nuts on the arm shown below. It should have a 1/4" play in it to allow for temperature adjustment. Info here: https://www.s2ki.com/...opic=120410&hl=
3) Is the air filter blocked?
Unlikely but worth a check! Unclip the airbox lid and check there arent any small animals, leaves, homeless people or tools left in there
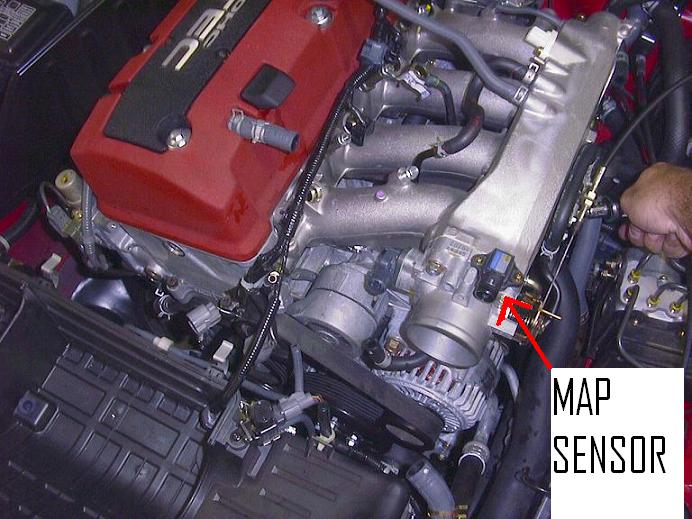
4) The MAP sensor...
The MAP basically tells the ECU how much fuel to put in. They can get gummed up with oil mist etc, as they are after the filter. They tend to be the cause problems with misfires while on VTEC, but also can be the cuse of hesitation / kangerooing. Many have had success by giving the sensor a gentle tap - so this can be worth a try. Its quite difficult to determine if this is broken without removing it and bench testing it to see if it gives a linear output as you bring up the pressure. A new one can be had quite cheaply from HardTopGuy in the US.
How to tap it https://www.s2ki.com/...howtopic=209708
5)Air leaks...
Can be atotal bast to find but they can cause your idle a lot of problems! Normally a problem after a service or a modification where you might have nocked something off, which is then a lot easier to spot. An air leak can be a problem anywhere after the throttle body, right back to the exhaust, just before the lambda sensor. Good luck finding it!
6) Plugs
Dodgy plugs can give a similar problem to the above one with injectors. There have been a number of issues with Denso plugs (tips coming off) so my advice would be to stick with NGK... Again, plugs can be moved from one slot to another as a fault finding task.
8) Is the car using a lot more fuel than normal?
If the lambda or O2 sensor (not these are one and the smae thing!) is damaged then this can be the cause - the sensor will fail to a low voltage which tells the ECU its running lean - so the ECU pours more fuel in to try and compensate. To check this your best bet is go to a dealer with an ECU monitor and ask them to look at the lambda voltage at idle. It should slowly bounce back and forth from 0- about 0.9 volts. if its broken it will either be very sluggish, or just not move at all! if this is the case then buy a new one and reset the ECU. You could also get an emissions check from an MOT place, and if it fails this will indicate the o2 is at fault. You can buy monitors from people like Greddy (Infometer) or Apexi etc and can be useful!
10) Injectors
A lot of people have recently been having misfire problems, the root cause of which appears to have been blocked injectors. If you have a misfire code on one cylinder, you could test it by removing an injector to a different cylinder to see if the problem moves to that cylinder. A blocked or non firing injector will cause a misfire as the associated cylinder will not be getting any / enough fuel. In terms of replacement, you could buy one from a breaker and get it flow tested / refurbished, buy a new one from a dealer, or buy an aftermarket one (Spoon etc). There are quite a few outfits who will flowtest and refurbish your injectors but the choice is yours as to whether you just go and buy new ones...
11) Idle Control Valve Cleaning
Fir idle only problems (ie no misfires) then your AICV might need a clean. It's good practice to do it every couple of years anyway. Good thread here by UncleFester:
12) Lots of weird CEL faults?
There have been quite a few reports of reccuring CEL codes popping up and general car misbehaviour, caused by corossion of the ECU wires. I think at least 2 UK owners have had this problem. Can be checked by resetting the ECU, getting the car stable at idle, then wiggling the wires to the ECU in the engine bay, or under the passenger footwell.
Engine management stuff
Next part is more for info, for those who are interested, to try and explain how some of the components uder the bonnet function, which will help you understand why the car will misbehave.
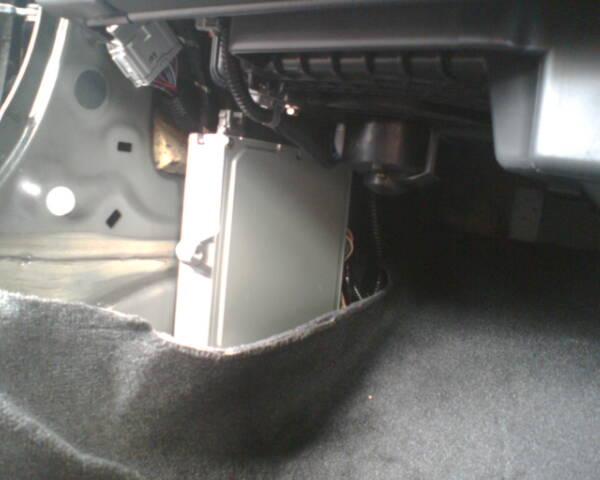
Attatched to a modern engine are various sensors which all feed into the ECU. The ECU lives under the passenger footwell as shown below. All the sensor wires form into a loom, which comes through the bulk head into the ECU.
The engine sensors mostly work on sending voltage outputs to the ECU, which allows it to determine things like how much fuel to put in, how much ignition timing to add or subtract, and to diagnose faults. Its an extremely complex device and never fails to amaze me!
The main sensors are as follows:
MAP - Manifold Absolute Pressure sensor
This is the sensor that gets the most attention on the S2000 It lives on top of the inlet manifold as pictured, and is a v important bit of kit. The ECU uses this as an indication of engine load, and will use it to decide how much fuel to put in.
Some cars use MAF (mass air flow) to tell the ECU how much work the engine is doing, but we use a MAP. Within the ECU are fuelling lookup tables, so for a given MAP voltage (combined with inputs from the TPS, knock, AIT and coolant temp) the ECU known what amount of fuel to put in for optimal fuelling. It would seem that these sensors, like any, can have a limited life and I know replacing mine really imporved the behaviour of the car. By now you can probably guess why im not a fan of this MAP whack business! You can also probably appreciate why the car can hesitate when pulling away or misbehave on VTEC if this sensor has a fault... A failing MAP very rarely seems to give a CEL.
O2 or Lambda sensor
The S2000 has 2 of these. One in the exhaust manifold and one in the catalytic convertor. The one in the cat has no input other than to tell you if it thinks the 1st one is causing fuelling problems. The one in the manifold is the more important one for us, as it has a big input into fuelling and idle control. The sensor is there to tell the ECU how rich or lean the fuelling is based on oxygen content, so it feeds back a signal to the ECU, from 0-1v volt, 0 being lean and 1 being rich. On our, and many cars the sensor is heated and takes about a minute to become live when you start the car. If your issues (idle etc) happen before this sensor is warm and active, its not the O2 sensor which is at fault.
At idle or cruise the ECU tries to achieve "stoichiometric mixture" which is 14.7 parts of air to 1 part fuel for normal pump fuel. To do this the ECU bounces back and forth either side of this figure to try and get to optimum.
This sensor is running all the time but only controls the fuelling when your are at idle or part throttle / cruise. Once you put your foot down a bit, the ECU purely iuses the MAP sensor to dictate its fuelling - and the O2 becomes passive. This is where the fixed fuelling lookup tables come it!
When the O2 sensor is being used, it is called "closed loop" fuelling, and when the MAP alone is being used it is called "open loop" fuelling. A broken O2 will often give a CEL.
TPS - Throtle position sensor
This sensor is bolted to the other side of your throttle body and has a rotary spring inside it, as pictured below. When you
have your foot off the throttle, the throttle butterfly is closed, and the TPS will give a voltage of about 0v to the ECU. When fully open, the spring turns and the resistance changes in the sensor and it will go to around 5v. The ECU uses the position of the TPS for various functions.
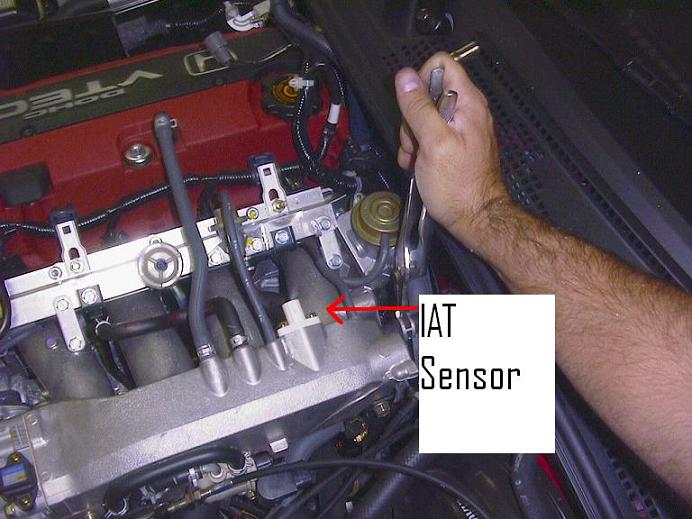
IAT - Air Intake Temperature sensor
This beasty provides input into the ECU for fuelling control too. The problem with just using manifold pressure to tell how much air is being used, is that the volume of air changes depending on ambient temps. So on a how day the air is less dense
than a cold day. By adding this input into the ECU it will help judge the air volume right, therefore the fuelling will be more precise The IAT is the white sensor plugged into the intake manifold, between the 3rd and 4th manifold branch.
Disclaimer - Im not responsible for any damage or injury caused by you or anyone acting on this information so its taken at your own risk! Im not a trained auto technician - just an enthusiast trying to help
To prevent the S2000 settling excessively on it's suspension during shipping, Honda insert spacers in the suspension springs all round. They are supposed to be removed by the dealership as part of the the pre-delivery prep. It's not unknown for this to get missed or for not all of them to be removed.
This is the card that Honda UK leaves in the car for the dealers
If the suspension feels overly hard or the steering response is vague, then check to see if you have any or all of the spacers left in!
Pic 1 shows a spacer in situ in a rear spring.
Pic 2 shows a spacer having been removed.
This is potentially highly dangerous and it's worth querying with your dealer at the outset to see if this has been done!
Seizing Suspension Geometry Adjustment Bolts
As this is turning out to be such a major issue, this section has been replaced by a full Definitive Suspension Bolt/Bush FAQ.
Please scroll down or Click Here to see this section.
MAP Sensor
Symptoms: Engine Stuttering, lack of VTEC engagement, and general intermittent engine problems.
Solution: The MAP sensor is a small piece of plastic that sits on top of the engine and has the words MAP Sensor printed on it. Normally a couple of light knocks with a rubber hammer will sort any problems out. You can also remove it and blow on it to remove any dirt build up.
Some MY04 and MY05 cars that have a problem with engine stuttering can get the MAP sensor replaced free of charge. Please contact your dealer for details
Another problem with similar symptoms is this...
A 'flat' spot when starting it after it had been standing for 15-45 minutes after it had been warmed up. It refused to respond to the accelerator, kangarooed, jerked and lost ALL power. The solution to this was...
A corroded wire near the scuttle on the passenger side, which was replaced.
Auto Window Function Fails
When your battery is disconnected, the auto function on the drivers window can stop working, this is because it then needs to be reset.
The car has to be started!!
1. push and and hold the window button down all the way until its completly down.
2. when its completely down, let go and push it down again and hold for 2 to 3 seconds. then let go
3. now pull and roll the window up until its all the way up.
4. when its up let go
5. pull the button up again for 2 to 3 seconds.
(after step 2, he said you should be able to hear or feel the motor or something inside reset.)
6. now then your autoscroll should work correctly.
Premature Wearing of Roof
A number of cars are suffering with premature roof wear. There is a guide below with some preventative measures.
It seems the arm that is doing the damage can only do so when the hood is right down and it is pressed against the hood.
Operation of the hood and the movement of the car then causes it to rub against the hood and wear through, possible bigger problem for those with hardtops.
My first idea was to add a piece of black gaffa tape at the wear point to protect the hood.
Then I made a sleeve to go around the 'elbow' of the frame that seems to cause the problems:-
Added velcro hooks down the edge of a piece of black bass box cloth 12 x 14cm and wrapped this around the elbow.
Looks OK and covers any rough edges
Heavy Clutch
For over a year now my clutch has been getting stiffer and stiffer, but initially started as being a slight sticking point when released. It got to the point where my left leg would ache after a drive, especially when encountering traffic (every morning to work along the M1 now).
I mentioned it a few times to the dealer over that period and got responses of
1) Will have to take the clutch out to have a look.
2) Clutch is on its way out and will probably need replacing.
3) Probably need to replace the Clutch Master Cylinder.
Having read in Under the Hood about sticky clutches various people have had Master, Slave cylinders replaced and still have had the same problem. Others have sprayed WD40 into the clutch housing (not recommended) and problems have gone away for a while, but always come back (WD40 doesn't have a high enough temperature range for the job and also dissolves grease!!). And others have managed to re-grease the release fork, pivot and bearing (contact point with release fork) through the release fork hole in the side of the gearbox using a piece of wire.
With all this in mind and not wanting to pay the dealer to diagnose and hence cost more than is required, I set about systematically solving the problem myself.
1) Replace and bleed clutch fluid. It was looking pretty black anyway, so needed doing just to eliminate this as a problem. Still the clutch was stiff.
2) So next day down to dealer to get some high temp grease, and it just so happened that night on one of the US forums someone had posted a service bulletin for 00-04 S2K, Clutch Stiff and Squeeky (or something like that).
This basically says, remove slave cylinder and pull-out release fork. Grease release fork pivot, release fork which comes into contact with release bearing and release fork to slave cylinder connection point.
With grease in hand, slave cylinder removed in 5 mins, and a quick tug on release fork (note: release fork
will not come out of gearbox!!). Using a torch and I went ....my god as dry as a bone, no grease to be
seen anywhere. So using a piece of wire (from a coat hanger) I applied grease to the relevent points and attempted to add some to the release bearing guide, but it was very tight and you generally end up doing it blind. I done the best I could and put everything back together and suddenly I had what felt like a brand new clutch. Smooth action when applying the clutch and releasing, its amazing how such a small thing makes driving easier and more pleasurable (yes! it was pissing me off).
So now I am and all it cost was £20 and my time (including clutch bleed).
The thing was I had the clutch replaced under warranty (54 clutch), so its not just a problem straight from the
factory. Honda know its a problem, hence service bulletin, and my guess is their installation instructions may have been wrong at dealers and factory. Either that or the areas in question get too hot for the grease and it just
disappears over time.
Whatever you do don't let the dealer fool you into thinking it is something else before this remedy is tried.
With ramps etc, it should only take 30 mins to complete..not a new Master Cylinder!!! The other thing to mention is that due to the restricted access it is very difficult to ensure everything gets greased, so at a later date
it may need to be done again.
Clonking Suspension
Symptons: Suspension making anything between a clicking and a clonking noise at low speeds on rough ground.
Solution: There can be many causes of this but the first and cheapest thing you should be looking to do with this problem is retorquing the suspension bolts. My dealer did this for free, and it's a good thing to rule out before playing with dampers etc
Squeaking Dashboard
Symptoms: A very annoying squeek that has been compared to having a mouse in the dashboard!
Solution: Check and oil the bonnet catch and also check the rear view mirror.
Puddle in Passenger Footwell
There is a pipe connected to the bottom of the aircon unit in the passenger footwell that takes the condensation out the car and drops it on the road. This can become disconnected (probably kicked off) , takes 15 seconds to replace and problem solved.
Rattling Roof Catches
My S HAD the most annoying little clicking/rattling sound coming from the strikers/roof latches. I understand that this is a common problem/fault with many s2k's out there.
Get yourselves down your local fish tank stockist and ask from some Fish tank tubing . . . .it is a clear flexible 6-8mm diameter plastic tubing. I had to buy a whole metre . . . . but who damn cares it only cost 49p. Basically you only need about 2cms of the stuff.
All you need to do is slip this over the small metal knobbly bit (technical jargon) that protrudes from the striker (the part that is fixed to the roof) quite difficult to explain really, but if you look at it, you will see where I mean. This simply prevents a metal to metal contact, the small about of plastic is just enough to tighten up the seal.
The clutches on the earlier cars, numbered 054, can make quite a lot of noise when decelerating in gear. These clutches can be replaced by the 055 clutch under warranty.
The part number for the 055 clutch is 22105PCX325
Alloy Wheels
Honda is aware of a corrosion problem with the wheels on the MY99 – MY01 They should replace corroded wheels under warranty. the warranty for the wheels on earlier cars was extended to 5 years. This is at Honda UKs discretion, so please talk to your dealer or HUK directly.
Locking Wheel nuts
Make sure these are removed and greased every six months to avoid seizing
Gearbox
It is not unheard of for S2000s to have gearbox problems, especially with the syncromesh in the higher gears. Honda's fix for this is usually a new gearbox.
Annoying 04 Headlamp Washers
MY04 cars come with the fantastic feature that means the headlamp washers come on when you clean the windscreen, causing the passengers to get a soaking!
There is a bulletin that covers the change from 03-04 model year.
The symptom it corrects is when you activate the screen washers, the headlamp washers also work, irrespective of whether the headlamps are on or not.
Only certain chassis ranges are afftected and the fix is customer complaint only and only for the duration of the manufacturers waranty.
If the sympton is one you are experiencing and your car is still under warranty, ask your dealer to look up bulletin HUK 521 dated 02.12.04.
This bulletin does not apply for 05 model year on as they are already modified.
Disabling the Headlamp Washers
MY99 - MY01 & MY04 - MY05
On the MY99 - MY01 the headlamp washer button is in a ridculous place so that you can soak yourself or your nicely washed car by leaning on the button
Honda solved this problem on the 02 model but in their wisdom re-introduced it on the 04 model in a different guise. When you press the windscreen washer on an 04 it also activates your headlamp washers - brilliant
To disable the headlamp washers on all models follow these instructions (stolen from Frenchie!)
Open up the bonnet. Look up by the windscreen on the passenger side; there's a black box about 6" x 3" with its top just below the level of the wing, between the battery and the wing.
Squeeze the ends of the box to free the clips and lift off the top. In the box, towards the front, is a 20 amp and a 30 amp fuse
Pull the 30 amp fuse out and store it in the empty space at the opposite end of the box.
There are a few differences between the MY99 - MY01 models and the MY02 - MY03. The MY04-MY05 and MY06-MY07 have further changes and a slight facelift from the earlier models. Note: The wind deflector became standard from MY01 onwards.
MY02 differences
• Glass Rear Screen
• Cd player with tweeters built into the door
• Slightly restyled polished alloys
• Chrome rings around the rear lights and chrome front light surrounds
• A softer suspension setting which makes the car slightly less "pointy"
• Repositioned headlamp washer switch
Some like the suspension changes and others do not, it is probably best to try both cars if you are in the market for a used S2000.
04 Differences
• New front and rear bumper design
• 17" wheels with different Bridgestone tyres
• New front and rear lights
• Facelifted interior
• Some suspension changes which include a slight ride height change and a little softening of the rear end.
• Colour coded headlamp washers
• Factory fitted alarm
• New colours...
06 Differences
• New Colours - Deep Burgundy Metallic, Bermuda Blue Metallic
• New Interior Colour - Brown Leather
• Drive-By-Wire Throttle System. Ues a computer sensor to input throttle as opposed to pulling on the throttle cable
• Vehicle Stability Assist (VSA) with traction control option on MY06, standard on MY08. A combination of computer controlled throttle and individual wheel braking to control sudden changes in vehicle behavior. VSA has a turn-off switch where the defrost button (moved) used to be.
• 20 lbs heavier
• Redesigned road wheels
• Redesigned steering wheel
• Brake Assist, which helps drivers apply full braking pressure in an accident avoidance situation via the ABS actuator. Braking pressure is maintained momentarily after the driver's initial braking action to help the driver stop promptly. It deactivates when the driver releases pressure on the brake pedal
• Exterior temperature gauge
• New seats (interfaced to air bags for weight and position)
• 4 of the 8 speaker audio system are integrated roll bar speakers
• New intake manifold, fuel rail, intake support bracket, and injector cover
• Only one cam sensor
• New style map sensor
• IAT sensor has moved to the rubber intake tract
• Fuel line at engine is now a quick-release type
• Air pump, associated lines and and control valve, have been eliminated
• Fan switch in the radiator has been replaced with a second CTS, in turn the fans are now computer controlled
• HO2S in the header is now referred to as an Air fuel ratio sensor
• New exhaust center section
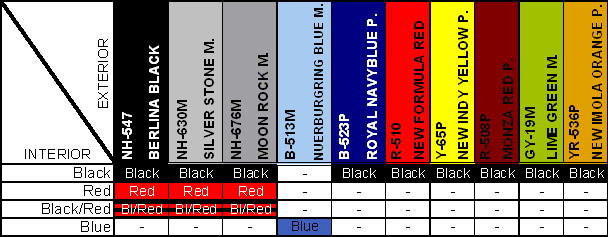
Full paint codes colour list including USDM and JDM:
NH630M=Silverstone
NH565=GrandPrix White
NH547=Berlina Black
R510=New Formula Red
B66P=Monte Carlo Blue
Y52P=Spa/Indy Yellow
B513M=Suzuka/Nurburgring Blue
YR536P=Imola Orange
GY19M=Lime Green
R508P=Monza Red
NH552M=Sebring Silver
Y65P=Rio/New Indy Yellow
NH676M=Moon Rock
B523P=Royal Navy Blue
B518P=Midnight Blue
B000P=Laguna/Bermuda Blue
YR564M=Deep Burgundy
B554P=Apex Blue
NH745M=Chicane/Synchro Silver
RP42P=Sunset Mauve
NH609P=Platinum White
UK PDI Check Sheet
Insert Image
Recalls
The following recalls should be done on MY99 – MY01
Roof tonneau cover Pre MY01? check with dealer / Honda UK
Seatbelt safety recall Pre MY01? check with dealer / Honda UK
Spark plugs replaced
Engine oil bolt replaced Honda should extend your engine warranty by one year after the oil bolt recall
The current Honda manufacturers warranty on a UK sourced S2000 is 3yrs up to 90000 miles.
The EU warranty for parallel import cars is 3yrs up to 60000 miles.
Some of the new cars available from certain car supermarkets are sourced from outside the EU and therefore Honda UK do not have to honour the warranty. Please take this into account when you buy a non-UK sourced car
The best way to find out the warranty situation on any non-UK sourced S2000 is to ring Honda UK direct and quote them the chassis number. Their contact details can be found here http://www.honda.co.uk/contact/contactForm...ontactType=CARS I have dealt with Honda UK myself on two occasions and found them very helpful in these matters.
I would recommend contacting Honda UK about any S2000 you are looking at buying unless you are 100% sure of it's history. Honda should then be able to tell you the car's origin, warranty details, and recall information. If the chassis number comes up with No Trace the chances are that this car has not had any recall work, does not have a warranty, and is imported from a non-EU country. You have been warned!
Imports
EU Imports
RHD EU/Parallel imports are identical to UK cars with the following exceptions:
No Alarm fitted (04 model now comes with a factory fitted alarm)
No Locking Wheel Nuts
3yr 60000 mile warranty instead of 3yr/90000
You should register your EU import at your local Honda dealer, who can provide you with an English warranty/Service book and inform you of any recalls.
Due to the strength of the pound over the last few years there are a lot of EU imports around. They command a slightly lower price than UK cars. Parallel importing has become less common since the start of 2003 because of the weakening pound.
JDM Imports
Japanese Domestic Market (JDM) Imports have a few more differences, such as cloth seats as standard (leather is an option), but are essentially the same cars that are sold over here.
You should be aware of the following points when buying a JDM S2000
Make sure its had its SVA before you accept it.
This means the speedo will read MPH and they should have fitted a rear fog lamp. They will also have to get around the lack of headlamp washers.
At your cost you will have to :-
Have the speed limiter removed
A Cat 1 alarm fitted
Replace stereo
Check for recall completion (Spark plug one in particular)
Insurance costs, are about same but you must inform your insurer that your car is a JDM import.
UK Main dealers seem happy to do service and recall work on these cars.
The key to telling the origin of the car is in the service book. Use it to check for the PDi stamp of the supplying dealer. If your service book does not have a stamp, the chances are that the book has been updated to English on registering in this country. I would now phone Honda UK with the VIN to see if they can confirm the origin of the car.
Other signs of an import are...
JDM imports have a smaller square space for the rear number plate. And don't always come with full leather seats.
EU imports are unlikely to have a Honda alarm. UK cars come with a Honda alarm and should therefore have Honda badged alarm fobs.
Other differences can be found earlier in this section.
Cutting Speed sensor wire.
This allows you to raise or lower the soft top whilst moving, with one click of the handbrake on.
It comes in handy in two situations.
a: When stuck in slow moving traffic with the top down and the rain comes on, you don't need to stop.
b: It pisses off other S2000 owners if you can put the top up while moving when your're on a meet and it starts to piss down.
NOT recommnded at anything above 10mph though.
View of dash with panel off showing where the plug lives
White wire with black trace looking at the front of the plug
White wire with black trace looking from the back of the plug
CD Changers
NOTE: If you are having a sound quality problem running a non-OEM changer to the Pre MY02 Honda head unit, please read this thread https://www.s2ki.com/...howtopic=169764
There are a few choices for positioning your changer...
Which upgrades should come first is a debatable point, although replacing the front speakers (particularly in the pre-02 model) is strongly recommended, as is the replacement of the stock head unit with a more powerful unit.
speakers
The stock speakers in the S are not the cutting edge (particularly the pre-2002 model set up which does not have the separate tweeters built into the door panels of the 2002 model and onwards). Many owners upgrade the front speakers and head unit and some also install speakers behind the seats.
Rear speakers can be fitted very cheaply with 4.5" or 5.25" units behind the seats. You will need to cut into your plastic panels to do this or you can buy pre-cut rear panels from http://lucidauto.com/Merchant2/merchant.mv...ategory_Code=SP There is no point in spending a huge amount on these speakers as they are blocked by the seat. you should also bear in mind that the seat will rub against the speakers if you have the seat fully reclined and all the way back on it's rails.
Connecting rear speakers to the OEM wiring harness
Originally posted by RickFriend
I recently installed a set of Pioneer rear speakers in a set of homemade s-pods and discovered a great little piece of info. After reading many posts on how to make the HU connection, including soldering the wires to the pins, pushing the wires into the harness and using the LUCID cable on MY00-03, I decided to examine the situation myself. Upon inspection of the radio harness pin configuration I realized that I had seen that style pin before. I am a computer technician and I realized that those pins are used on an ATX power supply for computers. I proceeded to dig up an old burned up power supply and removed four pins from the small connector that plugs into the floppy drive unit. These can be removed using a jeweler's screwdriver. Insert the screwdriver into the small slot on the top of the plug and push the locking tab down and pull the pin out. I clipped the wires leaving enough to splice my speaker wires onto. These pins are a perfect fit for the HU harness. Just bend the locking tab back out and insert into the radio harness. I used the wiring diagram from McGuyver's website and made the connection. Everything is working great without the hassle of the other methods. If you need to make this connection and happen to have an old power supply laying around....give it a try.
Here is a (poor) diagram of the pin layout of the stock Honda system, taken from the back of a MY00 Headunit
Using the Dash Audio Controls with upgraded Head Units
Alpine KCE-865B
For use with Alpine Head Units.
Cost is around £50 I and a few other users, found this unit to be a little "buggy" and occasionally when pressing one button the HU would do something else. However others find the unit to work without fault. You have been warned!
Countdown/InCarTec
This company makes a dash interface for the following Head Units: JVC, Kenwood, Pioneer, Panasonic, Blaupunkt, Sony. I have not heard of any reported problems about this unit.
Celsus
You need two items, firstly, the main control unit http://www.celsusice.co.uk/shopdisp_577.php and also a patch lead or adapter for your chosen brand of head unit (see under "Related Products").
Modifry
Modifry, who is a member of this board, sells this unit on the s2ki marketplace. The unit is compatible with the following brands: Sony, Alpine, Pioneer, Panasonic, Eclipse, Blaupunkt, Kenwood, JVC, Clarion and Nakamichi. This unit also benefits from some extra features, such as MP3 folder control from the dash buttons, and an optional speed sensitive volume control. I have not heard of any reported problems about this unit.
Cost is $90, plus shipping from the states, which means you may get caught for around £10 tax.
Removing the side Honda and/or S2000 badges is very easy. All you need is a hairdryer and some waxed dental floss. Heat the badge with the hairdryer for a few minutes and then use the dental floss to "saw" through the adhesive that holds the badge in place. The badge is then easily removed. All you need to do then is remove the excess adhesive from the bodywork. This is best done using some WD40 and some elbow grease!. Polish the area with some wax for a great finish!.
Alternatively: boil a kettle of water, let it cool a little then pour slowly over the offending badges. Leave them until just cool enough to touch and pull gently away from bodywork. This leaves no glue residue behind and takes seconds to do.
If you want instructions on how to remove the front/rear badges then I'd recommend you download instructions from somewhere like Rick's site as this can be a bit more complicated and can also depend on the model year. www.ricks2k.com
Cold Air Intakes & Air Box/Filter Modifications
There are a variety of Cold Air Intakes (CAI) and other air filter modifications for the S2000. Some increase horsepower, some just increase sound. I've included links to all the common CAIs available
AUS and 4IGS2000 intakes are are no longer available so I haven't included them in here.
Air Box Removal
Removal of the airbox lid gives a lot more noise, accompanied by a slight loss in performance. It's a trade off that a lot of people willingly make. The air intake on the S is badly located over the radiator, and suffers from heat soak problems due to build up of engine heat under the bonnet, particularly when the car is stationary in traffic. Removing the airbox lid just allows a greater volume of the hot air to enter the filter.
The sound is awesome with the lid off, but some find it a little rough and agricultural. Give it a shot... see what you think!
Removing Air Box Cover (No tools required)
Open the bonnet. The air box is the oblong black plastic box which sits in the front centre of the engine bay just behind the radiator. You'll see the lid of the box is held on with about half a dozen or so metal clips around the edges. . Release each clip in turn by inserting your thumb or finger between the clip and the air box, and pulling outwards (away from the box) They just spring loose. The clips are captive where they are so you wont lose any. Chuck the lid in the boot. That's it, off you go and scare every living thing in a one mile radius. Don't forget to close the bonnet!
To replace the lid simply align it in place and spring each clip back into place by pressing it in towards the air box.
Changing the Air Filter (no tools required)
Remove the air box lid as described above. You can see the filter sitting in the air box. It's basically a paper corrugated cone with plastic bits on each end. The wider end of the filter is to the right (as you stand looking at the engine from the front). The rubber intake tube which carries air to the engine is pushed onto a plastic collar at the wide end of the cone and is just a push-on fit. Wriggle the rubber tubing until it comes free of the filter collar. The only thing holding the filter in the box now is a plastic spigot at the other end of the cone (to the left) but you can't see it yet because its underneath, and is a push fit into a hole in the bottom of the air box. Pull up at the cone with a twisting action to release it completely. Vacuum any dust or rubbish out of the inside of the air box.
To fit the new filter, turn it so that the spigot is at the bottom left, and push it firmly home into it's receiving hole in the bottom of the air box. Now refit the rubber hose by wriggling it onto the collar on the right hand side of the filter. Replace the air box lid and spring the retaining clips back into place.
Aftermarket Wheel Fitment Guide
The guide in the link covers the following topics
1. How do I use this guide?
1.1 If you know what tire sizes you want
1.2 If you saw a wheel you love and want to see if it’ll fit
2. What is this offset business?
3. What causes rubbing?
4. What fits?
4.1 OEM Fitments
5. What is stagger and why do I need it?
- the left body side catcher
- the right body side catcher
- left side trim brush (optional, you can modify if you want - easy to get though)
- right side trim brush (optional, you can modify if you want - easy to get though)
- 2 front strikers (just to make sure that they're steel, & strong enough & they are cheaper than the uk)
- rear defroster switch
- Sub-harness
- 4 bolts 6x18mm
- 4 bolts 8x20mm
- 2 Rubber spacers
- 4 cushion spacers
- rear defroster relay
- 4 cushion tapes
Hardtop Fitting Instructions
Hardtop Stand Instructions
Removing the dash trim
J8mie has some instructions that can be found here!
Tyres: Should be run at higher pressures to promote more even wear when used on track - for S02s start at 34psi, maybe increase to 36psi. Note: higher pressures can make the handling more skittish.
Make sure you do at least one slow cool down lap before coming off track to allow the brakes to cool down.
Do not apply the handbrake immediately after a track session as this can warp the disks and damage the pads. Leave in gear instead.
Misc Comments
Please make sure you get the key for the locking wheel nuts if you are purchasing a car. Some alloy wheel fitters have keys to remove the nuts but it can take some time!
Periodically remove, WD40 and refit all wheel nuts to the correct torque settings to avoid future seizures
A strange moaning sound from the rear of the car after a run on a hot day is quite usual. It's just vapour pressure in the fuel tank.
A rattle from the passenger side is often the seatbelt buckle knocking on the door
ECU Fault Codes Error codes:
1 O2A - Oxygen sensor #1
2 O2B - Oxygen sensor #2
3 MAP - manifold absolute pressure sensor
4 CKP - crank position sensor
5 MAP - manifold absolute pressure sensor
6 ECT - water temperature sensor
7 TPS - throttle position sensor
8 TDC - top dead centre sensor
9 CYP - cylinder sensor
10 IAT - intake air temperature sensor
12 EGR - exhaust gas recirculation lift valve
13 BARO - atmospheric pressure sensor
14 IAC (EACV) - idle air control valve
15 Ignition output signal
16 Fuel injectors
17 VSS - speed sensor
19 Automatic transmission lockup control valve
20 Electrical load detector
21 VTEC spool solenoid valve
22 VTEC pressure valve
23 Knock sensor
30 Automatic transmission A signal
31 Automatic transmission B signal
36 traction control found on JDM ecu's
41 Primary oxygen sensor heater
43 Fuel supply system
45 Fuel system too rich or lean
48 LAF - lean air fuel sensor
54 CKF - crank fluctuation sensor
58 TDC sensor #2
61 Primary oxygen sensor
63 Secondary oxygen sensor
65 Secondary oxygen sensor heater
71 random misfire cylinder 1
72 random misfire cylinder 2
73 random misfire cylinder 3
74 random misfire cylinder 4
P0010 Variable Valve Timing Control (VTC) Oil Control Solenoid Valve Malfunction
P0011 Variable Valve Timing Control (VTC) System Malfunction
P0101 Mass Airflow (MAF) Sensor Range/Performance Problem
P0102 Mass Airflow (MAF) Sensor Circuit Low Voltage
P0103 Mass Airflow (MAF) Sensor Circuit High Voltage
P0106 Manifold Absolute Pressure (MAP) Sensor Range/Performance Problem
P0107 Manifold Absolute Pressure (MAP) Sensor Circuit Low Voltage
P0108 Manifold Absolute Pressure (MAP) Sensor Circuit High Voltage
P0111 Intake Air Temperature (IAT) Sensor Circuit Range/Performance Problem
P0112 Intake Air Temperature (IAT) Sensor Circuit Low Voltage
P0113 Intake Air Temperature (IAT) Sensor Circuit High Voltage
P0116 Engine Coolant Temperature (ECT) Sensor Circuit Range/Performance Problem
P0117 Engine Coolant Temperature (ECT) Sensor Circuit Low Input
P0118 Engine Coolant Temperature (ECT) Sensor Circuit High Input
P0122 Throttle Position (TP) Sensor Circuit Low Input
P0123 Throttle Position (TP) Sensor Circuit High Input
P0125 Engine Coolant Temperature (ECT) Sensor Slow Response
P0128 Cooling System Malfunction
P0131 Primary Heated Oxygen Sensor (Primary HO2S) (Sensor 1) Circuit Low Voltage
P0132 Primary Heated Oxygen Sensor (Primary HO2S) (Sensor 1) Circuit High Voltage
P0133 Rear Air/Fuel Ratio (A/F) Sensor (Bank 1, Sensor 1) Circuit Slow Response
P0134 Air/Fuel Ratio (A/F) Sensor (Sensor 1) No Activity Detected
P0135 Primary Heated Oxygen Sensor (Primary HO2S) (Sensor 1) Heater Circuit Malfunction
P0137 Secondary Heated Oxygen Sensor (Secondary HO2S) Circuit Low Voltage
P0138 Secondary Heated Oxygen Sensor (Secondary HO2S) Circuit High Voltage
P0139 Secondary Heated Oxygen Sensor (Secondary HO2S) Slow Response
P0141 Secondary Heated Oxygen Sensor (Secondary HO2S) (Sensor 2) Heater Circuit Malfunction
P0143 Third Heated Oxygen Sensor (Third HO2S) (Sensor 3) Circuit Low Voltage
P0144 Third Heated Oxygen Sensor (Third HO2S) (Sensor 3) Circuit High Voltage
P0145 Third Heated Oxygen Sensor (Third HO2S) (Sensor 3) Circuit Slow Response
P0147 Third Heated Oxygen Sensor (Third HO2S) (Sensor 3) Heater Circuit Malfunction
P0153 Front Air/Fuel Ratio (A/F) Sensor (Bank 2, Sensor 1) Circuit Slow Response
P0154 Front Air/Fuel Ratio (A/F) Sensor (Bank 2, Sensor 1) Heater System Malfunction
P0155 Front Air/Fuel Ratio (A/F) Sensor (Bank 2, Sensor 1) Heater Circuit Malfunction
P0157 Front Secondary Heated Oxygen Sensor (Secondary HO2S) (Bank 2, Sensor 2)
Circuit Low Voltage
P0158 Front Secondary Heated Oxygen Sensor (Secondary HO2S) (Bank 2, Sensor 2)
Circuit High Voltage
P0159 Front Secondary Heated Oxygen Sensor (Secondary HO2S) (Bank 2, Sensor 2)
Circuit Slow Response
P0161 Front Secondary Heated Oxygen Sensor (Secondary HO2S) (Bank 2, Sensor 2)
Heater Circuit Malfunction
P0171 Fuel System Too Lean
P0172 Fuel System Too Rich
P0174 Front Bank (Bank 2) Fuel System Too Lean
P0175 Front Bank (Bank 2) Fuel System Too Rich
P0191 Fuel Pressure Sensor Range/Performance Problem
P0192 Fuel Pressure Sensor Circuit Low Voltage
P0193 Fuel Pressure Sensor Circuit High Voltage
P0196 EOT Sensor/Range Performance Problem
P0197 EOT Sensor Circuit Low Voltage
P0198 EOT Sensor Circuit High Voltage
P0222 Throttle Position (TP) Sensor 2 Circuit Low Voltage
P0223 Throttle Position (TP) Sensor 2 Circuit High Voltage
P0300 Random Misfire
P0301 No. 1 Cylinder Misfire
P0302 No. 2 Cylinder Misfire
P0303 No. 3 Cylinder Misfire
P0304 No. 4 Cylinder Misfire
P0305 No. 5 Cylinder Misfire
P0306 No. 6 Cylinder Misfire
P0325 Knock Sensor Circuit Malfunction
P0335 Crankshaft Position (CKP) Sensor Circuit No Signal
P0336
P0339
Crankshaft Position (CKP) Sensor Circuit Intermittent Interruption
P0340 Camshaft Position (CMP) Sensor No Signal
P0341 Camshaft Position (CMP) Sensor A Intermittent Interruption
P0341 Variable Valve Timing Control (VTC) Phase Gap
P0344 Camshaft Position (CMP) Sensor Intermittent Interruption
P0365 Camshaft Position (CMP) Sensor B No Signal
P0366
P0369
Camshaft Position (CMP) Sensor B Intermittent Interruption
P0385 Crankshaft Position (CKP) Sensor B No Signal
P0389 Crankshaft Position (CKP) Sensor B Intermittent Interruption
P0401 Exhaust Gas Recirculation (EGR) Insufficient Flow
P0404 Exhaust Gas Recirculation (EGR) Control Circuit Range/Performance Problem
P0406 Exhaust Gas Recirculation (EGR) Valve Position Sensor Circuit High Voltage
P0410 Air Pump Circuit Malfunction
P0411 Secondary Air Injection System Incorrect Flow
P0420 Catalyst System Efficiency Below Threshold
P0430 Front Bank Catalyst System Efficiency Below Threshold (Bank 2)
P0441 Evaporative Emission (EVAP) Control System Incorrect Purge Flow
P0442 Evaporative Emission (EVAP) System Small Leak Detected
P0443 Evaporative Emission (EVAP) Canister Purge Valve Circuit Malfunction
P0451 Fuel Tank Pressure (FTP) Sensor Range/Performance Problem
P0452 Fuel Tank Pressure (FTP) Sensor Circuit Low Voltage
P0453 Fuel Tank Pressure (FTP) Sensor Circuit High Voltage
P0456 Evaporative Emission (EVAP) System Very Small Leak Detected
P0457 Evaporative Emission (EVAP) System Leak Detected Fuel Fill Cap Loose/Off
P0461 Fuel Gauge Sending Unit Range/Performance Problem
P0462 Fuel Gauge Sending Unit Circuit Low Voltage
P0463 Fuel Gauge Sending Unit Circuit High Voltage
P0496 Evaporative Emission (EVAP) System High Purge Flow
P0497 Evaporative Emission (EVAP) System Low Purge Flow
P0498 Evaporative Emission (EVAP) Canister Vent Shut Valve Control Circuit Low Voltage
P0499 Evaporative Emission (EVAP) Canister Vent Shut Valve Control Circuit High Voltage
P0500 Vehicle Speed Sensor (VSS) Circuit Malfunction
P0501 Vehicle Speed Sensor (VSS) Range/Peformance Problem
P0505 Idle Control System Malfunction
P0506 Idle Control System RPM Lower Than Expected
P0507 Idle Control System RPM Higher Than Expected
P0511 Idle Air Control (IAC) Valve Circuit Malfunction
P0521 EOP Sensor Range/Performance Problem
P0522 EOP Sensor Circuit Low Voltage
P0523 EOP Sensor Circuit High Voltage
P0560 ECM Back-up Circuit Low Voltage
P0563 Engine Control Module (ECM)/Powertrain Control Module (PCM) Power Source Circuit
Unexpected Voltage
P0600 Multiplex Control System Troubleshooting
P0603 ECM/PCM Internal Control Module Keep Alive Memory (KAM) Error
P0606 ECM/PCM Processor Malfunction
P0661 Intake Manifold Runner Control (IMRC) Valve Position Sensor Circuit Low Voltage
P0662 Intake Manifold Runner Control (IMRC) Valve Position Sensor Circuit High Voltage
P0685 ECM/PCM Power Relay Control Circuit Malfunction
P0700 Automatic Transmission Control System
P0705 Short in Transmission Range Switch Circuit (Multiple Shift-position Input)
P0706 Open in Transmission Range Switch Circuit
P0710
P0711
Problem in ATF Temperature Sensor Circuit
P0712 Short in ATF Temperature Sensor Circuit
P0713 Open in ATF Temperature Sensor Circuit
P0715
P0716
Problem in Mainshaft Speed Sensor Circuit
P0717 Problem in Mainshaft Speed Sensor Circuit (No Signal Input)
P0718 Mainshaft Speed Sensor Intermittent Failure
P0720 Countershaft Speed Sensor Circuit Malfunction
P0720
P0721
Problem in Countershaft Speed Sensor Circuit
P0722 Problem in Countershaft Speed Sensor Circuit (No Signal Input)
P0723 Countershaft Speed Sensor Intermittent Failure
P0725 Engine Speed Input Circuit Malfunction
P0730 Problem in Shift Control System
P0731 Problem in 1st Clutch and 1st Clutch Hydraulic Circuit
P0732 Problem in 2nd Clutch and 2nd Clutch Hydraulic Circuit
P0733 Problem in 3rd Clutch and 3rd Clutch Hydraulic Circuit
P0734 Problem in 4th Clutch and 4th Clutch Hydraulic Clutch
P0735 Problem in 5th Clutch and 5th Clutch Hydraulic Circuit
P0740 Problem in Lock-up Control System
P0741 Torque Converter Clutch Hydraulic Clutch Stuck OFF
P0743 Problem in Torque Converter Clutch Solenoid Valve Circuit
P0745 Problem in Hydraulic Control System of A/T Clutch Pressure Control Solenoid Valve A Circuit
P0746 A/T Clutch Pressure Control Solenoid Valve A Stuck OFF
P0747 A/T Clutch Pressure Control Solenoid Valve A Stuck ON
P0748 Problem in A/T Clutch Pressure Control Solenoid Valve A Circuit
P0750 Problem in Hydraulic Control System of Shift Solenoid Valve A Circuit
P0751 Shift Solenoid Valve A Stuck OFF
P0752 Shift Solenoid Valve A Stuck ON
P0753 Problem in Shift Solenoid Valve A Circuit
P0756 Shift Solenoid Valve B Stuck OFF
P0757 Shift Solenoid Valve B Stuck ON
P0758 Problem in Shift Solenoid Valve B Circuit
P0761 Shift Solenoid Valve C Stuck OFF
P0762 Shift Solenoid Valve C Stuck ON
P0763 Problem in Shift Solenoid Valve C Circuit
P0771 Shift Solenoid Valve E Stuck OFF
P0773 Problem in Shift Solenoid Valve E Circuit
P0775 Problem in the Hydraulic Control System of A/T Clutch Pressure Control Solenoid Valve B
Circuit
P0776 A/T Clutch Pressure Control Solenoid Valve B Stuck OFF
P0777 A/T Clutch Pressure Control Solenoid Valve B Stuck ON
P0778 Problem in A/T Clutch Pressure Control Solenoid Valve B Circuit
P0780 Problem in Shift Control System
P0795 Problem in Hydraulic Control System of A/T Clutch Pressure Control Solenoid Valve C Circuit
P0796 A/T Clutch Pressure Control Solenoid Valve C Stuck OFF
P0797 A/T Clutch Pressure Control Solenoid Valve C Stuck ON
P0798 Problem in A/T Clutch Pressure Control Solenoid Valve C Ciruit
P0812 Open in Transmission Range Switch ATP RVS Switch Circuit
P0842 Short in 2nd Clutch Transmission Fluid Pressure Switch Clutch, or 2nd Clutch Transmission
Fluid Pressure Switch (Clutch) Stuck ON
P0843 Open in 2nd Clutch Transmission Fluid Pressure Switch Circuit, or 2nd Clutch Transmission
Fluid Pressure Switch Stuck OFF
P0845 Problem in 3rd Clutch Pressure Switch Circuit
P0847 Short in 3rd Clutch Transmission Fluid Pressure Switch Circuit, or 3rd Clutch Transmission
Fluid Pressure Switch Stuck ON
P0848 Open in 3rd Clutch Transmission Fluid Pressure Switch Circuit, or 3rd Clutch Transmission
Fluid Pressure Switch Stuck OFF
P0872 Short in 4th Clutch Transmission Fluid Pressure Switch Circuit, or 4th Clutch Transmission
Fluid Pressure Switch Stuck ON
P0873 Open in 4th Clutch Transmission Fluid Pressure Switch Circuit, or 4th Clutch Transmission
Fluid Pressure Switch Stuck OFF
P0962 Problem in A/T Clutch Pressure Control Solenoid Valve A Circuit
P0963 Problem in A/T Clutch Pressure Control Solenoid Valve A
P0966 Problem in A/T Clutch Pressure Control Solenoid Valve B Circuit
P0967 Problem in A/T Clutch Pressure Control Solenoid Valve B
P0970 Problem in A/T Clutch Pressure Control Solenoid Valve C Circuit
P0971 Problem in A/T Clutch Pressure Control Solenoid Valve C
P0973 Short in Shift Solenoid Valve A Circuit
P0974 Open in Shift Solenoid Valve A Circuit
P0976 Short in Shift Solenoid Valve B Circuit
P0977 Open in Shift Solenoid Valve B Circuit
P0979 Short in Shift Solenoid Valve C Circuit
P0980 Open in Shift Solenoid Valve C Circuit
P0982 Short in Shift Solenoid Valve D Circuit
P0983 Open in Shift Solenoid Valve D Circuit
P0985 Short in Shift Solenoid Valve E Circuit
P0986 Open in Shift Solenoid Valve E Circuit
P1020 Valve Pause System Stuck Off
P1021 Valve Pause System Stuck On
P1025 Valve Pause System Sticking Off
P1026 Valve Pause System Sticking On
P1077 Intake Manifold Runner Control (IMRC) System Malfunction (Low rpm)
P1078 Intake Mainfold Runner Control (IMRC) System Malfunction (High rpm)
P1106 Barometric Pressure (BARO) Sensor Circuit Range/Performance Problem
P1107 Barometric Pressure (BARO) Sensor Circuit Low Voltage
P1108 Barometric Pressure (BARO) Sensor Circuit High Voltage
P1121 Throttle Position (TP) Sensor Lower Than Expected
P1122 Throttle Position (TP) Sensor Higher Than Expected
P1128 Manifold Absolute Pressure (MAP) Sensor Circuit Lower Than Expected
P1129 Manifold Absolute Pressure (MAP) Sensor Circuit Higher Than Expected
P1130 Demand for Changing Both Secondary Heated Oxygen Sensor (Secondary HO2S)
(Sensor 2) and Third Heated Oxygen Sensor (Third HO2S) (Sensor 3)
P1149 Air/Fuel Ratio (A/F) Sensor (Sensor 1) Range/Performance Problem
P1149 Air/Fuel Ratio Sensor (Sensor 1) Circuit Lean Range
P1157 Air/Fuel Ratio (A/F) Sensor (Sensor 1) AFS Line High Voltage
P1157 Air/Fuel Ratio (A/F) Sensor (Sensor 1) Circuit High Voltage
P1157 Air/Fuel Ratio (A/F) Sensor (Sensor 1) Range/Performance Problem
P1158 Air/Fuel Ratio (A/F) Sensor (Sensor 1) AFS- Terminal Low Voltage
P1159 Air/Fuel Ratio (A/F) Sensor (Sensor 1) AFS+ Terminal Low Voltage
P1162 Air/Fuel Ratio (A/F) Sensor (Sensor 1) Slow Response
P1163 Air/Fuel Ratio (A/F) Sensor (Sensor 1) Slow Response
P1163 Air/Fuel Ratio Sensor (Sensor 1) Slow Response
P1164 Air/Fuel Ratio (A/F) Sensor (Sensor 1) Range/Performance Problem
P1164 Air/Fuel Ratio (AF) Sensor (Sensor 1) Circuit Range/Performance
P1165 Air/Fuel Ratio (A/F) Sensor (Sensor 1) Range/Performance Problem
P1165 Air/Fuel Ratio Sensor (Sensor 1) Circuit Range/Performance
P1166 Air/Fuel Ratio (A/F) Sensor (Sensor 1) Heater System Electrical Problem
P1166 Heated Oxgen Sensor Sensor1 (Primary HO2S) Heater Circuit Malfunction
P1167 Air/Fuel Ratio (A/F) Sensor (Sensor 1) Heater System Malfunction
P1167 Heated Oxygen Sensor Sensor1 (Primary LAF HO2S) Heater System Malfunction
P1168 Air/Fuel Ratio (A/F) Sensor (Sensor 1) LABEL Low Voltage
P1169 Air/Fuel Ratio (A/F) Sensor (Sensor 1) LABEL High Voltage
P1182 Fuel Temperature Sensor Circuit Low Voltage
P1183 Fuel Temperature Sensor Circuit High Voltage
P1253
P1259
VTEC System Malfunction
P1297 Electric Load Detector (ELD) Circuit Low Voltage
P1298 Electric Load Detector (ELD) Circuit High Voltage
P1300 Random Misfire
P1324 Knock Sensor Power Source Circuit Low Voltage
P1336 Engine Speed (RPM) Fluctuation Sensor Intermittent Interruption
P1337 Engine Speed (RPM) Fluctuation Sensor No Signal
P1355 Front Ignition Coil Power Circuit Malfunction
P1359 Crankshaft Position (CKP)/Top Dead Center (TDC) Sensor Circuit Malfunction
P1361 Camshaft Position (CMP) Sensor A (Top Dead Center (TDC) Sensor) Intermittent Interruption
P1361 Top Dead Center (TDC) Sensor Intermittent Interruption
P1362 Camshaft Position (CMP) Sensor A (Top Dead Center (TDC) Sensor) No Signal
P1362 Top Dead Center (TDC) Sensor No Signal
P1366 Camshaft Position (CMP) Sensor B (Top Dead Center (TDC) Sensor) Intermittent Interruption
P1366 Top Dead Center (TDC) Sensor 2 Intermittent Interruption
P1367 Camshaft Position (CMP) Sensor B (Top Dead Center (TDC) Sensor) No Signal
P1367 Top Dear Center (TDC) Sensor 2 No Signal
P1381 Cylinder Position (CYP) Sensor Intermittent Interruption
P1382 Cylinder Position (CYP) Sensor No Signal
P1410 Air Pump Malfunction
P1415 Air Pump Electric Current Sensor Circuit Low Voltage
P1416 Air Pump Electric Current Sensor Circuit High Voltage
P1420 Nox Adsorptive Catalyst System Efficiency Below Threshold
P1438 Motor Drive Module (MDM) Overheating Signal Circuit
P1438 Motor Drive Module (MDM) Overheating
P1439 Motor Drive Module (MDM) Short Circuit Sensor Problem
P1439 Motor Drive Module (MDM) Short Circuit
P1440 IMA System Problem
P1445 Bypass Control Problem
P1448
P1449
Battery Module Overheating
P1449 Battery Cell Overheating
P1449 Battery Module Individual Voltage Input Deviation
P1449 Battery Module Deterioration
P1449 Battery Module Deviation
P1454 Fuel Tank Pressure (FTP) Sensor Range/Performance Problem
P1456 Evaporative Emissions (EVAP) Control System Leakage (Fuel Tank System)
P1457 Evaporative Emissions (EVAP) Control System Leakage (EVAP Canister System)
P1459 Evaporative Emission (EVAP) Purge Flow Switch Malfunction
P1491 Exhaust Gas Recirculation (EGR) Valve Insufficient Lift
P1486 Cooling System Malfunction
P1491 Exhaust Gas Recirculation (EGR) Valve Insufficient Lift
P1498 Exhaust Gas Recirculation (EGR) Valve Position Sensor Circuit High Voltage
P1505 Positive Crankcase Ventilation (PCV) Air Leakage
P1508
P1519
Idle Air Control Valve (IACV) Circuit Malfunction
P1509 Idle Air Control Valve (IACV) Circuit Failure
P1522 Brake Booster Pressure Sensor Circuit Low Voltage
P1523 Brake Booster Pressure Sensor Circuit High Voltage
P1524 Brake Booster Pressure Sensor Range/Performance Problem
P1541 Climate Control Unit Signal Circuit Low Voltage
P1542 Climate Control Unit Signal Circuit High Voltage
P1565 Motor Commutation Signal Problem
P1568 Battery Module Individual Voltage Input Problem
P1568 Battery Module Temperature Signal Circuit Problem
P1568 Battery Cell Temperature Signal Circuit Problem
P1572 Motor Drive Module (MDM) Temperature Signal Circuit Low Input
P1572 Motor Drive Module (MDM) Temperature Signal Circuit High Input
P1576 Motor Drive Module (MDM) Voltge Signal Circuit Low Input
P1577 High Voltage Detection Signal Circuit Problem
P1580 Battery Current Circuit Problem
P1581 Motor Power Inverter (MPI) Module Current Signal Circuit Low Input
P1581 Motor Power Inverter (MPI) Module Current Signal Circuit High Input
P1581 Motor Power Inverter (MPI) Module Current Signal Circuit Problem
P1582 Motor Current U Phase Signal Circuit Low Input
P1582 Motor Current U Phase Signal Circuit High Input
P1583 Motor Current V Phase Signal Circuit Low Input
P1583 Motor Current V Phase Signal Circuit High Input
P1584 Motor Current W Phase Signal Circuit Low Input
P1584 Motor Current W Phase Signal Circuit High Input
P1585 Motor Current Signal Circuit Problem
P1586 Motor Power Inverter (MPI) Module Current Signal/Battery Current Signal Circuit Problem
P1607 Engine Control Module (ECM)/Powertrain Control Module (PCM) Internal Circuit Malfunction
P1630 Transmission Control Module
P1635 Battery Condition Monitor (BCM) Module Proble
P1639 MOTB Signal Circuit Malfunction
P1640 ACTTRQ Motor Torque Signal Circuit Low Input
P1641 ACTTRQ Motor Torque Signal Circuit High Input
P1642 QBATT Battery Signal Circuit Low Input
P1643 QBATT Battery Signal Circuit High Input
P1644 MOTFSA Signal Malfunction
P1645 MOTFSB Signal Malfunction
P1646 MOTSTB Signal Malfunction
P1647 Power Command Signal Circuit Low Input
P1647 Power Command Signal Circuit High Input
P1647 Engine Torque Signal Circuit Low Input
P1647 Engine Torque Signal Circuit High Input
P1647 Mode Signal Circuit 1 Low Input
P1647 Mode Signal Circuit 1 High Input
P1647 Mode Signal Circuit 2 Problem
P1647 Engine Speed Signal Circuit Problem
P1648 Battery Condition Monitor (BCM) Module Communication Signal Circuit Problem
P1648 Motor Control Module (MCM) Communication Signal Circuit Problem
P1655 CVT-FI TMA/TMB Signal Line Failure
P1656 Problem in PCM-toVTM-4 Control Unit Communications Circuit
P1660 A/T-FI Data Line Failure/TCM - ECM Halt
P1676
P1678
FPTDR Signal Line Failure
P1679 RSCD Signal Circuit Malfunction
P1681 A/T FI Signal A Cicuit Low Voltage
P1682 A/T FI Signal A Circuit High Voltage
P1683 Throttle Valve Default Position Spring Performance Problem
P1684 Throttle Valve Return Spring Performance Problem
P1686 A/T FI Signal B Circuit Low Voltage
P1687 A/T FI Signal B Circuit High Voltage
P1705 Short in Transmission Range Switch Circuit (More than one range position is on at the
same time)
P1706 Open in Transmission Range Switch Circuit
P1709 Problem Transmission Gear Selection Switch Circuit
P1730 Problem in Shift Control System:
Shift Solenoid Valve A and D Stuck OFF
Shift Solenoid Valve B Stuck ON
Shift Valves A, B, and D Stuck
P1731 Problem in Shift Control System:
Shift Solenoid Valve E Stuck ON
Shift Valve E Stuck
A/T Clutch Pressure Control Solenoid Valve A Stuck OFF
P1732 Problem in Shift Control System:
Shift Solenoid Valve B and C Stuck ON
Shift Valves B and C Stuck
P1733 Problem in Shift Control System:
Shift Solenoid Valve D Stuck ON
Shift Valve D Stuck
A/T Clutch Pressure Control Solenoid Valve C Stuck OFF
P1734 Problem in Shift Control System:
Shift Solenoid Valves B and C Stuck ON
Shift Valves B and C Stuck
P1738 Problem in 2nd Clutch Pressure Switch Circuit
P1739 Problem in 3rd Clutch Pressure Switch Circuit
P1740 Problem in 4th Clutch Pressure Switch Circuit
P1750 Mechanical Problem in Hydraulic Control System of A/T Clutch Pressure Control Solenoid
Valve Assemblies A and B, or Problem in the Hydraulic Control System
P1751 Mechanical Problem in Hydraulic Control System of Shift Solenoid Valve B and A/T Clutch
Pressure Control Solenoid Valves A and B, or Problem in the Hydraulic Control System
P1753 Problem in Torque Converter Clutch Solenoid Valve Circuit
P1751
P1768
Problem in Torque Converter Clutch Solenoid Valve B Circuit
P1773 Problem in A/T Clutch Pressure Control Solenoid Valve B Circuit
P1790 Throttle Position (TP) Sensor Circuit Malfunction
P1791 Vehicle Speed Sensor (VSS) Range/Performance Problem
P1792 Problem in Engine Coolant Temperature (ECT) Sensor Circuit
P1793 Manifold Absolute Pressure Sensor Circuit
P1870 Problem in CVT Speed Change Control Valve Assembly Circuit
P1873 Problem in CVT Pulley Pressure Control Valve Assembly Circuit
P1879 Problem in CVT Start Clutch Pressure Control Valve Assembly Circuit
P1882 Problem in Inhibitor Solenoid Circuit
P1884 Secondary Gear Speed Sensor 2 Circuit Malfunction
P1885 CVT Drive Pulley Speed Sensor Circuit
P1886 CVT Driven Pulley Speed Sensor Circuit
P1888 CVT Speed Sensor
P1889 Problem in CVT Speed Sensor 2 Circuit
P1890 Shift Control System
P1891 Problem in Start Clutch System
P1894 CVT Speed Change Control Valve Circuit
P1895 CVT Pulley Pressure Control Valve Circuit
P2101 Throttle Actuator System Malfunction
P2108 Throttle Actuator Control Module Problem
P2118 Throttle Actuator Current Range/Performance Problem
P2122 Accelerator Pedal Position (APP) Sensor 1 (Throttle Position Sensor D) Circuit Low Voltage
P2123 Accelerator Pedal Position (APP) Sensor 1 (Throttle Position Sensor D) Circuit High Voltage
P2127 Accelerator Pedal Position (APP) Sensor 2 (Throttle Position Sensor E) Circuit Low Voltage
P2128 Accelerator Pedal Position (APP) Sensor 2 (Throttle Position Sensor E) Circuit High Voltage
P2135 Throttle Position (TP) Sensor 1/2 Incorrect Voltage Correlation
P2138 Accelerator Pedal Position (APP) Sensor 1/2 (Throttle Position Sensor D/E) Incorrect Voltage
Correlation
P2176 Throttle Actuator Control System Idle Position Not Learned
P2195 Air/Fuel Ratio (A/F) Sensor (Sensor 1) Signal Stuck Lean
P2197 Front Air/Fuel Ratio (A/F) Sensor (Bank 2, Sensor 1) Signal Stuck Lean
P2227 Barometric Pressure (BARO) Sensor Circuit Range/Performance Problem
P2228 Barometric Pressure (BARO) Sensor Circuit Low Voltage
P2229 Barometric Pressure (BARO) Sensor Circuit High Voltage
P2237 Rear Air/Fuel Ratio (A/F) Sensor (Bank 1, Sensor 1) IP Line High Voltage
P2238 Air/Fuel Ratio (A/F) Sensor (Sensor 1) AFS+ Line Low Voltage
P2238 Rear Air/Fuel Ratio (A/F) Sensor (Bank 1, Sensor 1) IP Line Low Voltage
P2240 Front Air/Fuel Ratio (A/F) Sensor (Bank 2, Sensor 1) IP Line High Voltage
P2241 Front Air/Fuel Ratio (A/F) Sensor (Bank 2, Sensor 1) IP Line Low Voltage
P2243 Rear Air/Fuel Ratio (A/F) Sensor (Bank 1, Sensor 1) VCENT Line High Voltage
P2245 Rear Air/Fuel Ratio (A/F) Sensor (Bank 1, Sensor 1) VCENT Line Low Voltage
P2247 Front Air/Fuel Ratio (A/F) Sensor (Bank 2, Sensor 1) VCENT Line High Voltage
P2249 Front Air/Fuel Ratio (A/F) Sensor (Bank 2, Sensor 1) VCENT Line Low Voltage
P2251 Rear Air/Fuel Ratio (A/F) Sensor (Bank 1, Sensor 1) VS Line High Voltage
P2252 Air/Fuel Ratio (A/F) Sensor (Sensor 1) AFS- Line Low Voltage
P2254 Front Air/Fuel Ratio (A/F) Sensor (Bank 2, Sensor 1) VS Line High Voltage
P2255 Front Air/Fuel Ratio (A/F) Sensor (Bank 2, Sensor 1) VS Line Low Voltage
P2279 Intake Air System Leak
P2413 Exhaust Gas Recirculation (EGR) System Range/Performance Problem
P2422 Evaporative Emission (EVAP) System Vent Shut Valve Close Malfunction
P2552 Throttle Actuator Control Module Relay Malfunction
P2627 Rear Air/Fuel Ratio (A/F) Sensor (Bank 1, Sensor 1) LABEL Circuit Low Voltage
P2628 Rear Air/Fuel Ratio (A/F) Sensor (Bank 1, Sensor 1) LABEL Circuit High Voltage
P2630 Front Air/Fuel Ratio (A/F) Sensor (Bank 2, Sensor 1) LABEL Circuit Low Voltage
P2631 Front Air/Fuel Ratio (A/F) Sensor (Bank 2, Sensor 1) LABEL Circuit High Voltage
P2646 VTEC Oil Pressure Switch Circuit Low Voltage
P2647 VTEC Oil Pressure Switch Circuit High Voltage
P2648 VTEC Solenoid Valve Circuit Low Voltage
P2649 VTEC Solenoid Valve Circuit High Voltage
P2769 Short in Torque Converter Clutch Solenoid Valve Circuit
P2770 Open in Torque Converter Clutch Solenoid Valve Circuit
P2A00 Air/Fuel Ratio (A/F) Sensor (Sensor 1) Range/Performance Problem
P2A03 Front A/F Sensor Circuit (Bank 2, Sensor 1) Circuit Range/Performance Problem
U0073 FCAN Malfunction (Bus-off)
U0107 Lost Communication With Throttle Actuator Control Module
U0121 FCAN Malfunction (TCS-PCM)
U0155 FCAN Malfunction (Gauge Control Module-ECM/PCM)
Oilmansi's Guide to Oil
What’s written on your oil bottle and what does it mean.
This post may seem like going back to basics but I am constantly surprised by the amount of people who do not know or understand what is written on a bottle of oil and therefore no idea of what they are buying/using.
To be blunt about the subject, if a bottle of oil does not contain the following basic information then DO NOT buy it look for something that does!
1) The purpose for which it is intended (i.e. Motor oil, Gear oil etc)
2) The viscosity (i.e. 10w-40, 5w-30 etc for Motor oils and 80w-90, 75w-90 etc for Gear oils)
3) The specifications that it meets (should contain both API and ACEA ratings)
4) The OEM Approvals that it carries and the codes (i.e. MB229.3, VW503.00, BMW LL01 etc)
Ignore the marketing blurb on the label it is in many cases meaningless and I will explain later what statements you should treat this with some scepticism
So, what does the above information mean and why is it important?
THE BASICS
All oils are intended for an application and in general are not interchangeable. You would not for example put an Automatic Transmission Oil or a Gear Oil in your engine! It is important to know what the oils intended purpose is.
VISCOSITY
Most oils on the shelves today are “Multigrades”, which simply means that the oil falls into 2 viscosity grades (i.e. 10w-40 etc)
Multigrades were first developed some 50 years ago to avoid the old routine of using a thinner oil in winter and a thicker oil in summer.
In a 10w-40 for example the 10w bit (W = winter, not weight or watt or anything else for that matter) simply means that the oil must have a certain maximum viscosity/flow at low temperature. The lower the “W” number the better the oils cold temperature/cold start performance.
The 40 in a 10w-40 simply means that the oil must fall within certain viscosity limits at 100 degC. This is a fixed limit and all oils that end in 40 must achieve these limits. Once again the lower the number the thinner the oil, a 30 oil is thinner than a 40 oil at 100 degC etc. Your handbook will specify whether a 30, 40 or 50 etc is required.
SPECIFICATIONS
Specifications are important as these indicate the performance of the oil and whether they have met or passed the latest tests or whether the formulation is effectively obsolete or out of date.
There are two specifications that you should look for on any oil bottle and these are API (American Petroleum Institute) and ACEA (Association des Constructeurs Europeens d’Automobiles) all good oils should contain both of these and an understanding of what they mean is important.
The following table shows how up to date the specifications the oil are:
PETROL
SG - Introduced 1989 has much more active dispersant to combat black sludge.
SH - Introduced 1993 has same engine tests as SG, but includes phosphorus limit 0.12%, together with control of foam, volatility and shear stability.
SJ - Introduced 1996 has the same engine tests as SG/SH, but phosphorus limit 0.10% together with variation on volatility limits
SL - Introduced 2001, all new engine tests reflective of modern engine designs meeting current emissions standards
SM - Introduced November 2004, improved oxidation resistance, deposit protection and wear protection, also better low temperature performance over the life of the oil compared to previous categories.
Note:
All specifications prior to SL are now obsolete and although suitable for some older vehicles are more than 10 years old and do not provide the same level of performance or protection as the more up to date SL and SM specifications.
DIESEL
CD - Introduced 1955, international standard for turbo diesel engine oils for many years, uses single cylinder test engine only
CE - Introduced 1984, improved control of oil consumption, oil thickening, piston deposits and wear, uses additional multi cylinder test engines
CF4 - Introduced 1990, further improvements in control of oil consumption and piston deposits, uses low emission test engine
CF - Introduced 1994, modernised version of CD, reverts to single cylinder low emission test engine. Intended for certain indirect injection engines
CF2 - Introduced 1994, defines effective control of cylinder deposits and ring face scuffing, intended for 2 stroke diesel engines
CG4 - Introduced 1994, development of CF4 giving improved control of piston deposits, wear, oxidation stability and soot entrainment. Uses low sulphur diesel fuel in engine tests
CH4 - Introduced 1998, development of CG4, giving further improvements in control of soot related wear and piston deposits, uses more comprehensive engine test program to include low and high sulphur fuels
CI4 Introduced 2002, developed to meet 2004 emission standards, may be used where EGR ( exhaust gas recirculation ) systems are fitted and with fuel containing up to 0.5 % sulphur. May be used where API CD, CE, CF4, CG4 and CH4 oils are specified.
Note:
All specifications prior to CH4 are now obsolete and although suitable for some older vehicles are more than 10 years old and do not provide the same level of performance or protection as the more up to date CH4 & CI4 specifications.
If you want a better more up to date oil specification then look for SL, SM, CH4, CI4
ACEA
This is the European equivalent of API (US) and is more specific in what the performance of the oil actually is. A = Petrol, B = Diesel and C = Catalyst compatible or low SAPS (Sulphated Ash, Phosphorus and Sulphur).
Unlike API the ACEA specs are split into performance/application catagories as follows:
A1 Fuel economy petrol
A2 Standard performance level (now obsolete)
A3 High performance and/or extended drain
A4 Reserved for future use in certain direct injection engines
A5 Combines A1 fuel economy with A3 performance
B1 Fuel economy diesel
B2 Standard performance level (now obsolete)
B3 High performance and/or extended drain
B4 For direct injection car diesel engines
B5 Combines B1 fuel economy with B3/B4 performance
C1-04 Petrol and Light duty Diesel engines, based on A5/B5-04 low SAPS, two way catalyst compatible.
C2-04 Petrol and light duty Diesel engines, based on A5/B5-04 mid SAPS, two way catalyst compatible.
C3-04 Petrol and light duty Diesel engines, based on A5/B5-04 mid SAPS, two way catalyst compatible, Higher performance levels due to higher HTHS.
Note: SAPS = Sulphated Ash, Phosphorous and Sulphur.
Put simply, A3/B3, A5/B5 and C3 oils are the better quality, stay in grade performance oils.
APPROVALS
Many oils mention various OEM’s on the bottle, the most common in the UK being VW, MB or BMW but do not be misled into thinking that you are buying a top oil because of this.
Oil Companies send their oils to OEM’s for approval however some older specs are easily achieved and can be done so with the cheapest of mineral oils. Newer specifications are always more up to date and better quality/performance than the older ones.
Some of the older OEM specifications are listed here and depending on the performance level of your car are best ignored if you are looking for a quality high performance oil:
VW – 500.00, 501.00 and 505.00
Later specs like 503, 504, 506 and 507 are better performing more up to date oils
MB – 229.1
Later specs like 229.3 and 229.5 are better performing more up to date oils.
BMW – LL98
Later specs like LL01 and LL04 are better performing more up to date oils.
FINALLY
Above is the most accurate guidance I can give without going into too much depth however there is one final piece of advice regarding the labelling.
Certain statements are made that are meaningless and just marketing blurb, here are a few to avoid!
Recommended for use where……………
May be used where the following specifications apply……………
Approved by………………………..(but with no qualification)
Recommended/Approved by (some famous person, these endorsements are paid for)
Racing/Track formula (but with no supporting evidence)
Also be wary of statements like “synthetic blend” if you are looking for a fully synthetic oil as this will merely be a semi-synthetic.
Like everything in life, you get what you pay for and the cheaper the oil the cheaper the ingredients and lower the performance levels.
If you want further advice then please feel free to ask here or contact us through our website at www.opieoils.co.uk.
Technical Service Bulletins
Service Bulletins are issued by Honda to their dealer and service network to advise them of technical issues and resolutions. Most of the service bulletins concern service and maintenance proceedures, test equipment and so forth but some are related to specific vehicle problems and resolutions.
The Definitive FAQ on Suspension Bushes and Bolts!
The Problem:
The suspension arms on the S2000 are attached to the body with bolts and “metalastic” bushes. This means that there is a rubber bush with a metal sleeve in the middle that the bolts pass through. These bolts are not greased in the factory, so when they are subjected to damp and road salt the bolts seize into the sleeve.
There is also a problem with the front castor/compliance bush, which starts to split after hard use.
Honda will not sell you the bushes separately, only a full suspension arm. This will cost over £350 before fitting.
What does this mean to me?:
This all becomes a problem when you need your suspension geometry set up. The bolts will not move and you won’t be able to adjust the suspension. Also, if you decide to change one of your arms it can take hours to remove, as it will need to be cut out.
Changing the front arm for a split castor/compliance bush can also be a problem if the arm needs to be cut off.
Track Control arms and anti-roll bar links also seize, meaning increased cost when replacing arms.
What preventative measures can I take to stop this happening?:
The best thing you can do is to get all the adjustment and castor bolts removed coated in copper slip/grease and refitted. You will need to perform a geometry set up after this.
It is also recommended that you spray all the bolts liberally with Plusgas or WD40 prior to having your bolts checked, as this will help free them off. However, if they are badly seized inside the sleeve - this may not make any difference
One or both of my Castor Bushes are split, what are the options for this?
A split front castor bush can cause MOT failure. These bushes seem to have a limited life of around 8years/90k miles.
As mentioned before, Honda will not supply you any bushes, however castor bushes (also called Fr compliance bushes) can be bought from Spoon or Mugen relatively cheaply - £40 should get you a set delivered.
Because these bushes are different to the Honda bush, you must replace both front castor bushes.
Assuming that your suspension arms can be easily removed, this job should take around 2 hours + a geometry set up. Please Note that the castor bushes are directional. There are arrows on the bushes. Use a punch to mark where the original bushes are pointing before removal.
What about upper suspension arms – any problems there?
The upper arms have splined bolts, which don’t tend to seize. There are no adjusting bolts on the upper arms so they are generally left alone. A seized upper arm can stop your suspension from performing properly.
What is the easiest way to find out if I have seized bolts?:
The only way to check is to get the bolts removed, greased and put back in with a suspension geometry. Expect to pay £150-£200 for this. Please Note: there is no way to tell the condition of these bolts without taking them out.
If I was buying from a dealer I would insist that this was done.
When buying a new car, I’d do my best to get this greasing done as part of the PDI.
My car is driving fine, I don’t need a geometry done, why should I get this work done?:
These cars are very sensitive to geometry and do drift out on our poor potholed surfaces. If your car is under 3 years old, the chances are that your bolts will still be ok – you will save yourself a huge amount of money in the future and improve your chances of quick, trouble-free resale if you get this done now. £200 very well spent IMO. Expect to spend anything in the region of £1000-£3000 to correct this problem in the future.
If your car is older, and has never had a geo, there is a very good chance you will have problems, although some MY2000 cars have recently been given a clean bill of health.
OK – so I’ve had my bolts checked and I have seized bolt/bolts – what are my options?: Option 1) Replace your seized arms with new Honda parts.
Budget £350 per arm, £10 per bolt and at least 2hours labour to remove arm fit arm and then £100+ for Geometry. Anti-roll bar links, should you need them, are £45 each.
All parts prices are +VAT
These components are considerably cheaper from the US, and Hardtopguy will supply for you. They are heavy though so make sure you check shipping costs.
Option 2) Replace your arms with second hand parts from a breaker.
Budget around £100 per arm + other costs above. Please note that 99-03 arms are different from 04> arms, and that the JDM arms will need a hole and thread drilled into the arm to hold the headlamp leveller sensor.
Option 3) Remove your arms and replace the Honda bushes.
There are a few options here – Spoon, Mugen and Powerflex.
Spoon and Mugen bushes are very similar in design to the Honda bushes - rubber with a metal sleeve - but harder. They will cost you in the region of £500 for a set.
Powerflex bushes cost around £300, these bushes are polyurethane and you will also need to budget to buy Spoon or Mugen castor bushes, as Powerflex do not make these.
You then need to remove all your arms – all 8 arms/wishbones and the 2 track control arms - and fit the new bushes with a 10 tonne press. Realistically, you’re looking at a minimum 8 hours labour to do this, depending on how badly your current arms are seized. Please Note that the castor bushes are directional. There are arrows on the bushes. Use a punch to mark where the original bushes are pointing before removal.
Can I replace these bushes myself?:
Thanks to eSem for providing this excellent write up...
It is easier if you buy a complete set of arms before undertaking this job. At the end of the job you should have the set of arms from your car that can be sold on. It also means that your car doesn't have to be off the road whilst you are preparing the arms.
Removing Arms with seized bolts: Best way I have found to do this is to use either an angle grinder or a reciprocating saw (you can pick one of these up for £40 at your local DIY store and it will save you a *lot* of time). You will find that the saw is the only tool that will allow you access to cut through the seized bolts.
As part of the process of removing the arms you will need to remove the links from the anti-roll bar. These are removed by inserting a 5mm allen key into the end of the bolt to hold it and using a 14mm spanner to losten the bolt. Corrosion in the head can mean that these can be difficult to remove. They can be hack sawed off but they cost £50 each from a dealer to replace.
You also need a reasonable sized ball joint remover to separate the arms. I found a Franklyn one does the job for all joints.
Removing bushes from arms: You will need a 10 tonne press and an angle grinder. I found that some of the bushes were almost impossible to push out the arms unless I first removed the lip with an angle grinder. One of the bushes is 2-piece and has a lip at each end, this took a lot of work with an angle grinder before I could remove it with the press.
The bushes in the upper arms are pushed in from the outside. They need to be removed by pushing from the inside and this is not easy. Need to take care not to twist the arms with the press.
When you have all the bushes removed from the arms it is worthwhile cleaning them up and painting them with an anti-rust paint like POR 15.
Poly bushes can be pushed into the arms without the use of a press. Mugen or Spoon metalic bushes will need a press to insert the bushes into the arms.
When replacing the arms you will need to replace the bolts that you have had to cut through. Budget £10 per bolt from a dealer. The bolts and sleaves to do both front compliance bushes are ~ £80.
Once you have replaced the arms on your car get booked into your dealer (or equivalent) to get the alignment sorted.
Time estimates:
Removing bushes from arms & Painting - 6hrs.
Removing Arms - 4hrs + 2hrs for each seized bolt.
Replacing arms - 5hrs
Took me around 20hrs to do the whole job with 3 front seized bolts.
Can you recommend a garage that has experience of this and will be able to help?:
Center Gravity: Chris Franklin has seen more S2000 suspension than anyone else! He is probably the UKs foremost expert in suspension tuning for the S2000 and also has good experience of getting acceptable geometry with seized bushes, replacing seized bushes, rebushing arms etc etc. Chris also stocks a large amount of used suspension parts should you have problems.
Chris favours a hands on approach for owners and you will learn a huge amount about the car while you are there.
Based in Atherstone, Warwickshire http://www.centergravity.co.uk/
Lloyds Honda: Currently working on my car and providing a superb service. I am in conference with the service manager at the moment and hope to be able to organise a fixed price regrease and geometry setup.
Based in Carlisle. http://www.lloydmotors.carlisle-honda.co.uk
There has been cause for concern in the UK over the “seizing up” of these bushes that comes to light whenever an alignment adjustment is done and you are told ‘sorry we cant get the correct settings as you have an alignment adjusting bolt (s) seized’
What seizes are the alignment adjustment bolts in the sleeves that go through the actual rubber bush in the bottom wishbones along with rear control arm bushes.
Alignment adjustment bolt & sleeve
You have in respect of the wishbones (2 wishbones - top & bottom - in each wheel arch) front and rear.
The bottom wishbones have 2 large bushes that attach them to the sub frame.
The top wishbone also has 2 bushes which mounts it to the car, the bolts used for the top wishbones mountings are splined which reduces the tendency for them to seize but never the less they can have a possible “seizing” problem but are not detected as easily as the bottom bushes as they do not have any alignment adjustment properties, they simply seize on the bolt going through them, making the top wishbone extremely hard to move up and down in its natural movement.
Front top wishbone & mountings
Rear top wishbone & mountings
Splined bolt for top wishbones
Rear control arm bushes: Again these alignment adjustment bolts will seizes in the bush that connects it to the rear sub frame and so causes the problem.
Rear control arm & alignment bolt
If they are seized then there is really only 2 ways of getting them out:
1/ heat, which usually destroys the rubber part that surrounds the bolt/sleeve
2/ sawing them, which obviously destroys them
Reason why they seize: They are assembled with no grease what so ever and if the vehicle is used all year round you are bound to get the ingress of water and corrosive salt (in the winter) that’s the start of it. Obviously I am more directing these comments to vehicles used in the UK with our damp weather and winter salting conditions.
Prevention; If your car is relatively new then I would suggest greasing these areas to hopefully cut down the moisture from entering, with vehicles older than that its anybody’s guess how far your corrosion problem will have progressed.
If you feel you want to have it stripped down, inspected and protected with thick grease, it will be quite expensive as it is quite a labour intensive job and not forgetting the “alignment” you will have to do afterwards.
 06-28-2005, 12:53 AM


 )
)


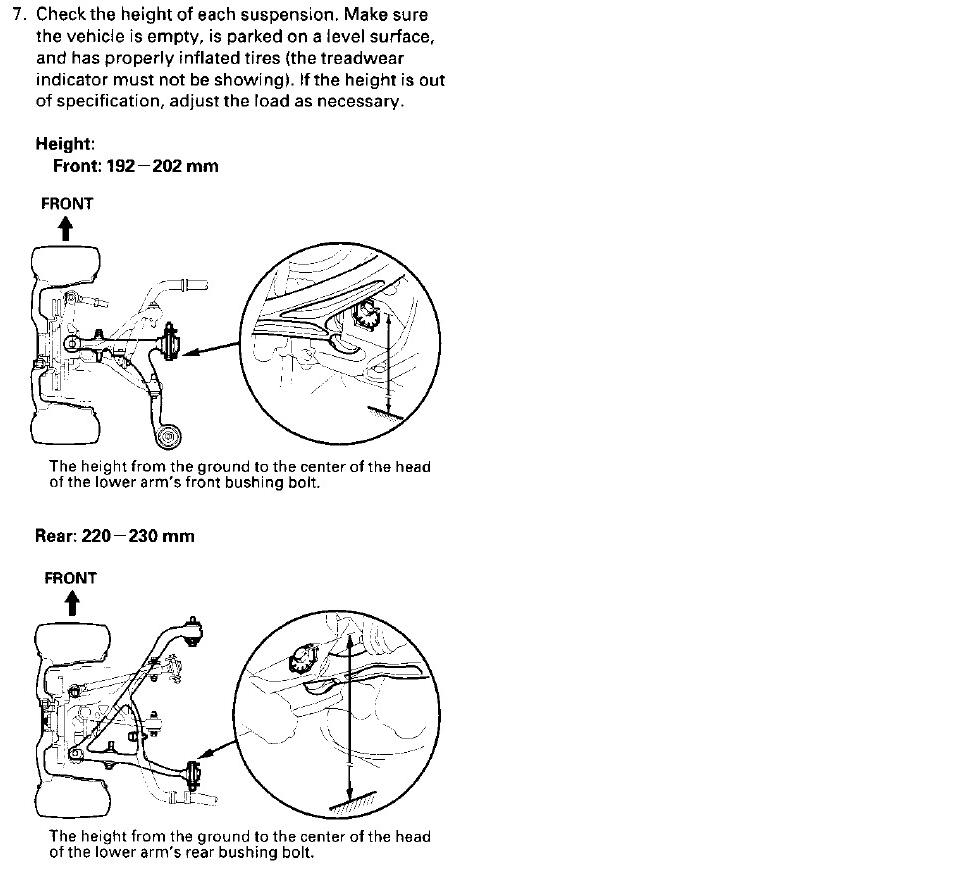
 Frustrating at best, dangerous at worst if you roll out in front of someone!