
DIY Rear Brake Ducting


Thread Starter
Joined: Sep 2005
Posts: 2,973
Likes: 21
This is going to be my first DIY with hopefully a few more to come. I did my front brake ducts and had some left over ducting so i decided to do some quick rear brake ducts. I wont be covering info on how to cut the heat shield and what not.
tools needed.
drill bits
saw/grinder
zip ties
mesh
hammer
vacuum hose
2.5 ducting and flange
shop vac attachment from home depot ($7.00 each)
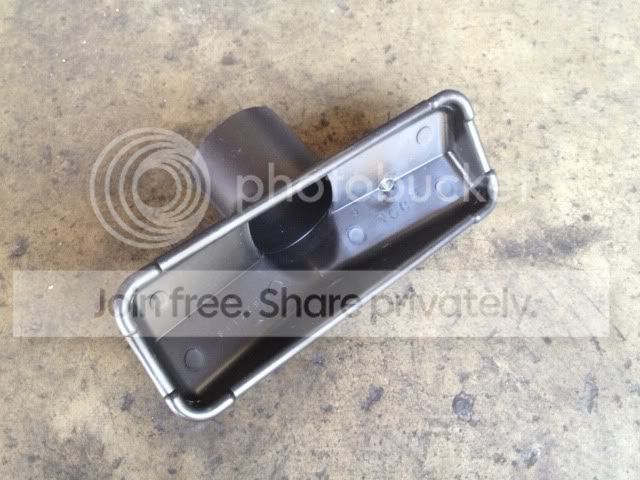
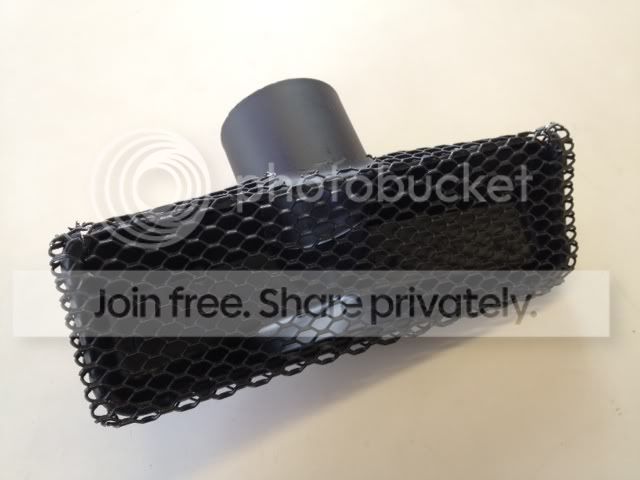
So first of all go to home depot and purchase 2 of the shop vac attachments. i forgot the exact size but there was only one that looked like the below. purchase some mesh (chicken wire).

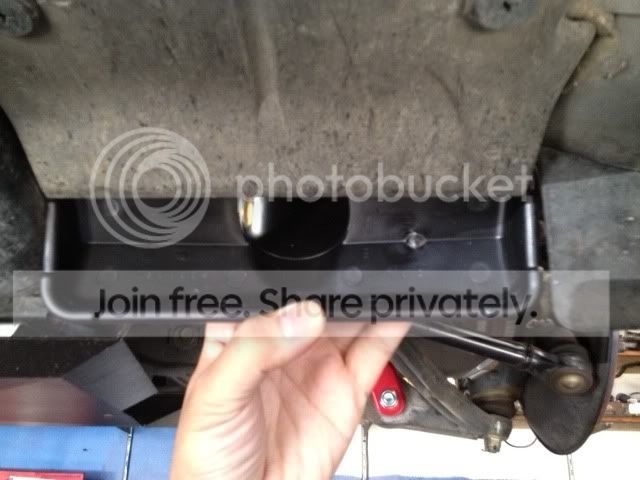
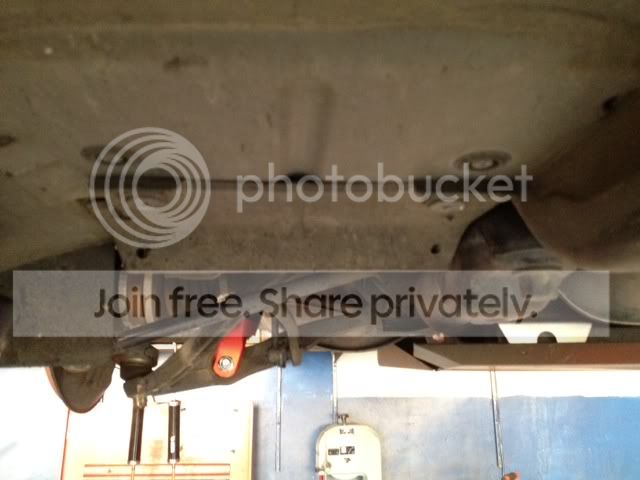
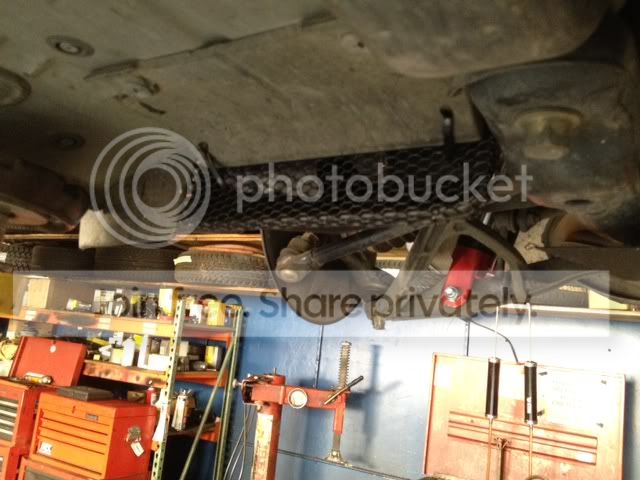
test fit this in the location shown below. it is right next to rear tire diffuser in the front of the rear wheel well and between the frame. it should be slightly larger than this plastic piece shown.

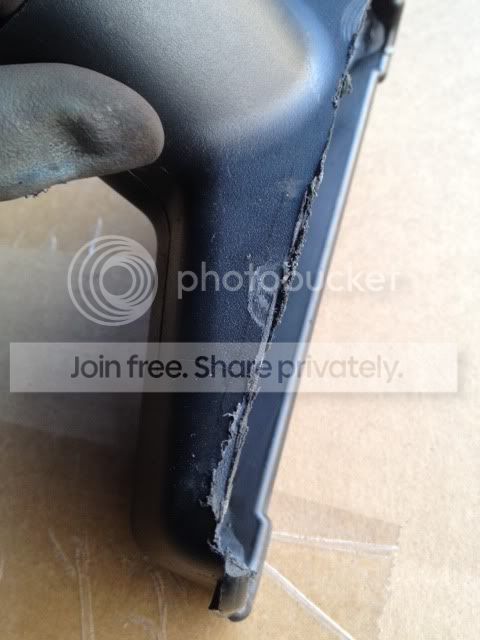
what we need to do now is to trim the lip so that it will give it a slightly better lip. I used a air saw but a jig saw or a grinder will work, its just soft plastic.


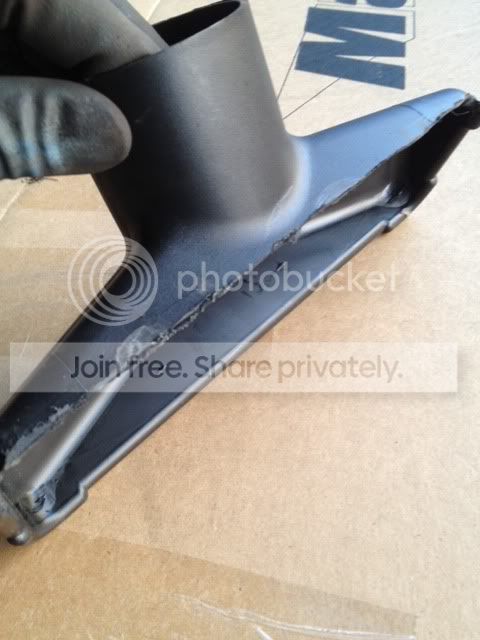
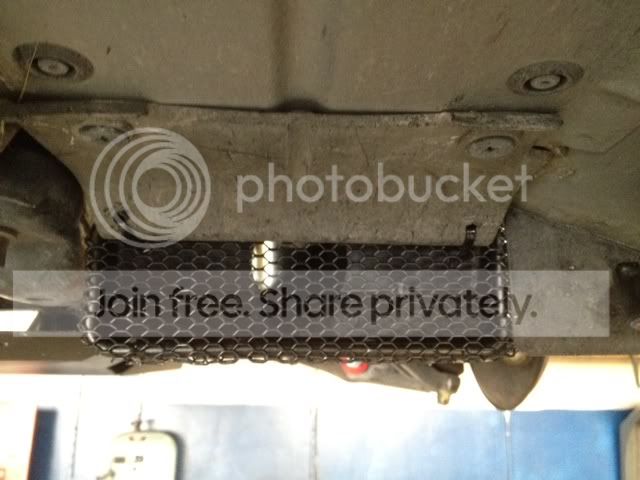
ok now what we do is cut the mesh to slightly larger size than the front of the nozzle. then you bend it around the nozzle and use a hammer to tap it so it conforms to the piece. trim as needed.


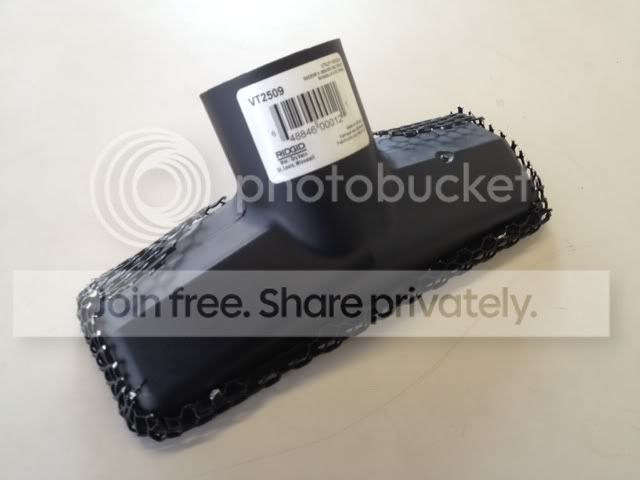
now put it up to the vehicle and get an idea of where you want to drill a hole to mount it. I used a drill bit and did it at a slight angle. Then drill some holes in the nozzle that corresponds to flap. i did a good guess. i used zip ties to hold it against the car but you can use some nuts and bolts if you would like.


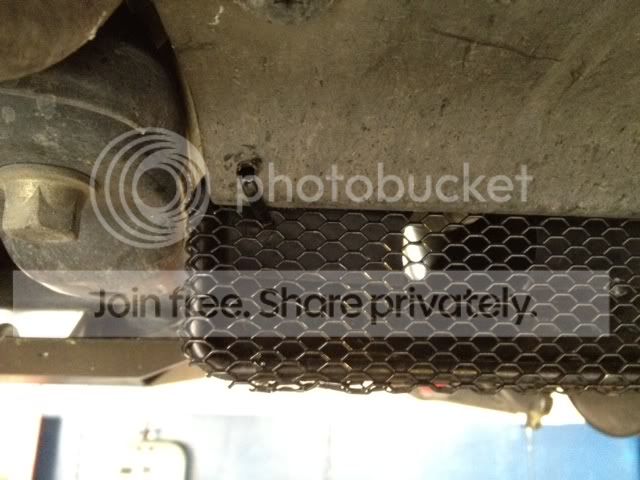
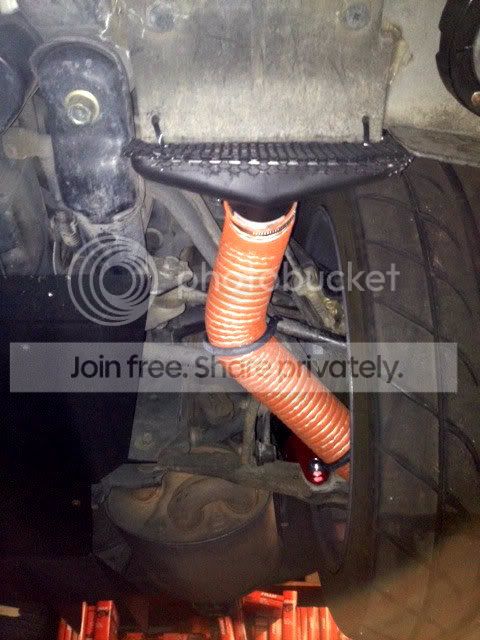
ok now go ahead and make the hole in the heat shield. I did it at the bottom so it would be closer to the duct. Its not the flattest part but its close. The best part would be on the very end if the shield near the back of the car but running the duct around the axle nicely was unnessacary i thought. i used rivets to hold mine together but some use nuts and bolts.

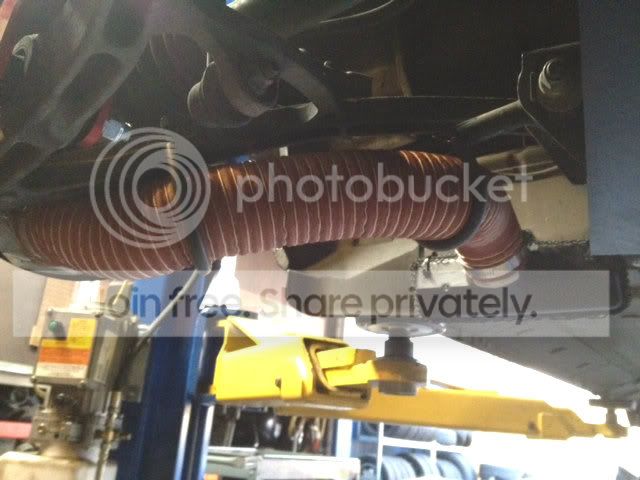
now lets hook it all together with the high temp hose and some hose clamps. cut the length you would like and clamp it down. once you get it on i zip tied it to the rear arm lightly. What i did was i used some vacuum tubing and slipped it over some zip ties so that it would not rub against the hose with a sharp edge. loosely attached it to the arm and adjust as needed.


repeat for the other side. I think this took me 3 hours on and off to finish it.
what i noticed after install. you dont have to use the mesh if you dont like. nuts and bolts would for the nozzle but it was not available for me. if you have some duct tape available, you can use it around the areas where the zip tie will go for added protection. i havent tried it out yet but i cant imagine any harm from this.
enjoy guys
tools needed.
drill bits
saw/grinder
zip ties
mesh
hammer
vacuum hose
2.5 ducting and flange
shop vac attachment from home depot ($7.00 each)
So first of all go to home depot and purchase 2 of the shop vac attachments. i forgot the exact size but there was only one that looked like the below. purchase some mesh (chicken wire).
test fit this in the location shown below. it is right next to rear tire diffuser in the front of the rear wheel well and between the frame. it should be slightly larger than this plastic piece shown.
what we need to do now is to trim the lip so that it will give it a slightly better lip. I used a air saw but a jig saw or a grinder will work, its just soft plastic.
ok now what we do is cut the mesh to slightly larger size than the front of the nozzle. then you bend it around the nozzle and use a hammer to tap it so it conforms to the piece. trim as needed.
now put it up to the vehicle and get an idea of where you want to drill a hole to mount it. I used a drill bit and did it at a slight angle. Then drill some holes in the nozzle that corresponds to flap. i did a good guess. i used zip ties to hold it against the car but you can use some nuts and bolts if you would like.
ok now go ahead and make the hole in the heat shield. I did it at the bottom so it would be closer to the duct. Its not the flattest part but its close. The best part would be on the very end if the shield near the back of the car but running the duct around the axle nicely was unnessacary i thought. i used rivets to hold mine together but some use nuts and bolts.
now lets hook it all together with the high temp hose and some hose clamps. cut the length you would like and clamp it down. once you get it on i zip tied it to the rear arm lightly. What i did was i used some vacuum tubing and slipped it over some zip ties so that it would not rub against the hose with a sharp edge. loosely attached it to the arm and adjust as needed.
repeat for the other side. I think this took me 3 hours on and off to finish it.
what i noticed after install. you dont have to use the mesh if you dont like. nuts and bolts would for the nozzle but it was not available for me. if you have some duct tape available, you can use it around the areas where the zip tie will go for added protection. i havent tried it out yet but i cant imagine any harm from this.
enjoy guys
Thread Starter
Joined: Sep 2005
Posts: 2,973
Likes: 21
its held on very tight. i doubt it will go anywhere. i might upgrade to nuts and bolts later but i doubt it. i forgot to mention the plastic on the car is 2 layers thick. i think these zip ties would be rated to be 20 lbs or so before they break

Joined: Apr 2008
Posts: 1,840
Likes: 21
From: Salt Lake City, UT
Well, I'm less concerned about it actually falling off, than I am that at speed the shop vac attachment will pivot posteriorly and superiorly about the hinge you created with the zip ties such that no more air is going into the duct. It would be really hard to tell what's going on at speed since it's hard to see in the first place...


Joined: Jul 2002
Posts: 2,724
Likes: 42
From: Orlando
This is going to be my first DIY with hopefully a few more to come. I did my front brake ducts and had some left over ducting so i decided to do some quick rear brake ducts. I wont be covering info on how to cut the heat shield and what not.
tools needed.
drill bits
saw/grinder
zip ties
mesh
hammer
vacuum hose
2.5 ducting and flange
shop vac attachment from home depot ($7.00 each)
So first of all go to home depot and purchase 2 of the shop vac attachments. i forgot the exact size but there was only one that looked like the below. purchase some mesh (chicken wire).
test fit this in the location shown below. it is right next to rear tire diffuser in the front of the rear wheel well and between the frame. it should be slightly larger than this plastic piece shown.
what we need to do now is to trim the lip so that it will give it a slightly better lip. I used a air saw but a jig saw or a grinder will work, its just soft plastic.
ok now what we do is cut the mesh to slightly larger size than the front of the nozzle. then you bend it around the nozzle and use a hammer to tap it so it conforms to the piece. trim as needed.
now put it up to the vehicle and get an idea of where you want to drill a hole to mount it. I used a drill bit and did it at a slight angle. Then drill some holes in the nozzle that corresponds to flap. i did a good guess. i used zip ties to hold it against the car but you can use some nuts and bolts if you would like.
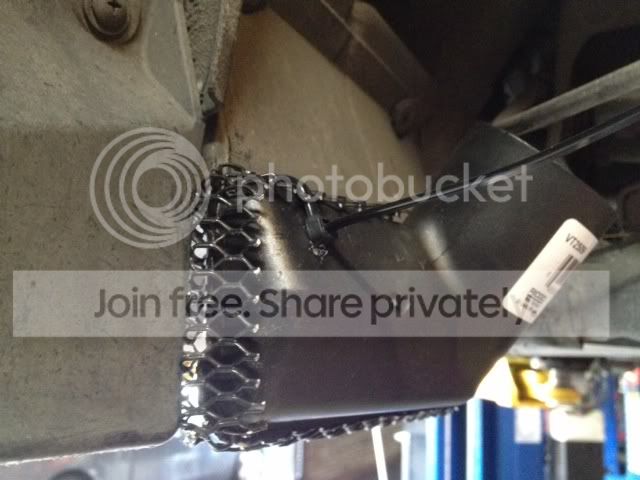
ok now go ahead and make the hole in the heat shield. I did it at the bottom so it would be closer to the duct. Its not the flattest part but its close. The best part would be on the very end if the shield near the back of the car but running the duct around the axle nicely was unnessacary i thought. i used rivets to hold mine together but some use nuts and bolts.
now lets hook it all together with the high temp hose and some hose clamps. cut the length you would like and clamp it down. once you get it on i zip tied it to the rear arm lightly. What i did was i used some vacuum tubing and slipped it over some zip ties so that it would not rub against the hose with a sharp edge. loosely attached it to the arm and adjust as needed.

repeat for the other side. I think this took me 3 hours on and off to finish it.
what i noticed after install. you dont have to use the mesh if you dont like. nuts and bolts would for the nozzle but it was not available for me. if you have some duct tape available, you can use it around the areas where the zip tie will go for added protection. i havent tried it out yet but i cant imagine any harm from this.
enjoy guys
tools needed.
drill bits
saw/grinder
zip ties
mesh
hammer
vacuum hose
2.5 ducting and flange
shop vac attachment from home depot ($7.00 each)
So first of all go to home depot and purchase 2 of the shop vac attachments. i forgot the exact size but there was only one that looked like the below. purchase some mesh (chicken wire).
test fit this in the location shown below. it is right next to rear tire diffuser in the front of the rear wheel well and between the frame. it should be slightly larger than this plastic piece shown.
what we need to do now is to trim the lip so that it will give it a slightly better lip. I used a air saw but a jig saw or a grinder will work, its just soft plastic.
ok now what we do is cut the mesh to slightly larger size than the front of the nozzle. then you bend it around the nozzle and use a hammer to tap it so it conforms to the piece. trim as needed.
now put it up to the vehicle and get an idea of where you want to drill a hole to mount it. I used a drill bit and did it at a slight angle. Then drill some holes in the nozzle that corresponds to flap. i did a good guess. i used zip ties to hold it against the car but you can use some nuts and bolts if you would like.
ok now go ahead and make the hole in the heat shield. I did it at the bottom so it would be closer to the duct. Its not the flattest part but its close. The best part would be on the very end if the shield near the back of the car but running the duct around the axle nicely was unnessacary i thought. i used rivets to hold mine together but some use nuts and bolts.
now lets hook it all together with the high temp hose and some hose clamps. cut the length you would like and clamp it down. once you get it on i zip tied it to the rear arm lightly. What i did was i used some vacuum tubing and slipped it over some zip ties so that it would not rub against the hose with a sharp edge. loosely attached it to the arm and adjust as needed.
repeat for the other side. I think this took me 3 hours on and off to finish it.
what i noticed after install. you dont have to use the mesh if you dont like. nuts and bolts would for the nozzle but it was not available for me. if you have some duct tape available, you can use it around the areas where the zip tie will go for added protection. i havent tried it out yet but i cant imagine any harm from this.
enjoy guys