How to change your coolant for dummies-
 01-08-2013, 07:50 PM
#1

Thread Starter
I just read through the service manual, checked out Billman's recommendations, and tackled the coolant change on my 2003 s2000. I'm not a mechanic by trade but have done valve adjustments, head gaskets, brakes, suspension etc.- i know my way around a car very well. This job is not difficult if you have COMMON SENSE and understand the mechanics of a car.
For one, i picked up 2 containers of Honda Type2 coolant- $20 each. Honda coolant goes in Honda engines. Don't use dexcool or anything- but that's just my opinion.
YOUR CAR's COOLANT MUST BE COLD TO DO THIS. DON'T BE STUPID AND SCALD YOURSELF.
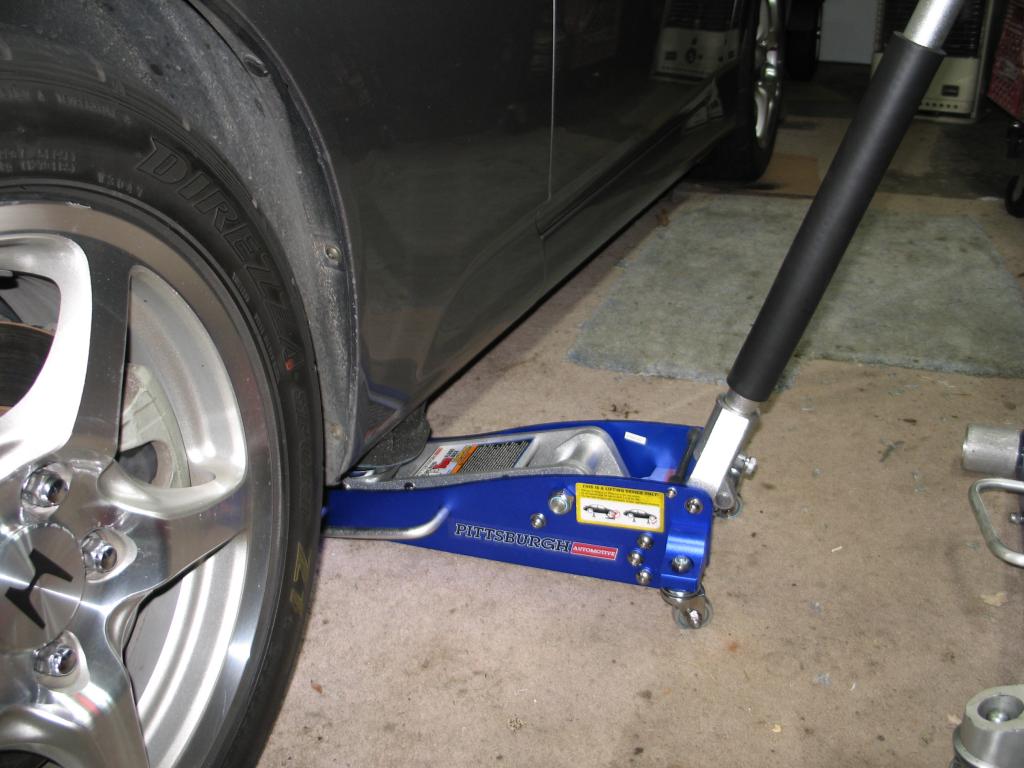
First, turn the car on enough to put the heater temperature dial to maximum heat. Turn the car off if you happened to start it to do this(as if you didn't know this). Jack the car up, just enough so you can access the coolant plug. Loosen the plug just enough. I didn't let it open all the way and drain coolant...yet.
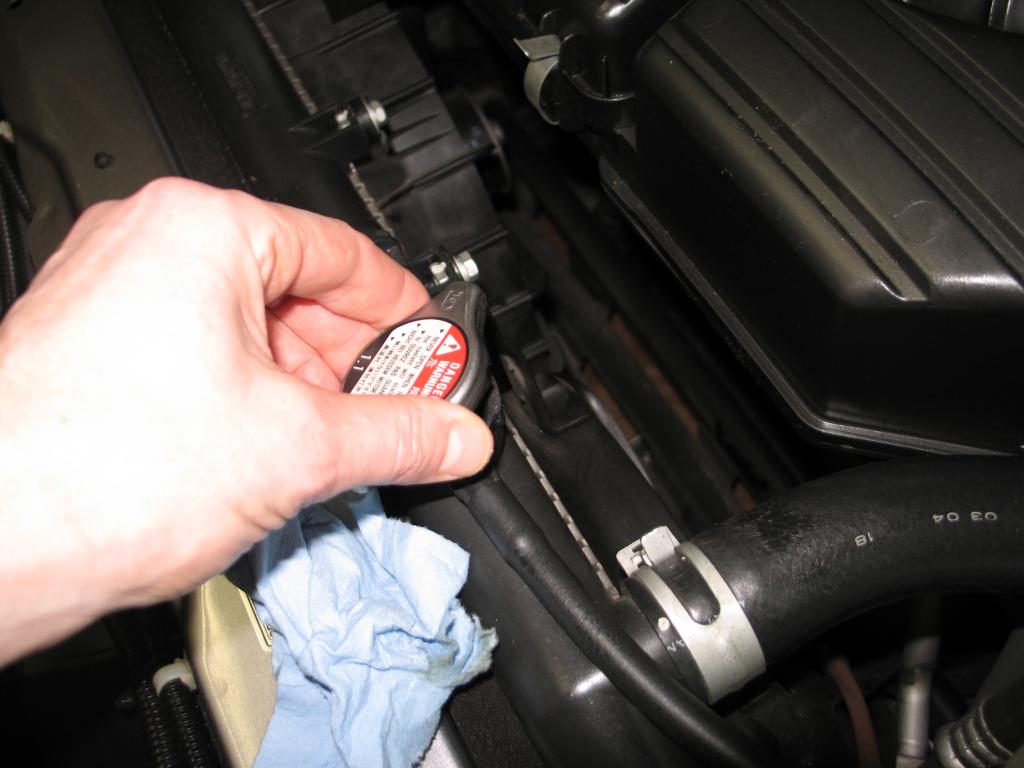
Undo the rad cap.
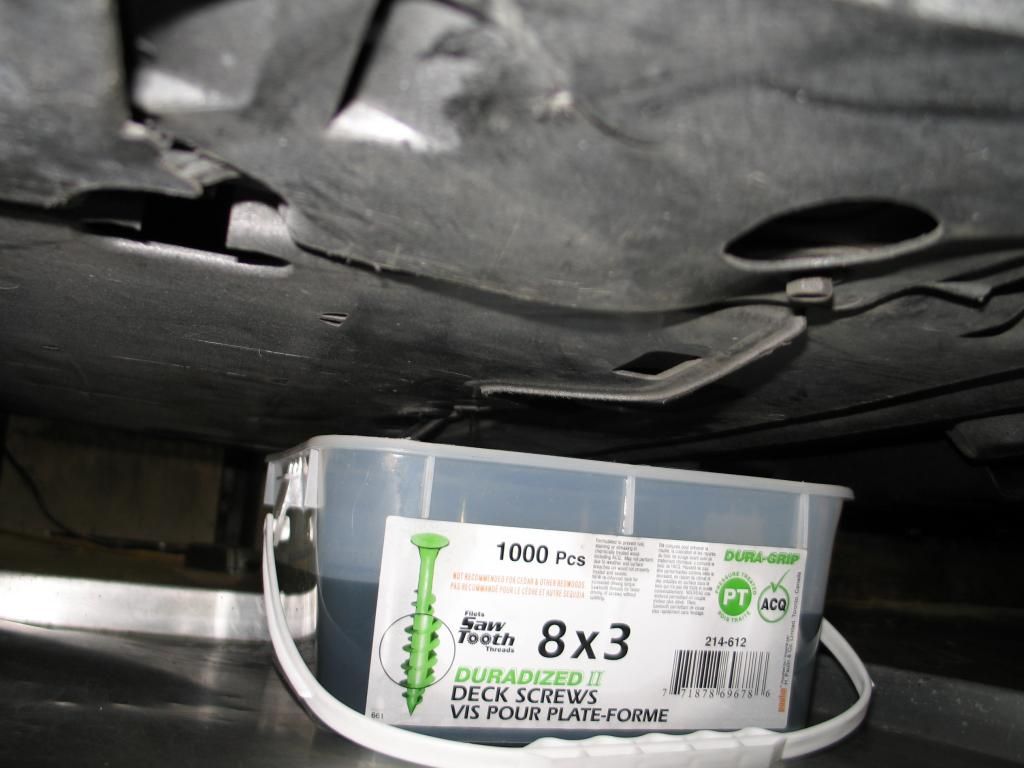
Build a deck and use the spare deck screw container as a catch can under the rad.
Now, lower the car down(provided your catch can is short enough). Open the RAD COOLANT DRAIN PLUG until coolant flows out- NOTE- you don't remove the plug completely. It is fairly accessible from the top between the two fans if you have skinny enough forearms like me (my biceps are killer though). Let the fluid drain into the catch can.
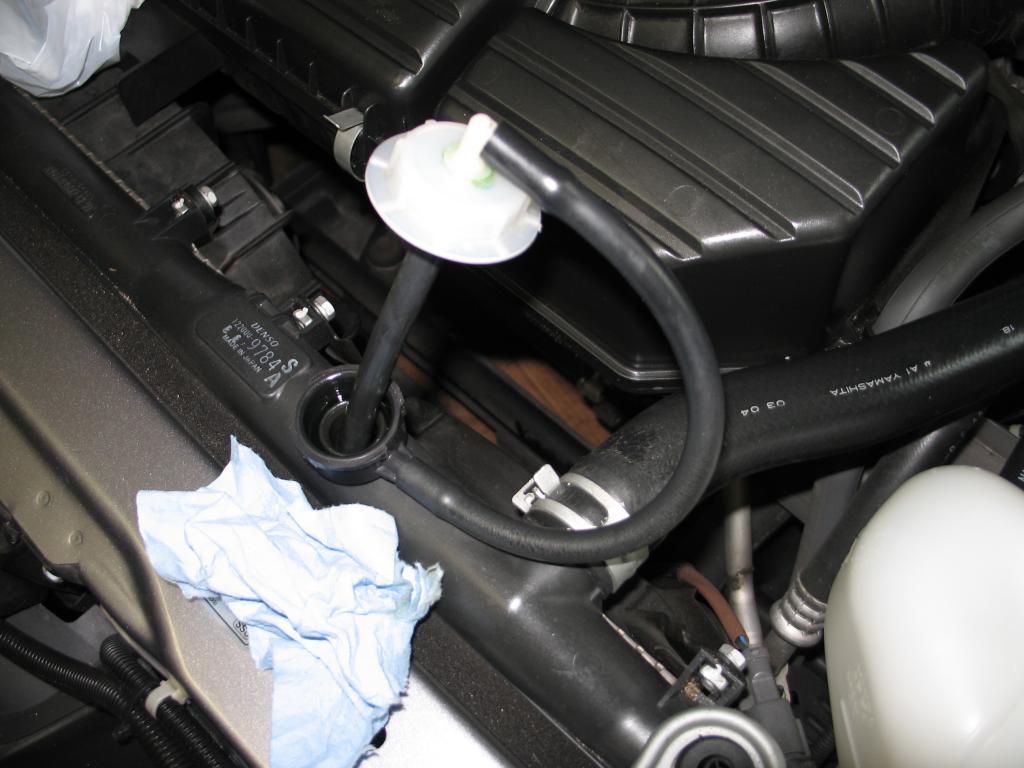
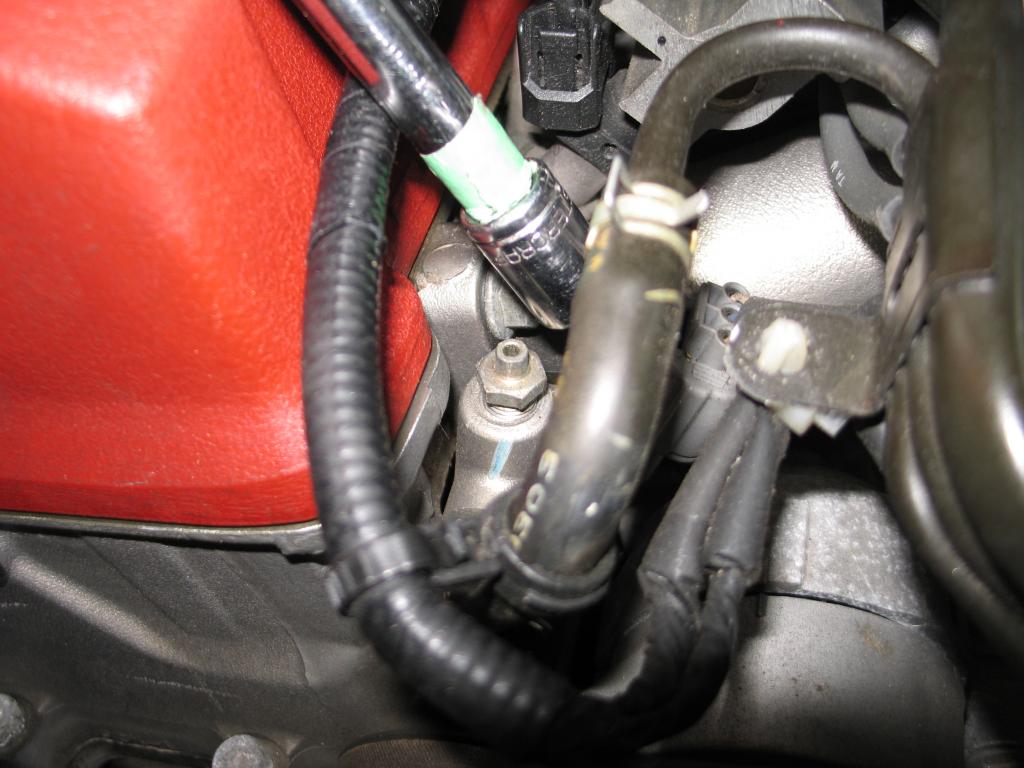
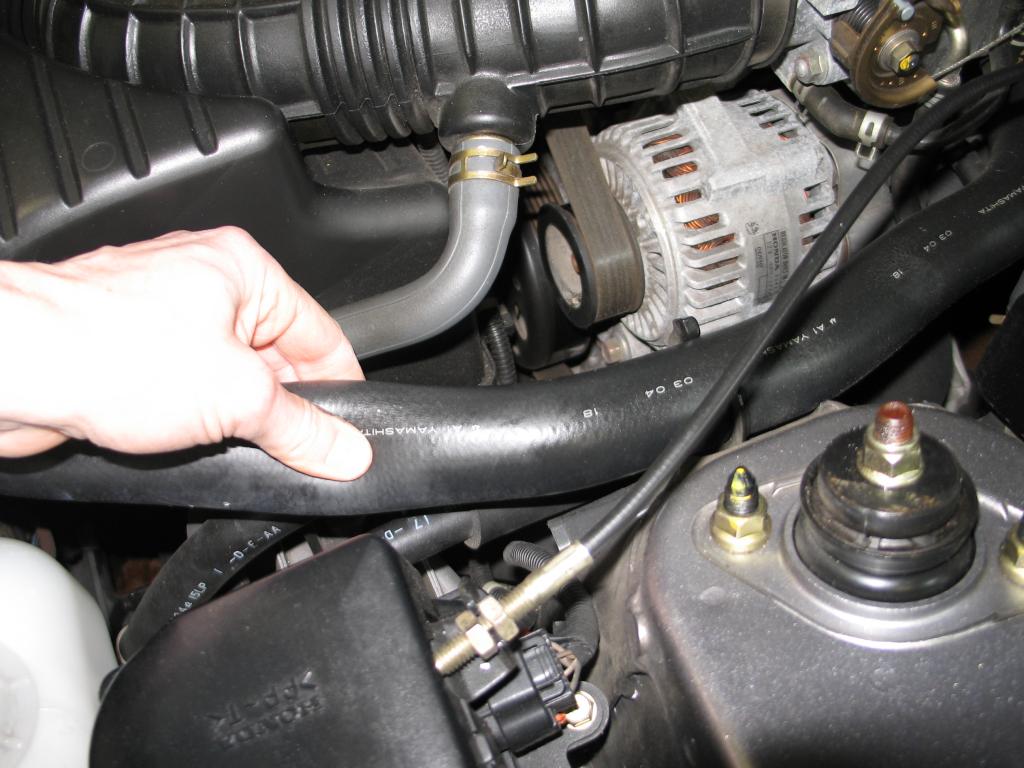
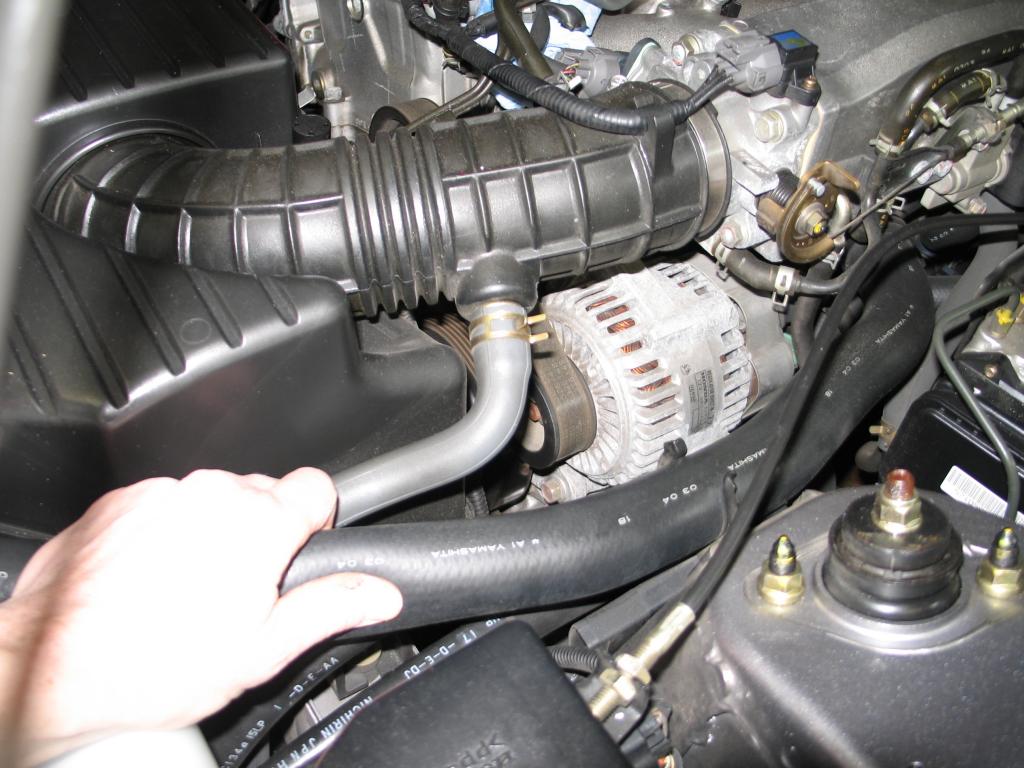
While it's draining, open the front air bleed access bolt near the front driver's side of the valve cover.
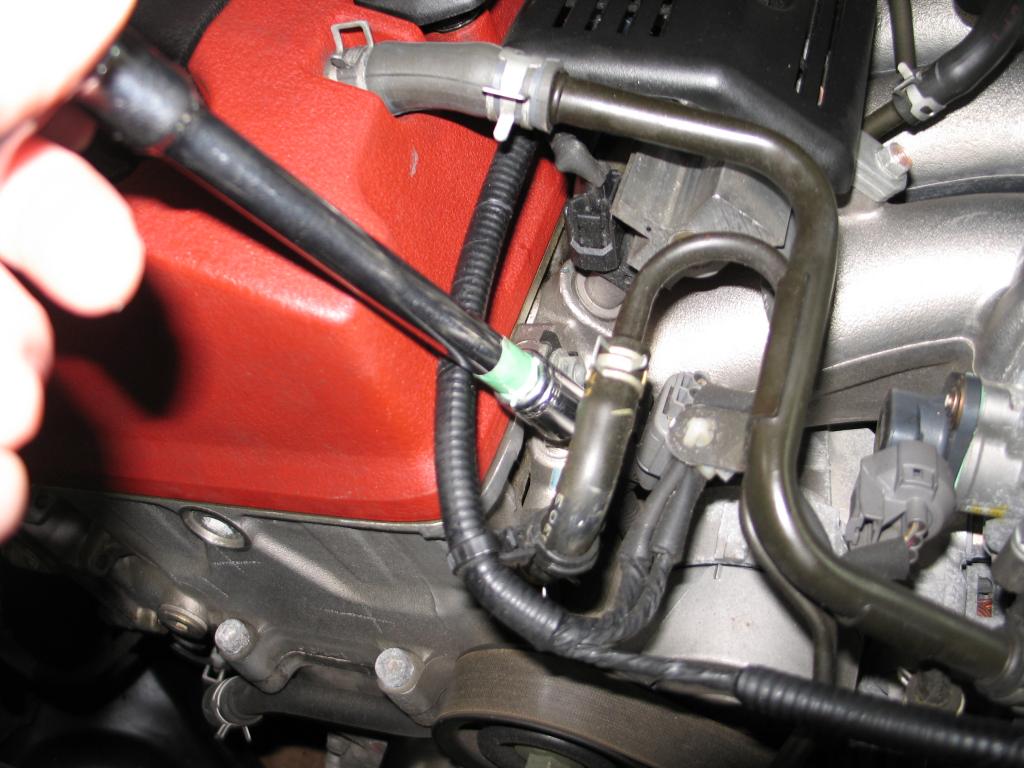
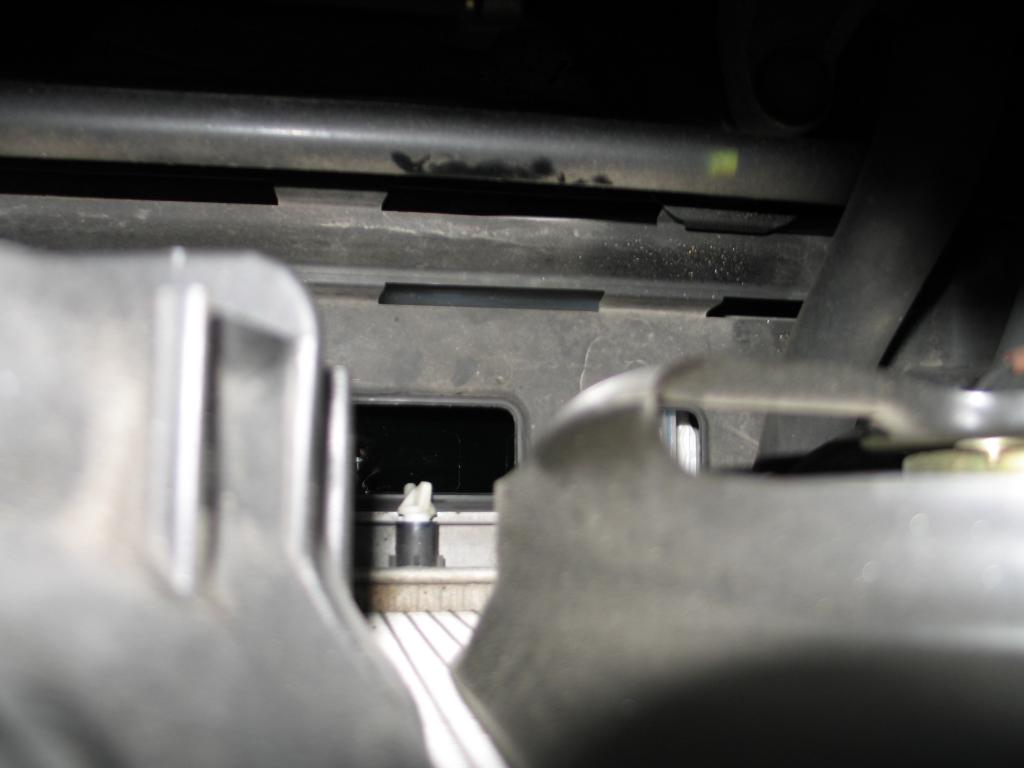
Once the coolant was trickling out, I opened the rear coolant access (its covered with a spring type hose clamp and small closed rubber nipple about an inch long)- its on the firewall near the top middle. Put the rad cap on temporarily. Snug the FRONT AIR BLEED BOLT too. I placed a clear hose on the rear coolant port and ran shop air into it to help blow out any remaining coolant- i got about another 200 ml out. This also kept me from needing to open the big bolt on the block itself.
After more coolant stops flowing out, close the REAR coolant access- its not really needed anymore, despite what the FSM says.
OPEN the FRONT AIR BLEED BOLT again.
Close the plastic rad drain plug- snug it tight- you won't need to touch this again until your next coolant change.
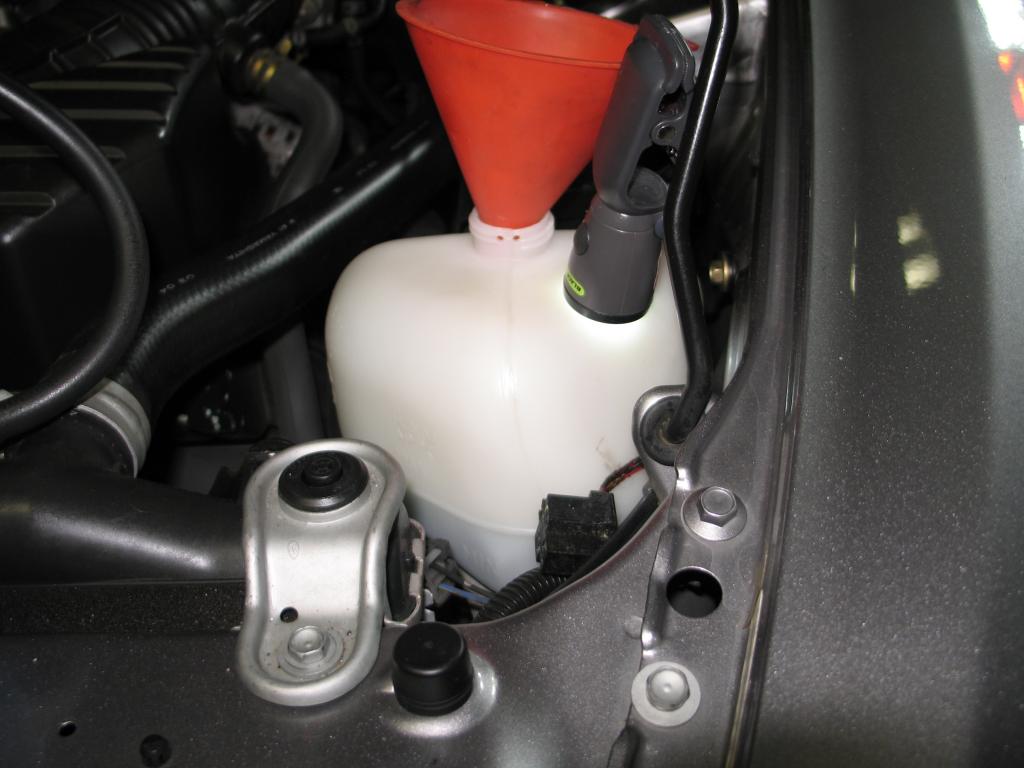
Empty the coolant overflow bottle. It literally slides up and out.
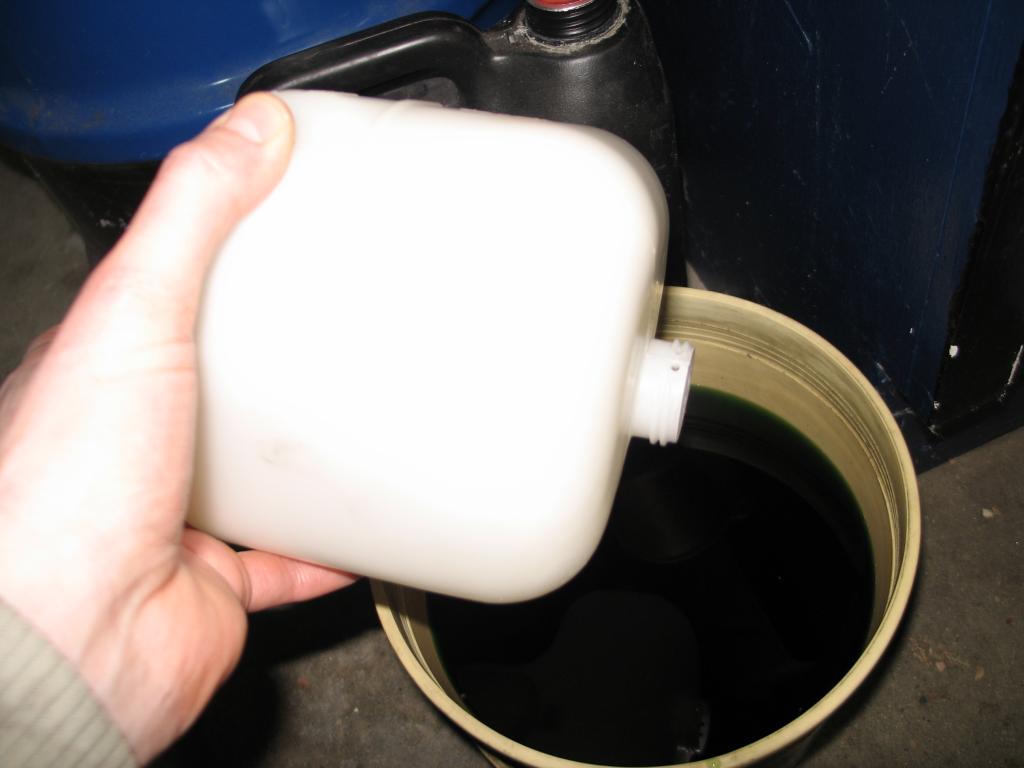
Clean it thoroughly, put it back and fill to the max line. Thread the overflow hose back in.
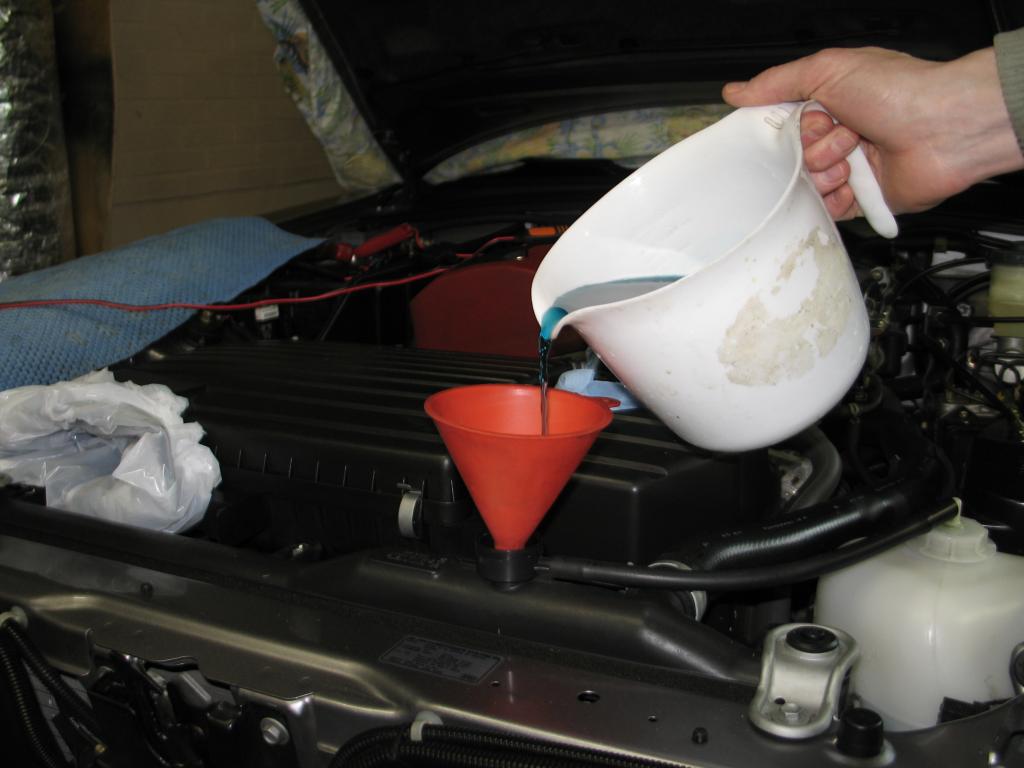
Now its time to fill the rad. Pay attention here. Expect to fill it with 6.5 to 6.6 litres. I kept track (i actually measured it) of how much coolant came out so expect the same amount to go back in.
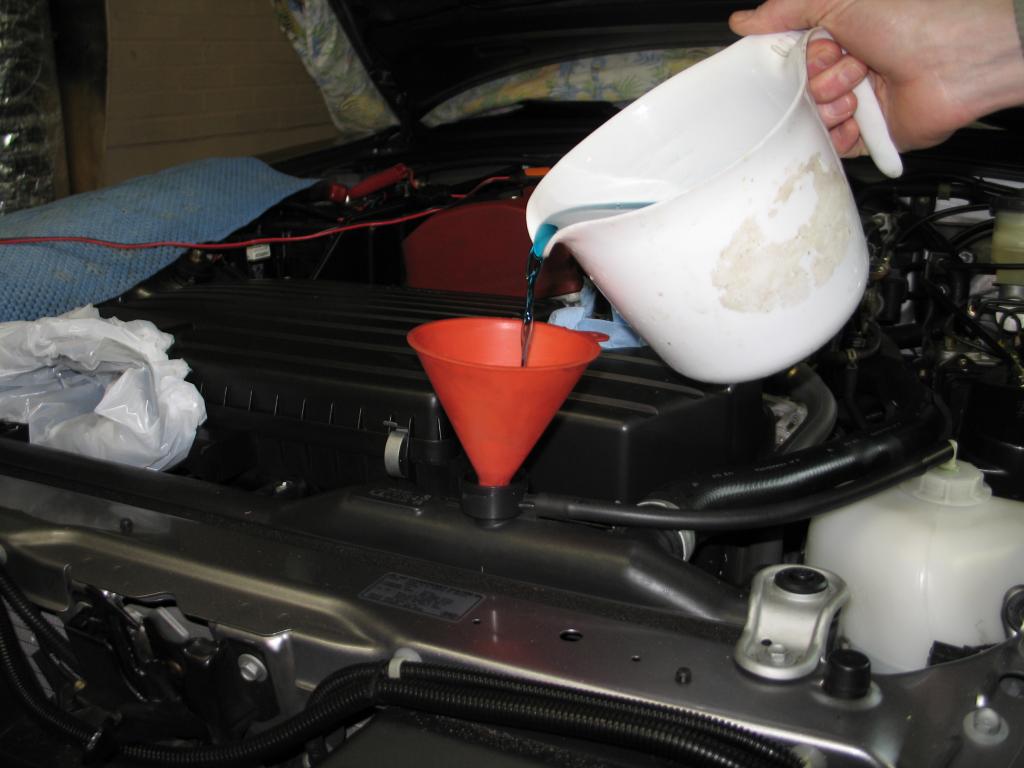
I used a 1400 ml container to keep track. Keep filling until coolant comes out of the FRONT AIR BLEED BOLT. NOW CLOSE IT. Squeeze the top rad hose to flush coolant around more. You can even seal your hand over the rad fill while you squeeze to force more of the coolant around. Just remember that the Front air bleed bolt allows that pesky air to bleed out- obvious, eh?
OPEN THE FRONT AIR BLEED ACCESS BOLT AGAIN. Add more coolant until it flows out that air bleed access bolt again. Keep repeating this until you're just making a mess.
NOW CLOSE THE FRONT AIR BLEED ACCESS BOLT- you do not have to crank on this bolt- just snug (like 1 lb/ft). Leave the rad cap OFF.
START THE CAR. let it run until you get 3 bars on the temp gauge. KEEP THE CAR HEATER ON HIGH HEAT. Run the fan on high. You won't likely get any heat out yet anyway.
If the coolant starts to come out the radiator itself, shut the car down.
Now, we have to work more of the air out of the system.
OPEN THIS. Air will escape.
YOU CAN DO THIS- i put a little hose on the bolt so i could see it rise up and not make a mess.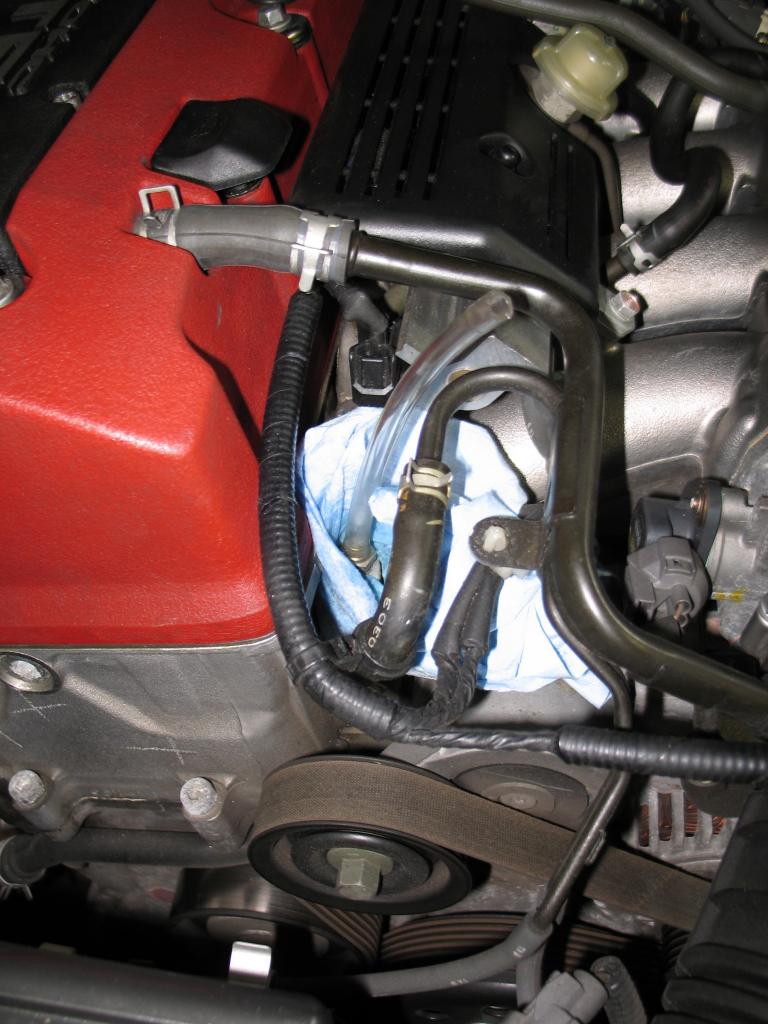
ADD COOLANT.
SQUEEZE THIS.
OPEN BLEEDER. ADD COOLANT. SQUEEZE...till more coolant comes out the front air bleed. CLOSE THE AIR BLEED. More coolant into the rad- unless the rad is overflowing.
START THE ENGINE, but be prepared to shut it off if the coolant starts coming out again.
KEEP REPEATING THIS OVER AND OVER UNTIL THE HEATER BLOWS HOT...not lukewarm...but hot like you remember it. Real hot.
OPEN FRONT AIR BLEED. ADD MORE COOLANT. SQUEEZE till fluid comes out of the front air bleed bolt. CLOSE THE FRONT AIR BLEED.
and remember, DO NOT OPEN THE FRONT AIR BLEED WHILE THE CAR IS RUNNING. DON'T BURN YOURSELF EITHER- keep the rad cap OFF to keep pressure from building in the system.
this is the technique that worked for me. There may be easier ways, but i've got lots of time on my hands.
This is meant to compliment the other posts on s2ki regarding coolant changes. I didn't find any with pictures, so here you go.
Good luck.
darcy
For one, i picked up 2 containers of Honda Type2 coolant- $20 each. Honda coolant goes in Honda engines. Don't use dexcool or anything- but that's just my opinion.
YOUR CAR's COOLANT MUST BE COLD TO DO THIS. DON'T BE STUPID AND SCALD YOURSELF.
First, turn the car on enough to put the heater temperature dial to maximum heat. Turn the car off if you happened to start it to do this(as if you didn't know this). Jack the car up, just enough so you can access the coolant plug. Loosen the plug just enough. I didn't let it open all the way and drain coolant...yet.
Undo the rad cap.
Build a deck and use the spare deck screw container as a catch can under the rad.
Now, lower the car down(provided your catch can is short enough). Open the RAD COOLANT DRAIN PLUG until coolant flows out- NOTE- you don't remove the plug completely. It is fairly accessible from the top between the two fans if you have skinny enough forearms like me (my biceps are killer though). Let the fluid drain into the catch can.
While it's draining, open the front air bleed access bolt near the front driver's side of the valve cover.
Once the coolant was trickling out, I opened the rear coolant access (its covered with a spring type hose clamp and small closed rubber nipple about an inch long)- its on the firewall near the top middle. Put the rad cap on temporarily. Snug the FRONT AIR BLEED BOLT too. I placed a clear hose on the rear coolant port and ran shop air into it to help blow out any remaining coolant- i got about another 200 ml out. This also kept me from needing to open the big bolt on the block itself.
After more coolant stops flowing out, close the REAR coolant access- its not really needed anymore, despite what the FSM says.
OPEN the FRONT AIR BLEED BOLT again.
Close the plastic rad drain plug- snug it tight- you won't need to touch this again until your next coolant change.
Empty the coolant overflow bottle. It literally slides up and out.
Clean it thoroughly, put it back and fill to the max line. Thread the overflow hose back in.
Now its time to fill the rad. Pay attention here. Expect to fill it with 6.5 to 6.6 litres. I kept track (i actually measured it) of how much coolant came out so expect the same amount to go back in.
I used a 1400 ml container to keep track. Keep filling until coolant comes out of the FRONT AIR BLEED BOLT. NOW CLOSE IT. Squeeze the top rad hose to flush coolant around more. You can even seal your hand over the rad fill while you squeeze to force more of the coolant around. Just remember that the Front air bleed bolt allows that pesky air to bleed out- obvious, eh?
OPEN THE FRONT AIR BLEED ACCESS BOLT AGAIN. Add more coolant until it flows out that air bleed access bolt again. Keep repeating this until you're just making a mess.
NOW CLOSE THE FRONT AIR BLEED ACCESS BOLT- you do not have to crank on this bolt- just snug (like 1 lb/ft). Leave the rad cap OFF.
START THE CAR. let it run until you get 3 bars on the temp gauge. KEEP THE CAR HEATER ON HIGH HEAT. Run the fan on high. You won't likely get any heat out yet anyway.
If the coolant starts to come out the radiator itself, shut the car down.
Now, we have to work more of the air out of the system.
OPEN THIS. Air will escape.
YOU CAN DO THIS- i put a little hose on the bolt so i could see it rise up and not make a mess.
ADD COOLANT.
SQUEEZE THIS.
OPEN BLEEDER. ADD COOLANT. SQUEEZE...till more coolant comes out the front air bleed. CLOSE THE AIR BLEED. More coolant into the rad- unless the rad is overflowing.
START THE ENGINE, but be prepared to shut it off if the coolant starts coming out again.
KEEP REPEATING THIS OVER AND OVER UNTIL THE HEATER BLOWS HOT...not lukewarm...but hot like you remember it. Real hot.
OPEN FRONT AIR BLEED. ADD MORE COOLANT. SQUEEZE till fluid comes out of the front air bleed bolt. CLOSE THE FRONT AIR BLEED.
and remember, DO NOT OPEN THE FRONT AIR BLEED WHILE THE CAR IS RUNNING. DON'T BURN YOURSELF EITHER- keep the rad cap OFF to keep pressure from building in the system.
this is the technique that worked for me. There may be easier ways, but i've got lots of time on my hands.
This is meant to compliment the other posts on s2ki regarding coolant changes. I didn't find any with pictures, so here you go.
Good luck.
darcy


