flanders NFR AP1 build
 03-11-2016, 03:02 AM
#11

Thread Starter
Fast forwarding a bit for results after some street tuning by me.
VTEC at 4k and fueling cleaned up, no changes on ignition.
Blue curve is my best run with CT intake.

VTEC at 4k and fueling cleaned up, no changes on ignition.
Blue curve is my best run with CT intake.
Last edited by flanders; 03-20-2017 at 11:19 PM.
 03-11-2016, 04:12 AM
#12
Thread Starter
Some interior mods.
Glove box organizer from Modifry

Also got seat belt lock from Modifry.
No picture on the actual thing but it's basically an electromagnet that engages the stock seat belt lock.
Some wiring done

Button to engage it placed behind passenger seat

Backyard special lowered seat rail

Dark picture with stock rail

and with the new rail about an inch lower and no more banging the roof with the helmet

Glove box organizer from Modifry
Also got seat belt lock from Modifry.
No picture on the actual thing but it's basically an electromagnet that engages the stock seat belt lock.
Some wiring done
Button to engage it placed behind passenger seat
Backyard special lowered seat rail
Dark picture with stock rail
and with the new rail about an inch lower and no more banging the roof with the helmet
Last edited by flanders; 03-20-2017 at 11:24 PM.
03-11-2016, 04:41 AM
#13
Thread Starter
Next up was the suspension.
I got myself a late but very nice Christmas present

Instructions said cut the rubber boots but I just pulled them down further

Started with the front and like many other owners I found that my geo bolts were seized in the bushings

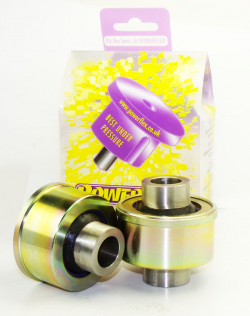
Went with the Powerflex compliance and camber bushings
After a few hours of cutting and swearing I got the lower arm off

The compliance bushing had some cracks but nothing to bad, anyways it was trash now

Thought I would need to cut the rear ones out as well but finally got them out with some heat

and lots of this stuff

While working on the suspension I took the opportunity to do some brake cooling as well

Brake shields looked a bit crappy so I blasted them clean

Got the stock bushings pressed out

100t press didn't even notice

Then blasted them clean

Some high temp paint on

Painted front control arms and new bushings installed

To keep the poly bushings work without binding I drilled and put in grease nipples and also cut some groves inside them.
Did another groove after this picture.

Grease nipple accessible from under the car

Close up on the new compliance bushing.

I got myself a late but very nice Christmas present
Instructions said cut the rubber boots but I just pulled them down further
Started with the front and like many other owners I found that my geo bolts were seized in the bushings
Went with the Powerflex compliance and camber bushings
After a few hours of cutting and swearing I got the lower arm off
The compliance bushing had some cracks but nothing to bad, anyways it was trash now
Thought I would need to cut the rear ones out as well but finally got them out with some heat
and lots of this stuff
While working on the suspension I took the opportunity to do some brake cooling as well
Brake shields looked a bit crappy so I blasted them clean
Got the stock bushings pressed out
100t press didn't even notice
Then blasted them clean
Some high temp paint on
Painted front control arms and new bushings installed
To keep the poly bushings work without binding I drilled and put in grease nipples and also cut some groves inside them.
Did another groove after this picture.
Grease nipple accessible from under the car
Close up on the new compliance bushing.
Last edited by flanders; 03-20-2017 at 11:41 PM.
03-11-2016, 05:20 AM
#14

Wow you've done a lot of work so far and everything looks great. The thermal images were a great idea to show the comparison for the Hondata gasket. I also really like how you blasted and repainted the arms and dust shields when doing the bushings. Looking forward to more updates.
03-11-2016, 06:28 AM
#15
Thread Starter
Thank you, well one of the few advantages on the long winters we got here is that you have a lot of time doing upgrades
Before moving on the suspension install I had a look at my spark plugs.
Pretty oily and to my surprise it was Bosch plugs
Cyl1

Cyl2

Cyl3

Cyl4

Pulled the valve cover to check

The seals looked good though so I just wiped everything clean and put it back on again

With new NGK plugs

Before moving on the suspension install I had a look at my spark plugs.
Pretty oily and to my surprise it was Bosch plugs
Cyl1
Cyl2
Cyl3
Cyl4
Pulled the valve cover to check
The seals looked good though so I just wiped everything clean and put it back on again
With new NGK plugs
Last edited by flanders; 03-20-2017 at 11:45 PM.
03-11-2016, 06:44 AM
#16
Thread Starter
With the new golden legs from Öhlins going on I had to get some new matching rims.
LSD Motorsport got me a really nice deal and after a few days UPS came to my door with some big boxes

yep seems to be a rim in there

mmh goold

Inspected and ready to go

Test fitted, wheel spec is 17x8 front and 17x9 rear both ET45

Got these red valves included but decided not to use them and got some black ones from 949 racing instead.
With matching lug nuts also of course, sorry no picture of that but you can check the link above

For tires I went with Federal 595 RS-R, 225/45 front and 255/40 in the rear

LSD Motorsport got me a really nice deal and after a few days UPS came to my door with some big boxes
yep seems to be a rim in there
mmh goold
Inspected and ready to go
Test fitted, wheel spec is 17x8 front and 17x9 rear both ET45
Got these red valves included but decided not to use them and got some black ones from 949 racing instead.
With matching lug nuts also of course, sorry no picture of that but you can check the link above
For tires I went with Federal 595 RS-R, 225/45 front and 255/40 in the rear
Last edited by flanders; 03-21-2017 at 12:02 AM.
03-11-2016, 07:16 AM
#17
Thread Starter
Moving on to the brake cooling.
Used a hole saw to open up the bumper

This hole saw was very angry when it came out on the other side which my left thumb soon realized.
Warning the picture is a bit graphical
After a few stitches, lots of grinding and sanding I got the ducts fitted


Silicone hoses connected and I guess the Öhlins also were installed by then

Got some leftover hose which I used to route a bit more cool air to the filter

To get the rims to fit without rubbing there had to be some work done on the fenders

Rear bumper tab relocation, put some rust protecting paint on there as well

Rear fender done


Looks like it should clear

Front before fender roll, used the same paint there for some added protection

Other side after roll, for some reason there was another type of damping mat on there.


Used a hole saw to open up the bumper
This hole saw was very angry when it came out on the other side which my left thumb soon realized.
Warning the picture is a bit graphical
Spoiler

Silicone hoses connected and I guess the Öhlins also were installed by then
Got some leftover hose which I used to route a bit more cool air to the filter
To get the rims to fit without rubbing there had to be some work done on the fenders
Rear bumper tab relocation, put some rust protecting paint on there as well
Rear fender done
Looks like it should clear
Front before fender roll, used the same paint there for some added protection
Other side after roll, for some reason there was another type of damping mat on there.
Last edited by flanders; 03-21-2017 at 12:14 AM.
 03-11-2016, 02:33 PM
#19
Thread Starter
Thanks and no I'm not a mechanic by trade, I'm a pretty meticulous person though and I love perfecting all those small little details
I'm at spring 2014 now and just getting the car ready for the streets again.
The front calipers were taken off, cleaned and got some new high temp paint on. Not sure why I didn't take any pictures of that.
Then of course some new fluid

and a new set of pads

When I got to change the engine oil there was a small disaster though.
Some remains from when I took the drain plug out, guess the previous owner didn't like torque wrenches

Now I was in kind of a rush to get the car ready, I got lucky though and found a "new" oil pan with small baffle

Cleaned it up a bit and put it on

This job actually took me a whole weekend, damn that stock pan was glued on super tight.
Some dirty remains in the stock pan, felt good to get that crap out

I'm at spring 2014 now and just getting the car ready for the streets again.
The front calipers were taken off, cleaned and got some new high temp paint on. Not sure why I didn't take any pictures of that.
Then of course some new fluid
and a new set of pads
When I got to change the engine oil there was a small disaster though.
Some remains from when I took the drain plug out, guess the previous owner didn't like torque wrenches
Now I was in kind of a rush to get the car ready, I got lucky though and found a "new" oil pan with small baffle
Cleaned it up a bit and put it on
This job actually took me a whole weekend, damn that stock pan was glued on super tight.
Some dirty remains in the stock pan, felt good to get that crap out
Last edited by flanders; 03-21-2017 at 12:32 AM.
03-11-2016, 03:04 PM
#20
Thread Starter
With all that done it was finally out from the garage again.
Super happy with the wheels and new suspension parts, the Öhlins felt amazing

It needed an aligment done though so went to a local Bosch car service place and had some lasers put on

After showing the mechanic how to adjust everything I got everything lined up pretty nice

Before the roof was taken off I took this nice picture

and a badass shot

Then it was time for the first track day and car felt great and it was really fun, for a few laps until I got black flagged for sound
Got recorded at 101dB and limit is only 95, only picture was from the meet before.

When I got home a ordered a Berk HFC to try and quiet things down a bit.

Inside check

With the new wide wheels I also had to make something to protect the sides from all the flying stone chips.
Found some rubber and made these flaps

Installed and ready


Super happy with the wheels and new suspension parts, the Öhlins felt amazing
It needed an aligment done though so went to a local Bosch car service place and had some lasers put on
After showing the mechanic how to adjust everything I got everything lined up pretty nice
Before the roof was taken off I took this nice picture
and a badass shot
Then it was time for the first track day and car felt great and it was really fun, for a few laps until I got black flagged for sound
Got recorded at 101dB and limit is only 95, only picture was from the meet before.
When I got home a ordered a Berk HFC to try and quiet things down a bit.
Inside check
With the new wide wheels I also had to make something to protect the sides from all the flying stone chips.
Found some rubber and made these flaps
Installed and ready
Last edited by flanders; 03-21-2017 at 12:48 AM.