Heater control disassembly
 01-28-2016, 10:47 AM
#1

Thread Starter

I have all the trim bits I want to get hydro dipped ready to go except the cover over the heater controls...I've remov d it from the dash, popped the knobs off but can't see how to take them off, any ideas.
Cheers
Ian
Cheers
Ian
 01-29-2016, 07:28 AM
#3
Thread Starter
Cheers Mike...I may well be being a little slow here, so will post a photo as I am not really getting it bruv 
01-29-2016, 07:45 AM
#4
Registered User
01-29-2016, 08:38 AM
#5
Registered User
Ok here is what you need to do:
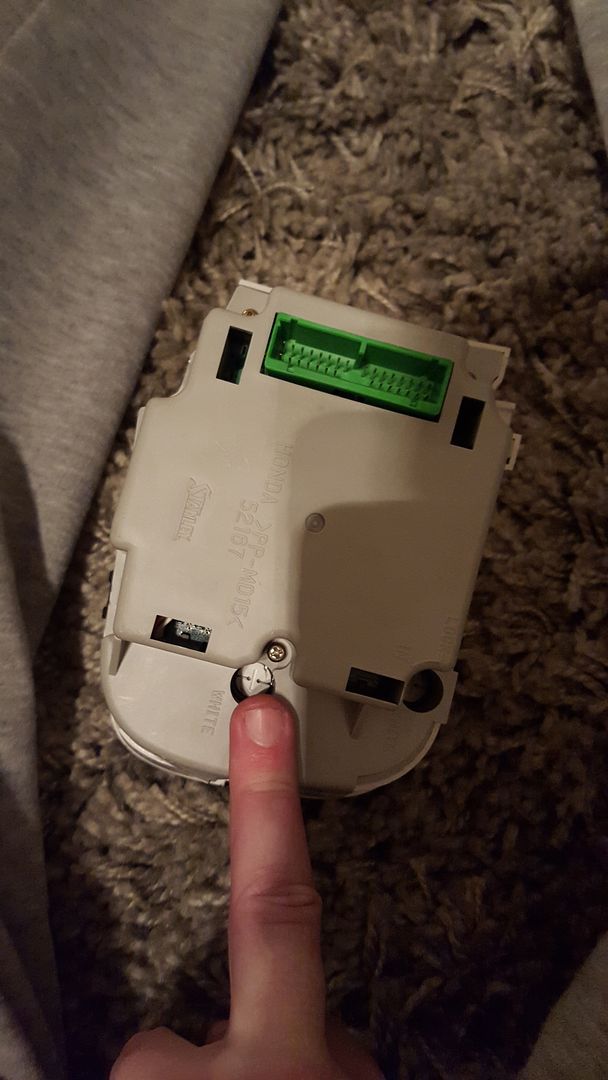
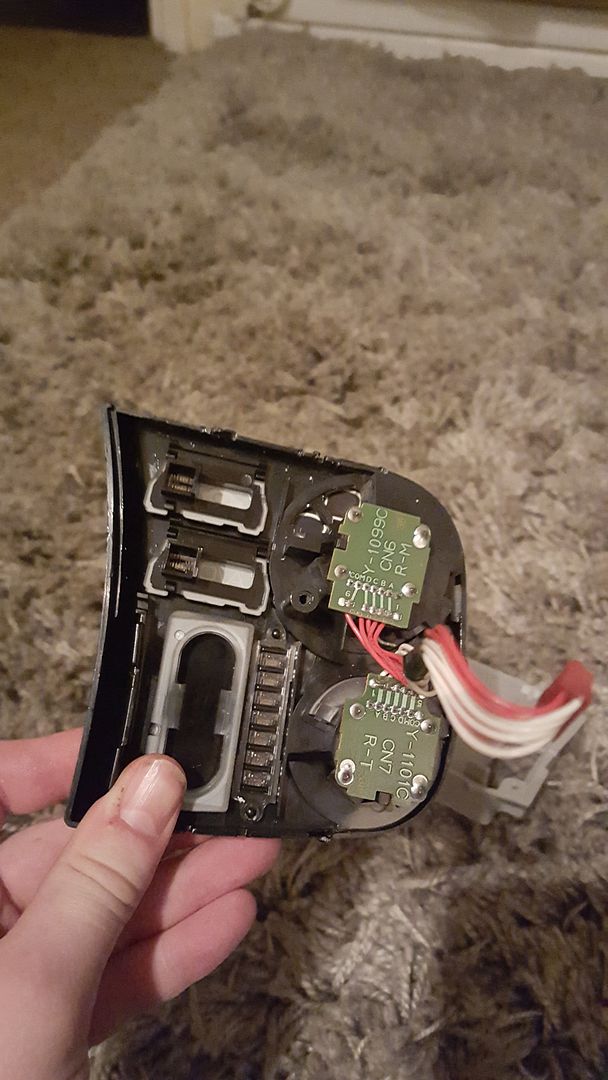
3 x brass screws to rear of assembly using a philips-head driver as indicated, undo and retain for future use.
Open assembly up into 2 sections, grey and white.
1 x Brass screw to middle of assembly that doesn't connect to any circuit boards, undo this. It's the one nearest white plastic riser as indicated in picture.
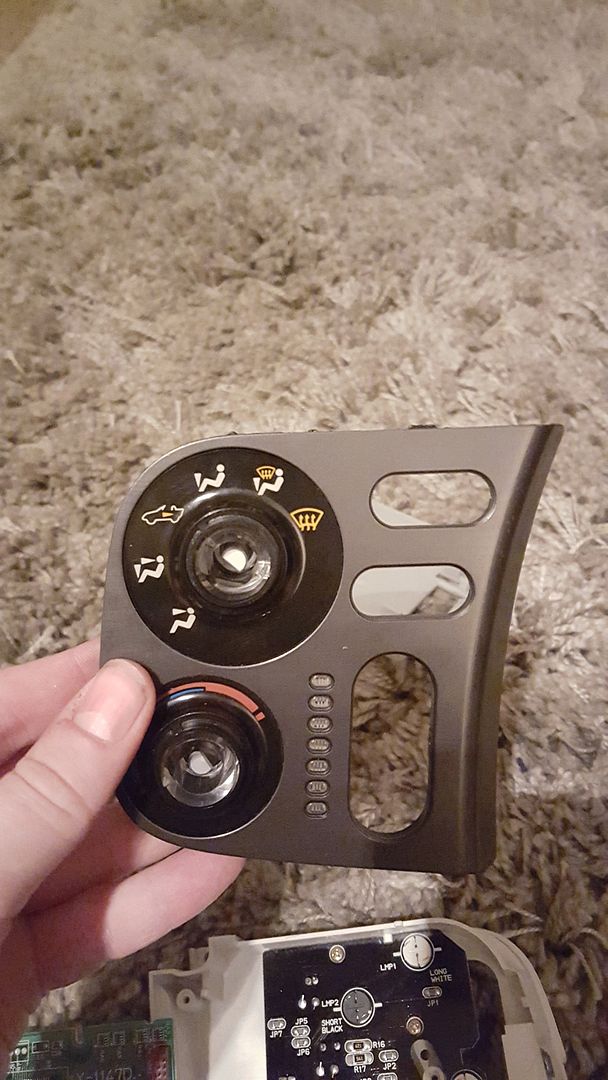
Now as indicated by my pics you need to prize the fascia off using a small flathead driver.
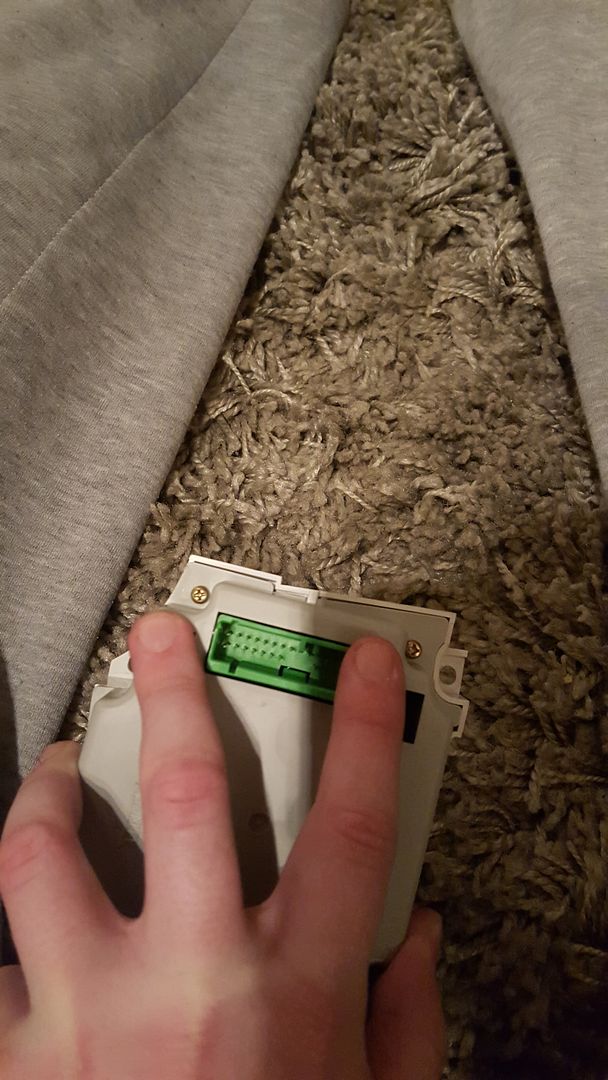
Once fascia is off you then need to disconnect the 2 looms connecting to air direction and fan speed. Do this via the removing wires from GREEN circuit board as indicated by picture, do not remove from back of rotational switches as they are soldered here.
Buttons can then be removed by carefully yanking till they gtfo. Rocker switch is harder. Use 2 fingers on each side and give it a good push. Push from the front to the rear of the assembly.
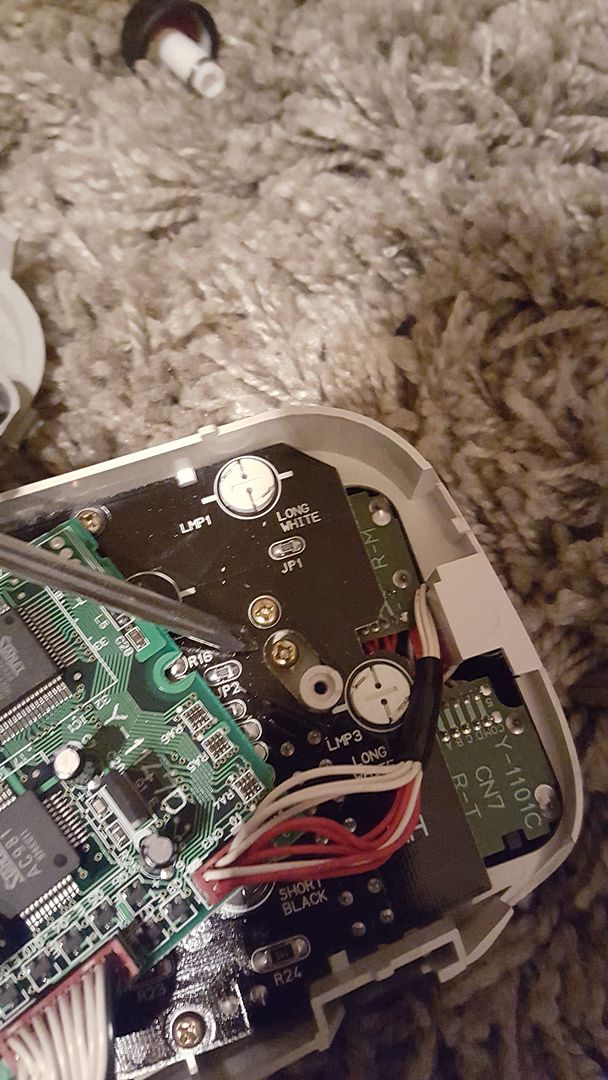
Now the harder part is removing the rotator switch position clear plastic things. They is glued so you need to just push them out. See pic to help. Only one of these can be successfully removed as there is no access to the other.
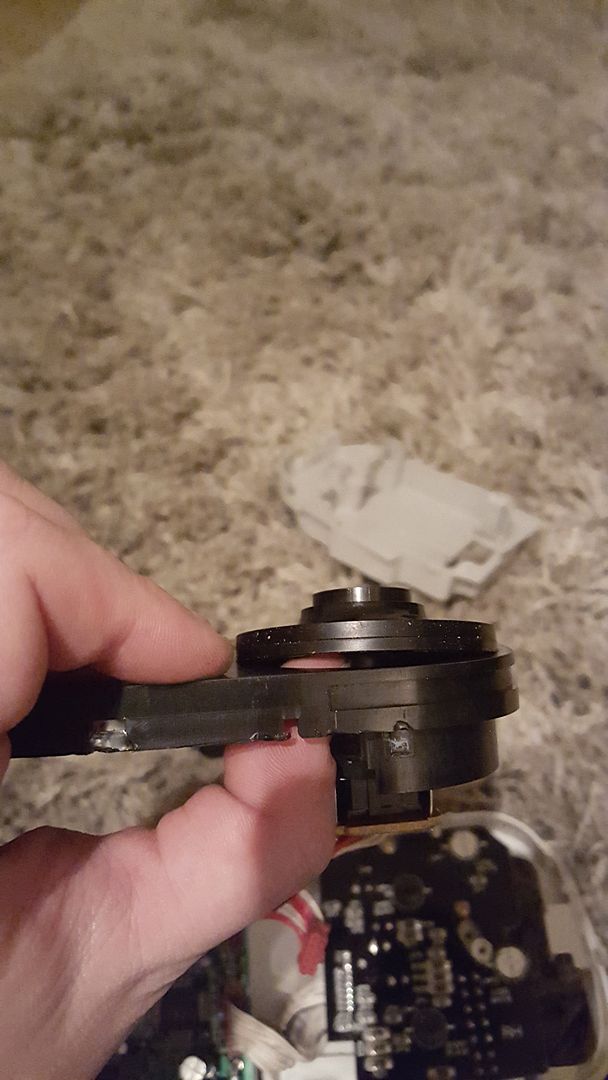
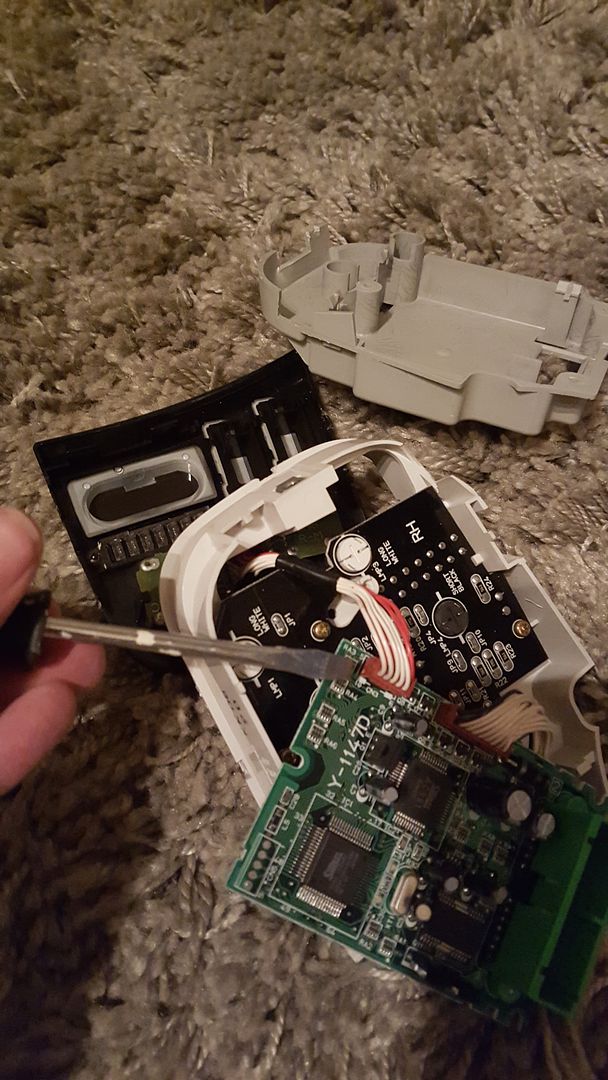
Remove the fan speed clear plastic bit, flathead will do this.
you will need some assembly glue to reattach clear plastic fan speed thing and circular plastic part, not essential but stops it rattling around.
Once done proceed to wrap or dip.
Be careful not to get still attached circuit boards wet.
Hope this helps you dudeth!
(Pics to follow)(Pics added)
Also I take f@#k all responsibility for any person human animal or alien who is following this guide set out above, if they are to break anything that is on you, not me.
3 x brass screws to rear of assembly using a philips-head driver as indicated, undo and retain for future use.


Open assembly up into 2 sections, grey and white.
1 x Brass screw to middle of assembly that doesn't connect to any circuit boards, undo this. It's the one nearest white plastic riser as indicated in picture.

Now as indicated by my pics you need to prize the fascia off using a small flathead driver.
Once fascia is off you then need to disconnect the 2 looms connecting to air direction and fan speed. Do this via the removing wires from GREEN circuit board as indicated by picture, do not remove from back of rotational switches as they are soldered here.

Buttons can then be removed by carefully yanking till they gtfo. Rocker switch is harder. Use 2 fingers on each side and give it a good push. Push from the front to the rear of the assembly.
Now the harder part is removing the rotator switch position clear plastic things. They is glued so you need to just push them out. See pic to help. Only one of these can be successfully removed as there is no access to the other.

Remove the fan speed clear plastic bit, flathead will do this.
you will need some assembly glue to reattach clear plastic fan speed thing and circular plastic part, not essential but stops it rattling around.


Once done proceed to wrap or dip.
Be careful not to get still attached circuit boards wet.
Hope this helps you dudeth!
(Pics to follow)(Pics added)
Also I take f@#k all responsibility for any person human animal or alien who is following this guide set out above, if they are to break anything that is on you, not me.
The following users liked this post:
shrykhar (01-27-2021)
01-29-2016, 09:31 AM
#6

Slightly off topic and apologies for butting in but how hard is it to remove the speedo surround from the dash (plastic facia that holds both the radio and heater controls)?
Mines a bit tatty so I'm keen to replace it.
Mines a bit tatty so I'm keen to replace it.
01-29-2016, 09:46 AM
#7
Registered User
remove 2 black poppers above speed, flathead, undo screws phillips head.
go to base of steering rack in footwell and locate 2 bolts that connect to supporting bracket this bracket connects to the footwell heater matrix, this simply pops off with a little pressure. undo the two bolts about halfway, both of them. allows for steering wheel to be lowered slightly so you can get the surround out easier without forcing anything too much.
simple matter of pulling the surround from the dash, try not to use anything too hard otherwise you may damage the dash.

diconnect the two connectors to the audio and heater controls, use a flathead to do this as fingers may not be strong enough
Thats how i do it anyway, but my dash has been in and out so many times I have do a few shortcuts so the above may not be 100% accurate for OEM.
Trending Topics
01-29-2016, 10:06 AM
#8
Thread Starter
You are a very nice man Mr mikefifth (btw my iPad just auto corrected that to mink filth...user name change?!). So thank you, hopefully I won't have to take you up on the replacement parts duuuude
01-29-2016, 10:09 AM
#9
Registered User

Brilliant user name!
Pics will be up once photobucket maintenance has been completed.
Good luck!
01-29-2016, 10:38 AM
#10
Originally Posted by Al_G' timestamp='1454092300' post='23866065
Slightly off topic and apologies for butting in but how hard is it to remove the speedo surround from the dash (plastic facia that holds both the radio and heater controls)?
Mines a bit tatty so I'm keen to replace it.
Mines a bit tatty so I'm keen to replace it.
remove 2 black poppers above speed, flathead, undo screws phillips head.
go to base of steering rack in footwell and locate 2 bolts that connect to supporting bracket this bracket connects to the footwell heater matrix, this simply pops off with a little pressure. undo the two bolts about halfway, both of them. allows for steering wheel to be lowered slightly so you can get the surround out easier without forcing anything too much.
simple matter of pulling the surround from the dash, try not to use anything too hard otherwise you may damage the dash.
diconnect the two connectors to the audio and heater controls, use a flathead to do this as fingers may not be strong enough
Thats how i do it anyway, but my dash has been in and out so many times I have do a few shortcuts so the above may not be 100% accurate for OEM.