Brake lights not working - Fixed with pics
 01-24-2011, 12:03 PM
#1
Registered User
Thread Starter
Join Date: Aug 2008
Location: Stamford
Posts: 2,520
Likes: 0
Received 0 Likes
on
0 Posts
Half way through Sundays Rutland meet, AE pointed out that my rear brake lights weren't working! A quick check of a bulb (which I had replaced only a few weeks ago) showed that it seemed to be OK, and the fact the high level brake light wasn't working either, indicated that there was a fault somewhere else.
A quick search on the forums threw up a couple of possibilities, the fuse or the brake light switch. The fuse can be checked without even opening the fuse box, the horn is on the same circuit, so a quick honk to check, and yep the fuse was OK. Just for the record it's a 15amp fuse, number 47 in the main engine bay fuse box.
Onto the brake light switch, which was my gut feeling from the start. The switch is found at the top of the brake pedal mounted on a small bracket. Unplug the loom connector (squeeze the small tab on one side of the plug), then slacken of the 14mm lock nut. The switch can now be unscrewed from the bracket.
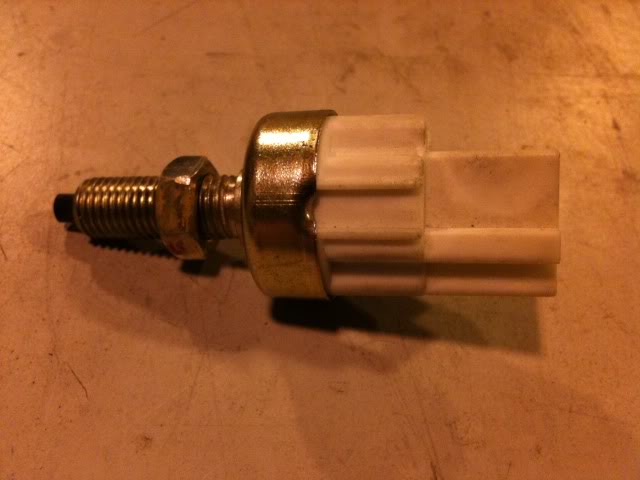
Here's a pic of the brake light switch.
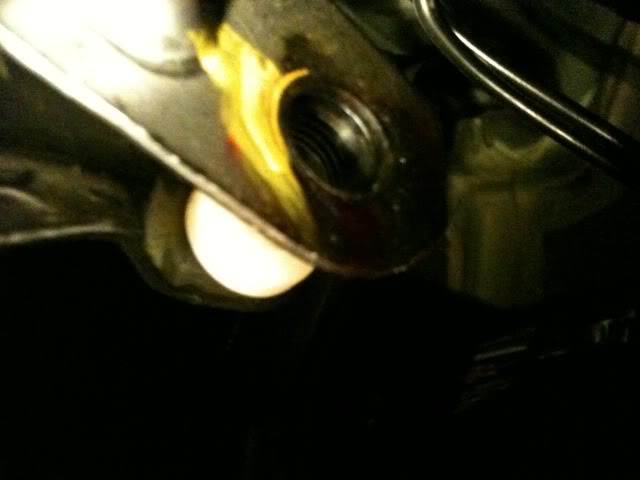
And this is a pretty poor pic (stupid iPhone) of the bracket at the top of the brake pedal which the switch screws into. The white object is a plastic pad on the pedal which acts on the plunger of the switch.
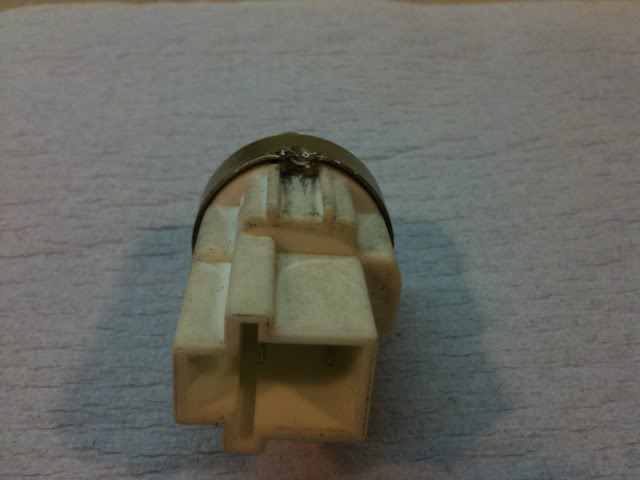
Suspecting a dodgy switch, I tested for continuity across the switch in both the open and closed positions, but this proved inconclusive, so the next thing to check for was dirty contacts. To take the switch apart, you have to un-crimp both sides of the metal part of the switch. You can see these crimps better in this pic.
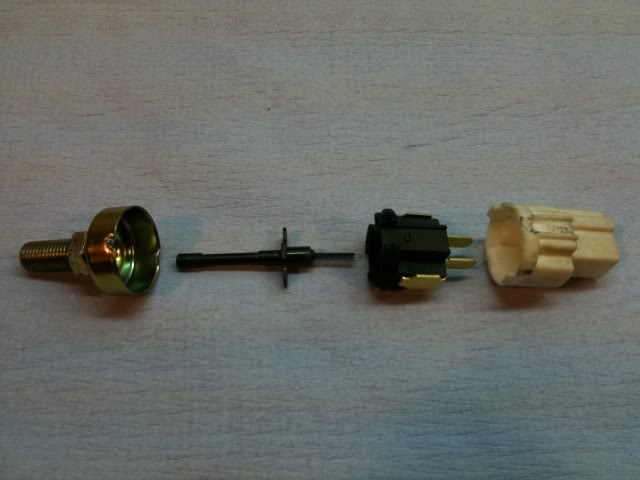
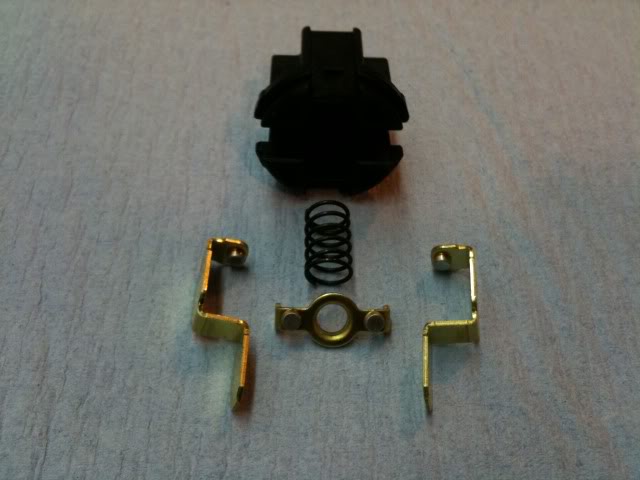
It's quite tricky to un-crimp the switch, in the end I gripped the switch in a vice tightened onto the locking nut, and then used a small flat screwdriver to ease the crimps out. Once the crimps are straightened out, the switch pulls apart quite easily but watch out for the springs (two in total, one long thin one for the plunger and one short fat one for the central contact). Below is the contents of the switch laid out.
The black part of the switch which houses the contacts, pulls out from the white switch housing. Remove the two larger contacts from either side and watch out for the small fat spring behind the central contact. The contacts themselves are the four small round things which you can see in this pic.
I cleaned these contacts up with some ScotchBrite, but wire wool or wet and dry paper would do just as well. The contacts had a film of oxidation on them, which cleaned off with very little effort. The pic was taken after I had cleaned the contacts.
Once they were cleaned, it was a simple job to reassemble the switch, just be careful to align the plunger into the black part of the switch correctly. It's hard to explain but very easy when it's laid out in front of you. Make sure the plunger operates smoothly and then pinch the crimps up again, I held the switch in a vice (remember to grip the lock nut and not the switch itself) and used a hammer and large flat screwdriver to tap the crimps in. For a quick confidence check, I plugged the switch back into the loom, turned the ignition on and manually operated the switch, hopefully you'll see the brake lights operate.
The last thing is to remount the switch to the bracket. Unplug the loom again (you need to keep unplugging the loom in order to rotate the switch), wind the lock nut all the way down the threaded portion of the switch, then screw the switch back into the bracket. It will take a bit of fiddling to get the switch set at the right height, just keep plugging the loom back in and check for correct operation of the brake lights. Once you're happy with the switch position, nip the lock nut up with a 14mm spanner and plug the loom back in. Check for correct operation again and you'll all done.
It sounds a lot more complicated than it really is, but was quite a satisfying fault to repair. Hope this helps
A quick search on the forums threw up a couple of possibilities, the fuse or the brake light switch. The fuse can be checked without even opening the fuse box, the horn is on the same circuit, so a quick honk to check, and yep the fuse was OK. Just for the record it's a 15amp fuse, number 47 in the main engine bay fuse box.
Onto the brake light switch, which was my gut feeling from the start. The switch is found at the top of the brake pedal mounted on a small bracket. Unplug the loom connector (squeeze the small tab on one side of the plug), then slacken of the 14mm lock nut. The switch can now be unscrewed from the bracket.
Here's a pic of the brake light switch.
And this is a pretty poor pic (stupid iPhone) of the bracket at the top of the brake pedal which the switch screws into. The white object is a plastic pad on the pedal which acts on the plunger of the switch.
Suspecting a dodgy switch, I tested for continuity across the switch in both the open and closed positions, but this proved inconclusive, so the next thing to check for was dirty contacts. To take the switch apart, you have to un-crimp both sides of the metal part of the switch. You can see these crimps better in this pic.
It's quite tricky to un-crimp the switch, in the end I gripped the switch in a vice tightened onto the locking nut, and then used a small flat screwdriver to ease the crimps out. Once the crimps are straightened out, the switch pulls apart quite easily but watch out for the springs (two in total, one long thin one for the plunger and one short fat one for the central contact). Below is the contents of the switch laid out.
The black part of the switch which houses the contacts, pulls out from the white switch housing. Remove the two larger contacts from either side and watch out for the small fat spring behind the central contact. The contacts themselves are the four small round things which you can see in this pic.
I cleaned these contacts up with some ScotchBrite, but wire wool or wet and dry paper would do just as well. The contacts had a film of oxidation on them, which cleaned off with very little effort. The pic was taken after I had cleaned the contacts.
Once they were cleaned, it was a simple job to reassemble the switch, just be careful to align the plunger into the black part of the switch correctly. It's hard to explain but very easy when it's laid out in front of you. Make sure the plunger operates smoothly and then pinch the crimps up again, I held the switch in a vice (remember to grip the lock nut and not the switch itself) and used a hammer and large flat screwdriver to tap the crimps in. For a quick confidence check, I plugged the switch back into the loom, turned the ignition on and manually operated the switch, hopefully you'll see the brake lights operate.
The last thing is to remount the switch to the bracket. Unplug the loom again (you need to keep unplugging the loom in order to rotate the switch), wind the lock nut all the way down the threaded portion of the switch, then screw the switch back into the bracket. It will take a bit of fiddling to get the switch set at the right height, just keep plugging the loom back in and check for correct operation of the brake lights. Once you're happy with the switch position, nip the lock nut up with a 14mm spanner and plug the loom back in. Check for correct operation again and you'll all done.
It sounds a lot more complicated than it really is, but was quite a satisfying fault to repair. Hope this helps
 01-25-2011, 01:26 AM
#3

That's because one sits on them in confined spaces!
IIRC, Honda supply a 'spare' brake switch at the top of the clutch pedal on EUDM cars. It's for the cruise control on USDM models.
IIRC, Honda supply a 'spare' brake switch at the top of the clutch pedal on EUDM cars. It's for the cruise control on USDM models.
01-25-2011, 11:17 AM
#4
Nice write up, I would have just located a new switch and changed it rather than a repair job though.
01-25-2011, 11:19 AM
#5
Administrator


Glad you got it fixed Wobbly
It was tough following you and deciding when you were braking - in the light it was OK as I could see ahead, but dusk and dark was difficult!
It was tough following you and deciding when you were braking - in the light it was OK as I could see ahead, but dusk and dark was difficult!
01-25-2011, 11:31 AM
#6
Registered User
Thread Starter
Join Date: Aug 2008
Location: Stamford
Posts: 2,520
Likes: 0
Received 0 Likes
on
0 Posts
Sorry about that AE, I had no idea the lights weren't working until you pointed it out It must have been like that since Christmas because that was when I changed the bulb.
Martin - It was worth a bash to see if I could fix it, I'm not sure how much a new switch is from Honda.
It must have been like that since Christmas because that was when I changed the bulb.Martin - It was worth a bash to see if I could fix it, I'm not sure how much a new switch is from Honda.
01-25-2011, 01:29 PM
#7
I work for spares firm so i tend just get something off the shelf when I need it, saves time although I might have pulled the old one apart at a later time just out of noseyness, now I know how to. 
