Taking Better Photographs

Article by Fred Chiu (Mannn)
“It is never about the camera, it has always been about the person behind the camera.”
Every now and then the question “What camera do you use?” comes up, after I posted my photos on various forums. The above sentence is the answer I have always replied with. The key is that a camera is a tool to help you convey what you want your audience to see. A high-end camera might help you take photos easier but not necessarily make pictures better. I hope after reading this series of articles you will understand more about taking pictures of your beloved car and in turn you will be able to get some rewarding results.
This article covers the following topics:
- Gear – what’s really needed?
- Megapixels – what do you really need?
- Auto Settings – who is taking control?
- Snapshots vs Photographs – what makes the difference?
- Exposure – the key to show what you want to see
- Macro – show me the dust!
Gear
 The most commonly used cameras nowadays are called point and shot (P&S) cameras, where the camera takes care of a lot of things for you (exposure, shutter speed, white balance, ISO settings, etc.). Some people like it for their ease of use, I prefer them myself for quick shots for illustrative purposes and their compactness. There is also Digital SLR (DSLR) which you can use inter-changeable lenses to get different ranges of zoom and depth of field. DSLR gives the user more control, it helps to take a better picture if the person knows what he is doing. Despite the differences of these two types of camera, one thing I would never go without on a shoot is a good sturdy tripod. It’s needed for longer exposure since not all of us can hold a camera without moving over a second or two. The rule of thumb of acceptable handheld shutter speed is one over focal length. For example, if you are shooting with a 200 mm lens, any shutter speed slower than 1/200 sec you will have a larger chance your image will come out blurry. In some low light situation, the tripod is a must. The image on the right was shot at 1/50 sec @ f2.8 with a tripod.
For some special effect shots, you will need special equipment. Take a look at the two shots below.
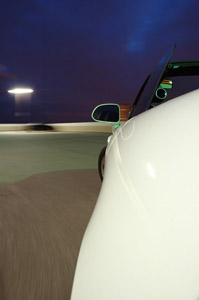
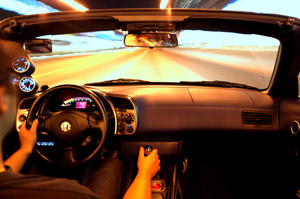
These shots were done with special mounts, they are commercially available or you can make a rig on your own – just be creative! (for details on how these shots are setup, please contact me if interested). If at times where a tripod is needed but not available, tucking your elbows in, or finding something to lean on always helps.
Megapixels
As digital cameras are getting more and more popular nowadays, I will concentrate on digital media and skip details about film. Needless to say, good quality pictures require to be captured in best form possible in the first place. Garbage in, garbage out; simple as that. If you can shoot it in the largest resolution possible, then do it. Some cameras have “Fine, Normal, Basic” settings, these determine how well your image is captured as well. I have seen people buying a 7 megapixel camera and setting it to shoot at 1280×1024 pixels, because they only have a 256mb memory card it in and want to shoot as much as possible. Also, more megapixels doesn’t mean better, you really have to think what you are going to do with the picture later on.
A 3 megapixel camera can provide a decent quality print in 4”x6”, if you know you are not going to print anything bigger than a 4”x6” there is no reason to higher pixel count. And remember, you will need to quadruple the megapixel count in order to double the size of the photo (think about a 2×2 meters square area is four times the size of a 1×1 meters square area). Having said that, do you think a 3 megapixel and a 6 megapixel camera has a big difference on 4×6 or 5×7 print? There is, but very little that to most it is negligible. (I will save the technical details) So on your next purchase of digital camera, keep in mind that the megapixel count has more significance as a marketing tool by manufactures then the function it actually gives you.
Auto Settings
As I have mentioned earlier P&S cameras take care of a lot of things for the user. In most situa-tion, a P&S camera will fire off its flash, this is how the manufacturer has designed it to overcome handshake in long exposure. Firing off the flash makes the exposure time required shorter, but in turn what you will get is a very bright foreground with little to no details in the background.
Under low light situation when you are shooting your car, this makes no difference as where you parked, be it at the side of a lake or next to field. To overcome this, turn off your flash, and what you will face with is longer exposure time. There are two things you can compensate: a steady hand or tripod if you have one and bump up the ISO setting (if available).
The higher the ISO value the more sensitive to light your sensor will be, this will give you more noise in the picture too. Personally I would put it up to ISO 400 at max, but that’s just my preference, if I have a tri-pod I will dail it down as low as possible.
Another common problem with tripod is that, some people would press the shutter release too hard so the camera and the tripod moves when a picture is taken (I do that too sometimes when it’s cold). It’s easy to eliminate this problem, just use the self-timer function or remote if you have one. The reason why I prefer a DSLR or prosumer level camera is that it gives you more control over settings, in some situations, what the camera thinks is properly exposed might not be what you are looking for.
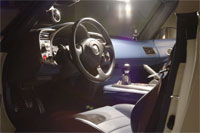 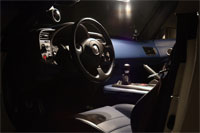 |
The image on the above left is the properly exposed image as per the camera, on the right is the way I wanted it to look. I was visioning a picture to show the simple lines of the cockpit of the S2000, I don’t need the details on how the vents look, or the odometer, or even the pedals. Those are not the things I want to show and they will make the photo too busy, hence, I have underexposed it to hide the details I don’t need – taking control over the camera.
Snapshots vs Photographs
 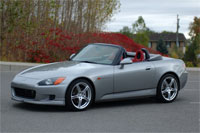 |
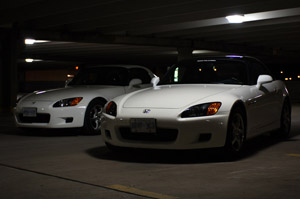
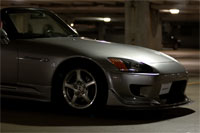
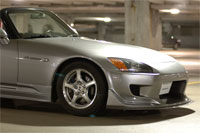
The above images were taken with the same camera (Nikon D70 – did I mention camera doesn’t matter?) yet they look very different. I could see one ending up on a calendar spread and the other wind up under the garbage bin after some time. The similarity? Same car and I took both pictures. The difference? Let’s see…
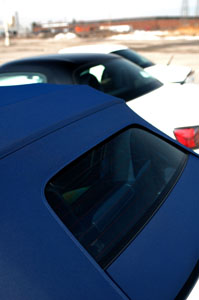
Location: Driveway versus carefully picked shooting location. The background of the image on the left has many things, too many things to be exact. The background becomes too busy which doesn’t make the subject (in this case – the S2000) standout. On the other hand, the background on the right image is simpler and less distractive, the red floral does compliments the red seats as well.
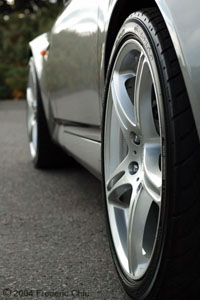 Angle: The image on the left was shoot at standing height – convenient shooting angle. The image on the right was shoot on a slanted pathway with me kneeling down. What makes one im-age looks better than the other was the angle. We look at cars everyday, when we are out walking on the streets, driving and even watching TV. What I tried to do is to photograph cars in an angle that we are not accustomed to, one that you would not normally look cars at. This would create some unique perspective to your audience. Another example would be one directly from the rear wheel-well (which alot of others have done before as well) as pictured on the right.
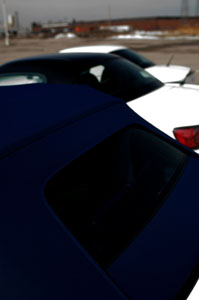
Focal length: Back to the images at the beginning of this section. Both cars occupy approximately the same amount of space within the picture, yet one looks warped and the other looks normal. Wide angle tends to make closer objects warped, I learned that the hard way when I took vacation pictures with my wife. (I will save that story later) So if you want your car look “more normal” try to use a longer focal length. Or with the P&S cameras, zoom in and stand back further. For your reference, the image on the left was shoot at 22mm and image on the right was done at 80mm.
Exposure
We have touched on this topic a little bit in section 3 “Auto Settings”, let’s take a closer look. Exposure is basically the control of amount of light entering your camera. There is a saying that photography is painting with light. The result of controlling and manipulating lights, you create your art piece. As I have mentioned before, the camera metering can easily be fooled. When the background is dark and your object is light, you might end up with an overexposed picture. The camera thinks the scene is too dark, thus it lets more light in (either with longer shutter speed or larger aperture or even higher ISO). Thus you will have to watch on the background you are taking pictures of.
At times, when you are shooting a white or dark coloured car, it might have the same effect to the camera’s metering. One way to solve this is do a few test shots and adjust the exposure compensation accordingly. This is the beauty of digital, you can see your results right away, so take advantage of it. I know some would shoot without worrying exposure since they can adjust them later with photoshop or other software. But why do adjustments when you can get it right the first time? Keep in mind that overexposed area are pure white in digital, and there is no detail in those area, i.e. if you adjust an overexposed picture you will not gain details in those overexposed area – white is white.
In the case of underexposure, however, you will gain details in those area in post processing. The downside of that is you will get more noise when you boost an underexposed picture, especially in those darker areas. Which is why I would just shoot it right the first time.
  |
The image on the left was the original, the white trunk on the white S2000 was over exposed. The image on the right was adjusted down with 1.5 stops, notice how the entire picture was darken yet the trunk is still flat white? That is because there is no data in those area except white, thus adjusting doesn’t bring anything to it.
  |
The image on the left was the original, look at how the fender gap and the tire is basically all black? With adjustments of 2 stops higher, you can see the tire is lighter than the wheel gap. Noise does not show up in such small scaled pictures, but the original has noisy shadowed areas.
Macro
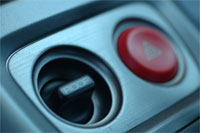
Macro photograph is an entirely different world, it’s like looking at the world through an insect’s eye. Special lens/ mode is required due to the close focusing on objects. With P&S cameras, you will need macro mode; and with SLR you will need lens with macro capability. Keep in mind when you do macro shots you will see all the details that includes dust and dirt. To this date, I still regret for not cleaning up the button with a toothbrush on the picture below (some dirt are hidden at the edges if inspects closely or when enlarged). Nicks and scratches also stick out like a sore thumb as the image on the right.
  |
Macro photography is fun as it brings a very different perspective as I have outlined in previous section, it’s at an angle you don’t see everyday!
Frederic Chiu is a car enthusiast residing in Toronto, Canada. His passion in automotive sports has led him into photography for the past years. Frederic is currently working as a freelance photographer and specializes in events, weddings, products, and portraits photography. His work can be seen at www.binarydarkroom.ca