completed project 2jz swap.


Thread Starter
Registered User
Joined: Apr 2017
Posts: 21
Likes: 0

So, here we go, after 3 years of collecting parts, 1 year of actual s2000 ownership, and already a stack of broken parts in its wake ive been able to sit down and post this. This cars purpose is not to be the fastest or the best looking, its just to be mine, so unfortunately it may be unfavored by some, the car is still under weekly improvements so stay tuned you may like what happens next! For now it starts a few years ago when a buddy of mine sold me the motor out of his Benz, but was not the German straight six inside.

my friend tom helping out, this was all his crazy idea so i guess he deserves a break.

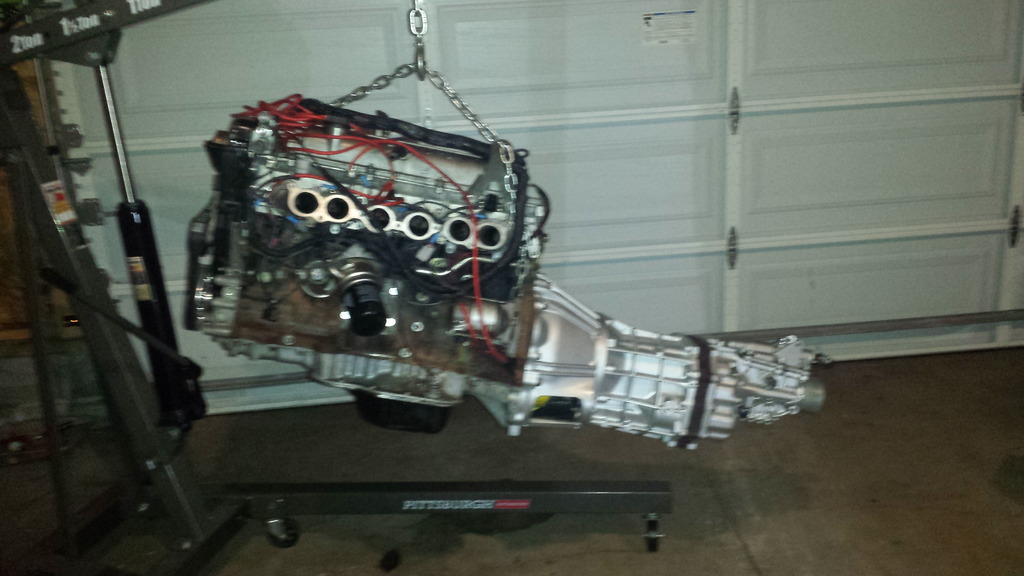
His 190e has an automatic stock aristo 2jz inside of it, and after a few hours it was mine, so i had the power, next i needed the trans. i was at a point in my life where i was not sure what i wanted to do overall with the car, drag, road racer, autocross(god help us all), so i spent most of my time gathering parts devoted to universally swapping a 2jz into anything i wanted, which lead me to the inexpensive 2jz to 350z trans adaptor made by collins racing. Used a JWT clutch kit and a cd006 trans for my setup.


picked up a wire-in tucked harness from tweaked performance and cam who has been the best aftermarket parts dealer i have ever delt with, his attention to customer satisfaction is crazy.


Then comes the star of the show, if your into the honda part at least. An ex tuning shop a state away was parting out its shop car, equipped with various widebody kit panels, ap2 goodies all over, a set of roller wheels, and hks coilovers which were attached to what i would find out to be the most wrecked suspension ever, but it was a shell, it was cool and perfect for my project. I ignored it, and tried in vain to find a good condition 350z. Although a month later i saw the same car for sale again, a few dollars cheaper, and i knew it was time to pick something.

and again with toms help as co-pilot

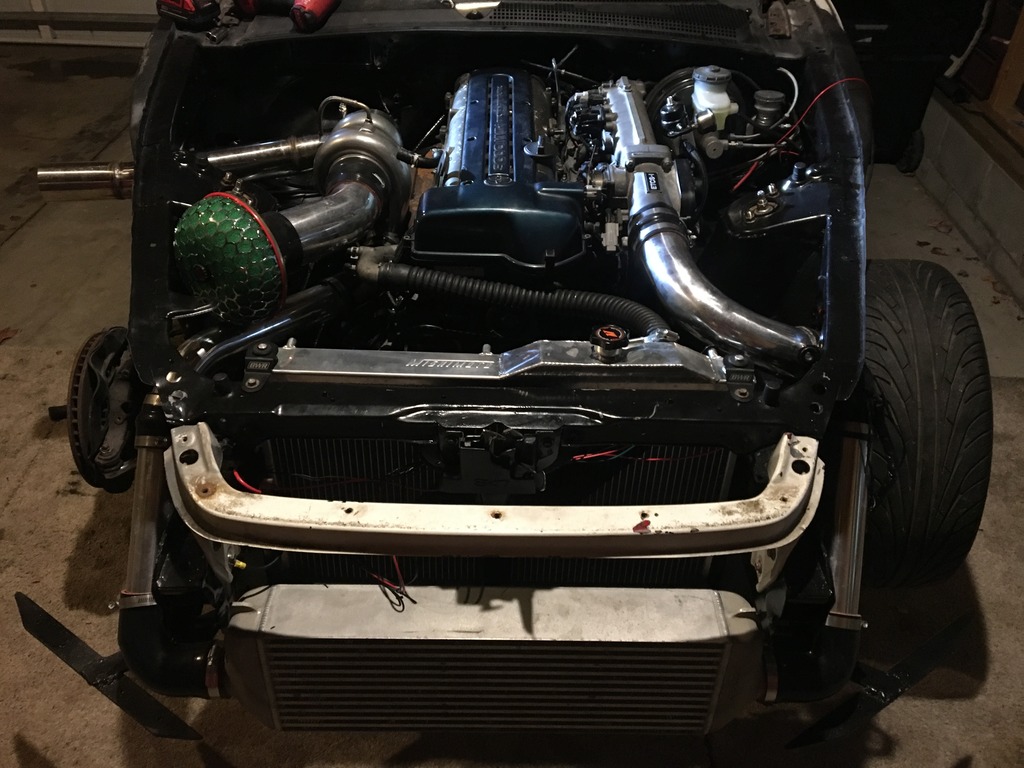
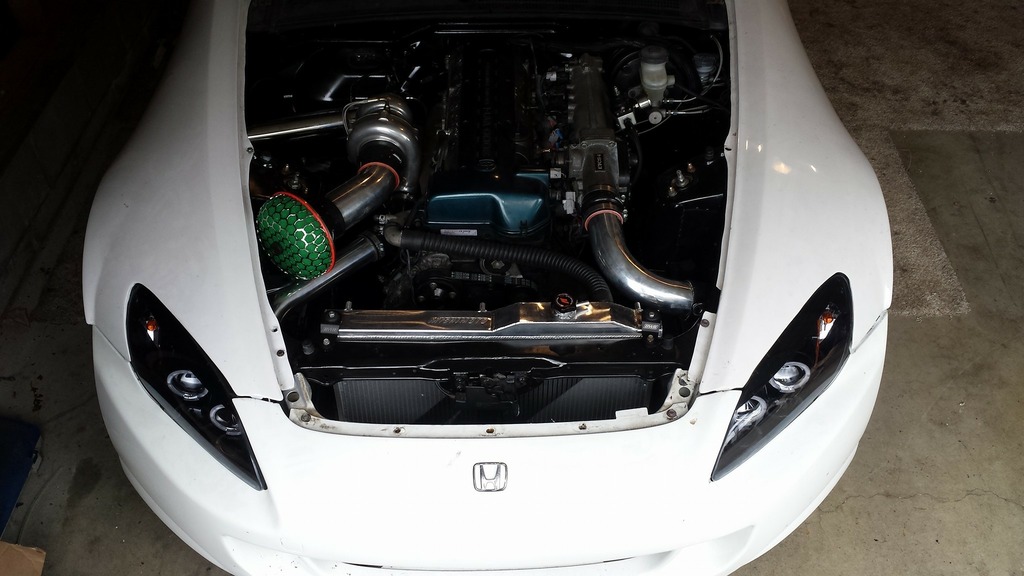
she made it home, and into the garage, so please welcome, the ugliest engine bay in america.

and without hesitation out comes the core support, in goes the drivetrain, kinda.

it was somewhere around this point we began the figure out, the trans was not going to fit, and the twin turbo setup had to go before we could even test anything, which began really the worst part of the project ill just call a black hole for my money, the actual test fit revealed how truly ambitious i had been, and how much this project was actually going to cost.
Thread Starter
Registered User
Joined: Apr 2017
Posts: 21
Likes: 0


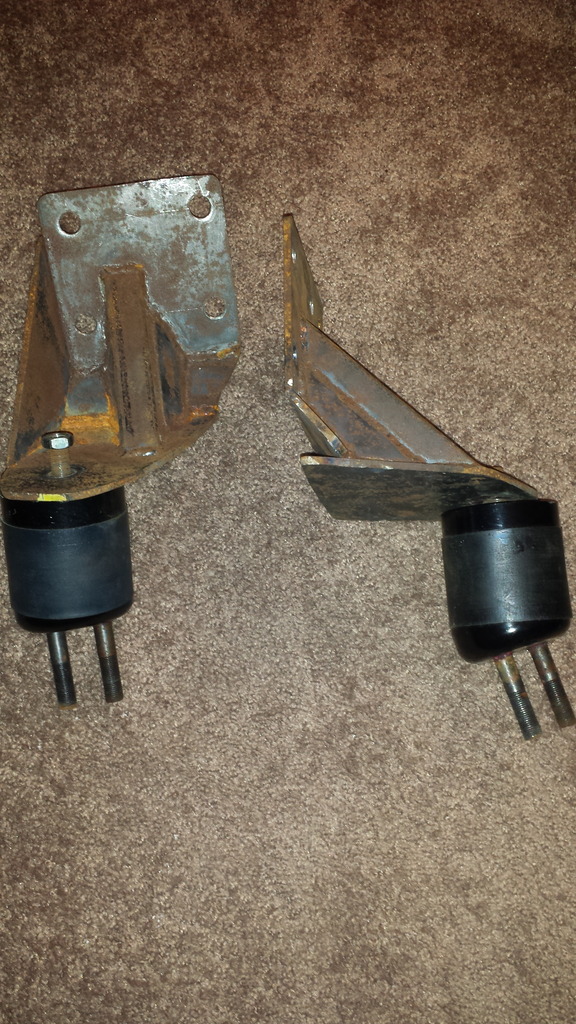
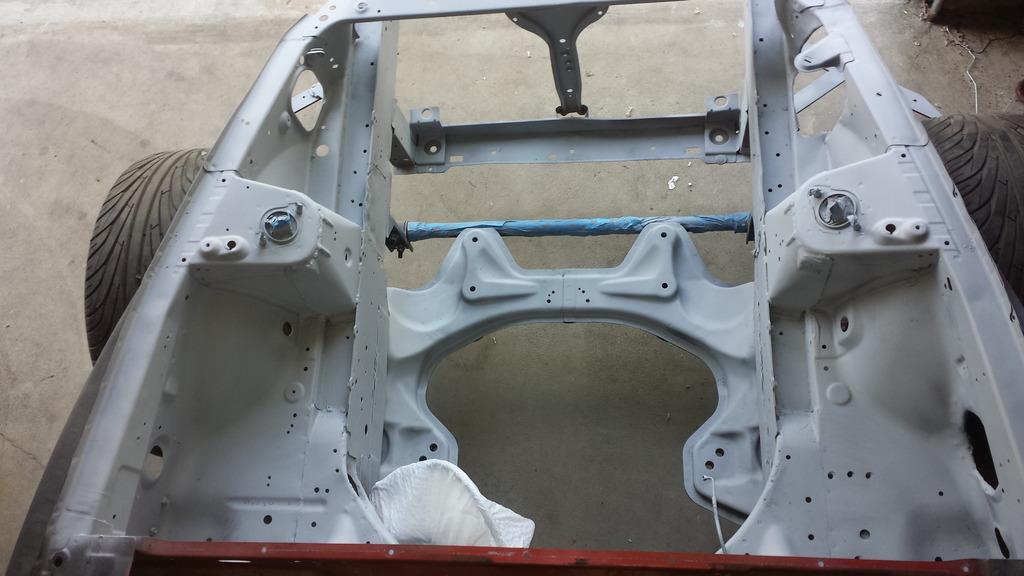
installing the motor with the mounts i sourced from another 2j car involved a lot of moving metal, obviously the cross member had to be cut out, the rear engine bay needs pushed back a bit. Youll have to rework your passenger front side brake line because the motor sits against it and the studs needed to go as well. aprox 1" over from where the throttle cable comes out of the interior needs pushed back significantly, the stock fuel rail pushes a 90 degree fitting right into the firewall, you could probably get around this with an aftermarket rail setup but i was all about cheap initial investment to get it running. although i kept running into a problem, and that was the cd009 trans, being ALOT wider than the 2j bell housing it was basically impossible to fit in the car with my setup. i figured i would need to move my gas pedal over before i could make the trans fit, well i decided i didnt want to have the motor extend much beyond the strut towers so i sold the Collins racing setup, and picked up a soarer r154 trans.

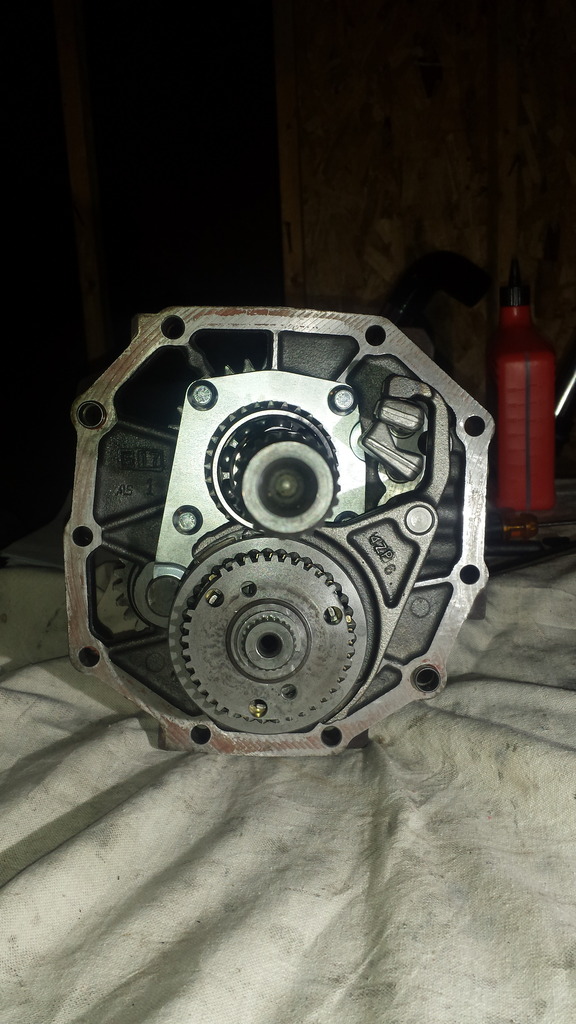
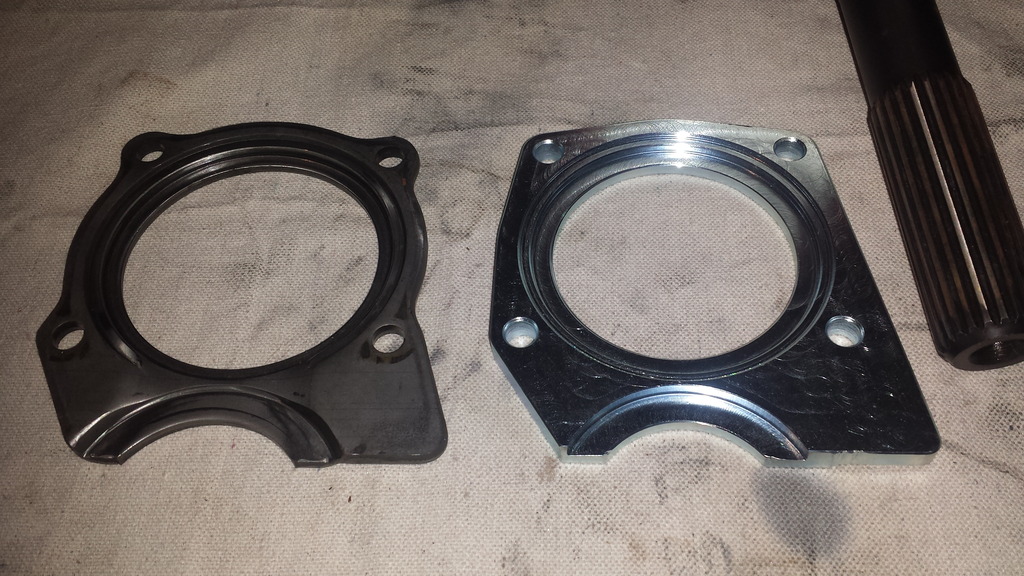
I found some metal in the oil so i cleaned and rebuilt the trans with marlin crawler parts and converted it to a tripod setup. whole mess was imported by a friend of mine that goes by Acmeturbo on ebay, great guy for finding jdm parts.


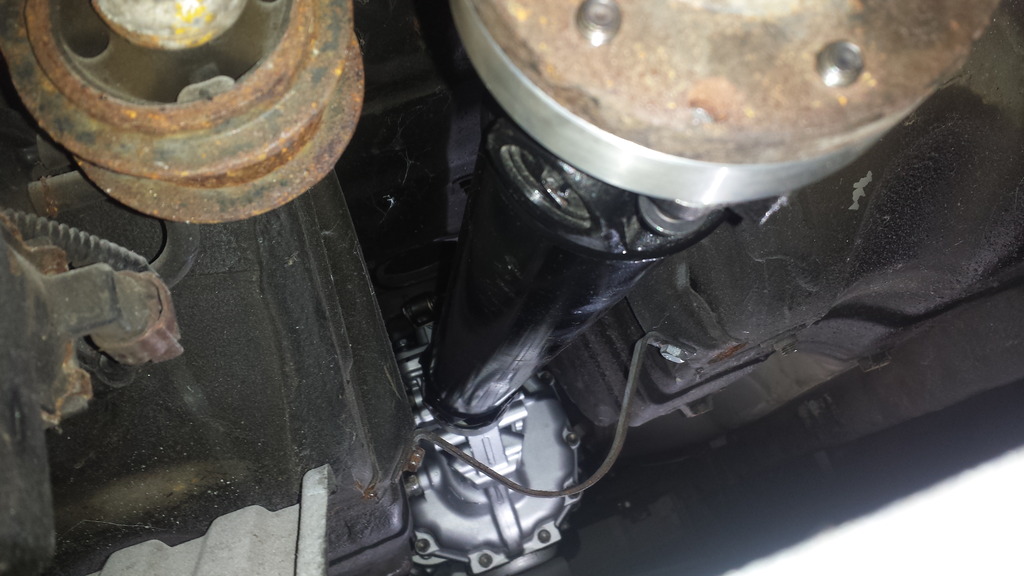
mounting it was fairly straight forward, 28" rail to rail underneath the car, i bought a 2x3 bar of mild steel and had endplates welded on, then bolted them straight to the rails, used the original mount center piece with a large through bolts and poly bushings that were the appropriate height for my driveshaft angle. the trans fits with no to slight modification of the center trans support on the body, i still removed a portion of it just to have some breathing room so to say for the transmission,

driveshaft was about 33" long, used a r154 to 1350 driveshaft yoke, and then an s2000 to 4 bolt conversion piece i found online, whole thing was made up and shipped to my house in less than a week by DSS. please excuse my ohio bought car rust.

Thread Starter
Registered User
Joined: Apr 2017
Posts: 21
Likes: 0
so shortly after the main drive train was mounted in the car, i bought a house with an attached garage and now instead of driving 25 minutes to one i had the car at that flooded every other day it was right outside my door! I was finally able to do some detail work and really get the car ready to drive!
primered and cleaned the whole thing, painted it basic black, sorry to any real painters out there, i make no claims to be good at it. but my god was it better than the 3 color bay combo i was running.

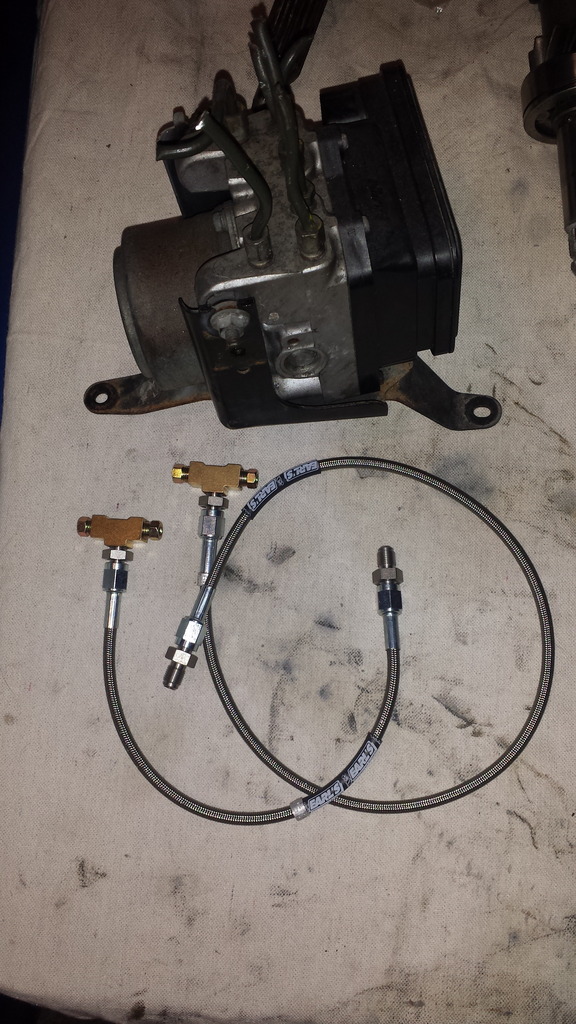
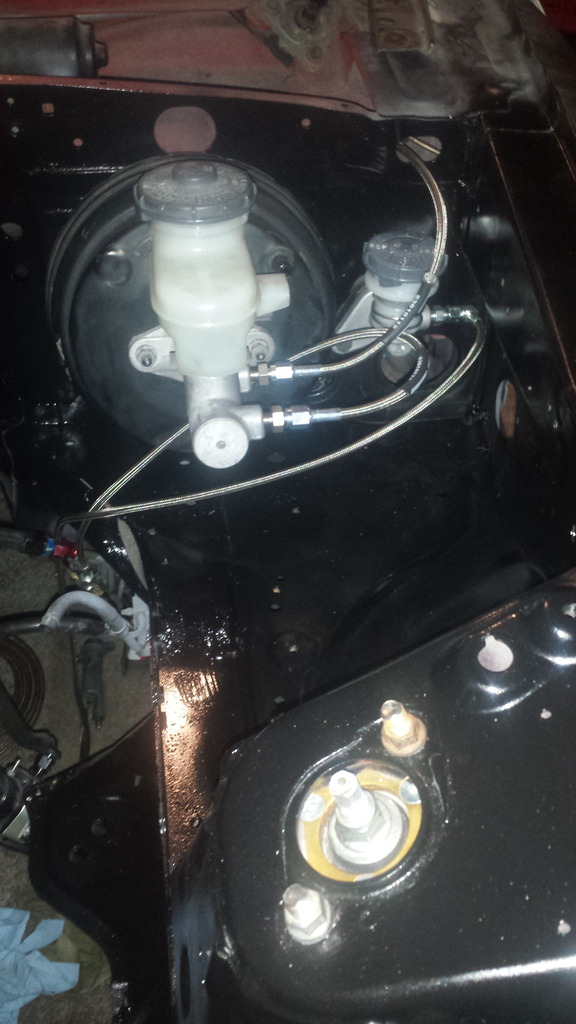
new masters and SS hoses were installed. ran to the stock proportion valve for the rear, then i did the fronts across the inside of the wiper cowl and down the outside of the car using nickle copper 3/16 line. The Toyota trans slave has the same thread pitch as the Honda 1.0 thread so any off the shelf 4' SS line will work for it.
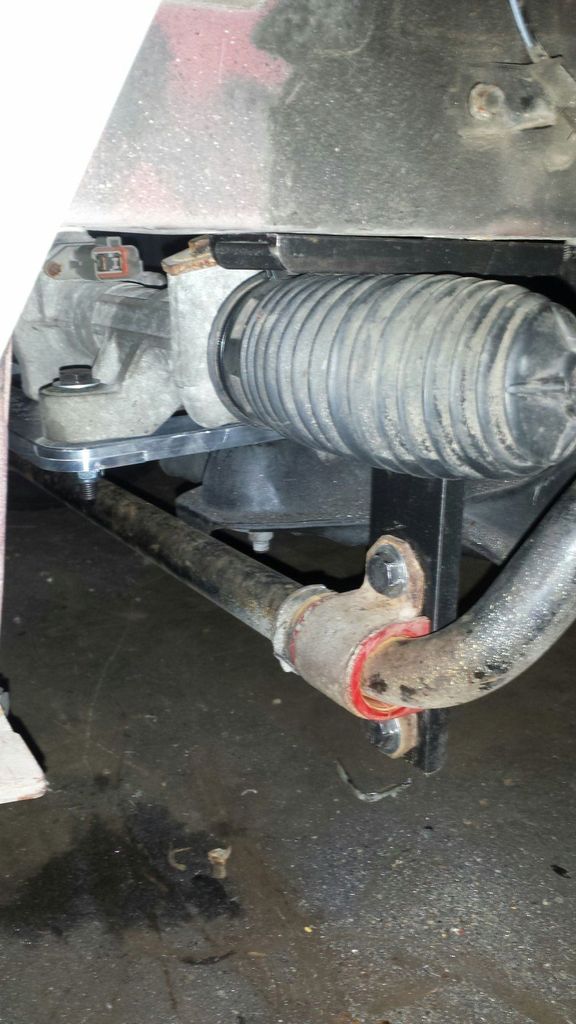
installed the Import muscle steering rack relocation kit along with the sway bar kit, had a local machinist friend cut my steering shaft and weld in the extension rod provided with the kit. the sway bar ends are a total bastard to install and the pieces that hold the bar are somewhat flimsy, ill for sure be going back and either reinforce these or make new ones because i was not impressed. kit does have adjustable links which is nice, but only half is usable because it binds past a certain point.
its nice to have such skilled friends with welders around! another buddy whipped together this vband 2 bung setup for me out of stainless 3.5" tube with a 9" twist style muffler inside layered with ceramic packing. Used a classic AEM wideband to get my readings, Its a touch too quiet so im going to change this here in the near future by installing a smaller muffler.

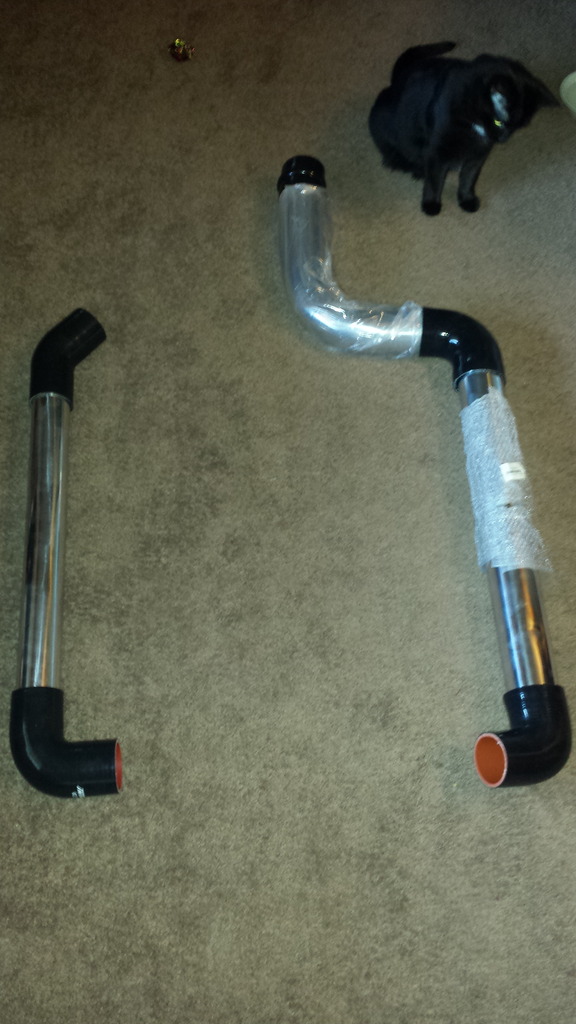
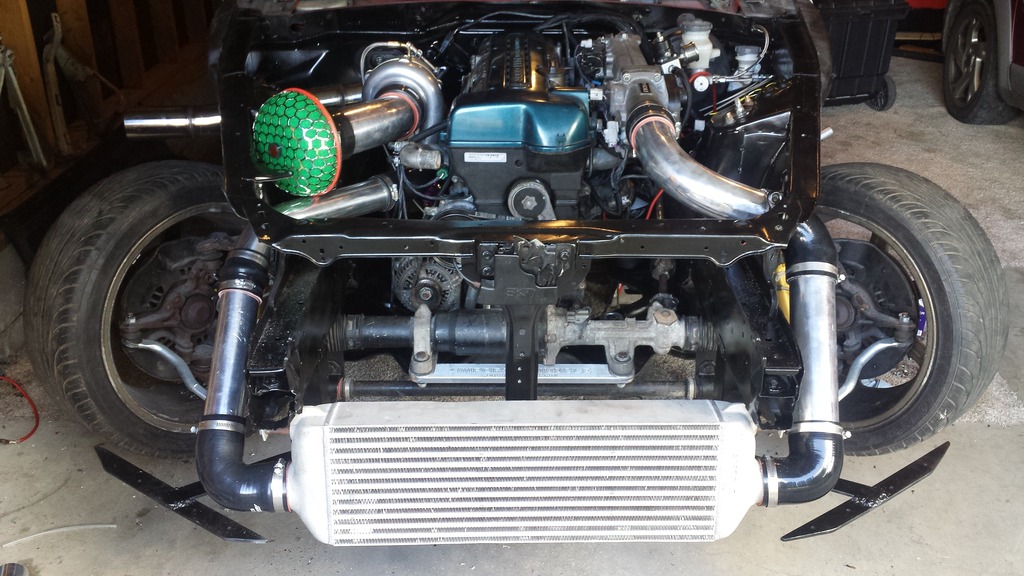
you cant use the normal off the shelf intercooler kits for these cars, the steering rack now occupies the space where you would normally run the piping, you've got to go along the outside and go into the bay under the headlights similar to the inlinepro kit, the headlight support needs cut back pretty much to nothing, some people just remove the brace entirely. Used 2.75 and 3" piping, the 3" cold side piping was about the max diameter you can do without having problems hitting the headlight from behind. My cat hanging around to cause a mess of the parts sorting,
primered and cleaned the whole thing, painted it basic black, sorry to any real painters out there, i make no claims to be good at it. but my god was it better than the 3 color bay combo i was running.


new masters and SS hoses were installed. ran to the stock proportion valve for the rear, then i did the fronts across the inside of the wiper cowl and down the outside of the car using nickle copper 3/16 line. The Toyota trans slave has the same thread pitch as the Honda 1.0 thread so any off the shelf 4' SS line will work for it.


installed the Import muscle steering rack relocation kit along with the sway bar kit, had a local machinist friend cut my steering shaft and weld in the extension rod provided with the kit. the sway bar ends are a total bastard to install and the pieces that hold the bar are somewhat flimsy, ill for sure be going back and either reinforce these or make new ones because i was not impressed. kit does have adjustable links which is nice, but only half is usable because it binds past a certain point.

its nice to have such skilled friends with welders around! another buddy whipped together this vband 2 bung setup for me out of stainless 3.5" tube with a 9" twist style muffler inside layered with ceramic packing. Used a classic AEM wideband to get my readings, Its a touch too quiet so im going to change this here in the near future by installing a smaller muffler.

you cant use the normal off the shelf intercooler kits for these cars, the steering rack now occupies the space where you would normally run the piping, you've got to go along the outside and go into the bay under the headlights similar to the inlinepro kit, the headlight support needs cut back pretty much to nothing, some people just remove the brace entirely. Used 2.75 and 3" piping, the 3" cold side piping was about the max diameter you can do without having problems hitting the headlight from behind. My cat hanging around to cause a mess of the parts sorting,

Thread Starter
Registered User
Joined: Apr 2017
Posts: 21
Likes: 0
thanks, the parts i am most knowledgeable about i try and make it as perfect as i can, i plan on having the car for quite a few years and id like to daily it for most of it. you cant beat that honda reliability, got an 08 civic parked beside it. here was a few more, dont worry when i open the motor up it will look just as good inside and out. this is the marlin crawler plate in the trans, looks super beefy and its a cool piece, really lets you know that it can take a beating.
back where we left off, this project pushed a lot of my skill beyond what it was, before this i had never done any swaps besides variants of what was already inside, leaving bolt on stuff kind of my go-to. the pictures make it look kinda quick, almost like i know what i was doing, in reality it was basically 2 to 3 weeks between stages because i research every move pretty hard before doing it, and one of my hardest parts was the intercooler piping for some reason, i actually shopped around to have it done professionally but didnt get good results with it, so i had to dive in and do it myself. when i finally sat down with some rulers and angle guides and worked on it it took like no time at all, so my perfectionist side really screwed me this round. but in all of its glory.
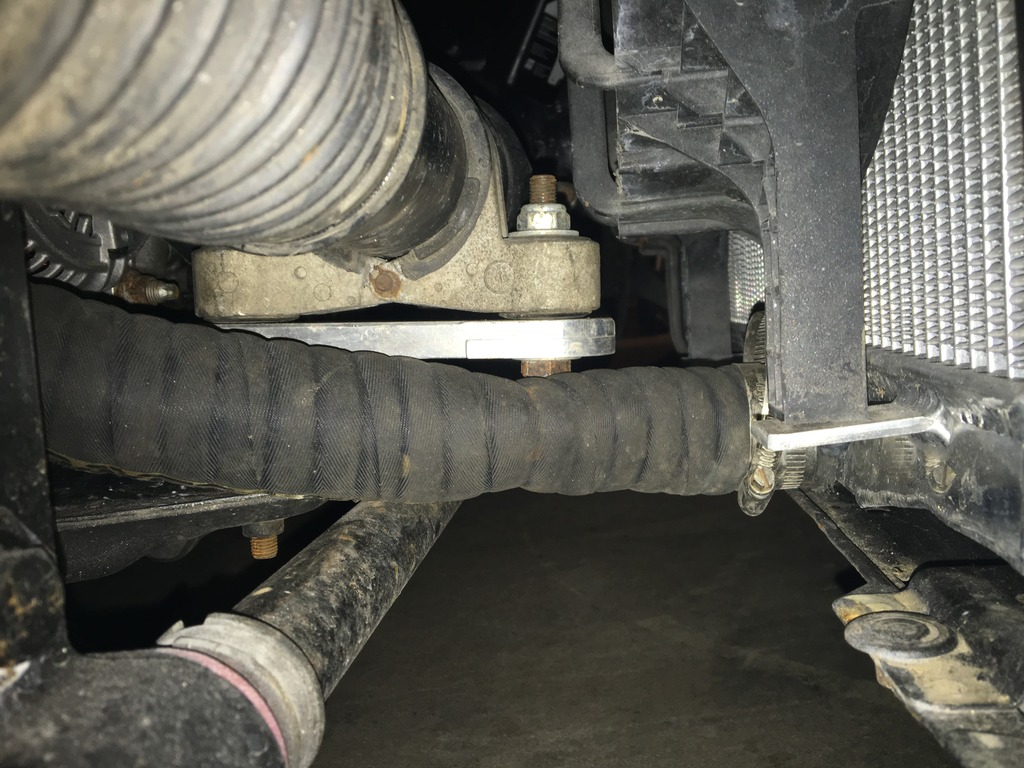
so around here i struggled with the coolant hoses using the stock s2000 radiator, keeping with my cheap initial cost thing and that didnt work well at all, the upper hose was a 24" flexible no collapse hose from summit racing, the lower hose was a mixture of hard pipes and bends that hung too low and leaked, so the whole lower hose was scrapped. i bought a mishimoto radiator and a mishi variable speed fan controller, the radiator i have not yet been able to make stop leaking out the cap, idk if i recommend it its very embarrassing to always smell like its over heating. I had the solid aluminum radiator sent to my radiator shop and they moved the lower neck to the opposite side and increased from the stock 2.25 to a 2.5" inlet, got a super heavy duty radiator hose and ovaled it slightly, by flipping the through bolt over i was able to run a straight hose to a 90 degree hard pipe. works fairly well until i can think of a better way to keep it smooth and not worry about wearing on the hose.
then a few days pass, and here i was ready for startup. The engine was attached to the car via innovate solid mounts and my own poly trans mount, w255 fuel pump had key switched power and push to start works on the factory button, exhaust was out of the way and had working sensors(a 2004 is300 bank 2 sensor 2 is the factory sensor to have a bung style and the correct connector),DSS driveshaft transferred the power, air got from the turbo to the intake via the custom piping and a precision intercooler, no coolant leaks, and the stock s2000 throttle cable works on the factory 2jz throttle cable mount It was a great night and to my surprise it started right up first crank, no leaks no noises!. Although getting it running was the easy part, now comes getting the car ready to handle the power which ill continue on here and keep it swap related.


back where we left off, this project pushed a lot of my skill beyond what it was, before this i had never done any swaps besides variants of what was already inside, leaving bolt on stuff kind of my go-to. the pictures make it look kinda quick, almost like i know what i was doing, in reality it was basically 2 to 3 weeks between stages because i research every move pretty hard before doing it, and one of my hardest parts was the intercooler piping for some reason, i actually shopped around to have it done professionally but didnt get good results with it, so i had to dive in and do it myself. when i finally sat down with some rulers and angle guides and worked on it it took like no time at all, so my perfectionist side really screwed me this round. but in all of its glory.

so around here i struggled with the coolant hoses using the stock s2000 radiator, keeping with my cheap initial cost thing and that didnt work well at all, the upper hose was a 24" flexible no collapse hose from summit racing, the lower hose was a mixture of hard pipes and bends that hung too low and leaked, so the whole lower hose was scrapped. i bought a mishimoto radiator and a mishi variable speed fan controller, the radiator i have not yet been able to make stop leaking out the cap, idk if i recommend it its very embarrassing to always smell like its over heating. I had the solid aluminum radiator sent to my radiator shop and they moved the lower neck to the opposite side and increased from the stock 2.25 to a 2.5" inlet, got a super heavy duty radiator hose and ovaled it slightly, by flipping the through bolt over i was able to run a straight hose to a 90 degree hard pipe. works fairly well until i can think of a better way to keep it smooth and not worry about wearing on the hose.

then a few days pass, and here i was ready for startup. The engine was attached to the car via innovate solid mounts and my own poly trans mount, w255 fuel pump had key switched power and push to start works on the factory button, exhaust was out of the way and had working sensors(a 2004 is300 bank 2 sensor 2 is the factory sensor to have a bung style and the correct connector),DSS driveshaft transferred the power, air got from the turbo to the intake via the custom piping and a precision intercooler, no coolant leaks, and the stock s2000 throttle cable works on the factory 2jz throttle cable mount It was a great night and to my surprise it started right up first crank, no leaks no noises!. Although getting it running was the easy part, now comes getting the car ready to handle the power which ill continue on here and keep it swap related.


Trending Topics
Thread Starter
Registered User
Joined: Apr 2017
Posts: 21
Likes: 0
For sure the first run of these, a lot could be upgraded but it got me boosting, but i wanted to make sure id clear everything and had everything straight and true before i made a long term mount. i do enjoy the innovate mounts, they really dont move but yet i have no interior rattles so they seem to absorbing alot as well.