
TerminatioN's In-Cabin 10" Sub Build

Thread Starter
Joined: Aug 2008
Posts: 3,606
Likes: 4
From: Tallahassee, Florida
Caution: This is a long and detailed post of everything. Pics and video are in the next post after this one. Feel free to skip there first. 
So, I've always been into car audio, and I knew I wanted a decent system in the S as soon as I bought it. The problem was, as I'm sure all of you know, the car has very little storage/trunk space, and since its my daily driver I really did NOT want to sacrifice any trunk or other storage space at all to use for the sub box and thus make the lack of space problem even worse.
Thus, I set out on this project.
My goal: Add in a decent sub with good sound quality to my current setup, without losing any trunk or other storage space.
Budget: <$100 on materials (including wiring), ~$100 on sub, already had an good amp.
So at the beginning of starting this project I really had no idea whatsoever where I was going to put this or how to do it. I had heard of some people putting them under the carpet in the passenger side footwell, in the secret compartment, under the dash, and other crazy places, but all those seemed to be kind of impractical and all required small subs. I decided I wanted to use a full size 10 inch subwoofer. Up until this project, the only place I had heard of putting such a sub was in the tool well of the trunk or tucked in the side of the trunk. While this might work wonderfully for others, as I said at the beginning, the car is my DD and I really did NOT want to lose any trunk or storage space.
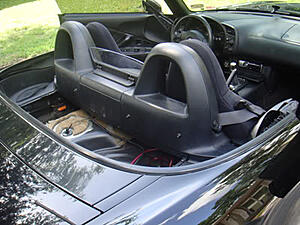
After giving it some thought I realized that I never took my hardtop off, my soft top had already been taken out, there was little to no chance I would ever put it back in, and thus the soft top tray area would be the perfect place to put my sub! If you haven't seen the pictures already, like the other fellow s2kers and friends I told of this idea, you're probably thinking I'm insane. Trust me, when I first thought up the idea I thought I was insane too, but the more I thought about it the more it made sense. I would lose absolutely no trunk or storage space, and would utilize in-cabin space that was previously, virtually unused! In my mind this basically meant all pros and no cons other than the added weight. So, we set off on the (what at least appeared to be) monumental task ahead.
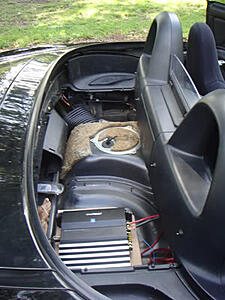
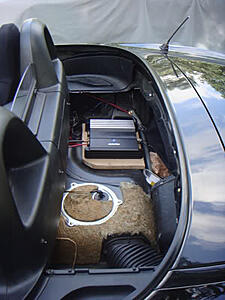
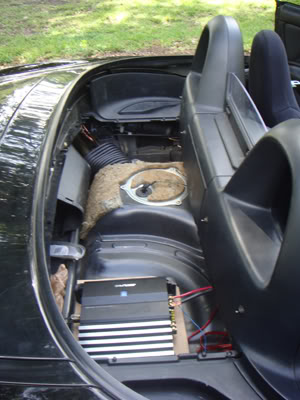
Originally we were going to attempt to make the box sit on top of the plastic soft-top tray bottom piece, but soon scrapped that idea after realizing that would be much more difficult and provide very little air space. So after removing that bottom piece it was obvious that we had clear access to the spare tire area where my amp was going to be mounted as well as the top of the gas tank which would partially support the bottom of the box (see pics). This proved to be a nearly ideal setup which would allow easy wiring of the sub/amp as well as support for the box.
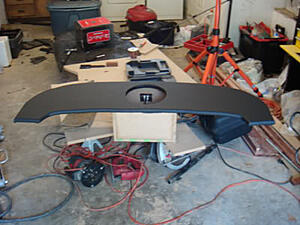
So now that we had everything pretty much planned out we started with the top of the box, which would be the hardest as it needed to follow the contours of the car pretty closely to conceal everything below and make it look good. At first we thought this was going to be ridiculously hard, but after using cardboard to make a template, we traced a rough outline onto the 3/4 inch MDF that we decided to use for the box, and trimmed it down to fit as best as possible (as you can see from the pics this method proved satisfactory).
After doing that everything else seemed very easy. I looked up the subwoofer on the rockford fosgate site, and it said the subwoofer slightly favored sealed enclosures with volume of .6 cubic feet. That sounded fine to me, so that's exactly what we went with.
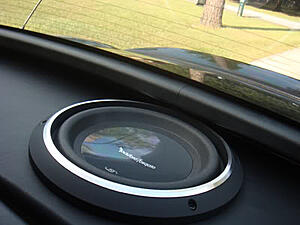
After cutting the proper diameter hole in the top piece of the box and wrapping it in some faux leather vinyl I bought from the local fabric shop (using staples to secure it) we proceeded to cut out the remaining 5 pieces of the box, using the proper dimensions to obtain .6 cubic feet. Then we screwed the pieces together, cut out a square hole for the speaker terminal plate, screwed that in, and sealed everything with clear silicon.
We proceeded to wire everything up and put the box in the car and hook everything up. After sitting the box in the car we noticed that although it was supported fairly well by the top of the gas tank, as well as the top piece fitting snugly, it still had some play and wasn't totally secure. After looking in the trunk we saw that the top metal piece that the trunk carpet was attached to had a few more holes that lined up with the box. So we got some long screws and drilled them into the box. After doing this the box was 100% secure and was not going anywhere.
We turned everything on and got everything tuned in and it sounds AWESOME!
I could not be happier.
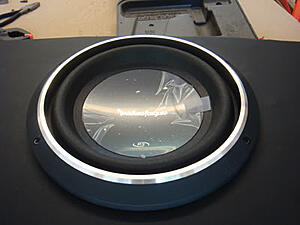
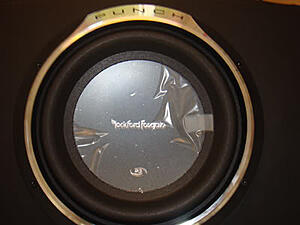
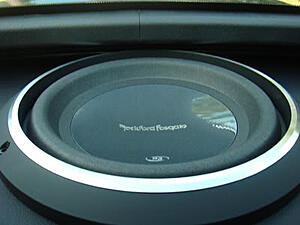
The sub I'm using is a 10 inch Rockford Fosgate P3 (model no. P3D410) rated for 400W RMS, 800W peak.
The amp I'm using is a mono Alpine (model no. MRP-M450) putting out 400W RMS, 800W peak @ 2 ohms.
So, in conclusion, I pretty much got exactly what I wanted: a great, full sized 10" sub with no loss of space. I had a lot of fun along the way and am excited that I am one of the first (if not the first) to attempt and successfully do this.
Lastly, I want to say that I wrote this long, detailed post not only to proudly show my work, but also to provide information to anyone and everyone who wishes to attempt to do something similar. I will be happy to answer any and all questions via PM or in this thread, so don't be shy.
If you are attempting to do this or something similar, I hope this has helped, and good luck!
Now, without further ado... the moment you have all been waiting for... the best part of the thread... the pictures and video!
So, I've always been into car audio, and I knew I wanted a decent system in the S as soon as I bought it. The problem was, as I'm sure all of you know, the car has very little storage/trunk space, and since its my daily driver I really did NOT want to sacrifice any trunk or other storage space at all to use for the sub box and thus make the lack of space problem even worse.
Thus, I set out on this project.
My goal: Add in a decent sub with good sound quality to my current setup, without losing any trunk or other storage space.
Budget: <$100 on materials (including wiring), ~$100 on sub, already had an good amp.
So at the beginning of starting this project I really had no idea whatsoever where I was going to put this or how to do it. I had heard of some people putting them under the carpet in the passenger side footwell, in the secret compartment, under the dash, and other crazy places, but all those seemed to be kind of impractical and all required small subs. I decided I wanted to use a full size 10 inch subwoofer. Up until this project, the only place I had heard of putting such a sub was in the tool well of the trunk or tucked in the side of the trunk. While this might work wonderfully for others, as I said at the beginning, the car is my DD and I really did NOT want to lose any trunk or storage space.
After giving it some thought I realized that I never took my hardtop off, my soft top had already been taken out, there was little to no chance I would ever put it back in, and thus the soft top tray area would be the perfect place to put my sub! If you haven't seen the pictures already, like the other fellow s2kers and friends I told of this idea, you're probably thinking I'm insane. Trust me, when I first thought up the idea I thought I was insane too, but the more I thought about it the more it made sense. I would lose absolutely no trunk or storage space, and would utilize in-cabin space that was previously, virtually unused! In my mind this basically meant all pros and no cons other than the added weight. So, we set off on the (what at least appeared to be) monumental task ahead.
Originally we were going to attempt to make the box sit on top of the plastic soft-top tray bottom piece, but soon scrapped that idea after realizing that would be much more difficult and provide very little air space. So after removing that bottom piece it was obvious that we had clear access to the spare tire area where my amp was going to be mounted as well as the top of the gas tank which would partially support the bottom of the box (see pics). This proved to be a nearly ideal setup which would allow easy wiring of the sub/amp as well as support for the box.
So now that we had everything pretty much planned out we started with the top of the box, which would be the hardest as it needed to follow the contours of the car pretty closely to conceal everything below and make it look good. At first we thought this was going to be ridiculously hard, but after using cardboard to make a template, we traced a rough outline onto the 3/4 inch MDF that we decided to use for the box, and trimmed it down to fit as best as possible (as you can see from the pics this method proved satisfactory).
After doing that everything else seemed very easy. I looked up the subwoofer on the rockford fosgate site, and it said the subwoofer slightly favored sealed enclosures with volume of .6 cubic feet. That sounded fine to me, so that's exactly what we went with.
After cutting the proper diameter hole in the top piece of the box and wrapping it in some faux leather vinyl I bought from the local fabric shop (using staples to secure it) we proceeded to cut out the remaining 5 pieces of the box, using the proper dimensions to obtain .6 cubic feet. Then we screwed the pieces together, cut out a square hole for the speaker terminal plate, screwed that in, and sealed everything with clear silicon.
We proceeded to wire everything up and put the box in the car and hook everything up. After sitting the box in the car we noticed that although it was supported fairly well by the top of the gas tank, as well as the top piece fitting snugly, it still had some play and wasn't totally secure. After looking in the trunk we saw that the top metal piece that the trunk carpet was attached to had a few more holes that lined up with the box. So we got some long screws and drilled them into the box. After doing this the box was 100% secure and was not going anywhere.
We turned everything on and got everything tuned in and it sounds AWESOME!
I could not be happier.
The sub I'm using is a 10 inch Rockford Fosgate P3 (model no. P3D410) rated for 400W RMS, 800W peak.
The amp I'm using is a mono Alpine (model no. MRP-M450) putting out 400W RMS, 800W peak @ 2 ohms.
So, in conclusion, I pretty much got exactly what I wanted: a great, full sized 10" sub with no loss of space. I had a lot of fun along the way and am excited that I am one of the first (if not the first) to attempt and successfully do this.
Lastly, I want to say that I wrote this long, detailed post not only to proudly show my work, but also to provide information to anyone and everyone who wishes to attempt to do something similar. I will be happy to answer any and all questions via PM or in this thread, so don't be shy.
If you are attempting to do this or something similar, I hope this has helped, and good luck!
Now, without further ado... the moment you have all been waiting for... the best part of the thread... the pictures and video!
Thread Starter
Joined: Aug 2008
Posts: 3,606
Likes: 4
From: Tallahassee, Florida
For those of you who skipped from the first post, here are the specs:
Sub: Rockford Fosgate P3D410
Amp: Alpine MRP-M450
Power: 400W RMS, 800W Peak
Box: sealed, .6 cubic feet
Videos:
Rock/Metal Version:
Rap Version:
Pictures:
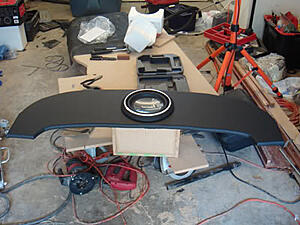
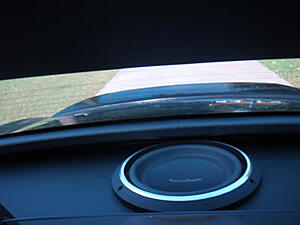
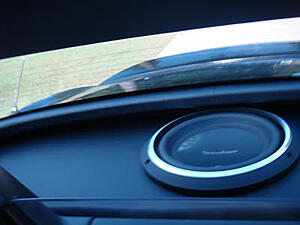
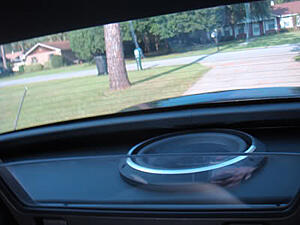
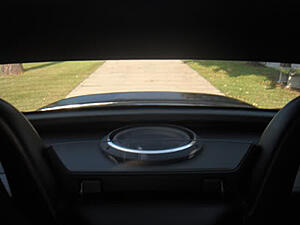
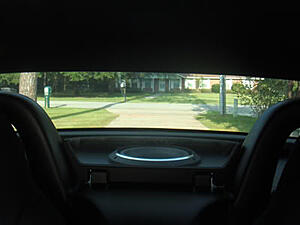
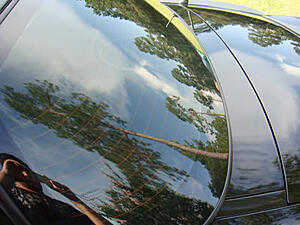
This last pic is just showing how, with my tint, the only thing you can see from the outside is a faint outline of the silver on the sub trim ring.
Finally, I would like to give a HUGE thanks to my good friend Davian from IMV Films (IMV Films - Vehicular Lunacy at its Finest) for helping me design and build this thing, use a lot of his tools, and be patient enough to not kill me.
Without his help I probably would have never even come close to finishing this, and if I did it certainly would have not turned out this well.
Thank you everyone for looking!
Please feel free to post any and all comments or questions!
Thanks again,
-TerminatioN
Sub: Rockford Fosgate P3D410
Amp: Alpine MRP-M450
Power: 400W RMS, 800W Peak
Box: sealed, .6 cubic feet
Videos:
Rock/Metal Version:
Rap Version:
Pictures:


This last pic is just showing how, with my tint, the only thing you can see from the outside is a faint outline of the silver on the sub trim ring.

Finally, I would like to give a HUGE thanks to my good friend Davian from IMV Films (IMV Films - Vehicular Lunacy at its Finest) for helping me design and build this thing, use a lot of his tools, and be patient enough to not kill me.
Without his help I probably would have never even come close to finishing this, and if I did it certainly would have not turned out this well.
Thank you everyone for looking!
Please feel free to post any and all comments or questions!
Thanks again,
-TerminatioN
Last edited by TerminatioN; Aug 30, 2017 at 11:52 AM. Reason: Fixed Photobucket links


Registered User
Joined: Feb 2007
Posts: 702
Likes: 0
From: Highland Village
Looks nice, horrible taste in music. A different music genre might have shown the sub off better but the install looks clean. Does the bass sound better in person? The video sounds like either the gain needs to be adjusted or the amp isn't providing enough power; but again, that could just be the effects of the video.


Trending Topics


Joined: Aug 2005
Posts: 872
Likes: 20
From: Central Florida
Termination,
Nice and clean install. I enjoyed reading about your install and watching the videos. If I didn't have a soft top under my hardtop, I would do the same. Even though I haven't removed the hardtop in 2 years, I can't wait until October and have my convertible back for a couple of weeks.
I did choose to lose my trunk space.....and it's my daily driver.... I'm sure your sub location rocks.
Looking forward to hearing it at the Supermeet Dec. 6th.
Good Job!
Thraak
Thread Starter
Joined: Aug 2008
Posts: 3,606
Likes: 4
From: Tallahassee, Florida
Originally Posted by CHILIBEANZ,Aug 13 2009, 03:19 PM
How does the underside look? And what are the measurements on the box?
Box is a foot square and 6/10 of a foot deep (think that turned out to be 7.2"), which calculates out to the .6 cubic feet of air space that RF recommended. So its 12" long x 12" wide x 7.2" high. Those are internal measurements btw. We added in the width of the MDF to make it even closer to the exact ideal airspace (.6 cubic feet). Lol I won't lie though, our measurements weren't exact, but we were pretty close.
Originally Posted by spectacle,Aug 13 2009, 04:17 PM
Very original idea I like it.
Have you had to track down any annoying rattles yet? I'm sure there's bound to be some
Have you had to track down any annoying rattles yet? I'm sure there's bound to be some
Haha, sort of. If you watch the second video (rap version) you can hear the trunk spring rattling terribly throughout most of the vid when the bass get loud enough. I haven't done much research into them, but my trunk has always had trouble closing and I thought it was to blame. Not sure whats wrong with it, but nothing rattles when I'm listening to my rock and the trunk thing isn't an issue, so I'll probably just leave it for now.
[QUOTE=thraak,Aug 13 2009, 04:25 PM]Termination,