
getting the car ready for this season

Thread Starter
Registered User
Joined: Aug 2006
Posts: 1,740
Likes: 0
From: Edmonton, Alberta, Canada
Just had to share stories of my stupidity. Over the winter, I researched the AP2 valve retainer swap. Bought the tool too - a decent valve spring compressor from Princess. And also during the winter, I removed the retainers and keepers from the spare F22C engine I have.
Two weekends ago I did the swap. Not too bad, but did damage an oil seal. On the Monday, I realized I replaced the wrong retainers. Seriously, how stupid can a person get?!? I did the exhaust side, not the intake side. I dunno what I was thinking. Or rather, I must have not been thinking. To top it off, I managed to damage one valve seal on the exhaust side, but I replaced it with one salvaged from the spare F22C, but it came from the intake side, and they are supposedly not interchangeable.
Then I also took the car for alignment at Bert's. As soon they got it onto the rack though, they noticed that one of my front brakelines had given up the ghost and had dumped fluid all over. I think there were some interference issues with the larger, Comptech front sway bar I had installed for a while. Thankfully, over the winter I had noticed the kink in the line, although hoping that it would survive a bit longer. So fortunately, I had purchased a new set of lines and just had to grab them bring them back to Bert's, where they were installed. Totally awesome 1984 Oldmobile loaner car. They also fabricated up a couple brackets to space out the lines a tad to ensure no more interference. BUT - they didn't do a very nice bleed, as I had a really long pedal all the way home. That was sorted out in about 30 minutes with the help of my long suffering wife though.
This past weekend, I finally corrected the top end work. I put in a new, correct valve seal to replace the buggered up one, and then replaced all the intake retainers with the AP2 side. And then adjusted the valves (again). So, needless to say, I'm quite familiar now with the F20C/22C top end! To get at the retainers, one has to remove not just the cams, but also the rocker arm assembly too. I also took the time to 'update' the timing chain tensioner, as a pre-emptive maintenance step. This involves glass peening the worm gear and inside of the piston on the timing chain tensioner.
None of the original AP1 retainers, intake or exhaust side, were cracked or showed any signs of cracking, but now I can rest a bit easier knowing the tougher AP2 pieces are in there. The nervous moments came after putting everything back together and starting it up again. No horrible noises = correct re-installation!
So....I'm a weekend behind on my schedule to do my supercharger install, but I'll get there. Other mods for this year include a lovely, genuine JDM red Honda trunk badge, PLX Devices multi gauge on an SOS single pillar pod, and AP2 centre console, now wrapped in carbon look vinyl.
Two weekends ago I did the swap. Not too bad, but did damage an oil seal. On the Monday, I realized I replaced the wrong retainers. Seriously, how stupid can a person get?!? I did the exhaust side, not the intake side. I dunno what I was thinking. Or rather, I must have not been thinking.
To top it off, I managed to damage one valve seal on the exhaust side, but I replaced it with one salvaged from the spare F22C, but it came from the intake side, and they are supposedly not interchangeable.Then I also took the car for alignment at Bert's. As soon they got it onto the rack though, they noticed that one of my front brakelines had given up the ghost and had dumped fluid all over. I think there were some interference issues with the larger, Comptech front sway bar I had installed for a while. Thankfully, over the winter I had noticed the kink in the line, although hoping that it would survive a bit longer. So fortunately, I had purchased a new set of lines and just had to grab them bring them back to Bert's, where they were installed. Totally awesome 1984 Oldmobile loaner car. They also fabricated up a couple brackets to space out the lines a tad to ensure no more interference. BUT - they didn't do a very nice bleed, as I had a really long pedal all the way home. That was sorted out in about 30 minutes with the help of my long suffering wife though.
This past weekend, I finally corrected the top end work. I put in a new, correct valve seal to replace the buggered up one, and then replaced all the intake retainers with the AP2 side. And then adjusted the valves (again). So, needless to say, I'm quite familiar now with the F20C/22C top end! To get at the retainers, one has to remove not just the cams, but also the rocker arm assembly too. I also took the time to 'update' the timing chain tensioner, as a pre-emptive maintenance step. This involves glass peening the worm gear and inside of the piston on the timing chain tensioner.
None of the original AP1 retainers, intake or exhaust side, were cracked or showed any signs of cracking, but now I can rest a bit easier knowing the tougher AP2 pieces are in there. The nervous moments came after putting everything back together and starting it up again. No horrible noises = correct re-installation!
So....I'm a weekend behind on my schedule to do my supercharger install, but I'll get there. Other mods for this year include a lovely, genuine JDM red Honda trunk badge, PLX Devices multi gauge on an SOS single pillar pod, and AP2 centre console, now wrapped in carbon look vinyl.


Thread Starter
Registered User
Joined: Aug 2006
Posts: 1,740
Likes: 0
From: Edmonton, Alberta, Canada
Whew, a long weekend working on the car! I was hoping to get it all finished by yesterday night, but wasn't able to. Still, there's only maybe a few hours worth of work left to do. I didn't want to rush last night, so I'm going to finish this coming weekend as my whole week is busy with other stuff already. Heh...I suppose only working in the afternoon didn't help with the time table either!
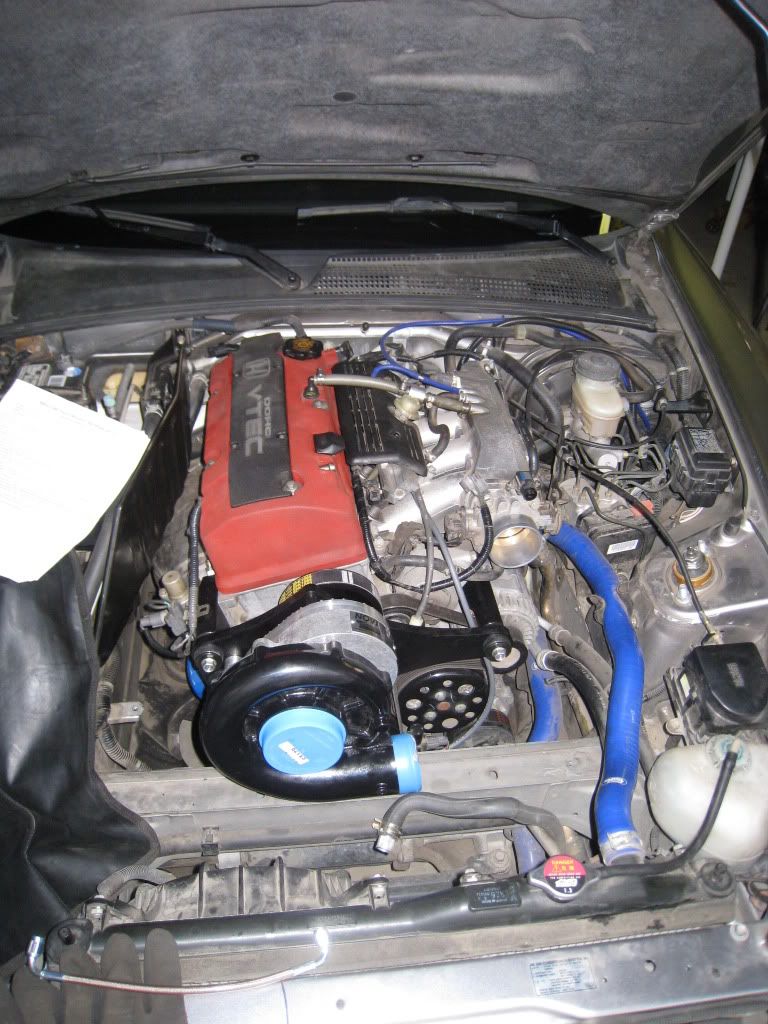
Saturday afternoon I started off and got the new fuel pump installed. With a buddy's help, we also got all the supercharger mounting brackets sorted out. Was too nice out, so we quit and hung out under my new gazebo on the patio for the rest of the evening.
Sunday was spent getting headachy and nauseous underneath the car as I did the updated banjo bolt install. Three of four aren't bad at all, but rethreading the banjo bolt on #1 was a huge pain in the ass. Didn't get any supercharger related stuff done then.
Yesterday my buddy came and helped again, and we got the intercooler and water pump and water lines all sorted out, plus the tight fitting fuel pressure regulator.
Now all that's left is to refit the front bumper, finish up the wiring on the water pump and tidy up a few hoses and such.
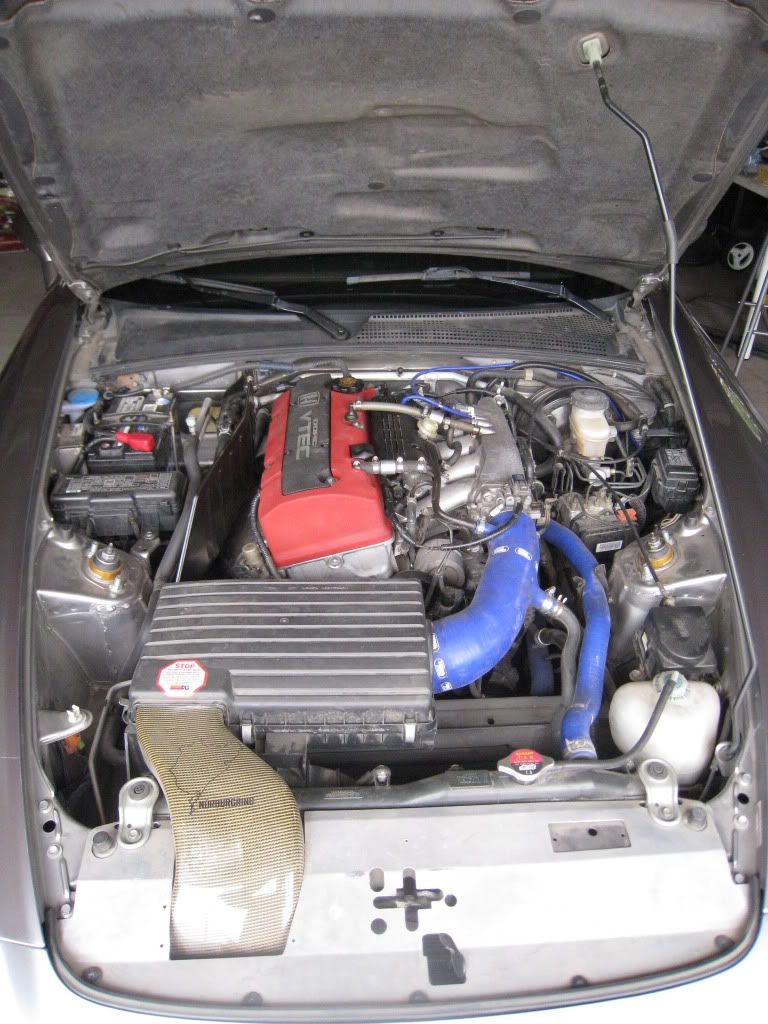
Here's some pix of my progress:
NA:
half supercharged:
90% supercharged:

If I didn't update the banjo bolts, I'm sure we would've finished yesterday. But, better not to rush and to keep everything nice and tidy. The kit is very impressive. All of the major bolts for the bespoke mounting blocks and such are OE Honda, in new baggies. The mounting plate and the other bespoke pieces are beautifully made and come in a lovely anodized finish. I just wish the intercooler and compressor housing were available in a natural, bare metal finish, but they only offer black or polished chrome as standard options - anything else costs extra.
I'm doing a slight variation for wiring the water pump, as I've already got my gauges and V1 hooked up to the spare power source by the interior fuse panel. So the water pump will be wired up per the Vortech supercharger kit instructions, with a relay and taking power off the under the hood fuse box.
More later! Can't wait to fire it up.
Saturday afternoon I started off and got the new fuel pump installed. With a buddy's help, we also got all the supercharger mounting brackets sorted out. Was too nice out, so we quit and hung out under my new gazebo on the patio for the rest of the evening.
Sunday was spent getting headachy and nauseous underneath the car as I did the updated banjo bolt install. Three of four aren't bad at all, but rethreading the banjo bolt on #1 was a huge pain in the ass. Didn't get any supercharger related stuff done then.
Yesterday my buddy came and helped again, and we got the intercooler and water pump and water lines all sorted out, plus the tight fitting fuel pressure regulator.
Now all that's left is to refit the front bumper, finish up the wiring on the water pump and tidy up a few hoses and such.
Here's some pix of my progress:
NA:
half supercharged:
90% supercharged:
If I didn't update the banjo bolts, I'm sure we would've finished yesterday. But, better not to rush and to keep everything nice and tidy. The kit is very impressive. All of the major bolts for the bespoke mounting blocks and such are OE Honda, in new baggies. The mounting plate and the other bespoke pieces are beautifully made and come in a lovely anodized finish. I just wish the intercooler and compressor housing were available in a natural, bare metal finish, but they only offer black or polished chrome as standard options - anything else costs extra.
I'm doing a slight variation for wiring the water pump, as I've already got my gauges and V1 hooked up to the spare power source by the interior fuse panel. So the water pump will be wired up per the Vortech supercharger kit instructions, with a relay and taking power off the under the hood fuse box.
More later!
Can't wait to fire it up.

