
Ace123's stereo build thread

Thread Starter
Registered User
Joined: Jul 2007
Posts: 3,187
Likes: 3
So I got to do a few hours more work today... I did about 5 hours the first day and about 4 hours this time. Before this I did probably 30 hours of research, and I've spent probably 10 or so hours shopping for all the stuff, counting online for the components as well as the trips to the hardware store. My experience level with all this is intermediate--I've done about 5-10 installs before this and have a reasonable understanding of what's going on, but I'm a far cry from an expert or somebody who's worked in the field for a fair length of time.
Still didn't do the amp power wire; today I started with the speakers. Ended up mounting 1 midbass, getting 1/2 the work done on the other, and I found the tweeters a home (A-pillars) and an EASY way to run the wiring--no removal of anything at all. I was going to start dynamat, but I was surprised at how much goop was on the doors. I didn't feel like removing it yet.
So here are some pictures along with my step by step. Hopefully others can learn from my mistakes. I learned from some past errors, but you always get a bit of conflicting advice and you never really see all the issues until you get into it. Hopefully this provides a bit more insight for others.
First things first.... took off the door panels. This was cake. It seems like access is almost a non-issue in this car--everything is a bolt or two and a few clips that are decent quality. These are the one clip and three bolts from the drivers side door panel. Yes, my floor mat is disgusting. It's snowy and salty here. I'll have to give the car a good detail after all this...
The hardware:

The panel:

You can get 1024 x 6XX resolution from my album--it's public--and I can send a 10MP image to anyone who wants one of these for a closer look at things; just shoot me a PM.
The door:

The stock tweeter and speaker: (tweeter only from behind at this point)


And the inevitable comparison between my new speaker and the old one:


Now this might be of interest to a few of you--here's the stock speaker basket with a few rough dimensions to the window. These dimensions aren't terribly useful though because you have a few inches between the front of the speakers and the point where the speakers would begin to strike the door panels.


Yes, that was a knob. And no, I didn't take the time to figure out what the heck it's doing there. It appears to be where the back of speakers would strike on a MY06 S2000.
Next, dimension to the knob from the metal part of the door frame. Keep in mind speakers can protrude outward from this frame quite a bit.

So I wondered if I could use my woofers while reusing the stock basket. So I tried a quick test-fit.

Not quite, eh?
Well, often people have commented on weather-related issues with the stock baskets acting to protect speakers. This doesn't seem unreasonable. My S2000 has 40k on the clock, and here's how dirty the stock basket was from drips and other messes creeping through the window seams. I DD my car rain or shine, and the water here is pretty hard so it leaves residue. This is admittedly a miserable measure for how much water hits the speakers, but it's the first measure of ANY kind I've seen, so here it is, FWIW.

And the stock speakers, which are "protected"

Now, the Pioneer speakers came with these neat little spacer rings:

So I got a perhaps bad idea....
Instead of taking the time to make spacers out of MDF, then spraypaint and/or epoxy coat them, I've seen a lot of people cut the stock spacers. Since I had these handy spacers from Pioneer, I thought I could keep the top "umbrella" portion of the stock baskets and get a bit of weather protection. So....


Well, I had a rough cut done, so here's the test fit:

And some more work:

Yes, the magnet is just TOO big. The only way I got it to fit was to ruin the "umbrella," but when it fit together it was pretty clear the "umbrella" wouldn't have protected much anyways since these are so much deeper. Oh well, nice try. Here's what I had after more and more dremeling.


So I put it in, but I didn't wire the speakers at all yet since I don't have the wiring run. I'll be jamming out to the roll hoop speakers until I finish it. Audiobooks FTW I guess.


They look pretty good IMO! Hopefully they sound even better, at least to my untrained ears... This is after all my first SQ oriented install.
I started on the passenger side midbass but only got about halfway through the dremeling before the battery was finished. I'll have to finish it up one of these evenings afer work.
Once I get the amp wired and figure out where it's going I'll run the speaker wiring. But until I decide whether to drill a hole for the amp power wire on the drivers side or push it through the battery grommet and redo the RCAs I won't know where to run the speaker wire, so there's no point doing it until I make up my mind.
So the next part was to figure out the tweeters. I had planned to install them in place of the stock tweeters. Here's what the stock ones look like:


And the new ones:

A bit too big also.... That's just not going to work without a ton of work. Everyone says the stock location isn't optimal, but the A-pillar is better. I was hoping for a stock look, but since the tweeters are bigger than the stock tweeter pods entirely--they are larger in diameter than the top to bottom depth of the tweeter area on the door trim--I figured I'm SOL there unless I set them back pretty far and get even poorer sound.
So I took them to the A-pillar. Now I was pleasantly surprised that the wire for the tweeters can be pulled right back through the trim as shown in the next image. I pulled the wire into place and left the tweeters hanging out for now. When I get the amp hooked up and sound coming out, I'll figure out what angle I like best and bolt them in. So I didn't get the stock look like I was originally hoping, but I think I'll get better sound, so it all evens out IMO. Poorer looks but better sound may be a net benefit honestly. So the tweeters went into place pretty quick, and now I don't have to fit 2 12-gauge wires through the door grommets!

And the link to this photo album is here: https://www.s2ki.com/forums/index.php?act=m...bum&album=33510
I'm not sure if I'll have time to work on this during the week; we'll see what happens. I need to do dynamat, run the power wire, run the speaker wires, and maybe redo the RCAs depending. I also forgot that I'll need to pull the radio again to switch it to 3 way network mode to run the fully active setup from the HU. I'll do the amp rack later and maybe the ground as well, but those can both wait until everything is up, running, and has a basic tune so I can start to enjoy the fruits of this work.
On the dynamat, do you guys just scrape the goop off the doors and throw the stuff on, or what? I'm not sure I care enough to get terribly elaborate and devote a day or two to it.
Still didn't do the amp power wire; today I started with the speakers. Ended up mounting 1 midbass, getting 1/2 the work done on the other, and I found the tweeters a home (A-pillars) and an EASY way to run the wiring--no removal of anything at all. I was going to start dynamat, but I was surprised at how much goop was on the doors. I didn't feel like removing it yet.
So here are some pictures along with my step by step. Hopefully others can learn from my mistakes. I learned from some past errors, but you always get a bit of conflicting advice and you never really see all the issues until you get into it. Hopefully this provides a bit more insight for others.
First things first.... took off the door panels. This was cake. It seems like access is almost a non-issue in this car--everything is a bolt or two and a few clips that are decent quality. These are the one clip and three bolts from the drivers side door panel. Yes, my floor mat is disgusting. It's snowy and salty here.
I'll have to give the car a good detail after all this...The hardware:
The panel:
You can get 1024 x 6XX resolution from my album--it's public--and I can send a 10MP image to anyone who wants one of these for a closer look at things; just shoot me a PM.
The door:
The stock tweeter and speaker: (tweeter only from behind at this point)
And the inevitable comparison between my new speaker and the old one:
Now this might be of interest to a few of you--here's the stock speaker basket with a few rough dimensions to the window. These dimensions aren't terribly useful though because you have a few inches between the front of the speakers and the point where the speakers would begin to strike the door panels.
Yes, that was a knob. And no, I didn't take the time to figure out what the heck it's doing there. It appears to be where the back of speakers would strike on a MY06 S2000.
Next, dimension to the knob from the metal part of the door frame. Keep in mind speakers can protrude outward from this frame quite a bit.
So I wondered if I could use my woofers while reusing the stock basket. So I tried a quick test-fit.
Not quite, eh?
Well, often people have commented on weather-related issues with the stock baskets acting to protect speakers. This doesn't seem unreasonable. My S2000 has 40k on the clock, and here's how dirty the stock basket was from drips and other messes creeping through the window seams. I DD my car rain or shine, and the water here is pretty hard so it leaves residue. This is admittedly a miserable measure for how much water hits the speakers, but it's the first measure of ANY kind I've seen, so here it is, FWIW.
And the stock speakers, which are "protected"
Now, the Pioneer speakers came with these neat little spacer rings:
So I got a perhaps bad idea....
Instead of taking the time to make spacers out of MDF, then spraypaint and/or epoxy coat them, I've seen a lot of people cut the stock spacers. Since I had these handy spacers from Pioneer, I thought I could keep the top "umbrella" portion of the stock baskets and get a bit of weather protection. So....
Well, I had a rough cut done, so here's the test fit:
And some more work:
Yes, the magnet is just TOO big. The only way I got it to fit was to ruin the "umbrella," but when it fit together it was pretty clear the "umbrella" wouldn't have protected much anyways since these are so much deeper. Oh well, nice try. Here's what I had after more and more dremeling.
So I put it in, but I didn't wire the speakers at all yet since I don't have the wiring run. I'll be jamming out to the roll hoop speakers until I finish it. Audiobooks FTW I guess.
They look pretty good IMO!
Hopefully they sound even better, at least to my untrained ears... This is after all my first SQ oriented install. I started on the passenger side midbass but only got about halfway through the dremeling before the battery was finished. I'll have to finish it up one of these evenings afer work.
Once I get the amp wired and figure out where it's going I'll run the speaker wiring. But until I decide whether to drill a hole for the amp power wire on the drivers side or push it through the battery grommet and redo the RCAs I won't know where to run the speaker wire, so there's no point doing it until I make up my mind.
So the next part was to figure out the tweeters. I had planned to install them in place of the stock tweeters. Here's what the stock ones look like:
And the new ones:
A bit too big also.... That's just not going to work without a ton of work. Everyone says the stock location isn't optimal, but the A-pillar is better. I was hoping for a stock look, but since the tweeters are bigger than the stock tweeter pods entirely--they are larger in diameter than the top to bottom depth of the tweeter area on the door trim--I figured I'm SOL there unless I set them back pretty far and get even poorer sound.
So I took them to the A-pillar. Now I was pleasantly surprised that the wire for the tweeters can be pulled right back through the trim as shown in the next image. I pulled the wire into place and left the tweeters hanging out for now. When I get the amp hooked up and sound coming out, I'll figure out what angle I like best and bolt them in. So I didn't get the stock look like I was originally hoping, but I think I'll get better sound, so it all evens out IMO. Poorer looks but better sound may be a net benefit honestly. So the tweeters went into place pretty quick, and now I don't have to fit 2 12-gauge wires through the door grommets!
And the link to this photo album is here: https://www.s2ki.com/forums/index.php?act=m...bum&album=33510
I'm not sure if I'll have time to work on this during the week; we'll see what happens. I need to do dynamat, run the power wire, run the speaker wires, and maybe redo the RCAs depending. I also forgot that I'll need to pull the radio again to switch it to 3 way network mode to run the fully active setup from the HU. I'll do the amp rack later and maybe the ground as well, but those can both wait until everything is up, running, and has a basic tune so I can start to enjoy the fruits of this work.
On the dynamat, do you guys just scrape the goop off the doors and throw the stuff on, or what? I'm not sure I care enough to get terribly elaborate and devote a day or two to it.

Registered User
Joined: Aug 2007
Posts: 7,712
Likes: 1
The thing about dynamat (if you're going to use it, I still feel it's too much permanently added weight on our cars) is that if you're going to install it, it needs to be done right.
That means a heat gun (or really hot day), a wallpaper roller (b/c the dynamat ones suck), and time.
The goal is not to seal the door b/c you can't. The goal is to minimize resonance of the door panels. Stretching the dynamat over the opening will accomplish little. Make sure you roll out any bubbles underneath the dynamat. The more solidly it's attached to the door, the better it will perform. Before you start, clean the door with Isopropyl alcohol so the dynamat will stick better.
Honestly...for best results... I would wait till the summer. 1 because the dynamat tar/glue sticks better with heat (hence the heat gun), and 2 this gives you a chance to hear the build without the dynamat, to determine if you really want to add that extra weight to the car. Think about how heavy that dynamat is when you pick up the roll...

Registered User
Joined: Feb 2007
Posts: 1,056
Likes: 0
From: Houston TX
 on the sundown amp, iv got a 125.2 coming... hopefully this week
i think the reason people aren't running the ppi's active is because of the gigantor xover it comes with, it seems like waste of such a nice looking piece of equipment

Registered User
Joined: Aug 2007
Posts: 7,712
Likes: 1
Originally Posted by lowrthnu2.2,Jan 4 2010, 02:07 AM
on the sundown amp, iv got a 125.2 coming... hopefully this weeki think the reason people aren't running the ppi's active is because of the gigantor xover it comes with, it seems like waste of such a nice looking piece of equipment

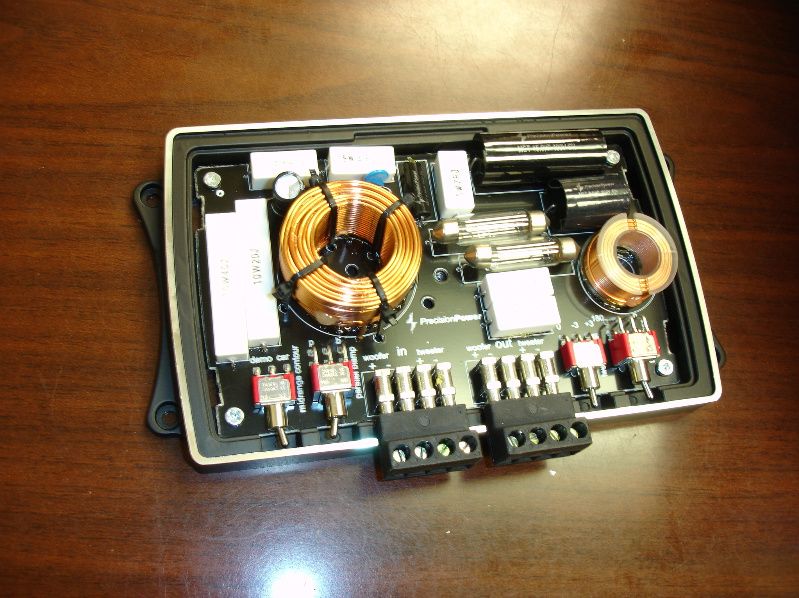
But think about the size/beauty of the crossover networks inside that 100.4
Thread Starter
Registered User
Joined: Jul 2007
Posts: 3,187
Likes: 3
Originally Posted by Neutered Sputniks,Jan 4 2010, 12:05 AM
Honestly...for best results... I would wait till the summer. 1 because the dynamat tar/glue sticks better with heat (hence the heat gun), and 2 this gives you a chance to hear the build without the dynamat, to determine if you really want to add that extra weight to the car. Think about how heavy that dynamat is when you pick up the roll...
I only bought 1 door kit, so 9# total, and I also cringed a bit at the thought. This is a light roadster, and I've taken it to the track and hope to do so more. I'm adding enough weight with the big amp in the trunk--why more? I also was thinking that when considering 1/0 gauge wire--it all gets terribly heavy.
Well, I think I might hold off on that for now. At least until I feel like spending the time to do it exactly right. Getting the door panels off doesn't take any time at all, so it would be easy to knock out later.
Thread Starter
Registered User
Joined: Jul 2007
Posts: 3,187
Likes: 3
Originally Posted by lowrthnu2.2,Jan 4 2010, 12:07 AM
on the sundown amp, iv got a 125.2 coming... hopefully this weeki think the reason people aren't running the ppi's active is because of the gigantor xover it comes with, it seems like waste of such a nice looking piece of equipment
Well, I'm with NS on this one--I'm storing my big fat crossover and letting the HU and amp do the work. I do agree though--it does look nice!
Registered User
Joined: Feb 2007
Posts: 1,056
Likes: 0
From: Houston TX
if your lookin for a good cheap sub look into these, i have 2 waiting to be installed

http://www.stevemeadedesigns.com/board/ind...showtopic=53685
http://www.stevemeadedesigns.com/board/ind...showtopic=53685


