
Ace123's stereo build thread


Registered User
Joined: Aug 2007
Posts: 7,712
Likes: 1
Originally Posted by DaPhatty,Jan 7 2010, 08:48 PM
With as much attention to detail you've already invested, I am surprised you are still entertaining the use of your tweeters. They will look sloppy no matter where they are placed.

A bit of dremel work will get the tweets to fit in the stock locations (or the A-pillar).

Registered User
Joined: Feb 2007
Posts: 1,056
Likes: 0
From: Houston TX
Originally Posted by ace123,Jan 7 2010, 04:12 PM
For option 1, I'd just tape it in for a while and then decide on whether/what to do as a permanent solution. I saw a recent thread where a member made fiberglass tweeter pods and placed them there. I've searched for over an hour now and still can't manage to find it... anybody know where that thread is?

Thread Starter
Registered User
Joined: Jul 2007
Posts: 3,187
Likes: 3
/\/\
Thank you -- that's exactly the thread i was looking for! Wow, it was more work than I remembered, and I didn't remember it being trivial, that's for sure. What an install! I was thinking to try to do something similar, but I'm not sure I have the time or patience for it right now. I'm working on my MS (in Mech Eng) part time while working, and my wife is an intern at the hospital and sometimes needs a bit of moral support, so I don't have the hours to devote that I would have when I was single a few years ago...
You know, after thinking about DaPhatty and Neutered Sputniks' comments, I'm starting to think... at first I thought I would have to dremel away one of the two bolts entirely to fit the tweeter in the OEM location, and I wasn't sure how that could be made to work. Now I'm starting to think it might just be the way to go since I've thought some and found this thread: https://www.s2ki.com/forums/index.php?showt...&#entry15967151
The tweeter, and the problem:

I suppose with some clever work I could slit one of the two posts and try to cant the tweeters inwards at an angle towards the seats. I might have to trim one edge of the tweeter as well if it's really tight. And if I can't fit it without completely removing the posts, and I also can't figure out how to make a metal mount (which sounds pretty easy, honestly), I could still maybe dremel MDF or use plumbers tape to make a mount to hold the tweeter in place...
This install was supposed to take just a weekend or so--it's amazing how it can just grow...
Thank you -- that's exactly the thread i was looking for! Wow, it was more work than I remembered, and I didn't remember it being trivial, that's for sure. What an install! I was thinking to try to do something similar, but I'm not sure I have the time or patience for it right now. I'm working on my MS (in Mech Eng) part time while working, and my wife is an intern at the hospital and sometimes needs a bit of moral support, so I don't have the hours to devote that I would have when I was single a few years ago...
You know, after thinking about DaPhatty and Neutered Sputniks' comments, I'm starting to think... at first I thought I would have to dremel away one of the two bolts entirely to fit the tweeter in the OEM location, and I wasn't sure how that could be made to work. Now I'm starting to think it might just be the way to go since I've thought some and found this thread: https://www.s2ki.com/forums/index.php?showt...&#entry15967151
The tweeter, and the problem:
I suppose with some clever work I could slit one of the two posts and try to cant the tweeters inwards at an angle towards the seats. I might have to trim one edge of the tweeter as well if it's really tight. And if I can't fit it without completely removing the posts, and I also can't figure out how to make a metal mount (which sounds pretty easy, honestly), I could still maybe dremel MDF or use plumbers tape to make a mount to hold the tweeter in place...
This install was supposed to take just a weekend or so--it's amazing how it can just grow...

Registered User
Joined: Aug 2007
Posts: 7,712
Likes: 1
 I suppose I should've followed the link you posted Ace...
When you do it, you just need to dremel out the bottom part of the post(s) - really don't need massive support on the posts and the metal backing plate will still work to hold the tweeter in place.
Definitely want to cut out the grill or it will block sound from the tweeter. And you can cut down the edges of the tweeter - be careful not to hit the surround, but the outside lip is used for mounting and can be cut down.
Thread Starter
Registered User
Joined: Jul 2007
Posts: 3,187
Likes: 3
On speaker baskets--I just checked majestic honda; see item 1.
http://www.hondaautomotiveparts.com/auto/j...TENNA+-+SPEAKER
They're 8 bucks. Go to town with the dremel; have no fear.
And the tweeter grilles, items 34-35, are $18 each from there.
http://www.hondaautomotiveparts.com/auto/j...ONT+DOOR+LINING
That removes any fear or anticipation I might have of ruining something or damaging it beyond repair and being stuck with it. Maybe it will do the same for others

Thread Starter
Registered User
Joined: Jul 2007
Posts: 3,187
Likes: 3
Originally Posted by Swiftoy,Jan 8 2010, 07:25 PM
Hey ACE Im hoping you plan to post detailed pics on the tweeter install as I plan to install theses exact speakers. Good work by the way your info will be most helpful.
Thread Starter
Registered User
Joined: Jul 2007
Posts: 3,187
Likes: 3
Saturday I got in another 5-6 hours. I finished wiring the amp, the RCAs are run, and 2 of the 4 speaker wires are run with the car apart awaiting the other pair tomorrow. For power wire, I used the grommet under the battery as had been suggested. I ended up taking the battery cable through the center console, leaving the RCAs on the passenger side, and running the driver and passengeer speaker wires on the driver and passenger side respectively.
First, I decided to start with the battery cable.
Pulled the battery. I left the (+) terminal disconnected until the battery cable was fused and settled in.

Located the grommet


Ran the snake through the grommet. It comes out in the pasenger side up pretty high where above the passenger's toes. I felt the snake hitting electrical tape, very carefully slit the tape with box cutters, and then I could pull the head of it out.

I lined up the power wire with the snake, taped it up thoroughly and over a length of several inches on each end, and then I applied a bit of wire lube.


A steady pull was all it took, then I connected it to the battery terminal. I did a test fit (after I verified the other end of the wire was nowhere near ground), and then I disconnected the terminal and kept on going.


Now by this point I had figured I want to try running the battery cable up the center console, so I needed to pull the passenger center console tray and the plastic piece at the passenger's left knee area.
You have to push the center of this pin in before it will come out. There is one on each side and a screw deep in the center, then this all pulls down and back into your lap. If you haven't done the top down rolling mod, this is a great time to think about it, as it's just a matter of clipping a wire to defeat the vehicle speed sensor.


Now I took off the panel at the passenger's left knee area. I took the screw out and pulled at the right side of it. I broke the clip on the right regardless... But with the 06+, that dash thing in front of the passenger keeps it in place anyways. I used the snake to pull the cable through a bit of carpet and felt clever. It saved me unclipping several hard (read: likely to be broken by me) clips.

Next I pulled the clips to lift up the center console area surrounding the shifter. I also pulled the radio and switched it to 3-way network mode, which is something specific to my head unit. I made sure the power cable was isolated, then turned on the power and checked the radio before disconnecting and moving on. I then routed the power cable under the radio through a hole. I managed to, through a bit of blind luck and careful rotation of the wire to control its curvature, get it to move back to right where the shifter is. The shifter has a foam surround that I pulled back when doing this.


I put the shifter's foam surround back into place, then I routed the wire a bit further back through holes in the console area. I was careful to consider the pockets in the center console and made sure not to introduce interference. I decided somebody at Honda likes custom stereos, because I found a pair of white wire clips that were perfectly sized for my 4 AWG wire. Sorry, no pic of the clips. You'll see them if you have a MY06-07, maybe you'll get lucky with other years.

Here's what the cable looks like taut. It's probably worth mentioning that my headunit has a copper chassis, so I was less concerned about interfering EMI than usual.

And taking this panel off again reminded me of why I love having a convertible.


Isn't that just so much easier to work with?
I put the front of the car back together at this point. The passenger panel in front had these tabbed push-pins. To put them back you have to set them like shown in the next image. You put the main body into place and then push the center to widen them. Play with them and you'll figure it out--just remember you'll have to reset them before putting them back together.

To finish up the power wire, I wanted to put it under the secret compartment. I unbolted it and then slid the wire in. If I were to do it again I'd consider going over the drivers side here instead of the passenger side (didn't give it any thought), but it's not enough to spend the 20 minutes to redo IMO. A Honda engineer here did NOT like custom stereos--right behind the secret compartment area is a wire harness running perpendicular to the power wire. It took me about a minute of fidgeting blind to get it out of the way and get the power wire in there.
Also, the image below shows the power wire kind of running down the middle of the area. Later on I found that this struck with the slide-open cupholder and I ended up with the spring coming undone. If you push it to the side like the factory wire I expect this will not be an issue.


Now I have more wires coming through the trunk

Next I cut the end of the battery cable, added the fuse, and added the splitter that drops it down to 8 AWG for the last few feet. I've loved this JL amp kit--just feels like quality every step--except the fuse holder. It feels like sorta nice components but poor design. Everything else was great. The sides of the fuse holder were exposed metal, and I'm not planning to mount this on the gas tank--just leave it hanging stuffed in there somewhere is what I'm thinking for now--so I covered the sides with electrical tape like you see in the picture. I feel safer now.

I slit the carpet and then slid the RCAs through.

I then repeated for the other wires. I also cut the edge of the carpet off to let them fit better--the carpet had some J-shaped bends in the edge to interface with other carpet, and it makes big lumps when wires run under the edge. So I cut it out in a few places.

Finally, I connected the amp to power, ground, remote, and RCAs.

I don't know which RCA is which, nor do I care at this point. I'll figure it out through testing at low volumes with double crossovers. By this, I mean if I use a woofer for a test, I'll have a LPF on the amp on that channel in addition to the HU's crossovers, so if I hook up the tweeter channel RCA I'll get a signal that's attenuated to nothing, and then when I switch I'll have midbass. It seemed easier than keeping track of the RCAs, especially when the tape piece I was using to track them fell off early on in the install.
Next item -- finish the speaker wire, then all the wiring is done. I only had a 25' speaker wire on the passenger side, so instead of wiring that one I opened up the drivers side to use the 50' wire. I thought 50' / 3 = about 16.5' per wire, while 25' might not even give me 2 long enough wires. I base this on a rough measurement of the speaker wire. When I gave myself a bit of extra room for error, I had about 12' left on the 25' wire. I felt more comfortable using the longer one, so I kept that 12' as scrap.
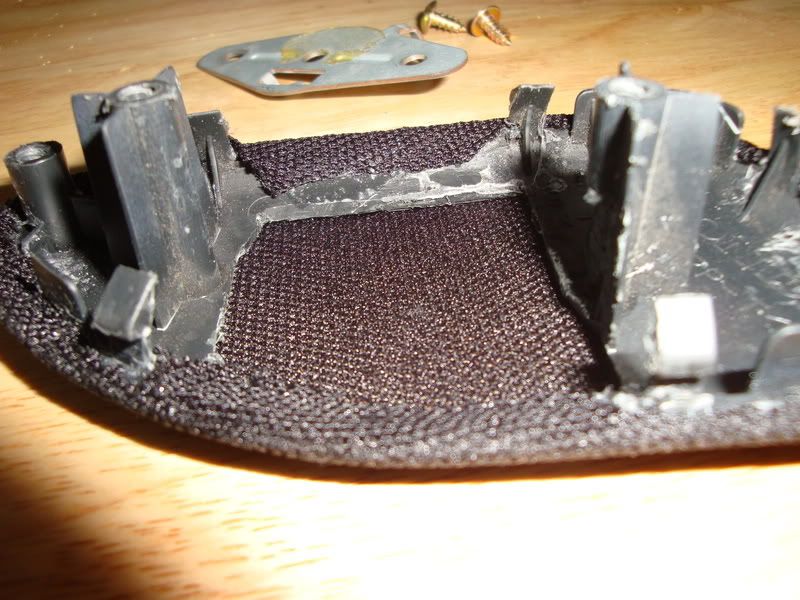
So I popped the door panel off. Remember I've left the bolts out, so this took about a second flat. I actually didn't do anything in the door panel since I had already slipped the wire through, but I pulled the tweeter mount off and brought it in the house, and I did that for the other side too. I'll need it in fabricating the tweeter's new home.

I stuffed the wire in pretty deep. It's several inches under the wiring that runs the drivers side and parallel to lots of metal. The factory wiring sits atop some metal, so I feel safe--that I won't get tons of noise--in that area.
Then I took off the panels behind the drivers seat. They were almost the same as the ones on the passenger seat, except the bolt covers look like hooks. No idea what Honda though we'd use these for.

Here it is with the panel off:

I tucked the wire just the same as on the passenger side.

I couldn't figure out where to push the wire through into the trunk, so I put my light in the trunk and went toward the light with the wire.

I then slid it in the trunk carpet and ran it to the amp terminal area. I'll connect the woofer speaker wires before the tweeter speaker wires so I keep track of which is which.
I didn't get to run the tweeter speaker wires like I had hoped, but I'll probably do that today. With a lot of luck I'll get some of the speaker mounts fabricated, but we'll see. If not, I'll have no radio tomorrow on the commute, and that will motivate me to finish. Dropping the speakers in will take very little time.
First, I decided to start with the battery cable.
Pulled the battery. I left the (+) terminal disconnected until the battery cable was fused and settled in.
Located the grommet
Ran the snake through the grommet. It comes out in the pasenger side up pretty high where above the passenger's toes. I felt the snake hitting electrical tape, very carefully slit the tape with box cutters, and then I could pull the head of it out.
I lined up the power wire with the snake, taped it up thoroughly and over a length of several inches on each end, and then I applied a bit of wire lube.
A steady pull was all it took, then I connected it to the battery terminal. I did a test fit (after I verified the other end of the wire was nowhere near ground), and then I disconnected the terminal and kept on going.
Now by this point I had figured I want to try running the battery cable up the center console, so I needed to pull the passenger center console tray and the plastic piece at the passenger's left knee area.
You have to push the center of this pin in before it will come out. There is one on each side and a screw deep in the center, then this all pulls down and back into your lap. If you haven't done the top down rolling mod, this is a great time to think about it, as it's just a matter of clipping a wire to defeat the vehicle speed sensor.
Now I took off the panel at the passenger's left knee area. I took the screw out and pulled at the right side of it. I broke the clip on the right regardless... But with the 06+, that dash thing in front of the passenger keeps it in place anyways. I used the snake to pull the cable through a bit of carpet and felt clever. It saved me unclipping several hard (read: likely to be broken by me) clips.
Next I pulled the clips to lift up the center console area surrounding the shifter. I also pulled the radio and switched it to 3-way network mode, which is something specific to my head unit. I made sure the power cable was isolated, then turned on the power and checked the radio before disconnecting and moving on. I then routed the power cable under the radio through a hole. I managed to, through a bit of blind luck and careful rotation of the wire to control its curvature, get it to move back to right where the shifter is. The shifter has a foam surround that I pulled back when doing this.
I put the shifter's foam surround back into place, then I routed the wire a bit further back through holes in the console area. I was careful to consider the pockets in the center console and made sure not to introduce interference. I decided somebody at Honda likes custom stereos, because I found a pair of white wire clips that were perfectly sized for my 4 AWG wire.
Sorry, no pic of the clips. You'll see them if you have a MY06-07, maybe you'll get lucky with other years. Here's what the cable looks like taut. It's probably worth mentioning that my headunit has a copper chassis, so I was less concerned about interfering EMI than usual.
And taking this panel off again reminded me of why I love having a convertible.
Isn't that just so much easier to work with?
I put the front of the car back together at this point. The passenger panel in front had these tabbed push-pins. To put them back you have to set them like shown in the next image. You put the main body into place and then push the center to widen them. Play with them and you'll figure it out--just remember you'll have to reset them before putting them back together.
To finish up the power wire, I wanted to put it under the secret compartment. I unbolted it and then slid the wire in. If I were to do it again I'd consider going over the drivers side here instead of the passenger side (didn't give it any thought), but it's not enough to spend the 20 minutes to redo IMO. A Honda engineer here did NOT like custom stereos--right behind the secret compartment area is a wire harness running perpendicular to the power wire. It took me about a minute of fidgeting blind to get it out of the way and get the power wire in there.
Also, the image below shows the power wire kind of running down the middle of the area. Later on I found that this struck with the slide-open cupholder and I ended up with the spring coming undone. If you push it to the side like the factory wire I expect this will not be an issue.
Now I have more wires coming through the trunk
Next I cut the end of the battery cable, added the fuse, and added the splitter that drops it down to 8 AWG for the last few feet. I've loved this JL amp kit--just feels like quality every step--except the fuse holder. It feels like sorta nice components but poor design. Everything else was great. The sides of the fuse holder were exposed metal, and I'm not planning to mount this on the gas tank--just leave it hanging stuffed in there somewhere is what I'm thinking for now--so I covered the sides with electrical tape like you see in the picture. I feel safer now.
I slit the carpet and then slid the RCAs through.
I then repeated for the other wires. I also cut the edge of the carpet off to let them fit better--the carpet had some J-shaped bends in the edge to interface with other carpet, and it makes big lumps when wires run under the edge. So I cut it out in a few places.
Finally, I connected the amp to power, ground, remote, and RCAs.
I don't know which RCA is which, nor do I care at this point. I'll figure it out through testing at low volumes with double crossovers. By this, I mean if I use a woofer for a test, I'll have a LPF on the amp on that channel in addition to the HU's crossovers, so if I hook up the tweeter channel RCA I'll get a signal that's attenuated to nothing, and then when I switch I'll have midbass. It seemed easier than keeping track of the RCAs, especially when the tape piece I was using to track them fell off early on in the install.
Next item -- finish the speaker wire, then all the wiring is done. I only had a 25' speaker wire on the passenger side, so instead of wiring that one I opened up the drivers side to use the 50' wire. I thought 50' / 3 = about 16.5' per wire, while 25' might not even give me 2 long enough wires. I base this on a rough measurement of the speaker wire. When I gave myself a bit of extra room for error, I had about 12' left on the 25' wire. I felt more comfortable using the longer one, so I kept that 12' as scrap.
So I popped the door panel off. Remember I've left the bolts out, so this took about a second flat. I actually didn't do anything in the door panel since I had already slipped the wire through, but I pulled the tweeter mount off and brought it in the house, and I did that for the other side too. I'll need it in fabricating the tweeter's new home.
I stuffed the wire in pretty deep. It's several inches under the wiring that runs the drivers side and parallel to lots of metal. The factory wiring sits atop some metal, so I feel safe--that I won't get tons of noise--in that area.
Then I took off the panels behind the drivers seat. They were almost the same as the ones on the passenger seat, except the bolt covers look like hooks. No idea what Honda though we'd use these for.
Here it is with the panel off:
I tucked the wire just the same as on the passenger side.
I couldn't figure out where to push the wire through into the trunk, so I put my light in the trunk and went toward the light with the wire.
I then slid it in the trunk carpet and ran it to the amp terminal area. I'll connect the woofer speaker wires before the tweeter speaker wires so I keep track of which is which.
I didn't get to run the tweeter speaker wires like I had hoped, but I'll probably do that today. With a lot of luck I'll get some of the speaker mounts fabricated, but we'll see. If not, I'll have no radio tomorrow on the commute, and that will motivate me to finish. Dropping the speakers in will take very little time.

